
By Dan Frost
I have lost many days, weeks, possibly even months to JavaScript. The recent rise of JavaScript frameworks - and their increasing stability - has helped. The Google Web Toolkit (GWT) [1] looks like the next evolutionary stage in JavaScript development: Instead of writing in JavaScript, you can write in Java.
GWT is an environment for building optimized JavaScript applications that are cross-browser compatible. With GWT, you build JavaScript applications by coding in Java and compiling the code to highly optimized JavaScript, HTML, and CSS. As much as you might like working on intricate little cross-browser JavaScript bugs, there comes a point when enough is enough. GTW came along just before I reached my breaking point.
GWT provides a library of layouts, form elements, and other components for building web apps. Instead of adding JavaScript/AJAX on top of raw HTML and CSS, you can use higher level Java components that GWT compiles to browser-safe JavaScript that probably won't need debugging.
However, you don't have to give up programming in JavaScript completely. JavaScript still has its place, and in this article, you'll see how to expose parts of your GWT-build-app to JavaScript, thereby creating a proper API.
Some benefits of GWT are:
At 3ev, we have built a front-end-based CMS that sits on top of the HTML/CSS of any web page and allows in-place editing. This stuff is pretty cool but hell to debug. The app was first built on custom JS, then migrated to Prototype, and more recently MooTools, with Ext JS providing some Window/Form elements. Eventually, we started migrating parts of the CMS to GWT. This situation is quite common: You have a large and growing JavaScript application that takes time to test and debug; GWT looks like an attractive solution, but how can you plug it into the problem areas? In this article, I show you how to use GWT to build and integrate JavaScript components with existing apps and web pages.
To start, download an appropriate version of GWT for your OS [2]. This download contains a set of examples, the Java-to-JavaScript compiler, and tools for creating new applications and running tests. Next, untar the downloaded file and find applicationCreator:
tar xzf gwt-mac-1.5.2.tar.gz
 cd gwt-mac-1.5.2
 ./ applicationCreator --help
The applicationCreator tool creates a new GWT project for building JavaScript applications. ProjectCreator, in the same directory, is used to create GWT projects for editing in Eclipse, but I'm going to stay editor-agnostic here.
To start, create a simple project:
./applicationCreator -out ~/MyGwtProject com.mycompany.client.MyApp
The application creator has now created the following files in ~/MyGwtProject:
MyApp-compile
MyApp-shell
src/com/mycompany/
        client/MyApp.java
        MyApp.gwt.xml
               public/
               MyApp.css
               MyApp.html
This small number of files is nice because it means what you see is what you're working on rather than folders and folders of stuff to wade through.
Now, open up client/myapp.java, which contains the Java class that GWT will compile into working JavaScript code. This article sticks to one class, but you can refactor your code out into other classes as you would on any other project. To start up the GWT shell, type the following:
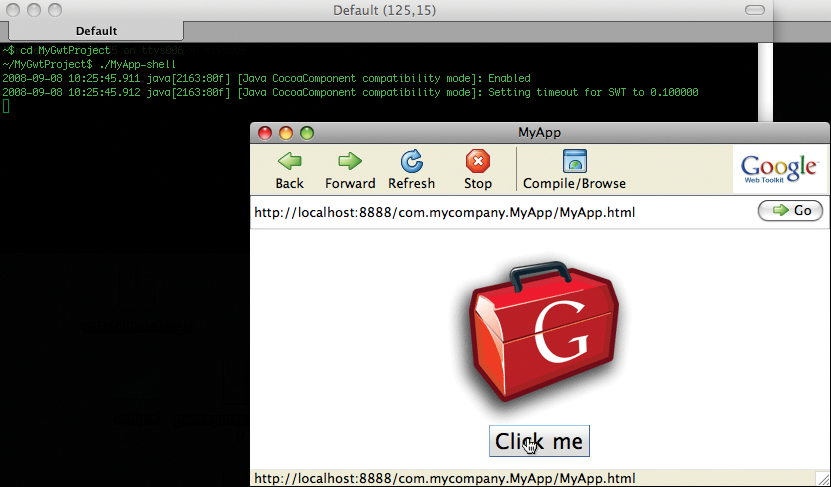
./MyApp-shell
This puts you in hosted mode (Figure 1), which suddenly makes GWT about a billion time more amazing than all the clever stuff I described earlier. Hosted mode is a browser dedicated to your development environment that will re-compile the Java code to JavaScript each time you refresh. When you make a change in the Java file and refresh the GWT shell, you'll see the results straight away, thus obviating the need to compile the Java every time. Keep the GWT shell (i.e., the hosted mode browser) open during the next step.
The application that GWT created is quick and simple, and it shows off some standard components of web pages: buttons, images, boxes, and dialog boxes. Next, open up MyApp.java and change
dialogBox.setText("Welcome to GWT!");
to:
dialogBox.setText("Welcome to GWT - isn't it amazing?!");
Now refresh your GWT shell, click the button, and see the Java compiled to JavaScript straight away. Of course, hosted mode is only useful during development, so you can use compile to compile the application to a set of JS, HTML, CSS, and image files (Listing 1). The app is then compiled to a new directory, www/com.mycompany.MyApp/, which contains the files shown in Listing 2.
| Listing 1: Compiling with GWT |
01 # ./MyApp-compile 02 Compiling module com.mycompany.MyApp 03 2008-08-30 15:14:35.774 java[2748:80f] [Java CocoaComponent compatibility mode]: Enabled 04 2008-08-30 15:14:35.775 java[2748:80f] [Java CocoaComponent compatibility mode]: Setting timeout for SWT to 0.100000 05 Compilation succeeded 06 Linking compilation into ./www/com.mycompany.MyApp |
| Listing 2: Contents of com.mycompany.MyApp |
01 01 548CDF11D6FE9011F3447CA200D7FB7F.cache.png 02 02 9DA92932034707C17CFF15F95086D53F.cache.png 03 03 A84A8EF7341E8139F58DC5FC2AD52F22.cache.html 04 04 MyApp.css 05 05 MyApp.html 06 06 clear.cache.gif 07 07 com.mycompany.MyApp.nocache.js 08 08 gwt/ 09 history.html 10 hosted.html |
If you open up MyApp.html with a browser. This application is now completely self-contained; you can move the www/com.mycompany.MyApp directory to another location - for example, inside an existing web app:
mv www/com.mycompany.MyApp /path/to/my_old_application/
The process of working with GWT should start to make sense: Rather than compiling Java to JS every time you finish a feature or bug fix, you instead work in hosted mode until it's 90% complete and then compile to JavaScript.
The Java class implements EntryPoint/onModuleLoad, which GWT triggers on each page load, so you can think of it as the onload in HTML pages or dom ready in libraries such as MooTools. A very small example shows this; edit MyApp.java so the class contains only the lines shown in Listing 3.
| Listing 3: MyApp.java |
01 public class MyApp implements EntryPoint {
02          //This is the entry point method.
03          public void onModuleLoad() {
04                   Window.alert("Hello");
05          }
06 }
|
Intuitively, Window.alert() is calling the JavaScript alert function. If you fire up hosted mode using MyApp-shell, you'll see that not much happens, but you're starting to see how the JavaScript user experience fits around the Java code.
Next, try building a simple dialog box that loads from an existing AJAX URL. Out of laziness, make sure you're importing everything from GWT's client package:
import com.google.gwt.user.client.*;
Replace the contents of onModuleLoad with:
openDialogBox();
and then add the function shown in Listing 4.
| Listing 4: Add this Function |
01         public void openDialogBox() {
02             final DialogBox dialogBox = new DialogBox();
03             dialogBox.setText("This is my simple dialog box");
04             dialogBox.setAnimationEnabled(true);
05                 dialogBox.center();
06         dialogBox.show();
07         }
|
If you open this in hosted mode, the diaglog box appears when the page opens, which is a nice demo, but it isn't really useful. Instead, you want to be able to call the dialog box from anywhere in the application, and to do this, you need to expose part of the Java application to JavaScript using the JavaScript Native Interface (JSNI).
First, create a function that declares itself "native" and effectively initializes a JavaScript "API," such as the function shown in Listing 5.
| Listing 5: Going Native |
01         private native void initJavaScriptAPI (MyApp myapp) /*-{
02                 $wnd.openDialog = function () {
03                         myapp.@com.mycompany.client.MyApp::openDialogBox()();
04                 };
05         }-*/;
|
Finally, in onModuleLoad, replace openDialogBox() with initJavaScriptAPI():
initJavaScriptAPI(this);
If you refresh hosted mode, you'll see nothing because when the app is loaded, it only declares the JS API - a window only opens when the JavaScript function openDialog() is called. To see this work, add the following line inside the <body> in public/MyApp.html:
<a href="javascript:openDialog();">Open my GWT dialog box</a>
Then, refresh hosted mode, click the link, and watch the dialog open. Although this example is basic, it demonstrates something useful: You can now build complex, cross-browser functionality in GWT and call this functionality from your existing JavaScript applications.
| Alternatives |
|
An alternative to using GWT is to use one of the available JavaScript frameworks, such as Scriptaculous/prototype, MooTools, jQuery, or Ext JS. These frameworks are extremely strong and have improved my JavaScript, but they don't do the the same thing as GWT. For specific, smaller (but not small) pieces of AJAX/Web 2.0 functionality, these libraries are great, but after a while, debugging, maintaining, and optimizing in a purely JavaScript environment becomes time consuming. |
The dialog box is still just a nice demo, rather than anything really useful, so spice it up by adding AJAX between an existing AJAX server and GWT.
A typical requirement is for a dialog box to load its contents over AJAX, and you can easily achieve this by modifying your class. Add the code in Listing 6 to the end of openDialogBox().
| Listing 6: Adding AJAX |
01 RequestBuilder builder = new RequestBuilder(RequestBuilder.GET, URL.encode("/  AjaxServer.php"));
02
03 try {
04 Request request = builder.sendRequest(null,
05 new RequestCallback() {
06 public void onError(Request request, Throwable exception)
07 // Couldn't connect to server (could be timeout,SOP violation, etc.)
08 dialogBox.setText( "Sorry - Could not load the HTML");
09 }
10
11 public void onResponseReceived(Request request, Response response) {
12 if (200 == response.getStatusCode()) {
13 dialogBox.setText( response.getText() );
14 } else {
15 // Handle the error. Can get the status  text from response.getStatusText()
16 dialogBox.setText( "Sorry - I got the response,  but don't understand it!");
17 }
18 }
19 }
20 );
21 } catch(Exception e) { }
|
Next, use MyApp-compile to deploy it into an existing application: You'll need some existing web pages running locally - I'll assume you're running a LAMP stack.
Then compile the app and copy the www directory to your existing application:
./MyApp-compile
mv -r www /path/to/my/app/gwt-www
touch /path/to/my/app/gwt-www/AjaxServer.php
Finally, create a file called AjaxServer.php and add the following:
<php
echo "Hello, World from my existing AJAX server called from GWT, but triggered from a native JavaScript call!";
?>
To test the new AJAX feature, open up MyApp.htm from inside the application and click the link (Figure 2). The JavaScript API means you can call GWT functionality from the existing JS app, and the use of the AJAX server means that GWT can integrate with your existing AJAX functionality. However, the AJAX URL is hardcoded, so push that URL into a variable passed from JavaScript into Java.

First, modify the contents of initJavaScriptAPI (see Listing 7).
| Listing 7: Modifying initJavaScriptAPI |
01 $wnd.openDialog = function (url) {
02         myapp.@com.mycompany.client.MyApp::openDialogBox(Ljava/lang/String;)(url);
03 };
|
The url argument on the first line is a JavaScript parameter, which will be converted to a Java variable of type java.lang.string and passed to openDialogBox.
Then modify openDialogBox to accept the argument
public void openDialogBox(String url) {
and then modify the request to use this variable:
RequestBuilder builder = new RequestBuilder (RequestBuilder.GET, URL.encode( url ));
Now compile it and move the files into your application, then add some URLs to the JS function calls so you can call existing URLs:
<a href=!javascript:openDialog('/AjaxServer1.php');">Open my GWT dialog box</a> <a href="javascript:openDialog('/AjaxServer2.php');">Open another dialog box</a>
In the final step, get the GWT functionality into the web app by including a JavaScript file. Add the script tag to the HTML header, adjusting the src=".." to point to the appropriate directory:
<script type="text/javascript"language="javascript" src="com.mycompany.MyApp.nocache.js"></script>
Then, somewhere in your template, add links that trigger the JavaScript:
<a href="javascript:openDialog('/path/to/ajax.php');">Open my Ajax server</a>
As a test, you could throw this link onto WordPress, your existing CMS, or any other web page.
My experience is that JavaScript becomes unwieldy when the app gets large; I spend a long time optimizing the code at a low level. Also, because JavaScript is a scripting language and weakly typed, you often don't find bugs right away.
The move from lightweigt JavaScript to robust, heavy-weight Java isn't trivial, but it is possible to migrate slowly or to migrate just those problem areas of the application. To migrate existing JavaScript functionality to GWT, you must start with a pretty solid API. Usually, this means you're calling just one or two functions in your web page.
Start by building the components and functionality in GWT with the use of GWT components and features instead of raw HTML and JavaScript. It's important to stick to higher level components that provide XBrowser safety.
Next, expose specific parts of the GWT component to JavaScript with the use of "native" functions. These functions will probably look just like your existing API so that you keep backward compatibility. Finally, you just need to include the GWT-generated JavaScript and remove the old, native JavaScript from your web page.
| INFO |
|
[1] Google Web Toolkit: http://code.google.com/webtoolkit/
[2] GWT download: http://code.google.com/webtoolkit/download.html [3] Gwt-fx (basic animation for GWT): http://code.google.com/p/gwt-fx/ [4] GWT Ext JS (application framework for GWT): http://extjs.com/products/gxt/ [5] GWT on Rails: http://code.google.com/p/gwt-on-rails/ |