
By Tobias Doerffel
Computers are just as much a part of a school's equipment today as chalk and blackboards, but teachers often face a lack of software to help them keep track of what's going on in the classroom. Software with a range of features for controlling the student machines, such as the ability to control computers remotely, lock screens, or display the teacher's screen in realtime on all the student machines for demonstration purposes, would be helpful. Plenty of companies are developing classroom management software, but licenses can be costly. In addition, the software often requires the use of Windows while stipulating restrictive licensing terms.
The world of open source long lacked a usable alternative, which prompted me, a former student at a school in Chemnitz, Germany, to launch the iTalc [1] project. Originally designed to be Linux-only software, iTalc now also runs on Windows, and the roadmap for this year includes support for OS X. In the meantime, iTalc has been integrated by Edubuntu as part of the standard software distribution, thus increasing its user community. After you finish the installation, some configuration work is necessary to make sure that iTalc works properly and securely. For help with installation, see the "Setting up iTalc" box.
| Setting Up iTalc |
|
Installing and setting up iTalc is quite easy, as long as you remember a couple of points. After you download the software from the website, it makes sense to install the teacher's machine first. If you have Ubuntu 8.04 (or its derivates) or Debian "Testing"/"Lenny," all you need to do is select the italc-client and italc-master packages in the package manager. Mandriva [2] and openSUSE [3] also offer education repositories with the required packages. Note that Debian "Etch" and various other older distributions include an early version of iTalc (0.9.x) that is no longer supported. If you use a distribution without a current version of iTalc (1.0.7 or newer), it makes sense to build the software from scratch. To do so, you need Qt 4.2.3 or newer, including the developer packages, the OpenSSL library developer packages, libjpeg, and zlib. After downloading the source code, unpack the archive and follow the standard approach: configure && make && sudo make install. |
Remember that students have the ability to download the software and interrupt the proceedings, or even view other people's screens without them noticing. To prevent this from happening, iTalc has a public key-based authentication mechanism. The teacher's machine has a private key from which the software calculates a public key, which is then distributed to the student machines.
When an iTalc service (client) on the student computer receives a connection request, the requesting entity (master) authenticates by signing a random byte sequence, which is sent to it by the client, with its private key. The client receives the signature and uses the public key to validate it. If the signature checks out, the client keeps the connection open, and the master can control the computer and view the screen.
On Ubuntu, the system automatically creates a private and a public key during the installation process. If you have one of these distributions, you can simply omit the next step. In all other cases, you will need to run the following command as root:
# ica -role teacher -createkeypair
After doing so, you will find the private and public keys in /etc/italc/keys/private/teacher/key and /etc/italc/keys/public/teacher/key, respectively. Setting the correct permissions is important; you can allow global access to the public key, but access to the private key must be restricted to a specific user group. Because the keys belong to root:root by default, it makes sense to create an italcusers group and then modify the permissions by issuing chgrp -R italcusers /etc/italc/keys/private/teacher as root.
Next, you can add users to the group and then copy the directory with the public keys (/etc/italc/keys/public) as is to the student machines. Alternatively, you can store the directory on a network share and use a symlink to reference the share, which saves some work, especially if the private key is compromised.
Next, make sure that the iTalc Service (ICA) starts automatically on all of the computers, including the teacher's machine. Various approaches exist for this step, each with its own advantages and disadvantages. The first option is to launch ICA from the Xsetup or Xstartup script. In this case, the program is executed with superuser privileges, which means the students aren't able to kill the process to escape from its control; however, a service running at this privilege level is always a potential security risk.
If you want to configure a machine in this way, just add a /usr/bin/ica & line to /etc/kde3/kdm/Xstartup (KDE) or /etc/gdm/PostLogin/Default (Gnome). To enable remote control before a user logs on, edit the /etc/kde3/kdm/Xsetup or /etc/gdm/Init/Default file accordingly.
Another option is to launch ICA via a desktop file in the autostart folder /etc/xdg/autostart/. On Ubuntu, this is done automatically. In all other cases, you must become root and store a file with the content shown in Listing 1, /etc/xdg/autostart/ica.desktop. This approach means that ICA will run as a non-privileged process and students can terminate the software; however, it has the advantage that the iTalc Execute program function works perfectly. After restarting the X interface, you will see an icon with the green iTalc logo in the system tray.
| Listing 1: Desktop file |
01 [Desktop Entry] 02 Version=1.0 03 Name=iTalc client 04 Comment=iTalc Client Application 05 Exec=/usr/bin/ica 06 Terminal=false 07 Type=Application 08 StartupNotify=true 09 Categories=GNOME;KDE;System; |
After you have installed and set up iTalc, it's time to launch the software itself. Typically, the setup program creates an icon in the program menu during installation. If not, you can type the italc command via Alt+F2 or in a console. After displaying the splash screen, the application tells you that it does not have a classroom configuration. If the key setup fails for some reason, iTalc refuses to launch and instead displays an error message. Otherwise, you should see the master interface with three main areas.
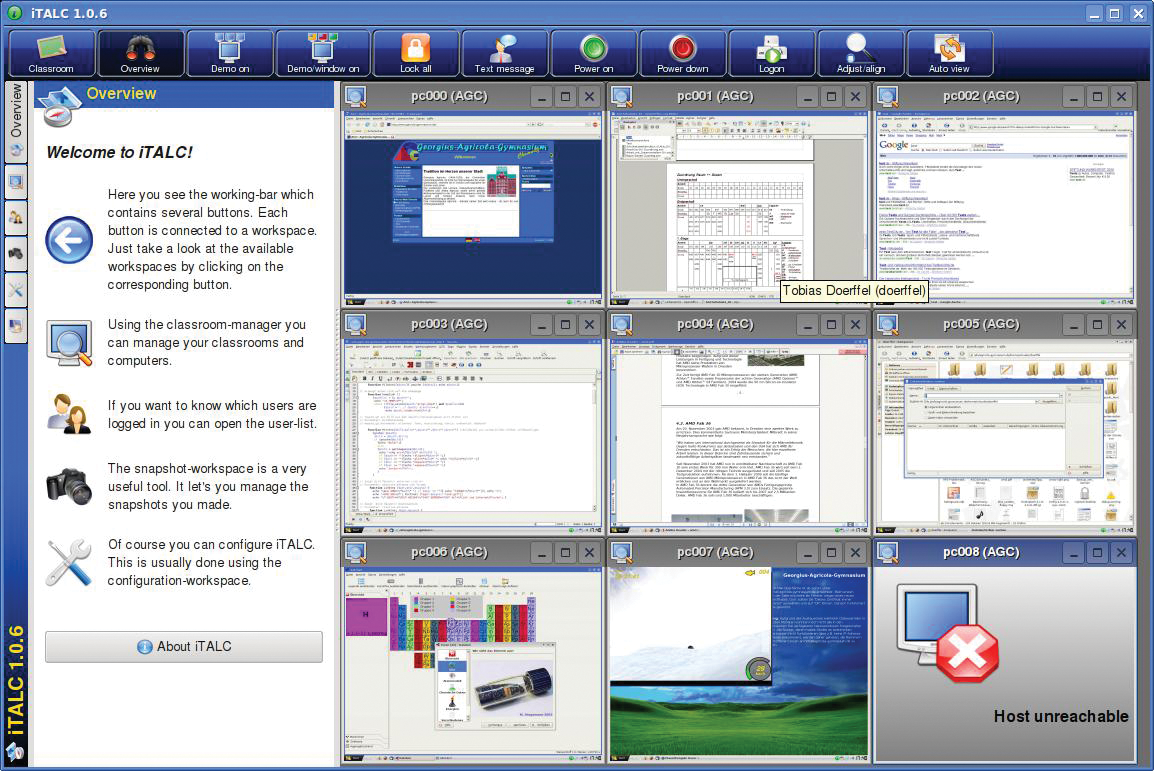
The button bar at the top has a collection of important buttons for controlling iTalc. Below this and on the right-hand side, you will see the main view, where the student machines will appear later. To the left of this, after clicking the right button in the button bar, you have a workspace.
The classroom management tool lets you manage classrooms and the computers they contain. Now you can start to add your student machines. Double-clicking the computers in the list, or globally selecting the classroom via the Classroom menu (the first button in the button bar), displays a collection of small windows in the workspace. If the public keys have been distributed correctly, a miniature view of the screen in question should appear within a short time.
Because the windows are stacked in no particular order after setting up, you can click the button on the far right (Sort) to sort the client windows by IP address. This gives you an overview of the classroom and a rough idea of what your students are doing (Figure 1).
To view a student's screen at full size, right-click the window in question and select Live view in the drop-down menu. The software then enables full-screen mode for the client in question, and you can follow the client's activities in real time. Moving the mouse cursor to the top of the screen displays a toolbox with various actions, including a function for enabling remote control mode (Figure 2).
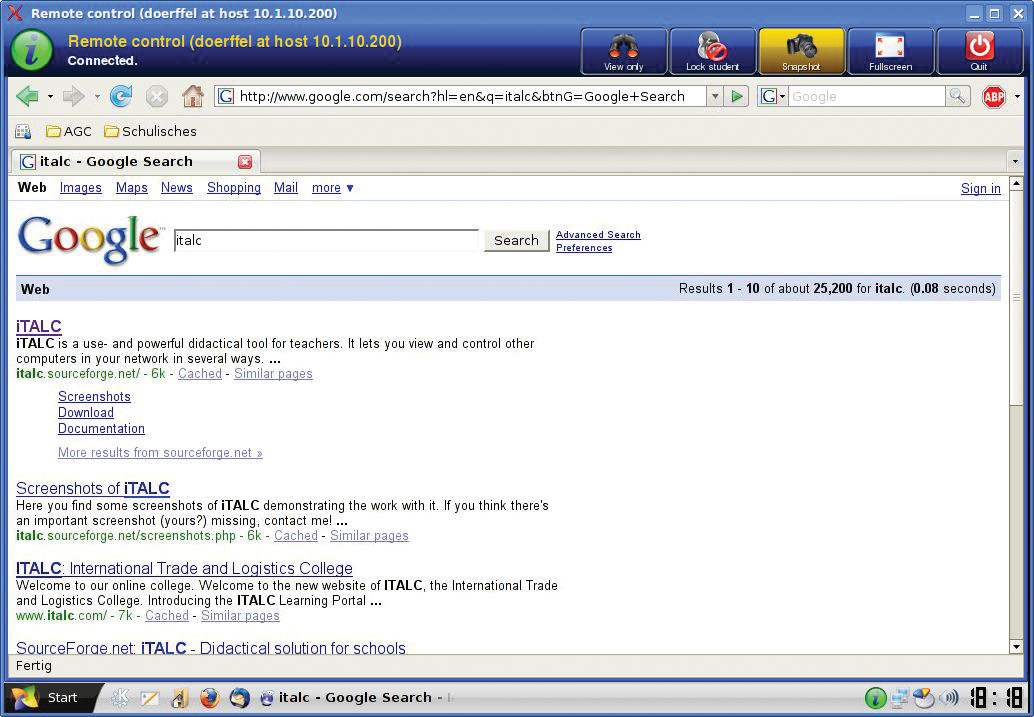
Double-clicking the client window gives you direct access. At the same time, you can grab a screenshot. To do so, either press the snapshot button in full-screen mode or select the entry in the client window drop-down. After grabbing the screenshot, you can see the results in the snapshot workspace, where you can delete them if needed.
One of iTalc's most impressive functions is its demo mode. If you do not have a video projector in your computer cabinet, or if it doesn't make sense in the context of your lessons, you can click either Full screen demo or Window demo to project the teacher's screen to all student screens.
The difference between the two modes is that full-screen mode blocks all input devices, thus giving the students no alternative but to watch the demo. In contrast to this, the window demo allows students to iconize, move, or close the window, thus trying out what the demo shows them. To quit the demo, just click the Overview button.
In contrast to many commercial solutions, the demo does not overload the network. Instead, an intelligent approach to compression makes it possible to run a demo in real time on 16 clients, with an average network load of just 1-2MBps. Demo mode (and all other functions) is not restricted to a single subnet, but it will work across subnet borders, thanks to direct TCP/IP connections. (Some commercial solutions rely on UDP broadcasts.) This allows students to take part in lessons from their homes via VPN tunnels.
If you need to attract the students' attention to yourself rather than to the computers, you can simply lock the screens. Besides the buttons for the two demo modes, the button bar also has a padlock icon. Clicking the icon blocks the input devices on the student PCs and blacks out the screens. Again, you can quit this mode by pressing the Overview button.
Many more functions make life easy for teachers, especially if they need to work with a large number of computers, including central switching on all of the computers. This function relies on the client machines being equipped with WOL-capable network interface cards and Wake-on-LAN being enabled in the BIOS or via Ethtool. iTalc also supports centralized shutting down of the classroom computers with the press of a button.
In environments in which users do not have their own accounts and use shared user accounts for the whole classroom, which is often the case in primary schools, the Remotely controlled login will reduce the time needed for the class to get to work on the subject in hand. To use this function, switch on all the machines centrally before the lesson starts, and log in with the required account. Depending on the configuration and the login manager you use, this feature might or might not work on Linux.
Administrators will appreciate the Run command feature. This option is available in the drop-down menu, not the toolbox, for a classroom in the classroom manager. The features allows the administrator to run a series of commands on all computers. If ICA is running as root on all of these machines, you can even enter system commands and launch system programs. In all other cases, the programs will run as the logged on user, which in turn could be useful for opening a browser with a specific page for all users.
Various issues kept on cropping up during the software configuration. The most common source of error is an incorrect key configuration - that is, the file permissions are not set correctly. To troubleshoot this, first check to see whether you can access the private key. Also ensure that the account on which the ICA is running can access the public key. If this does not solve the problem, you might want to check out the logfiles (/tmp/italc_client.log on the students' machines and /tmp/italc_master.log on the teacher's machine).
Besides incorrectly set permissions for the keys, firewalls often prevent connections being set up. Make sure that the /usr/bin/ica and /usr/bin/italc programs have inward- and outward-bound access to ports 5900 and 5858, respectively. See the iTalc Wiki for additional tips [4].
The developers have put in some good work to make iTalc a nicely rounded package for deployment in classroom situations. Critical functions are available intuitively via buttons and drop-down menus. If you select a distribution that has iTalc in its repository, the installation and configuration should also be fairly trivial. With budgets in education as tight as ever, the software really does seem to be a worthwhile alternative.
| INFO |
|
[1] iTalc: http://italc.sourceforge.net
[2] Mandrake packages: http://www.edumandriva.ru/download/Pac2008.1/ [3] openSUSE packages: http://www.opensuse-education.org/download/repo/1.0/10.3/ [4] iTalc Wiki: http://italc.sourceforge.net/wiki/index.php?title=Troubleshooting |