
By Bruce Byfield
One way to reduce the anxiety of using the command line is to gain as much control over the situation as possible. Bash, the default shell in most GNU/Linux distributions, is no exception. If you know how to customize Bash, you should start to lose the sense of trauma (no doubt induced by an exposure to DOS early in your computing life) that seizes you when the idea of using a command line is raised.
Of course, many customizations are interesting only if you are a developer. Frankly, listing every possible option would require a column five or six times the length of this one. Still, the examples below can be interesting to users at any level and give some sense of the possibilities. They range from creating short names for commands and changing default permissions to customizing the look and feel of the command prompt and the behavior of the Bash history.
Before you begin, you should know that all user accounts have potentially four files associated with Bash. All are ordinarily hidden, but you can see which ones are used by your distribution by typing ls -a .bash*.
Two Bash files are of limited interest if you are learning how to customize. The .bash_history file is a list of previously entered commands, one per line. Although you can edit it in a text editor, most people use the Up and Down arrow keys to scroll through the history for a command they want to reuse. The optional .bash_logout file lets you run a script when Bash exits, but it is often unused.
The other two Bash files are central for configuration. The first, the .bashrc file, contains basic settings for the history and prompt options and is always present. It is automatically re-created by the /etc/bash.bashrc file if deleted. The second is .bash_profile, which includes additional options and configurations. If .bash_profile is not present, the user account uses /etc/profile instead - the default for the entire system.
These files can be edited directly or with the use of a command like export.
The path is a list of directories the operating system looks to for commands that you enter. It consists of all the paths defined in /etc/profile plus any added to .bash_profile in your home directory. Should a command not be in the path, you either have to enter a complete path when you type the command or change to the directory in which it is found - neither of which is as convenient as simply entering the command and trusting Bash to know where to look for it.
To add a directory to the path, you can open your .bash_profile in a text editor and search for the $PATH statement. If it isn't mentioned anywhere in the file, you can enter the lines manually at the end of the file. For instance, if I wanted to add a /bin directory for executables to my home directory, I would add:
PATH=$PATH:/home/bruce/bin
export PATH
Alternatively, I could modify the path from the command line by first declaring the path, then setting it:
PATH=$PATH:/usr/local/bin:/usr/bin:/bin:/usr/games:/home/bruce/bin
export PATH
If you ever decide that you do not need a directory in your path, you can re-define it with the same two lines, simply omitting the unneeded directory.
![]()
Commands can become long and involved. Depending on the command, you can have the basic command, any number of variables, a source file or directory, and a target. In some cases, as with the apt-get command, you can also have a sub-command in addition to the basic one. This structure can be hard to remember, and, to make matters worse, one mistake in syntax can have unexpected results or invalidate the command.
Thus, Bash allows you to define and use shortcuts. You could create these shortcuts by editing .bashrc in a text editor, but it is faster to use the built-in commands alias and unalias. As you might expect from the names, alias creates shortcuts, and unalias deletes them.
The structure of these commands is simple. For example, if you always wanted to see color-coded lists of directory contents, you might enter the command alias ls =`ls --color=auto'.
Technically, you should begin with alias -p, but the -p option, which sends the results to standard output, is unnecessary in all the distributions I've tried, so you don't need to bother with it.
Once you have defined this alias, instead of always entering ls --color=auto, all you have to do is type ls. This savings of keystrokes can quickly add up if you use the command line for file management. You can do the same for any Bash command or application, including one for the desktop, if you choose. The obvious limitation is to choose a shortcut that you are unlikely to enter by accident, although I suppose you might also find - at least in theory - that an alias creates a conflict between incompatible options.
To delete a shortcut is even simpler: Type unalias, followed by the name of the shortcut. For instance, if you decide that color-coding a directory listing isn't something you prefer after all (possibly because you are color blind, or you prefer the -F option to indicate file types by a character at the end of the name), then you would enter unalias ls.
This command would delete the alias, but not, let me stress, the command ls itself. If you want to delete all aliases, the command is simpler still: unalias -a.
To see a list of defined shortcuts, type alias. If you use many aliases, you might add comment lines (#) in .bashrc, arrange your shortcuts by function, then view them in a text editor when you need a reminder. One sample .bashrc file I've seen had separate categories for programming, desktop applications, scripts, and half a dozen other purposes. Another included common typos, so that the user would not receive an error by typing yum intsall instead of yum install when adding packages to his Fedora system. As these examples show, how useful you find aliases depends entirely on your patience and ingenuity.
As you probably know, permissions define how a file or directory can be used. When you create a new file, it is automatically given a default set of permissions called the umask.
One way to summarize permissions is with three digits. From left to right, they are the permissions for the user account from which the file was created, for those in the same group as the creator, and for all others logged in. Apparently for no other reason than that the idea seemed good at the time, each digit is a sum of numbers in base 8 defining a permission. Read permission is 4, write permission 2, execute permission 1, and no permissions 0. This shorthand is called absolute mode, symbolic permissions, or octal permissions, depending on your preference.
Under this system, a file that everyone could read, write, and execute would have a permission of 777. By contrast, a file that the owner could read, write, and execute, and that nobody else could use at all, would have a permission of 700.
When you create a file and the system assigns the default set of permissions, the umask is defined in /etc/login.defs. However, you can set the umask for each account by adding the umask command followed by the permissions (e.g., umask 700) to .bashrc.
The command prompt is the recurring text that appears to the left of where you start typing in a command. If you're a new user, you might not have paid much attention to the prompt.
Nor do you absolutely need to these days. In the days before desktops became the norm, the prompt once held useful information that you might want at a glance, such as the current directory, date, and time. Nowadays, when you can get much of this information from the desktop, you might not care so much about the prompt.
Still, even today, you might find it handy to have basic information always visible, such as the current account and directory, even if you are almost always using a virtual terminal. For one thing, you never know when you will need to repair your system when you have no desktop available. Moreover, if you look at many distributions, you often find that the final character in the prompt tells you whether you are using a user or root account; user account prompts end in a dollar sign, whereas root account prompts end in a hash sign (#).
In fact, once you look, you might notice that different distributions have different prompts on the basis of what information they think users might want. For example, if I were working in the /usr/share directory on a computer called nanday, in Fedora, my default prompt would be [bruce@conure share] $, whereas in Debian, it would be bruce@nanday:/usr/share$. From this difference, you might correctly infer that Fedora's defaults assume that users stay largely in their home directories because the full path is not given, whereas Debian's defaults assume that their more advanced users might be anywhere in the system and prefer not to stop to use the pwd command to find out where they are.
In addition, you might want to shorten the prompt, especially if you are listing current paths but tend to have directories nested five or six deep. Alternatively, you might simply want to change the color of the prompt to make it more visible, to please your sense of aesthetics, or to provide a more striking distinction between the root and everyday accounts.
Whatever your reason, the best place to start if you want to change your prompt is by temporarily changing the PS1 prompt parameter. These changes will remain in effect until you either change them yet again or close your current virtual terminal. The next terminal you open will revert to the default prompt.
To begin, you want to view the current settings for PS1, the variable for the prompt, by entering the command echo $PS1. Likely, you will get a response that reads something like: [\u@\h \W]$, which is the reading I get for a machine with Fedora 10 installed. By comparing it with the Fedora prompt mentioned above, you can figure out what each entry in it means. Notice, though, the extra elements, such as the @ between the username (\u) and hostname (\h) and the space between the hostname and the current directory (\W).
You can change this prompt temporarily by referring to Table 1. I have not bothered with some options that are unlikely to be of interest to modern non-developers. If you are curious, you can easily find a complete list online with a quick search.
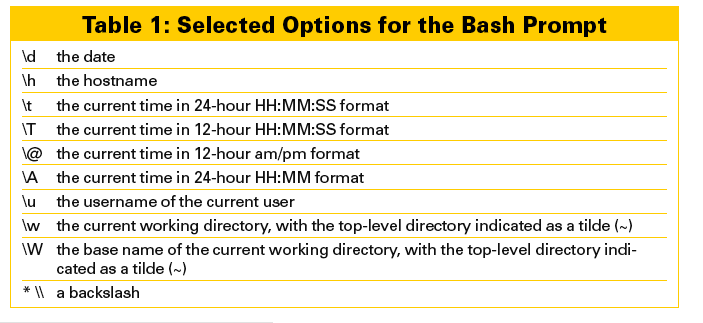
For instance, if I wanted just to display the current user account, I could make a temporary change by running PS1="\u $ " to produce the prompt bruce $ . Notice that the space after the dollar sign is not an error but was added deliberately so that my typing is separate from the prompt.
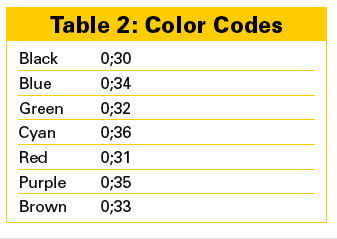
If I want to add color, I can change the color of the characters according to the formula:
"\e[x;ym\e[m "
In this formula, \e[ marks the start of the characters that the color applies to, \e[m marks the end, and x;ym is the color code (Table 2). The command to change the prompt to dark red would be:
PS1="\e[0;31m[\u@\h \W]\$ \e[m "
If you substitute a 1 for the 0, you get a lighter version of the same color.
Experiment with these temporary changes until you have the prompt you want. If you make a mistake, you can either use the arrow keys to find an entry in the command history from which you can reverse the mistake or simply close the window if you are working in a virtual terminal.
When you figure out the prompt formula that you want, open the .bashrc file for your account in a text editor and replace the existing formula with the one that you have devised. If you prefer, you can also use the export command: for example, export PS1="\e[0;31m[\u@\h \W]\$ \e[m ".

![]()
The Bash history is a list of previously used commands stored in .bash_history. If you continually type the same or similar commands, you can use the Up and Down arrow keys to scroll to the command you want to use.
The export command sets shell variables and is one way to customize the Bash history. Or, edit .bashrc directly. To set the number of commands stored in the history to 1,200, either enter on the command line or add to .bashrc:
export HISTFILESIZE=1200
Because .bash_history is a text file, it does not require much memory, so you have no reason not to use this setting to increase the default size of 500 entries. Of course, the larger the file, the more scrolling you have to do to find an older command, but you can always open .bash_history in a text editor and use its search function.
Another customization is to keep duplicate commands from being added to .bash_history. For this option, enter:
export HISTCONTROL=erasedups
This customization ensures that .bash_history contains only unique commands, but it might mean that the command you want requires extra scrolling, especially if you have just used a command that already appears well down the list.
To go much beyond this point, you really need to know some Bash scripting. Scripting can expand the range of possibilities in a huge way. In Debian, for example, a script is used in .bash_logout to clear the screen to ensure your privacy when you exit the command line. The examples described in this article are simple enough to help you get started and give you a glimpse of the possibilities for customizing Bash.