
By Mayank Sharma
Interoperability is a favorite technology buzzword, but if you have ever managed a heterogeneous network of Linux and Windows, you know the goal of a truly interoperable desktop has been something of a myth. If you administer a mixed environment, though, you can breathe easier with the recent arrival of Ulteo Open Virtual Desktop (OVD). OVD lets you serve both Linux and Windows apps as part of the same desktop!
Ulteo OVD comes from the labs of Gaël Duval, creator of the first user-friendly Linux desktop distro, Mandrake, which evolved into Mandriva. Ulteo OVD, which just had its first stable release, doesn't do what hasn't been done before - similar products come from big companies like Citrix, VMware, and Sun. But unlike the competition, Ulteo OVD is released under the GNU GPL, and it is available as a free download.
The innovative OVD merges input from Windows and Linux application servers into a single desktop interface (Figure 1). The client system can be a full Windows computer, a Linux computer, or even a thin client system. A user working with the virtual desktop on the client can even cut text from a Linux application and paste it in a Windows app.
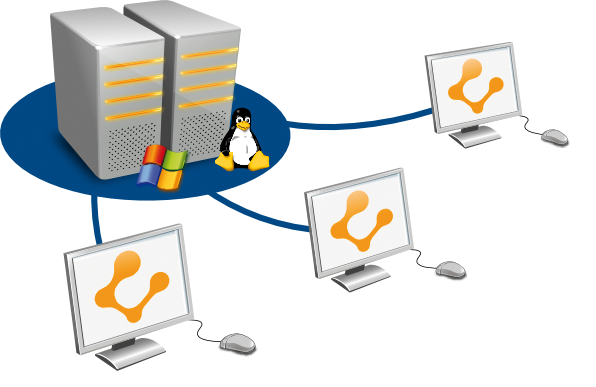
The unified desktop is served on a Java-enabled web browser - on Linux, Windows, or Mac. And you don't need to spend time, effort, and money configuring client systems. Because Ulteo OVD uses secure SSH tunnels, you can even deliver the virtual desktops outside the confines of your network. The best bit about Ulteo OVD is that it can use existing network services, such as a directory server (both Active Directory and LDAP) to authenticate users, which further simplifies the setup process and integrates the desktop with the existing network infrastructure.
Ulteo OVD consists of two main components: a Session Manager (SM) and an Application Server (AS). For creating and validating an OVD desktop session, as well as for managing the whole OVD network, you need the SM.
The job of the AS is to serve Linux applications. Depending on the resources available on an AS and the number of users you'll be servicing, you'll probably need more than one installation of the AS. To help serve the Windows applications, you'll need the Ulteo OVD Windows agent, which turns the Windows computer into an AS for serving Windows apps.
Because all the processing takes place on the application servers, make sure you are using multi-core machines with lots of RAM. As per the Ulteo website, you need about 1GB RAM on an AS to handle 20 concurrent users. If you run multiple application servers, you can balance load between them with the easily configurable built-in load balancer.
The SM has more modest hardware requirements and will do nicely on a single-core machine with 512MB of RAM. In fact, you can install both the SM and the AS on a single machine.
For the Windows AS, you need a machine running a Windows Server 2003 installation. Also, you will need to enable and configure terminal services on this Windows installation for it to pipe Windows apps to another computer.
Ulteo makes OVD binary packages available for both DEB and RPM-based distros, along with source tarballs. In addition, you will need the following tools on both the SM and AS computers: autoconf, intltool, make, MySQL database, and php5 with MySQL; curl, ldap, and gettext modules; and Apache 2 web server with the PHP module enabled.
The first order of business, is to set up a MySQL database for the OVD SM:
# mysql -u root -p
Enter password:
mysql> create database ulteo_sm;
 Query OK, 1 row affected (0.02 sec)
mysql> exit
Next, grab the Ulteo OVD SM packages. On DEB-based distros, just add the Ulteo repository [1] to the sources.list file, and install with:
# apt-get install ulteo-ovd-session-manager
On RPM-based distros, download the SM RPM [2], and install it with:
# yum install --nogpgcheck ovd-session-manager-latest.rpm
If you install the packages through apt-get on DEB-based machines, you'll be prompted for a username and password for the administrator. On RPM-based installations, you have to manually invoke the configuration wizard with:
# sm-config
Next you'll be prompted with a URL from the site where Ulteo will fetch a tarball of pre-packaged Linux apps. These apps include the complete OpenOffice.org office suite, Firefox web browser, Adobe PDF reader, GIMP image editor, Pidgin Instant Messenger, and lots of others. If you don't want to interrupt the setup process, you can manually fetch the tarball [3] and copy it to the session manager under the /usr/share/ulteo/sessionmanager/base.tar.gz directory.
To point the SM to the MySQL database, you'll need to access the web-based administration console. To do this, either use the Fully Qualified Domain Name (FQDN) of this box, such as sm.example.com, or use its IP address. Assuming the IP address is 192.168.2.40, you can access the admin console at http://192.168.2.40/sessionmanager/admin. If you can't bring up the console, make sure the Apache server is up and running.
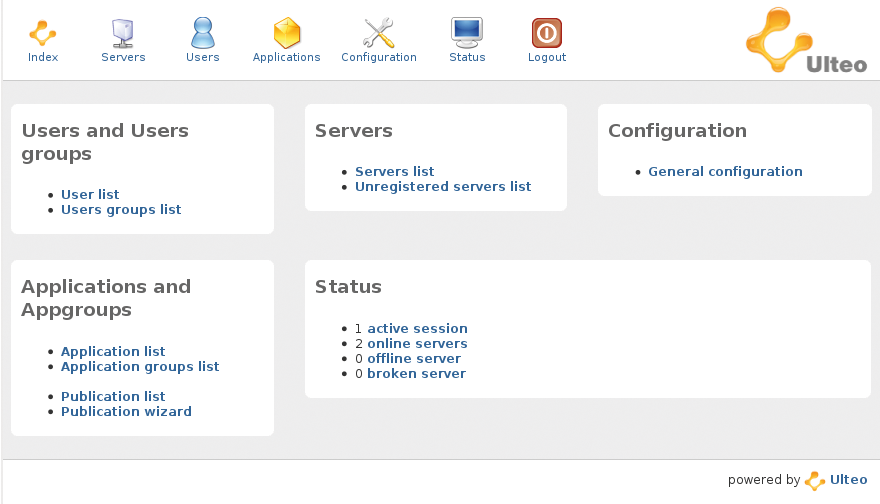
First you'll need to enter your admin credentials, after which you'll be asked to point the SM to the MySQL server and database. If the settings are correct, you'll arrive at the main administration console (Figure 2).
Before you set up the AS, make sure the application tarball has been copied under the SM, if you downloaded it manually.
Now on to the computer that will serve as the Linux AS. Just as with the SM, users on DEB-based distros will need to add the OVD repository [1] to the sources.list file before calling apt-get:
# apt-get install ulteo-ovd
Users on RPM-based distros need to fetch the AS RPM [4] before installing it with:
# yum install --nogpgcheck ovd-application-server-latest.rpm
On Debian-based systems, the configuration routine is called automatically; however, other users will need to start it with:
# aps-chroot-install
When you are asked for the location of the SM, you can refer to it by either its FQDN or its IP address. If the settings are correct, the AS will copy the applications from the tarball over at the SM. Once it is done, you should restart the OVD service with:
# /etc/init.d/ulteo-ovd restart
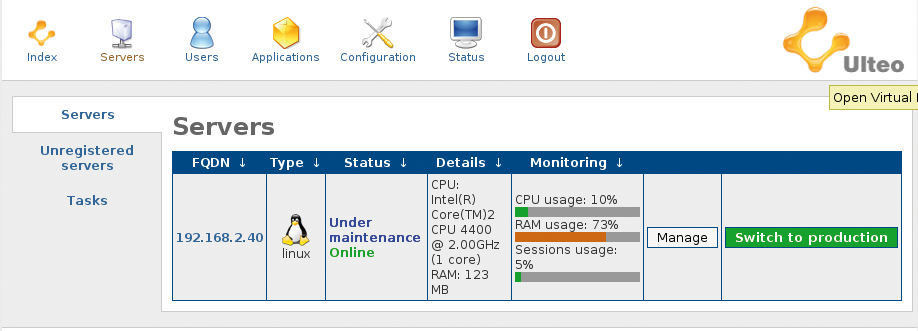
Finally, you will need to launch the web browser and head over to the web-based SM administration console. Here, click on the Unregistered servers list link, which should list your AS. Then click on the Register button, which registers the server. Now head over to the Servers tab and click on the Switch to Production button to bring this server online (Figure 3).
Besides the individual binaries and source tarballs for the SM and AS, the Ulteo OVD project also makes available a 784MB DVD ISO image [5], which includes both the SM and the AS. The DVD removes the need for a lengthy download if you are on a slow Internet connection.
Also, you should use the DVD if you are new to Linux or if you don't have Linux running on the computers that will act as the SM and AS. The installer on the DVD will set up a customized Ubuntu Linux for you, along with both the application server and the session manager.
Only install the SM and AS on the same computer if you are servicing a small number of users. Although this configuration might be faster and more convenient, it has the effect of putting all your eggs in one basket. Because Ulteo OVD is designed to work with multiple application servers, even if one AS server fails, the users serviced by the other servers will not be affected. However, if one computer accommodates both the AS and the SM and it goes down, the entire network will come to a screeching standstill because OVD can't function without the SM.
Once you have finished installing the customized Ubuntu with the Ulteo OVD DVD, use ifconfig to find the IP address of the machine. Assuming the IP address is 192.168.2.101, your session manager will be at http://192.168.2.101/sessionmanager and the administration console will be at http://192.168.2.101/sessionmanager/admin.
That's all there's to it. (Didn't I mention the DVD is convenient?) Now head over to the admin console to bring the server into production.
Serving fully functional Linux apps remotely via a web browser is pretty cool in itself. But add Windows apps to that mix, and the coolness factor goes up quite a few notches.
Currently, Ulteo OVD supports only Windows Server 2003, with support for Windows Server 2008 expected soon. When you prepare the Windows server, be sure to install and enable the Terminal Services component as well. Also, don't forget to check the User Right Assignment. This ensures that your users are allowed to log in through terminal services.
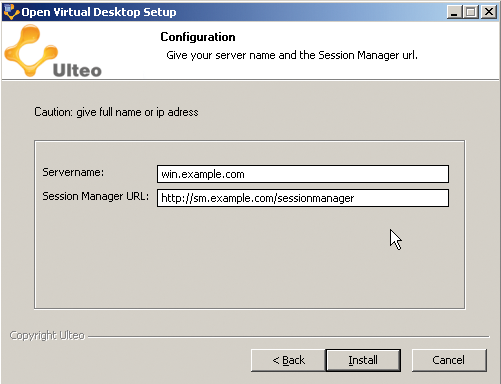
When your Windows Server is set up, download the Ulteo Windows agent [6] and double-click on it to install. Next you'll be prompted for the IP address or FQDN of this server, as well as the SM (Figure 4).
Terminal Services uses the Remote Desktop Protocol (RDP) to stream Windows apps over the network. Like the Linux AS, the Windows AS needs a web server. The OVD Windows agent includes an embedded http server, which runs on port 8082.
The Windows agent is controlled through a configuration file that's under the installation directory (typically C:\Program Files\Ulteo\Open Virtual Desktop\ulteo-ovd.conf). If you move the SM or the Windows application server, you'll have to edit this file to reflect the change in the IP address.
Once you're done installing the Windows agent, head over to the SM admin console and bring the Windows server into production.
The last critical bit of configuration is to create what OVD calls Publications. A publication is a group of users and the apps they can use. For example, you can make an Accounts publication that includes all users in the Accounts department, as well as all accounts-related applications.
OVD lets you create multiple publications with multiple users and multiple application groups. This approach allows for much better control over the users and the apps they have access to. Although it might not sound intuitive at first, it eases user/app management by several degrees.
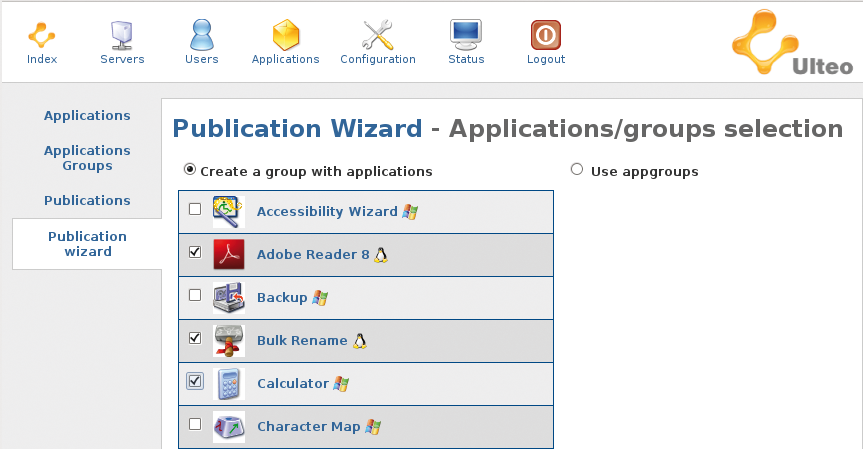
To create a publication, log in into the admin console and start the Publication Wizard. Now click on the Create a group with users radio button and select all the users you want in a particular publication. Next, select the Create a group with applications radio button, and select all the applications (Linux and Windows) you want that group of users to have access to (Figure 5).
When you're done, your newly created publication will be listed under the Publications group. From this page, you can either delete a publication or add/delete applications and users from within the publication.
OVD works on any browser that is equipped with Sun's JRE plugin. I have tested it on Firefox in both Windows and Linux: with Internet Explorer on Windows and with Iceweasel on Debian Lenny.
With the plugin in place, launch the browser and point it to the SM URL - for example, http://sm.example.com/sessionmanager. Select a username from the drop-down list and enter the password. Presto! Ulteo OVD displays your unified desktop with both Linux and Windows apps in a new browser window (Figure 6).
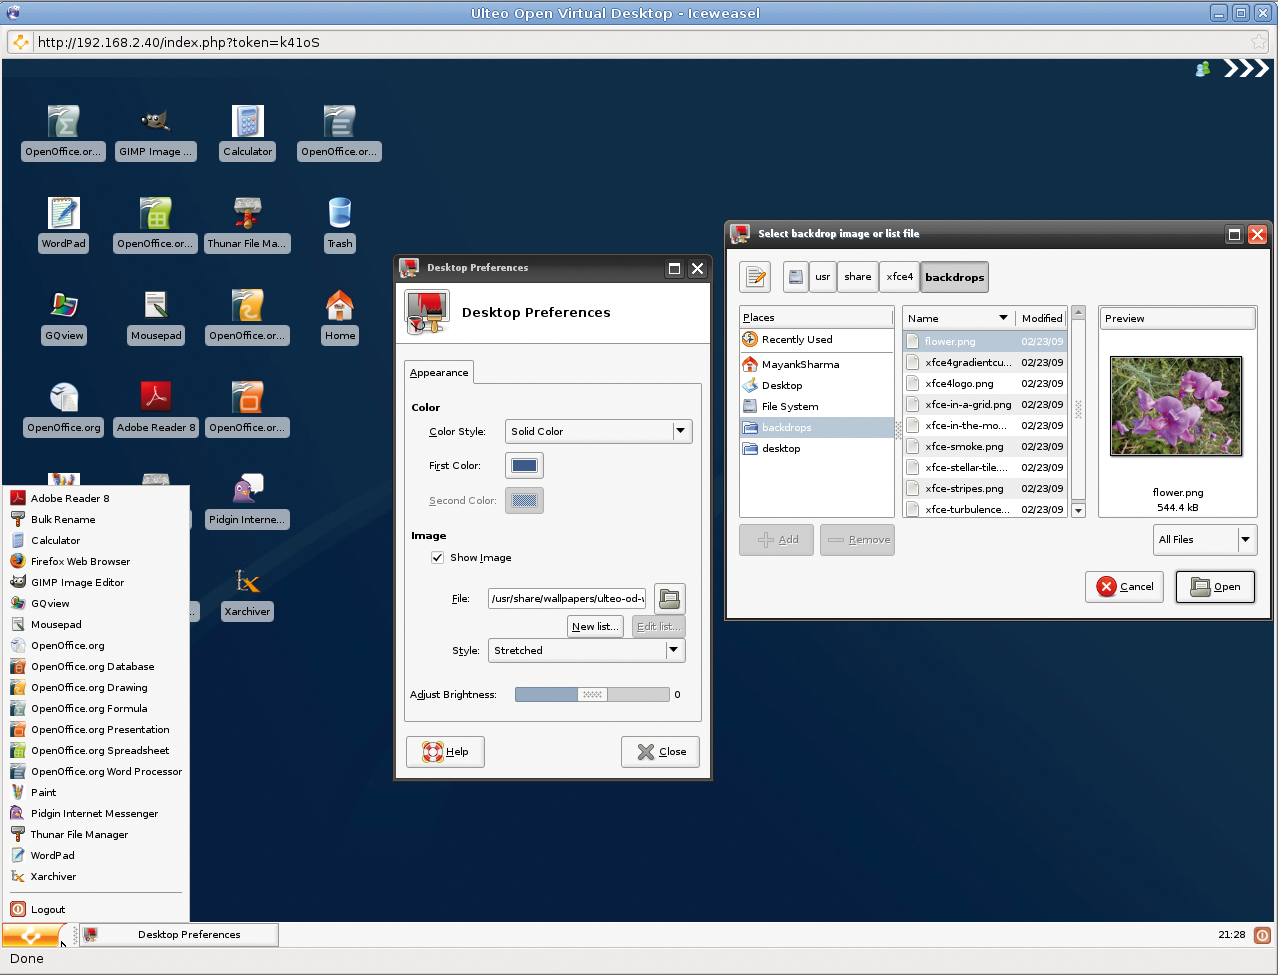
Although it resides inside a web browser, the Ulteo OVD desktop looks like your typical Linux desktop. It has desktop icons, and you can right-click on the desktop and change the wallpaper. As mentioned earlier, you can even copy and paste text between the Windows and Linux apps inside the virtual desktop, as well as from the native OS outside the browser window.
To top it off, Ulteo OVD will print documents on any printer attached to either a Windows or Linux machine on the network.
Ulteo OVD includes a set of user accounts to help you test the setup. The Internal Database Profiles option lets you add users to the Ulteo SM MySQL database. But for all practical purposes, it is best to hook up Ulteo OVD to a directory server. Currently, OVD supports both Active Directory running on a Windows server and an LDAP server running on Linux.
To add a directory server, from the SM admin console, head over to Configuration | Profile settings. In the drop down list, select the server that's managing users on your network and fill in the connection details (Figure 7).
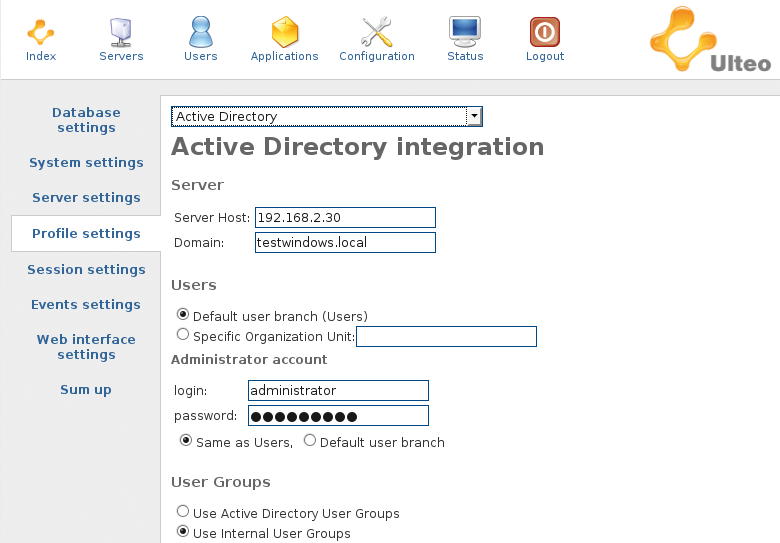
Depending on how your directory server is configured, you might want to let it handle the user groups as well. Or, you can grab users from the directory server while you group them with Ulteo OVD. Similarly, it is a good idea to let users store their files under their home directory, as defined by the directory server.
If you are using Active Directory, make sure you make all your users members of the Remote Desktop Users group; otherwise, they won't be able to run the Windows apps.
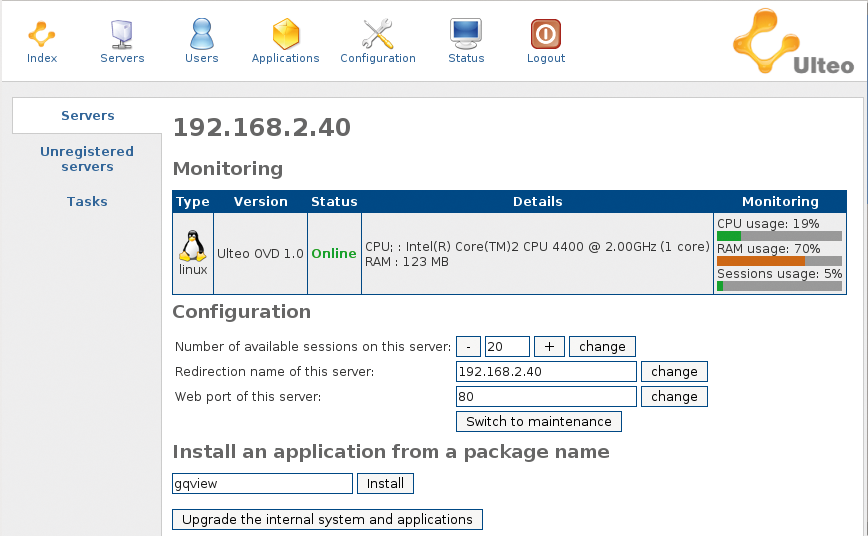
Although the default set of apps is good for a wide variety of users, it surely doesn't cover all the bases. To install another app, head over to the Servers tab. If you have multiple Linux application servers, find the one you want to install the new app to and click on its FQDN or IP address.
Now you'll see a list of all the apps installed on the server, along with an empty text box under the Install an application from a package name section (Figure 8). To install an app, just type in its name in the text box (say, gqview) and click on the Install button.
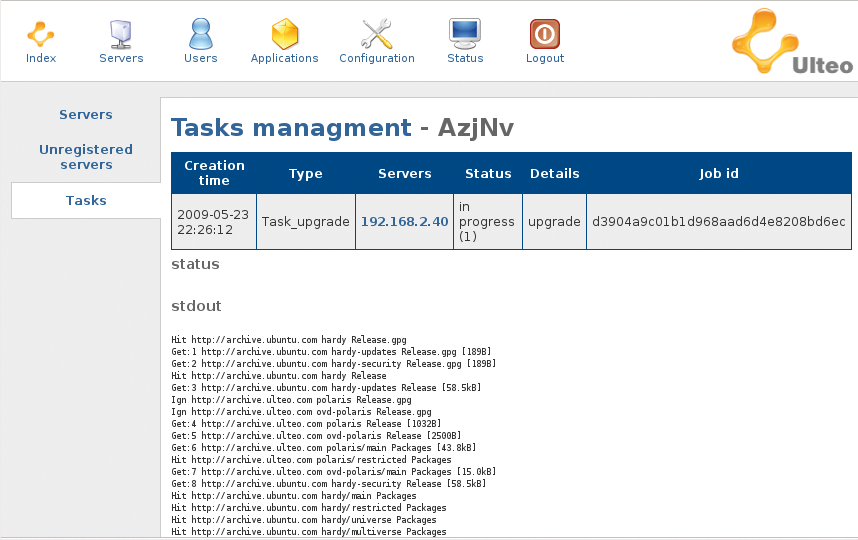
To monitor the app installation, click on the Tasks tab, which lists all the active and completed tasks on all the servers. To get the details of a task, click on the ID (Figure 9). When the installation is complete, the app will appear under the list of available applications on the server.
Before users can access this app, you have to include it in an application group. Either edit an existing group or create a new one. That's it. The app is now available to all users in the publication that contains the application group that bundles the app.
Under the Web interface settings tab in the SM admin console, you'll find options for tweaking some aspects of the login screen. For instance, you can modify the heading title, replace the Ulteo logo with your own logo, or disable the drop-down list of users.
Other tweakable parameters that affect the user's virtual desktop are under the Session settings tab (Figure 10). For example, you can preset a default time out, after which a user is automatically logged out. If you want, you can let users use a console inside the virtual desktop or free up space on the desktop by disabling the desktop icons.

By default, Ulteo OVD allows users to share their desktop with other users. For this to work, you need to equip the SM with SMTP settings for your mail server. If you aren't running a mail server, you can also use Gmail's SMTP settings.
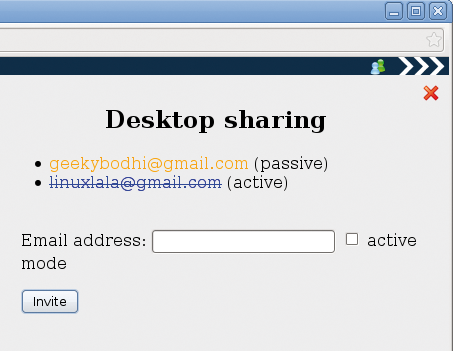
Once the settings are in place, users can invite others by using the Share desktop link at the top-right corner of their screen. If you select the Active option (Figure 11), the invited user will be able to take control of your desktop; otherwise, the visitor will be a mere spectator.
Finally, the load balancing policy comes into the picture if you are using multiple application servers. Under the Server settings menu, you can tweak factors, such as available RAM and CPU usage, that help Ulteo OVD balance the workload (Figure 12).

Ulteo's Open Virtual Desktop is the most promising open source interoperability tool to appear for some time. OVD is ideal for anyone who wants to run both Windows and Linux apps from within a unified desktop. The innovative OVD trumps the expensive proprietary alternatives with its adaptability and exhaustive features.
| INFO |
|
[1] The Ulteo Debian repository: deb http://archive.ulteo.com/ulteo/ovd ovd-polaris main
[2] RPMs for the Session Manager: http://www.ulteo.com/main/downloads/ulteo-ovd-rpm-sm.php [3] Default application bundle http://www.ulteo.com/main/downloads/ulteo-ovd.php [4] RPMs for the Application Server: http://www.ulteo.com/main/downloads/ulteo-ovd-rpm-aps.php [5] Ulteo OVD DVD ISO: http://www.ulteo.com/main/downloads/ulteo-ovd-iso.php [6] Agent for Windows application servers: http://www.ulteo.com/main/downloads/ulteo-ovd-win.php |