
By Michael Schilli
If you have ever tried sending a patch to an open source project, you will be familiar with the obstacles that can put off even the most motivated of developers. For example, you need to discover the project maintainer's email address and negotiate the various levels of moderation. If somebody in a position to make decisions actually finds the time to take a look, the patch format might be wrong, or the patch might collide with another, unpublished change.
GitHub's aim is to reduce the PITA (pain in the ass) factor [2]. Public code repositories that are hosted on GitHub use the branch- and merge-friendly Git revision control system that allows the open source community to apply changes, test locally, and - if successful - flow the code into the original project with little pain.
Creating a fork - spawning a copy of an open source project - is not a sneaky move on github.com. Here, forks are not a means of taking control of a project, but the recommended way of developing and testing new features and, finally, asking the project maintainer to add them to the main branch of the project.
GitHub hosts open source projects free of charge for public access, offering 300MB of disc space per developer. If you want to use the service for a non-public project, GitHub has a number of commercial variants that provide the small startup with a handful of developers a steady source of income.
Listing 1, cvs2github, helps convert CVS repositories to Git and prepare them for publication on github.com. Git with the git-cvs add-on package already includes an import function. All cvs2github needs to do is use rsync to download the CVS repository and the CVSROOT directory from wherever it is being hosted to the local machine and then call git-cvsimport.
For this to happen, line 16 of the script creates a temporary directory in which rsync stores the local copy of the server's CVS repository files. The CVS server name and account information is stored in line 24. The directory in which the Git repository finally lands is set in line 20 with the $git_dir variable. Because developers create entries in the CVS repository with their Unix IDs but use a different ID on GitHub, lines 30 through 32 map the old Unix usernames to new GitHub IDs with an email address, using an author conversion file.
| Listing 1: cvs2github |
01 #!/usr/bin/perl -w
02 #############################
03 # cvs2github - Turn cvs repos
04 #              to github
05 # 2009 (m@perlmeister.com)
06 #############################
07 use strict;
08 use Getopt::Std;
09 use Pod::Usage;
10 use File::Temp
11   qw(tempdir tempfile);
12 use Sysadm::Install qw(:all);
13
14 my ($proj) = @ARGV;
15 my ($temp_dir) =
16   tempdir( CLEANUP => 1 );
17 my ( $fh, $author_conv_file )
18   = tempfile( UNLINK => 1 );
19 my ($home) = glob "~";
20 my $git_dir = "$home/DEV";
21
22 my $email =
23   'githubemail@mydomain.com';
24 my $cvs_loc = 'mikeschilli@some.cvs.server:cvs';
25 my $github_loc =
26   'git@github.com:mschilli';
27
28 blurt(
29   <<EOT, $author_conv_file );
30 mschilli=mschilli <$email>
31 perlmeis=mschilli <$email>
32 mikeschilli=mschilli <$email>
33 EOT
34
35 pod2usage("No project given")
36   unless defined $proj;
37
38 my $git_proj_name =
39   lc($proj) . "-perl";
40 my $git_path =
41   "$git_dir/$git_proj_name";
42
43 if ( -e $git_path ) {
44   die "Path $git_path already exists";
45 }
46
47 mkd $git_path;
48
49 for my $cvs_dir ( $proj,
50   "CVSROOT" )
51 {
52   sysrun(
53    "RSYNC_RSH=/usr/bin/ssh ".
54    "rsync -avz $cvs_loc:cvs".
55    "/$cvs_dir $temp_dir/");
56 }
57
58 cd $git_path;
59
60 sysrun( "git-cvsimport -A " .
61   "$author_conv_file -d $temp_dir $proj");
62
63 sysrun(
64   "git remote add origin " .
65   "$github_loc/$git_proj_name.git"
66 );
67
68 print
69   "Done: $git_proj_name\n";
70
71 __END__
72
73 =head1 NAME
74
75   cvs2github - Convert cvs projects to git
76
77 =head1 SYNOPSIS
78
79   cvs2github My-Project-Name
80
81 =head1 DESCRIPTION
82
83 cvs2github takes a project
84 checked into cvs and converts
85 it into a git repo ready for
86 github.
87
88 =head1 EXAMPLES
89
90   $ cvs2github Foo-Bar
|
Here, I am mapping three different IDs (mschill, perlmeis, mikeschilli) to a single new GitHub ID mschilli. If multiple developers have worked on a project, you need to convert all of their IDs to new GitHub IDs. The blurt function from the CPAN Sysadm::Install module stores the lines in a temporary file, which git-cvsimport accepts for mapping via the -A option. Because cvs2github is intended for Perl modules, line 38 converts project names to lowercase letters and adds a -perl suffix; hence, Log-Log4perl becomes log-log4perl-perl; this is in line with the Debian name schema, keeps the namespace on GitHub clean, and helps avoid clashes between original projects and their Perl ports or wrappers. Line 52 calls the rsync command to copy the server's CVS repository and then calls it again for the CVSROOT metadata directory to the local machine because git-cvsroot requires them both to make the transformation to Git. The RSYNC_RSH environmental variable gets set to the SSH client program on the local machine (ssh) because the client communicates via SSH with the server-side repository. A similar approach exists for SourceForge projects [3]. Importing the CVS repositories in line 60 creates a Git repository in the directory specified by line 20 ($HOME/DEV/log-log4perl-perl in this case). The command called in line 63, git remote add, points Git's default remote branch origin to the GitHub project to be created. Git uses this later to synchronize the local copy and the GitHub server version via push and pull.
The CVS repository is no longer needed. To prevent developers who have not heard about the move from checking in new material, the admin should check in a highly visible file, such as MOVED_TO_GITHUB, to give the latecomers a wake-up call before their contributions end up in a dead repository.
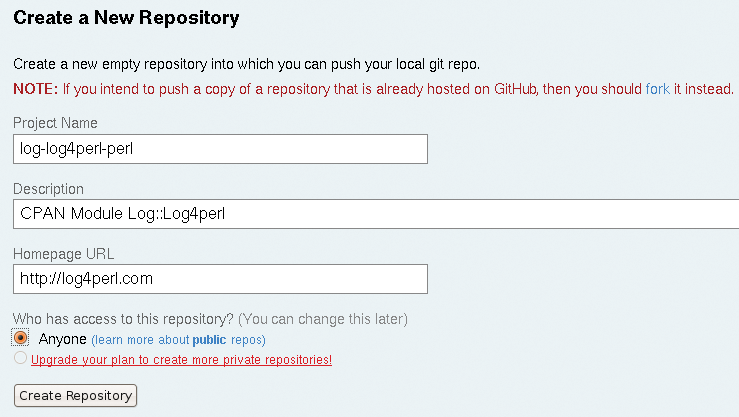
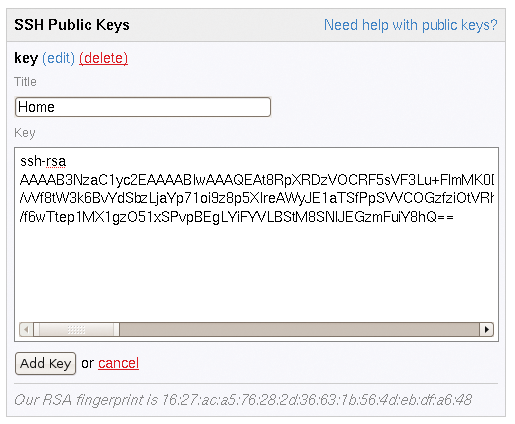
Now it's high time to create the project on GitHub so that you can push it live. Once the developer has created a new account with a username (mschilli in this case), you can click Your Repositories (create a new one) and add the three lines of text shown in Figure 1. The next thing GitHub needs is the public keys of everybody who has write access for the project repository. Public keys with the Secure Shell are a great way to eliminate typing your password every time; on GitHub, they're mandatory to identify a developer (Figure 2). Write access to the repository is handled later by talking to git@github.com, without specifying a username. Password-based identification is thus impossible via SSH on GitHub.
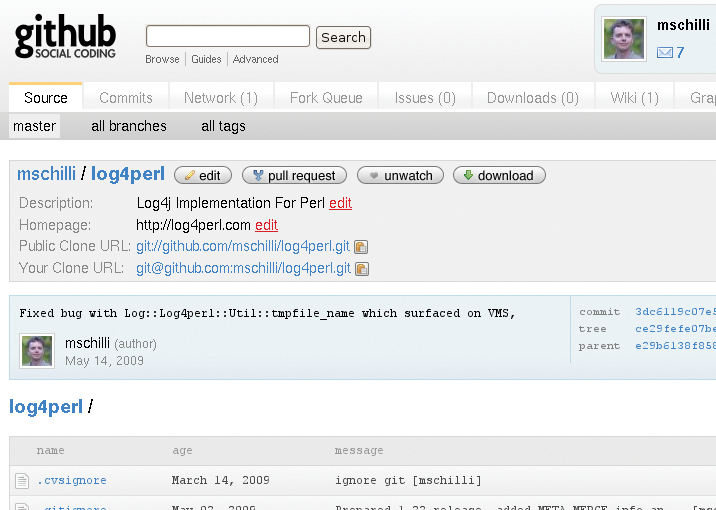
Once the public key has been deposited with github.com, git push origin master synchronizes the local Git repository that I migrated from CVS with what is currently an empty repository on GitHub. Following this, the web page at http://github.com/user/project will show the project, including its full history, and give other developers an opportunity to contribute (Figure 3).
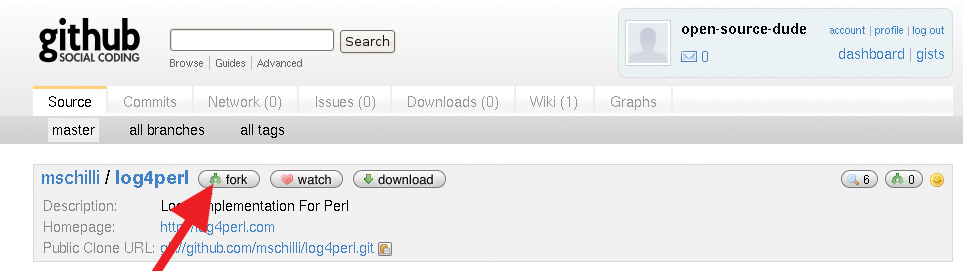
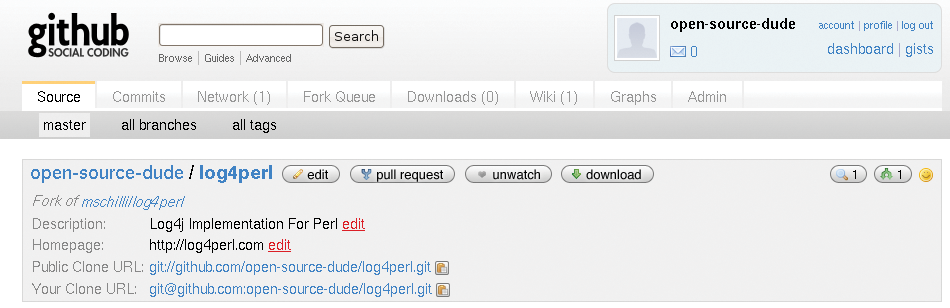
If another GitHub user, call him the open-source-dude, stumbles across the project and discovers a bug or would like to contribute an improvement, he can create a fork by pressing the project's Fork button (arrow in Figure 4). This creates a copy of the original repository and gives the user write access to the copy. Again, the Dude has to deposit his public key with GitHub because he'll have write access to the forked project. Figure 5 shows the project belonging to open-source-dude.
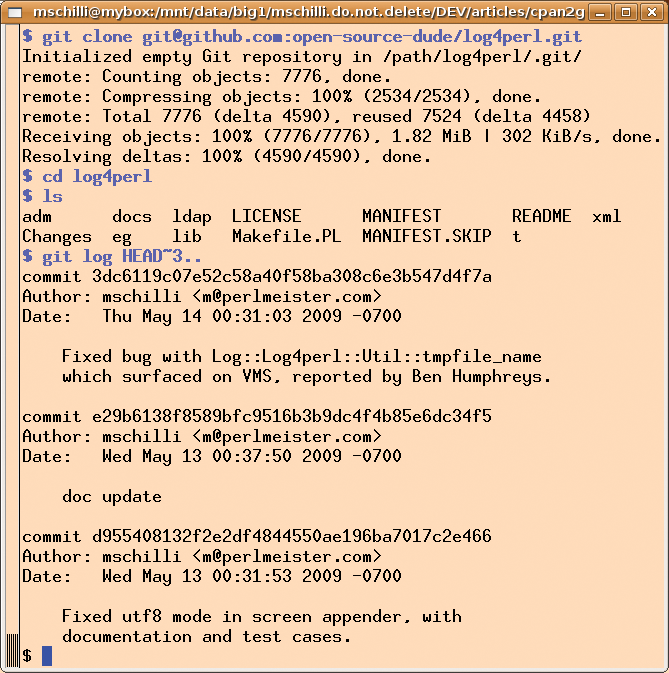
To introduce changes, open-source-dude runs the git clone command to create a local clone of the fork (Figure 6). In typical Git style, and this would be impossible in Subversion or CVS, the local copy not only includes the latest version of the project, but all previous versions, starting with the first check-in. The git log command, with the HEAD~3.. parameter, shows the messages for the last three check-ins.
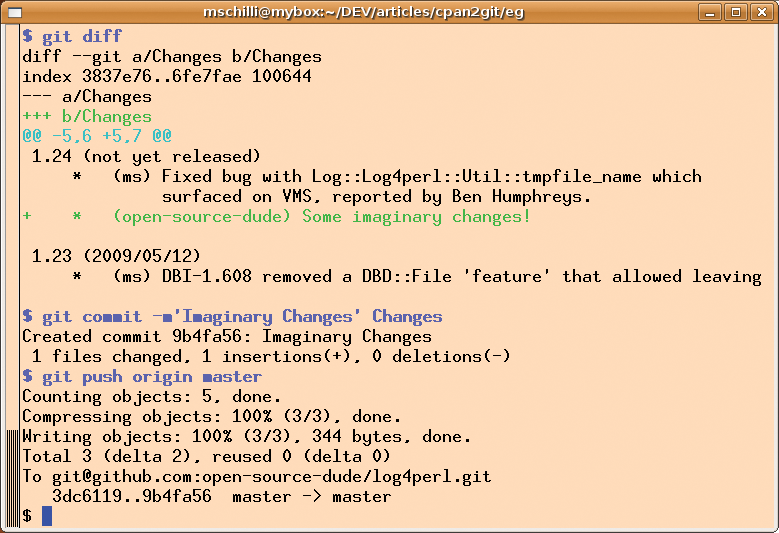
As an example of a change in a forked project, I'll add a line to the Changes file announcing an imaginary bug fix under open-source-dude's ID. git diff shows the difference between the local workspace and the local repository (Figure 7). The following commit, with the comment `Imaginary Changes', writes the changes to the local repository. To upload the commit to the publicly visible fork on GitHub, open-source-dude would give the git push origin master command, pushing the main branch of the local repository, master, to the Git repository, origin. Git is efficient when it comes to synchronizing and will not take long because there is little to synchronize. Whereas CVS takes ages to discover that the workspace and server repositories are synchronized, especially with larger repositories, Git will be back with you in a fraction of a second in cases like this.
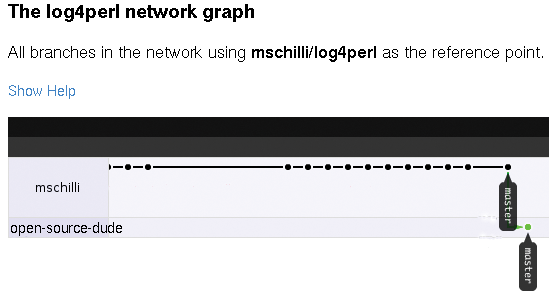
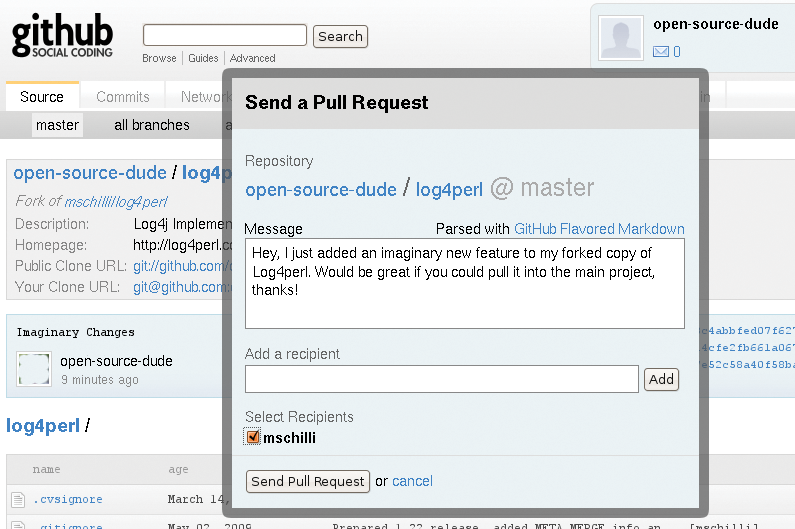
The developer has thus made a change to the local repository and committed it to the forked repository on GitHub. If you click the Network button on the project page, GitHub will show you a slightly blocky Flash graphic (Figure 8) telling you that the owner of the fork has added a feature to the project that the original project has not yet incorporated. In most cases, a fork on GitHub will lead to the new functionality being integrated with the original; after all, nobody intends to take over the maintenance burden of a project, just for a simple new feature. Forks are just a temporary approach to pushing project development along and a way of asking the maintainer to merge your work once it has reached a stable state. To facilitate this communication, GitHub displays a Pull Request button on the fork's project page, and all the contributor has to do is type in a few explanatory sentences for the maintainer in the box that pops up (Figure 9). Pressing the Send Pull Request button sends the message to the maintainer of the project and optional recipients.
The project maintainer receives the message via his GitHub project page and by email. One weak point in the workflow at the time of this writing is that the email appears to come from no-reply territory, and the maintainer can't just mail the sender back; instead, the maintainer has to access the GitHub page in his browser.
Assuming the maintainer approves of the new feature proposed by the contributor, he can pull the fork into his local repository. Instead of blindly trusting the contributor, the maintainer will set up a new branch for this. If you have experience with source control in Subversion or CVS, you will probably be groaning by now; after all, creating alternative branches and merging them with the main branch is a nightmare on these platforms. With Git, merging is just business as usual, and you can create a new branch or merge an existing branch in just a fraction of a second. A couple of clever ideas and advanced data storage techniques have helped Git solve a problem that has been around since the stone age of programming. The norm for developers is to open up a new branch for each bug they need to fix and to keep dozens of branches open at the same time.
Figure 10 shows the sequence of commands the maintainer enters to add the new feature to a temporary new branch of the project. This assumes that the maintainer has set up a local clone of the original repository on GitHub and is now accessing it. To start, run remote add to create a new alias - say, open-source- dude-repo - for our favorite contributor's repository. The checkout command with the -b option then creates a new branch, open- source-dude-branch, in the local repository and moves to it by checking it out to the local workspace.
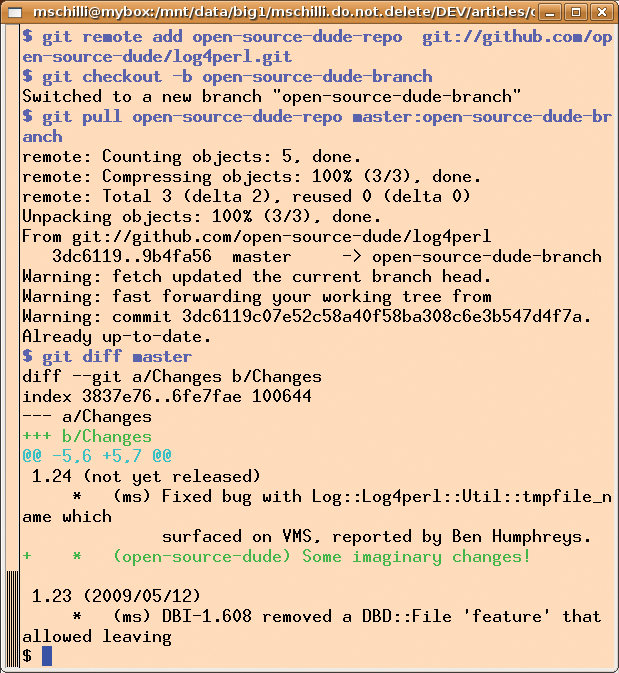
The following pull command in Figure 10, with the alias I created previously for the fork and the master:open-source- dude-branch parameter, reels in the master branch of the fork on GitHub and dumps it into the open-source-dude-branch branch of the local repository. In the new branch, by giving the diff command with the master branch as a reference, git shows the differences between open-source-dude-branch and the master branch (i.e., the main branch of the local repository).
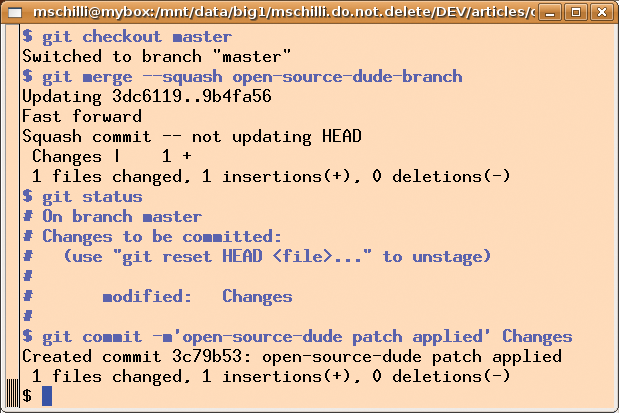
If the maintainer decides to accept the patch, he gives the checkout master command to return to the main branch and then calls git merge with the --squash option and the branch to merge as the parameter (Figure 11). Whereas merge normally accepts all the changes in the fork, commit for commit, which could cause dozens of entries in the original project's log, --squash reduces them to a single commit and dumps it into Git's staging area, where it waits for the next git commit to send it into the repository. This means that the project maintainer can accept the patch into the project without generating more than a single log entry.
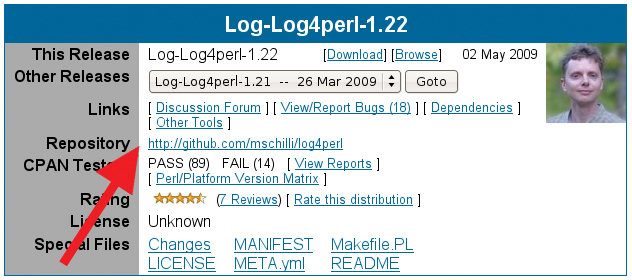
This revolutionary approach to contributing to open source projects has already reached CPAN, where hundreds of new modules see the light of day every week. To allow a CPAN module on search.cpan.org to display a link to the underlying GitHub repository (Figure 12), all you need is a META entry in Makefile.PL in the style of Figure 13; the CPAN software will handle the details automatically.

Remember that GitHub publishes every detail of your project work: If you enjoy writing insulting code comments or commit log messages, it's a good idea to stop doing so and clean up the repository before publishing it; GitHub will post whatever you write as search engine fodder. Things that were previously only accessible to a few developers in a hidden CVS repository are now suddenly available to your grandma and grandpa on a normal HTML page. Before you commit, make sure you take a close look at the content.
| INFO |
|
[1] Listings for this article: ftp://www.linux-magazin.de/pub/listings/magazin/2009/08/Perl
[2] "The PITA Threshold: GitHub vs. CPAN" by Dan Dascalescu, http://wiki.dandascalescu.com/essays/pita-threshold [3] "Turn your Sourceforge Project into a Git Repo" by Mike Schilli, March 21, 2009, http://blog.usarundbrief.com/?p=12 |