
By Tim Schürmann
Listening to the heads on your hard disk clicking when the disk fails is bad enough as it is, but worse things are still to come. Although buying and installing a replacement disk is unlikely to faze most users, this is just the start of a time-consuming installation marathon that can easily take a day or two to restore the whole system with your personal preferences and favorite wallpaper. Having a backup copy of the whole disk means that you can carry on with your work after about an hour, just as if nothing had gone wrong.
Retailers offer a variety of programs that will create a full backup with the press of a button, but these programs cost money. The open source Clonezilla [1] is an alternative to proprietary tools such as True Image, Drive Image, and Norton Ghost. Clonezilla will read a partition or your whole disk bit by bit and store the results in a (fairly large) file known as an image or write directly to a second medium. This allows you to clone a disk fairly quickly, which is handy if you are moving to a new computer and want to take your old system with you.
Clonezilla comes in two flavors: Clonezilla Live, which boots from a CD; or a bootable USB stick, which backs up a partition on another medium attached to your computer and is your best choice for everyday work. If needed, Clonezilla Live will back images up to the network, for example an NFS, SSH, or Samba server. This is really useful on home or school networks where you could store drive images on a small NAS. Clonezilla Server Edition can even clone the disks in multiple computers simultaneously over a network, but it requires a special environment to do so (see the "Clonezilla SE" box).
| Clonezilla SE |
|
Clonezilla Server Edition (Clonezilla SE) is part of the DRBL server. DRBL stands for Diskless Remote Boot in Linux, which is a fair description of the way it works. The clients attached to it do not boot from their internal hard disks, but via the network. The DRBL server then feeds the Linux system required by the clients for their daily work to the attached computers. Clonezilla SE uses the same approach to access the disks in these computers and can then back them up simultaneously over the wire. |
To back up your own disk, go to the Clonezilla project homepage and pick up the latest stable version from the Download area. If you prefer to boot Clonezilla Live from a CD, grab the ISO file and then burn a CD with the image. If you prefer the USB stick approach, download the ZIP archive and then make sure the USB stick has a FAT32-formatted partition. Next, mount the partition, unpack the Clonezilla ZIP archive on it, pop up a terminal window and change to the utils/linux subdirectory, and then give the bash makeboot.sh /dev/sdb1 command to make the stick bootable (replace sbd1 with the device name for the partition on the stick).
There is a good reason for not being able to run Clonezilla like any other program on the active Linux system. To be able to clone a partition without any risk, you must dismount the partition. If this is not the case, Linux might write to the disk while you are backing up your data, and thus ruin the image. Unmounting the system partition is not easy; thus, the only alternative is to boot Clonezilla from an external medium. If you succeed in doing so, you will see the screen shown in Figure 1.
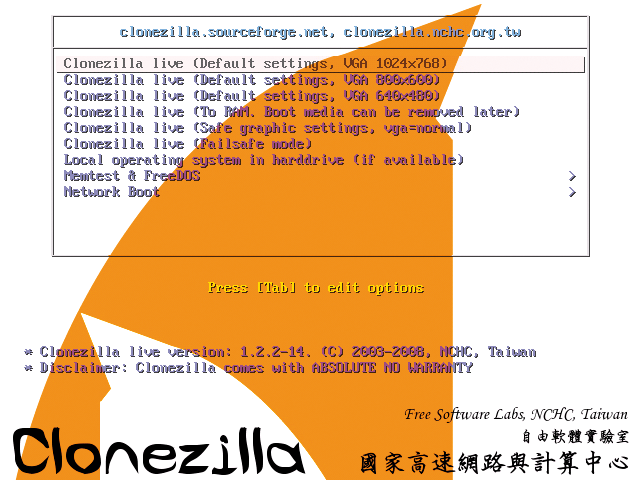
Clonezilla Live boots automatically, unless you press a key. If you experience graphics problems later on, you may need to select a lower resolution, or even Safe graphic settings. In case of other hardware problems, you can still try Failsafe mode. The To RAM item copies the whole Clonezilla Live system into main memory. You can then remove the CD or unplug the USB stick. This is really useful if you only have a single free USB port, as is the case with some netbooks. Use the arrow keys to select an option, and press Enter to execute the selected action.
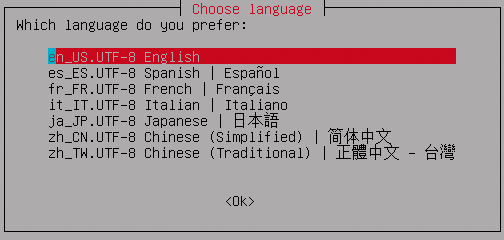
Whatever you select, you will be running a Debian Live System that initially fires a number of text messages at you. The next step is to select a language; English is the default.
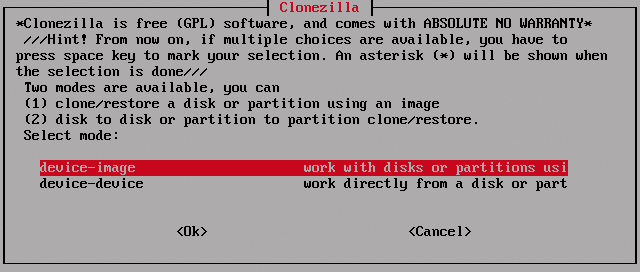
You can now launch Clonezilla or switch to the command line. When you launch Clonezilla, it will prompt you to choose whether to drop the partition into an image file (device-image) or write directly to another, physical hard disk (that is, clone the partition - device-device). If you are backing up an existing Linux system, the image file is easier to archive and the first of these options is your best bet (Figure 3).
The next screen lets you tell Clonezilla where to store the image. Also, you have the option of opening up a connection to an SSH, Samba, or NFS server (the "Networker" box tells you where to go from there). If you are backing up your home PC, you will probably want to store the image on a second disk or on a USB drive. In this case, select the first option local_dev. If you prefer to use an external USB drive or a stick, plug in the device, wait for about five seconds for Linux to detect it, and then press Enter. Clonezilla then searches all the storage media it can find, and you can select the partition on which you will be storing the image. Make sure you don't select the partition you want to back up!
| Networker |
|
If you would like to store the image on a server, your own computer first needs a valid IP address. Clonezilla can either request an IP address from a DHCP server, or you can type in a static address. Alternatively, you can use PPPoE to set up a (DSL) connection. Next you'll need to enter the domain name or IP address of the server. If this is a Samba server, Clonezilla will still prompt you for the domain. If you choose an SSH server, you will need to enter the port instead; in both cases, the defaults are typically okay. Then Clonezilla needs the name of the user authorized to access the server, followed by the full path of the subdirectory in which you will be storing the image server side. Say yes to the first screen and, if you are setting up an SSH connection, say yes again to accept the SSH key. Now type the password for the user you previously specified. |
Clonezilla then mounts the selected partition in /home/partition and simply refers to the mountpoint in all other dialogs. You have no chance to check the target medium or to change it.
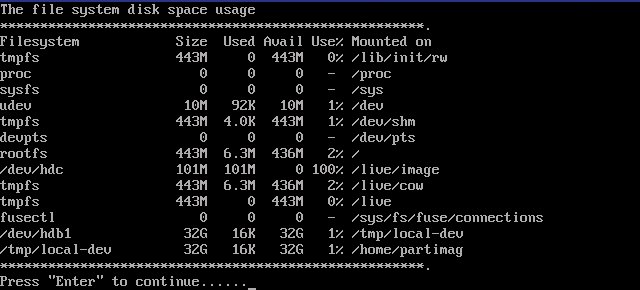
Your next task is to set the subdirectory in which Clonezilla will be storing the image. When you press Enter, you will be shown exactly how much free space you have on the target medium (Figure 4).
To save space, Clonezilla only saves sectors with data and additionally compresses the results. This will only work with known filesystems, such as NTFS, FAT32, or Ext3. Clonezilla will save any unknown filesystems as-is; in the worst case, the image will be exactly the same size as the original partition. This applies in particular to more recent filesystems such as Btrfs. Having more free space on your backup partition than on the original partition is a good idea. If you are sure you have enough space, press Enter to continue.
Next, set Clonezilla to Beginner mode. Except for special situations, you will not need the optional Expert mode (for example, if you need to influence how the image is created because you experience issues, or if you need to change the compression method Clonezilla uses).
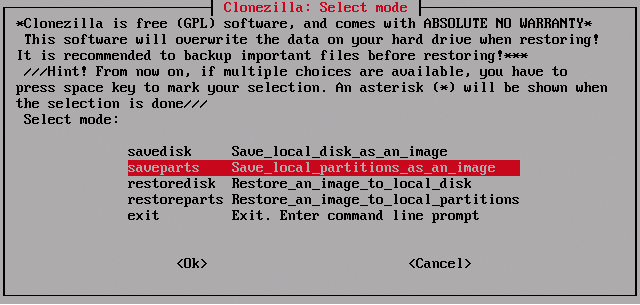
The next menu gives you four options: Clonezilla can store a partition in an image file (saveparts) or vice-versa (i.e., restore a partition from an existing image, restoreparts). You can also store the whole disk in an image (savedisk) or restore a full backup (restoredisk).
To back up your system partition, select the second of these items, saveparts (as shown in Figure 5), and enter a name for the backup (this is the name for the backup, but not for the image file). You can overwrite the default values of date and hour. Clonezilla then prompts you to choose the partitions to store in the image. Press the Space key to select your backup candidates. Figure 6 simply backs up the system partition on the first hard disk (hda1).
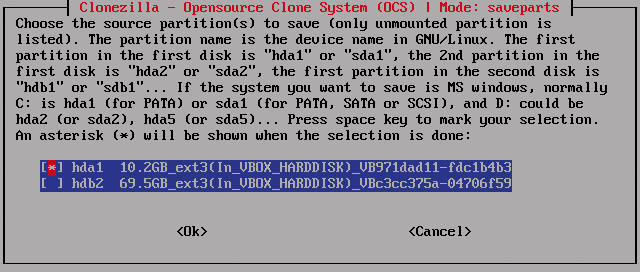
Note that the partitions in the list must not be mounted. After confirming your choices, press Enter to run the command shown in green on your screen.
To be on the safe side, Clonezilla shows you - in bright yellow letters - which partitions it will be backing up and where (Figure 7).
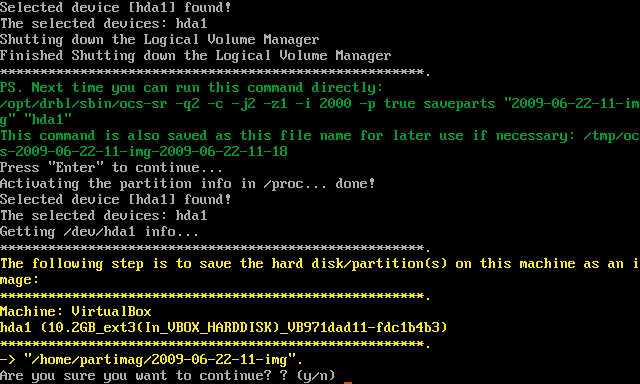
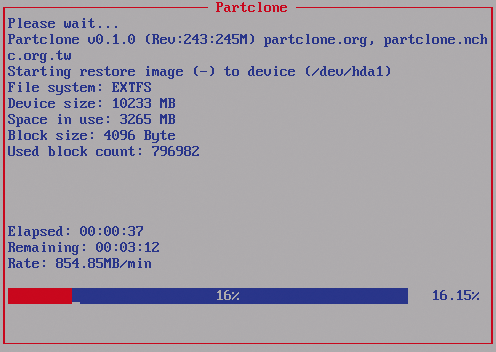
Now press y to confirm these details and Clonezilla will immediately get on with its work. Depending on the size of the partition you are backing up, this can take several minutes. The line at the bottom of the screen (Figures 8 and 9) gives you a progress indicator.
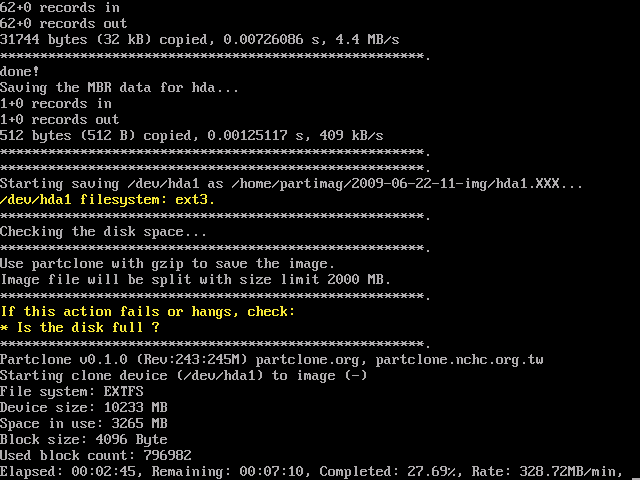
Clonezilla will not write the partition to an enormous file; instead, it automatically splits the image up into chunks of 2GB each. The chunks, garnished with some additional information, are dumped into a subdirectory with the name of the backup. Incidentally, Clonezilla does not use internal tools to create the image, but will leave this task to popular command-line programs, including partclone, ntfsclone, and dd.
Once Clonezilla has created the image, it simply quits. When you press Enter, you can choose to switch off the computer, trigger a reset, change to the command line, or restart Clonezilla. To do so, press 3.
To restore an image, simply go through the whole procedure in reverse order. That is, you need to select the following menu items in the order Start_Clonezilla | device-image | local_dev and attach the medium with the image, if applicable; then, select the image, specify the directory containing the image, and opt for Beginner mode. Because you will be restoring a partition to disk, restoreparts is the correct mode to choose. Clonezilla should now show you the image or images to restore - if not, you might have chosen the wrong medium in a previous step.
Next you must decide on a partition to which Clonezilla will restore the image. Again, this will destroy any existing data on the partition; consider your decision carefully. The target partition must be exactly the same size as the original partition; if it is larger, you are just wasting space.
In some special cases, you can modify the system in the image to match its new home environment, but this requires the Expert mode with the use of the -r parameter.
Next, you need to confirm the command line shown in green and check the summary once more. After confirming the settings by pressing y, Clonezilla will prompt you once again, just to be sure. Do not interrupt the write process unless you really do want a partition that is full of junk data.
| Removal Helpers |
|
To clone a partition or a hard disk, select device-device from the menu shown in Figure 3 and then opt for Beginner mode. The next screen gives you the option of transferring the whole disk to another local disk (disk_to_local_disk), to transfer the whole disk over the wire (disk_to_remote_disk), to clone a single partition on a local disk (part_to_local_part), or to send a single partition across the network. If your old disk is running out of space, you can simply install a second disk, launch Clonezilla, and then select the first option. At this point, you should be careful because you must select the Source from the list shown to you (that is, the partition or disk you would like to clone). Next select the Target, which is the partition on the new disk that Clonezilla will overwrite with the copy, thus destroying any data you have on the target medium. Finally, check all the settings once more and press y to confirm. |
Clonezilla Live, which was developed at the NCHC (National Center for High Performance Computing [2]) in Taiwan, is a fast, free, and user-friendly tool for backing up complete disks. Although Clonezilla uses compression, full backups can be fairly large, and the tool does not offer incremental backups at the time of this writing. For these reasons, Clonezilla should be considered as something to supplement your daily backup routine.
Another thing Clonezilla does not offer is partitioning. Live CDs by third parties have found a solution to this failing. For example, GParted-Clonezilla includes the GParted [3] partitioning program. You will also find Clonezilla on a variety of rescue CDs, such as Parted Magic 4.2 [4], which was released in June 2009.
| INFO |
|
[1] Clonezilla project: http://clonezilla.org
[2] Clonezilla at NCHC: http://www.nchc.org.tw/en/collaborative_research/fsl/ [3] GParted-Clonezilla Live CD: http://gpartedclonz.tuxfamily.org [4] Parted Magic: http://partedmagic.com |