
By Erik Bärwaldt
Life without Linux as a server system is hard to imagine. Excellent performance, fabled stability, and impressive scalability have helped Linux conquer an increasing share of the server market. Despite this success in the server room, setting up, managing, and maintaining the services is often a complex task that requires in-depth knowledge of services and config files.
Various graphical tools have appeared to facilitate easier configuration. Whereas most tools are limited to a couple of services, Webmin [1], a free Perl-based remote management application, lets you manage a full range of Linux services through a single, standardized interface. A single interface configures daemons and firewalls, as well as watches logfiles, disk partitions, system processes, and configuration parameters. The project also offers a useful collection of modules [2] that extends the reach of Webmin's graphical oversight.
Most distributions have Webmin in their repositories, although the Webmin packages are missing from Debian and Ubuntu. Webmin is available in both RPM and DEB package format and as a generic tarball with detailed documentation for any other distribution. A compatibility list of the supported Linux versions is available online [3].
The Webmin project puts a great deal of effort into maintaining and developing the software. Users with older distributions will probably want to ignore the obsolete version in their distribution's repository and download the current version [4] (1.480 when this issue went to press). Depending on your distribution, first become root and type rpm -ivh webmin-Version.noarch.rpm or dpkg -i webmin_Version_all.deb to install Webmin on your system. The installation routine will report the successful completion of the install process.
Because Webmin has its own lean web server that serves up the administrative interface, you can access Webmin through the URL http://IP_address:10000 from any workstation on the network. After you authenticate as the administrator, the browser shows the configuration framework welcome page with some basic information on hard disk usage and the server operating system. On the left side of the window is a list of topics; clicking an item opens the matching submenu.
The use of an administrative password as the default security feature has rightly been criticized in the past. Before you start using Webmin, you should use the on-board tools to harden the system against unauthorized access. First, select Webmin | Webmin Configuration to open the selection window. The important settings related to security include IP Access Control, Ports and Addresses, Authentication, and Trusted Referrers. Clicking an icon opens a new window with detailed modification options. For example, you can specify which computers on the local network are allowed to access Webmin. To exclude users or machines without administrative tasks, block their user- or hostname. If the computer has an Internet connection, it makes sense to change the default port of 10000.
To prevent automated brute force attacks on Webmin, you need to set the password timeout in Authentication to introduce a wait before allowing a second login attempt after an invalid login. To keep unauthorized users from accessing the Webmin server if a user forgets to log out, it is a good idea to enable the auto-logout feature, which logs users off after a defined inactivity period.
The Others | System and Server Status option gives an overview of the active daemons and allows you to monitor their activities. From the table that displays active daemons, and you can check the box of an entry to add it to the permanent or temporary watch list. If something goes wrong, the service notifies you. Additionally, the System | Running Processes item gives detailed information on all of the active processes running on the system.
The Servers module on the left side of the Webmin window takes you to the service configuration features. The software lists all the modules that Webmin has loaded for server operations as individual menu items. If you follow one of the links, the corresponding configuration window appears, and you can click the buttons to modify the options. Most configuration items are self-explanatory, which removes the need to learn the details of the individual services.
Because Webmin writes modifications directly to the configuration files of individual services, you can still modify the configuration manually without the risk of conflicts or redundancy.
In many cases, you need to adapt the operating system to support an application correctly. This configuration might include enabling daemons at the right run level to launch the application automatically at boot time. Again, Webmin can help you with this task. The System module includes an impressive number of options that let you set up the boot process, configure time-driven program execution on the server, and control backup functions on various media. Additionally, you can set up hard disk quotas and change user passwords.
Webmin also lets you modify the start and stop scripts to meet your requirements. Additionally, the menu gives you access to various logfiles and a list of active processes. Finally, the System module gives you an overview of the mounted filesystems, as well as a nicely sorted list of both local and network filesystems.
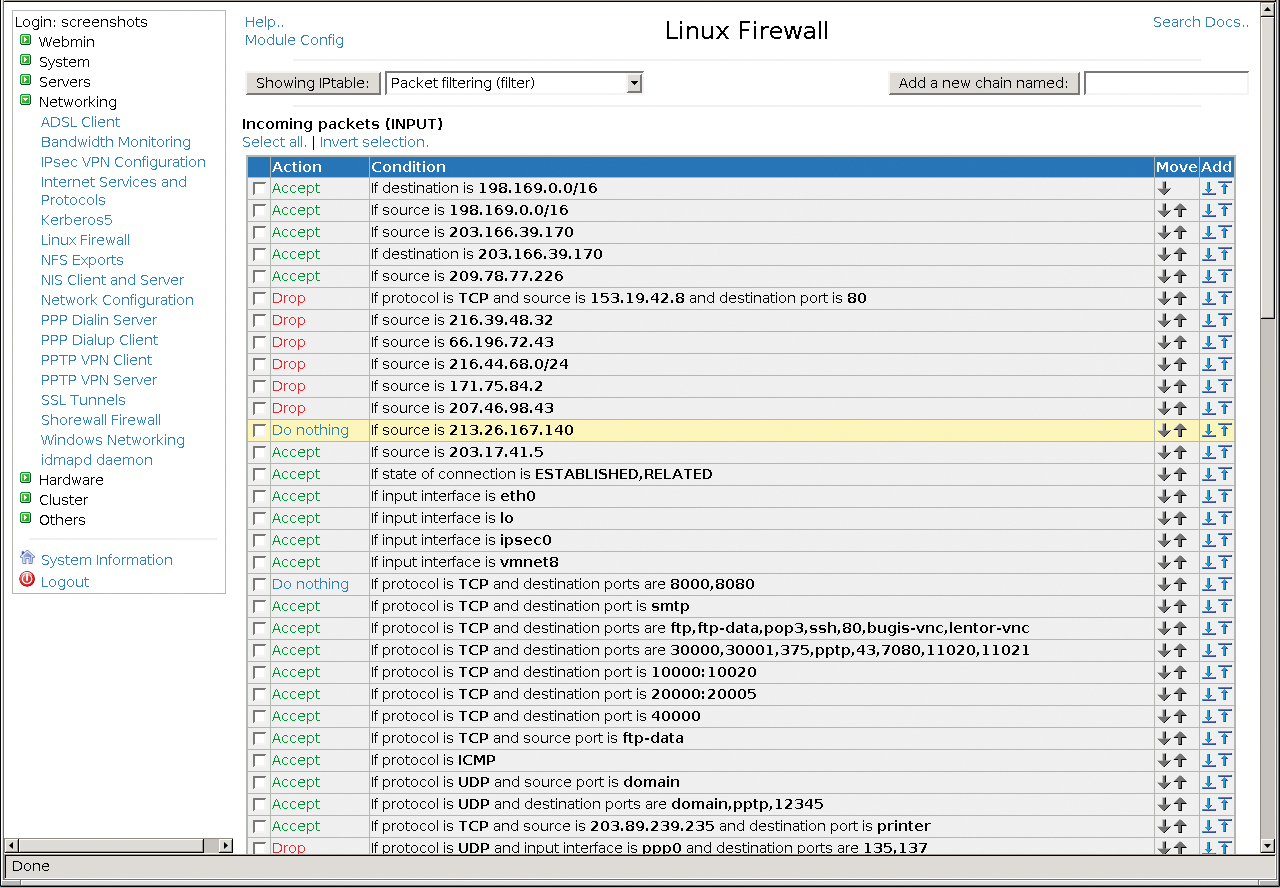
Webmin has the tools you'll need to convert your computer into a firewall. The hard-hitting duo of Netfilter/iptables has long been the packet filter of choice on Linux. But because of its convoluted syntax, configuring this team at the command line is something best left to experts. Selecting Networking | Linux Firewall in Webmin takes you to an easy-to-use interface with rule sets nicely organized in tables to help you create, manage, and delete rules without needing a degree in rocket science (Figure 1).
The Networking item also takes you to the basic network settings. If you are experiencing network problems, bandwidth measurement is a useful troubleshooting tool. This service takes some time to return meaningful data, and it generates a fair amount of CPU load, especially on less powerful servers.
The Hardware item has everything you need to manage your system's mass storage media. In addition to the options for configuring RAID arrays, mirror volumes, or partitions, you will also find a Logical Volume Management option, along with a front end to help you modify the parameters of individual disks. To launch the tool, select Hardware | Partitions on Local Disks. Webmin then shows you the usage statistics for the current volume as a red bar. To create a new partition or modify the default parameters, click Edit IDE parameters. Under the hood, Webmin calls the Hdparm program. But beware: Changes to settings such as the data transfer mode can cause data loss if the hardware does not support the selected mode. Before you change any of the IDE parameters, make sure you understand the characteristics of your hard disk.
The multifunctional Webmin configuration interface easily exceeds the scope of other open source graphical management tools. In our lab, Webmin proved extremely easy on resources: For example, I had no trouble installing the current version on a 10-year-old machine with a 300MHz CPU and 64MB of RAM, and the result was an amazingly stable and fast system.
| INFO |
|
[1] Webmin homepage: http://www.webmin.com
[2] Third-party modules: http://webmin.com/third.html [3] Supported distributions: http://www.webmin.com/support.html [4] Webmin download: http://www.webmin.com/download.html |