
By Marcel Gagné
Clear your mind. Now think about the words mobile and open source and Linux. You are probably thinking netbooks, Android phone, or some Linux application interacting with mobile devices. My first instinct when considering the mobile apps theme of this issue was to look at Linux and FOSS programs that would interface with my BlackBerry. That or my wife's Motorola cell phone. So I started looking at synchronization tools, which led me to contact management, address books, and so on.
After looking at, and tossing aside, several ideas, it occurred to me that my notion of mobile applications has changed quite a bit. Mobility isn't just about contacts; it's about the conversations you have with those people when you aren't with them. Furthermore, it's about working with groups, not just chatting or texting the cute programmer on the second floor of Building 5.
Group communication and interaction in a mobile world is entering the fuzzy realm of the global network. Because it is web based, the gateway to working (and playing) within a group is your browser. The real magic, however, happens on that Linux server, somewhere in the fuzzy world of your own network. Group communication, like the classic reasons for travel, tends to fall into one of two categories. Like the friendly border guard says a thousand times a day: "Business or pleasure?"
And so I found Open Atrium, a fascinating project that calls itself "an Intranet in a box." Open Atrium consists of several modules that provide a powerful, ready-to-use collaboration environment. The Open Atrium environment is actually based on Drupal - one of the most popular content management systems in existence. In fact, you could theoretically create a Drupal site, assemble the necessary collection of modules, tweak them just right, create a professional-looking site, and redesign the user interface to achieve an effect similar to installing Open Atrium.
But why not save yourself several days of work and just use Open Atrium instead? By default, Open Atrium starts with six ready-to-use tools:
Open Atrium is simply beautiful and beautifully simple. As the administrator, you can define one or more groups, invite users, and let them get to work. The groups inhabit spaces where they share information, documents, events, and more. Every person who logs in can access the cool Dashboard tool to monitor group activity at a glance (Figure 1).
A workspace can be public, where anyone can visit the site, or completely private, in which case only registered members of the group have access.

To get started with Open Atrium, you'll need a Linux server with Apache, MySQL, and PHP (LAMP). If you are already running a LAMP server, head on over to http://openatrium.com and download the latest bundle. Extract it into your server document hierarchy and rename the resulting directory to something that makes sense in your environment:
tar -xzvf atrium-1-0-beta3-1.tgz
mv atrium-1-0-beta3-1 myatrium
Also, you need to set up an appropriate Apache configuration for that host so that you can point to it (e.g., myatrium.mydomain.dom or mydomain.dom/myatrium). When you point your browser to that address, installation can begin (Figure 2).
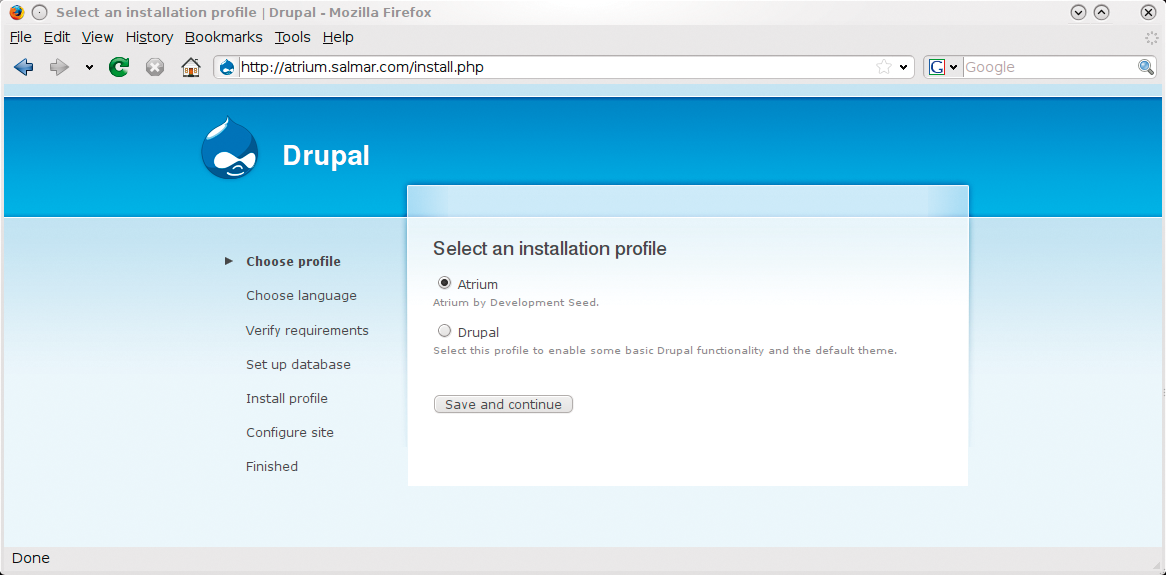
If you have ever performed a Drupal installation before, a lot of this is going to seem familiar. If you haven't, don't worry. Once you have installed Open Atrium, you don't have to know Drupal. What's important on this first screen is to choose Atrium as the installation profile. After all, that's what Open Atrium is: a superbly appointed Drupal installation profile.
The second screen merely asks for a language. The default is English, but you have many choices. The third screen (Verify Requirements) reminds you that if you haven't already done so, you should copy the default.settings.php file (which is located under sites/default in the install directory) to settings.php. Also, you should make sure the file is writable by the web server user (usually www-data or apache, depending on your server). Once the configuration is complete, the installer will rename these files and change their permissions to read-only for security reasons.
The next form, which involves creating and configuring your database, asks you to enter a database name, a database user, and a password for that user, all of which must already exist. To create these, you need to use a web tool like phpMyAdmin or Webmin. Alternatively, you could just scoot down to the command line and work with the MySQL interpreter. The steps involve creating the database, as well as assigning a privileged username and password to access and update the database (Listing 1).
| Listing 1: Creating a Database |
01 $ mysql -u root -p 02 Enter password: 03 Welcome to the MySQL monitor. Commands end with ; or \g. 04 Your MySQL connection id is 253404 05 Server version: 5.0.51a-3ubuntu5.4 (Ubuntu) 06 07 Type 'help;' or '\h' for help. Type '\c' to clear the buffer. 08 09 mysql> create database atrium; 10 mysql> grant all privileges on atrium.* to 'someuser'@'localhost' identified by 'somepassword'; 11 mysql> flush privileges; 12 mysql> \q |
Now you're ready to continue with the web-based installation, which includes some final steps for configuring the site. The Configure step asks for your site name (I'm calling mine Marcel's Atrium), your email address, and what will become the administrator account and password. Choose your default time zone (it may well be selected by default), and decide whether you want to run clean URLs (server-side configuration). By default, a box labeled Check for updates automatically is checked. This option is very handy, and I highly recommend that you leave it as is.
In the final steps, the Intranet modules are installed and configured; a progress meter tells you how swimmingly things are going. When the installation completes, click the link labeled You may now visit your new site to get started. This is where the fun really begins.
When you log in for the first time, which happens as part of the installation, you are asked to create your first group (Figure 3). Give your group a title (e.g., Development Team 5), a description (e.g., Items related to our secret project), and a path through which this particular group and its content can be accessed; in my case, secretdev. The last thing you need to decide is whether this group is public or private. Public groups will appear in the site list of groups; private groups will not, so remember how to find it when you give it a name. Deciding whether a group is private or public also has some effect on the default features enabled for your group (more on that later). Given the nature of this project, I'm going to make this group private.
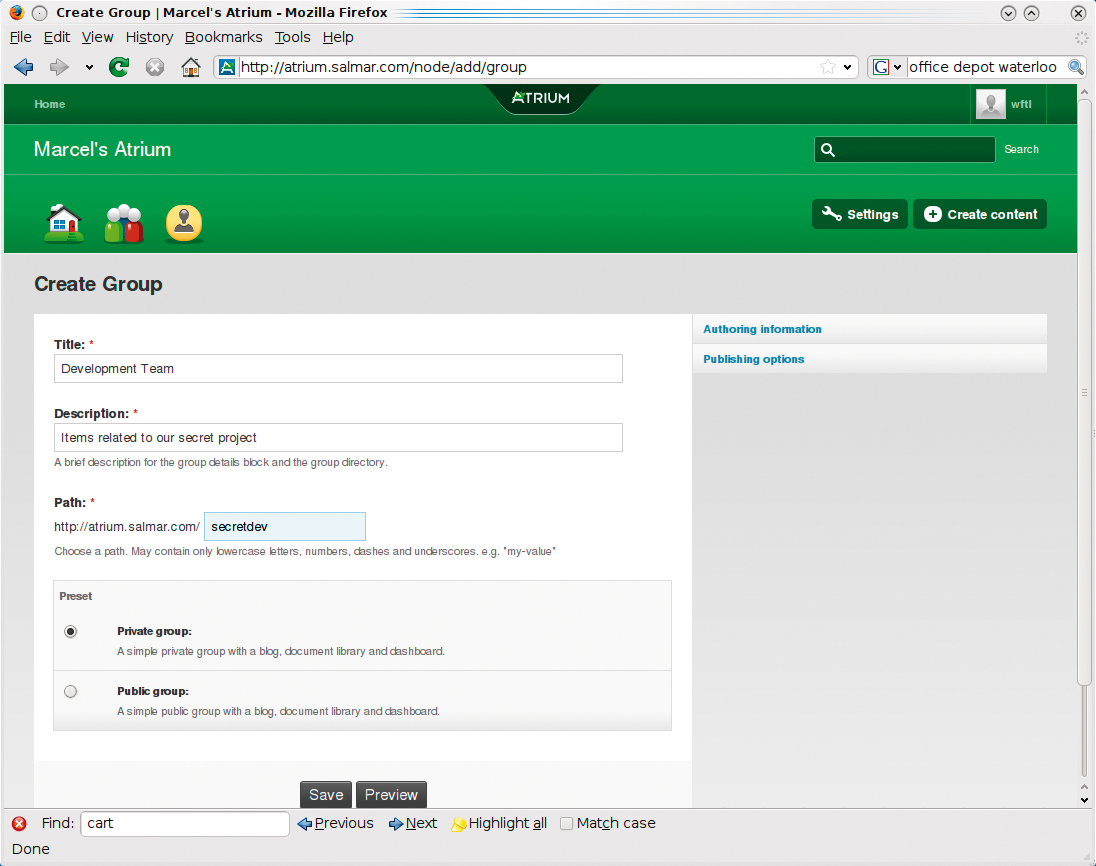
Before you click that Save button, look over on the top right at two labels, Authoring information and Publishing options, both of which will open up additional options if you click on them. Under Authoring information, you can change the group manager, the author of the group, and the date it was authored (or created). The default author is yourself, although you can assign another user as group manager. Perhaps you have your own reasons for selecting a date and time other than right now - I'll leave that one to you.
Under publishing options, you'll find three checkboxes: Published, Promoted to front page, and Sticky at top of group home page and other lists. Whether a document (or group, or ...) is published or not is important in that it is the difference between sending out an email and saving it as a draft. Should you need to stop in the middle of that update of policies and procedures you are working on without showing your entire group, leave Published unchecked and save your work. Promoted to front page literally means that this particular post, in whatever form, will appear on the site's front page. Finally, Sticky means that it will remain at the top of the home page regardless of newer content being published to the front page.
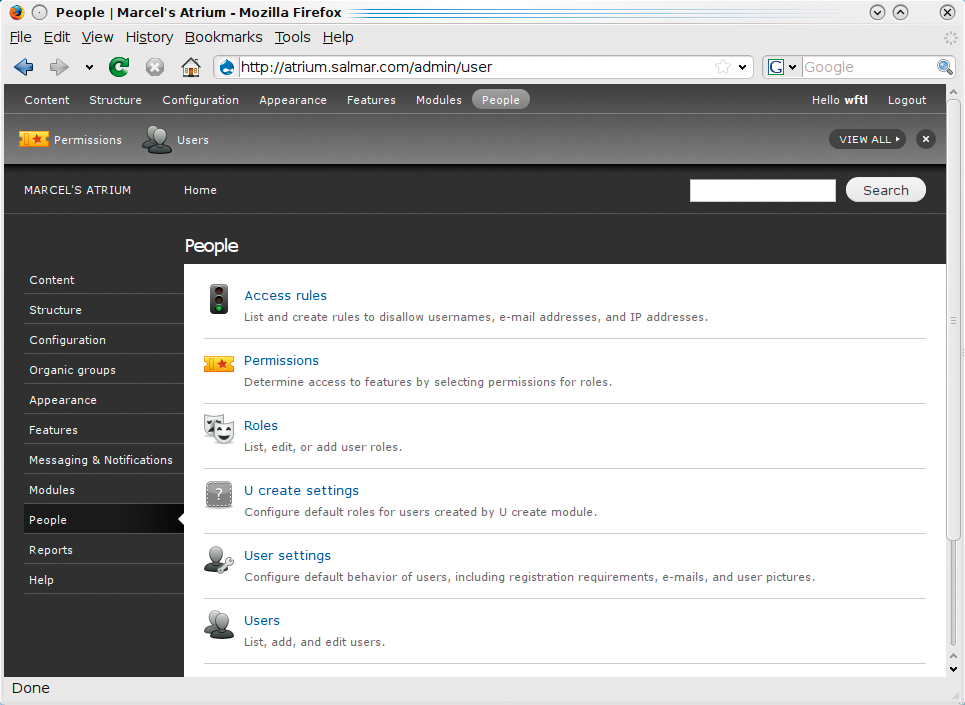
Now that you have a group, you can create more groups (perhaps some public groups as well), announce the site, have users register, or register them yourself. Because the first user to register on the system is the administrator, you'll find that in the bottom right hand corner of every page, a little button labeled "Administer" is quietly waiting for your call. Depending on the amount of information on your page, you might need to scroll down to access it. After clicking the button, you'll find yourself looking at the administration interface (Figure 4). Most of what you see in the admin area is Drupal administration features organized and tuned for Open Atrium. For the most part, you probably won't need to spend much time in the admin area, but a few tasks do require administrator credentials.
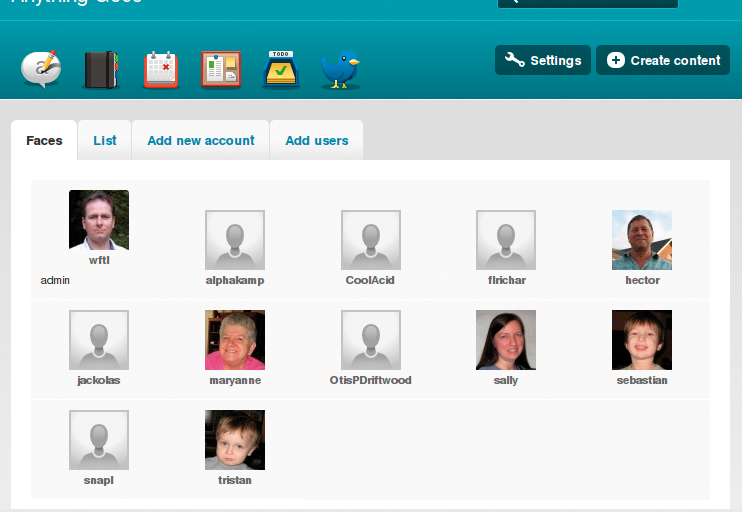
One duty you can perform through the admin interface is adding users, but you can also create new user accounts through the Group Dashboard. From the dashboard, click the button labeled Settings. A drop-down list appears with the following options: Members, Group settings, Customize features, and Customize layout. To add users, click on Members.
The screen will switch to the members page, with four tabs labeled Faces, List, Add new account, and Add users. By default, it starts on the Faces tab with current users and their profile pictures (if they are set) visible. Click the Add new account tab to add a member. Fill in the username, enter the email address (twice, to confirm), and check off the role the user will play. In addition to a "regular" group member, you can specify that this person will act as a group manager, meaning she is effectively an admin for the group, or you can make her a site admin. A little farther down, you can write a custom welcome message for the user. When you complete the Add user form, an email message is sent to the user with a link for a first-time login.
If you scroll to the bottom of that page, you'll see that the current group is checked automatically for subscriptions. All your other groups should be visible as well. At this time, you can add the new user to any number of groups, regardless of whether you chose to assign a specific role to the individual. To finish, click Add, and to see the members in your group, click the Settings button again and select Members (Figure 5).
Notice in Figure 1 that several tabs are visible that provide access to the core Open Atrium features. Depending on the type of group you created, some features you will want might not be enabled: Click Home, then click the Settings button again. Things look at little different here than they do in group settings, and only two options are present. If you select Site Settings from the drop-down list, a page appears showing the core Open Atrium features that are enabled. Notice that the shared calendar isn't currently available (Figure 6). To enable it, click the drop-down list for that feature, select Enable, then click Save Settings at the bottom of the page.
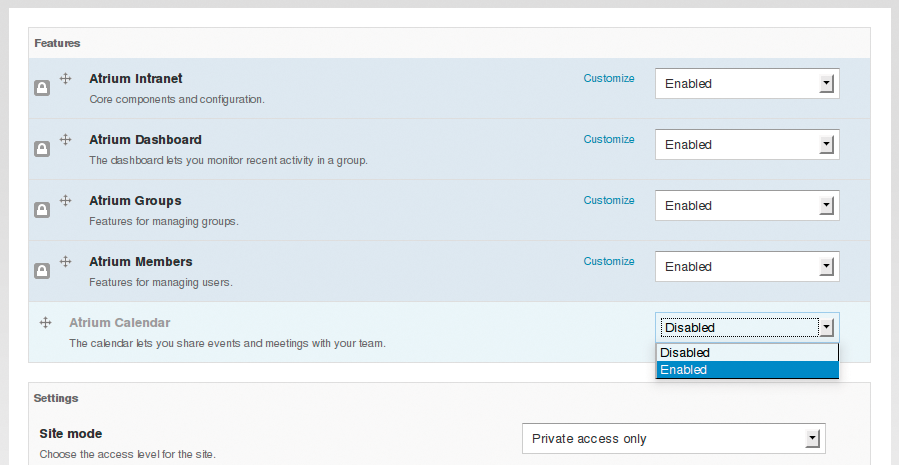
That page has other items you might want to consider. For instance, when I mentioned adding users, I suggested that, depending on how you ran your site, you might choose to add everyone manually or invite them to register on their own. Below the Features list is a category titled Settings. This includes default site registration settings. Also, there's a place to upload your logo.
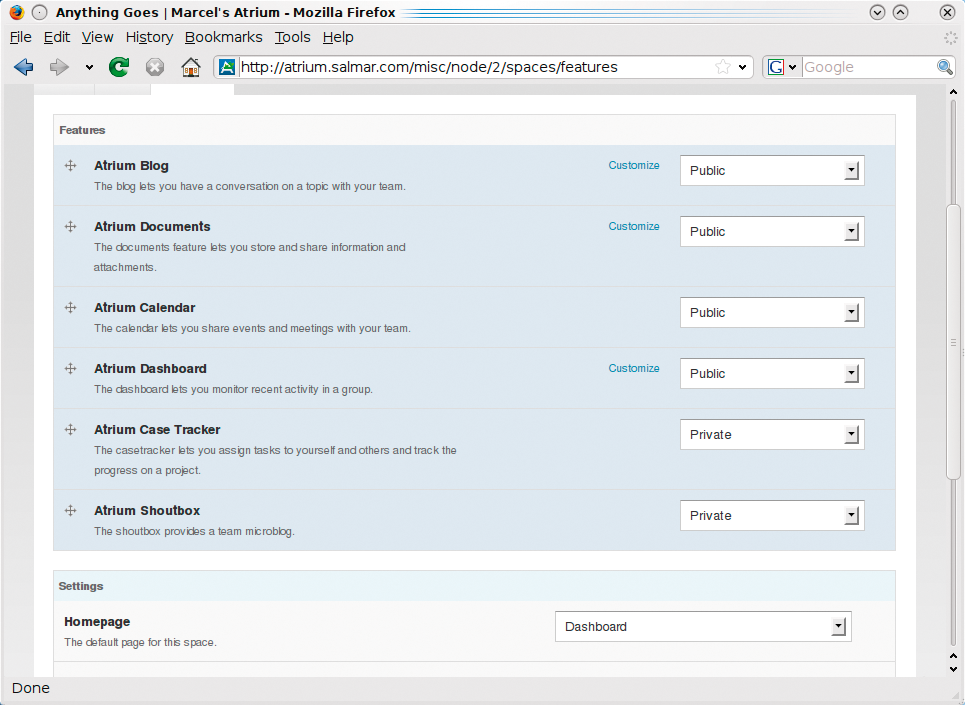
Speaking of settings, if you were to create a public instead of a private group, you'd find a couple of additional features available, although they might not be enabled. These features include the aforementioned Atrium Calendar, the Case Tracker, and the Shoutbox. This takes a little getting used to because when you create groups, whether private or public, certain features are available while others are not. To enable features for a group, rather than simply making them available system-wide, switch to group view, click the Settings button again, then select Customize Features (Figure 7). Now you will see the features available for that particular group. In a public group, you can enable or disable features, define them as public, or define them as private. (A public group can have both public and private features.)
The calendar is pretty obvious in its function - you can create and share meetings, events, or anything else that is date related with members of your group. Events can be described by date and time and can span several days. When you add events, they are color-coded for readability (Figure 8). A small version of the calendar, as well as a list of upcoming events, appears on the main Dashboard page (see an example in Figure 1).
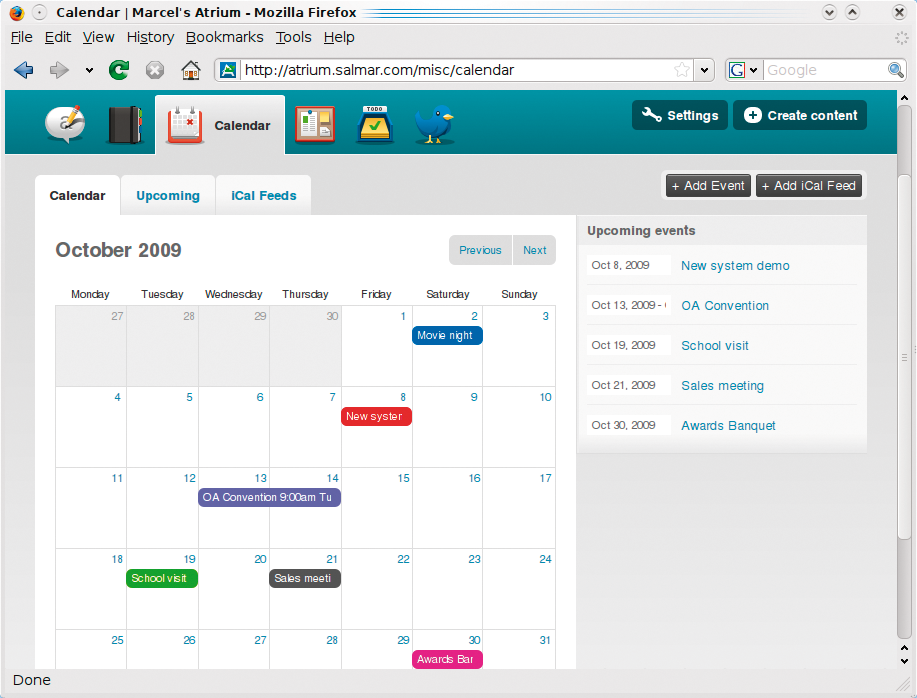
One of the really great features of the Open Atrium calendar is that it's possible to add iCalendar feeds, thereby letting the system populate the calendar for your group from an external source. When you do add an external feed, you can define how often the feed is checked (the default is every 30 minutes) and when (or whether) you want old entries purged.
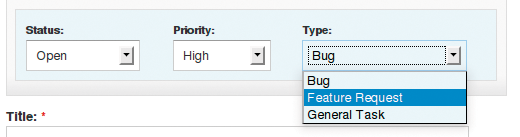
The Project feature and, most importantly, Case Tracker are particularly useful for support or development groups. With this feature, you can create projects and tasks (cases) within those projects, then track their progress. Also, you can assign cases to other group members, and cases can be assigned a status, a priority, and a type (Figure 9). Although Case Tracker is not as powerful as Bugzilla or Mantis, it is excellent for a small support desk.
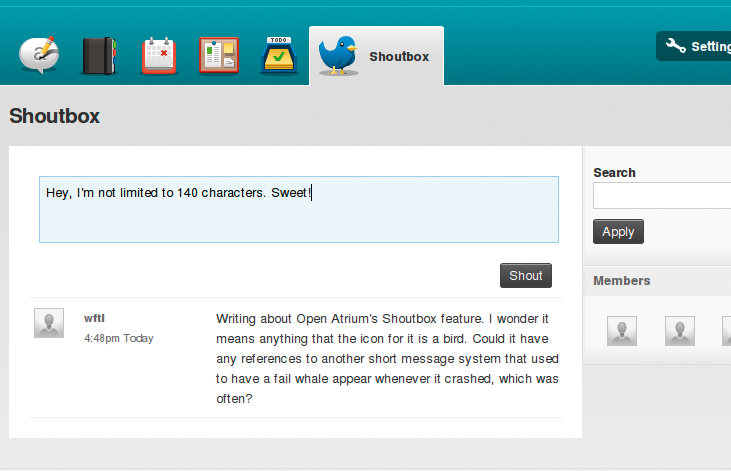
Before I wrap this up, I have to tell you about the Shoutbox, which is your basic identi.ca- or Twitter-like board. Shoutbox lets you send quick little messages to let others in your group know what you are up to (Figure 10). The great thing for people like me is that you aren't limited to 140 characters. You can interpret short as you see fit.
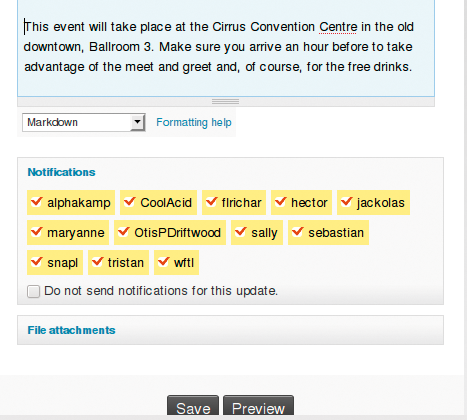
Part of what makes popular social networking sites successful is that they keep you posted via your regular email address should someone direct a message to you or to the group. Open Atrium can send a notification of changes to a blog, online document library, or event. At the bottom of each screen, just before you click Save, you will find an area labeled Notifications (Figure 11). Every user in your group is listed there. To let people know about a new post, check their names off the list. When it is an update to an existing post, you might choose not to notify users a second time (or third or fourth ...). Once you save the information, email is sent to each member of the group.
Open Atrium is a fantastic example of what you can create with intelligent design (the real kind), a finely tuned Drupal installation profile, and a touch of style. To be part of that ongoing design, be sure to join the Open Atrium community to offer your expertise, contribute code, suggest improvements, or ask questions. With Open Atrium, you can collaborate, chat, and share information with your group from the comfort of your browser, which can be anywhere, including the palm of your hand, making the server the new mobile app.
Somehow I always knew it would come back to the mainframe.