
By Leandro Melo de Sales
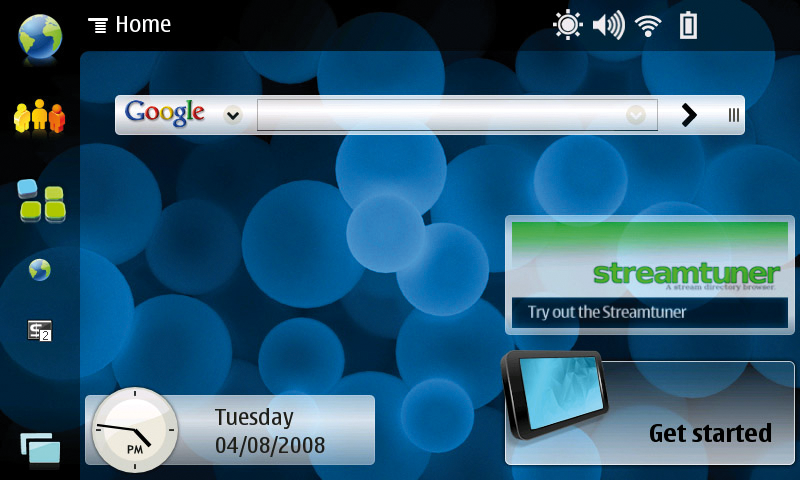
Maemo, known as the "Internet Tablet OS," is a software platform developed by Nokia for their line of Internet tablets. The Maemo platform [1], with an operating system and the Maemo SDK, is based on Debian Linux and Gnome (Figure 1).
In 2008 Nokia announced the acquisition of Trolltech, makers of the Qt application framework. The easily extensible Qt provides all the necessary functionality for building applications with state-of-the-art graphical user interfaces, I/O, and networking. Applications written with Qt range from the KDE desktop, to computer softphones such as Skype, to the Opera web browser, to applications such as Google Earth and MythTV.
After the Trolltech acquisition, Nokia said that Qt would "accelerate its cross-platform software strategy for mobile devices and desktop applications and develop its Internet services business." In the beginning of 2009, Nokia released a set of packages enabling support for Qt in Maemo [2].
Another result of the acquisition was the recently announced Nokia N900, a fully Qt-supported Nokia device. Although only the Nokia N900 Internet Tablets provide native Maemo support, many applications are already written for the Maemo platform based on previous Nokia tablets, such as the N800 and N810. In addition, Qt provides some support for the Nokia Symbian platform. In both Maemo and Symbian, platform developers can implement Qt applications in C++ or Python. The latest stable version of Qt is 4.5.
In this article, I describe how to start developing Qt applications for the Maemo platform [3]. First, I'll show you how to set up Qt with the Scratchbox embedded development toolkit on a Nokia N810, then I'll take you through some examples, starting with a simple Hello World application and ending with an app that displays city maps using the Qt WebKit and the Google Maps API.
The latest versions of Qt provide a complete mobile and embedded development platform based on the open source Qt toolkit. The modular Qt architecture offers building blocks for assembling a Linux-based software stack for various embedded devices, ranging from phones to set-top boxes. The Qt Extended platform comprises 19 separate components that span a broad range of functionality, including messaging, multimedia, and productivity.
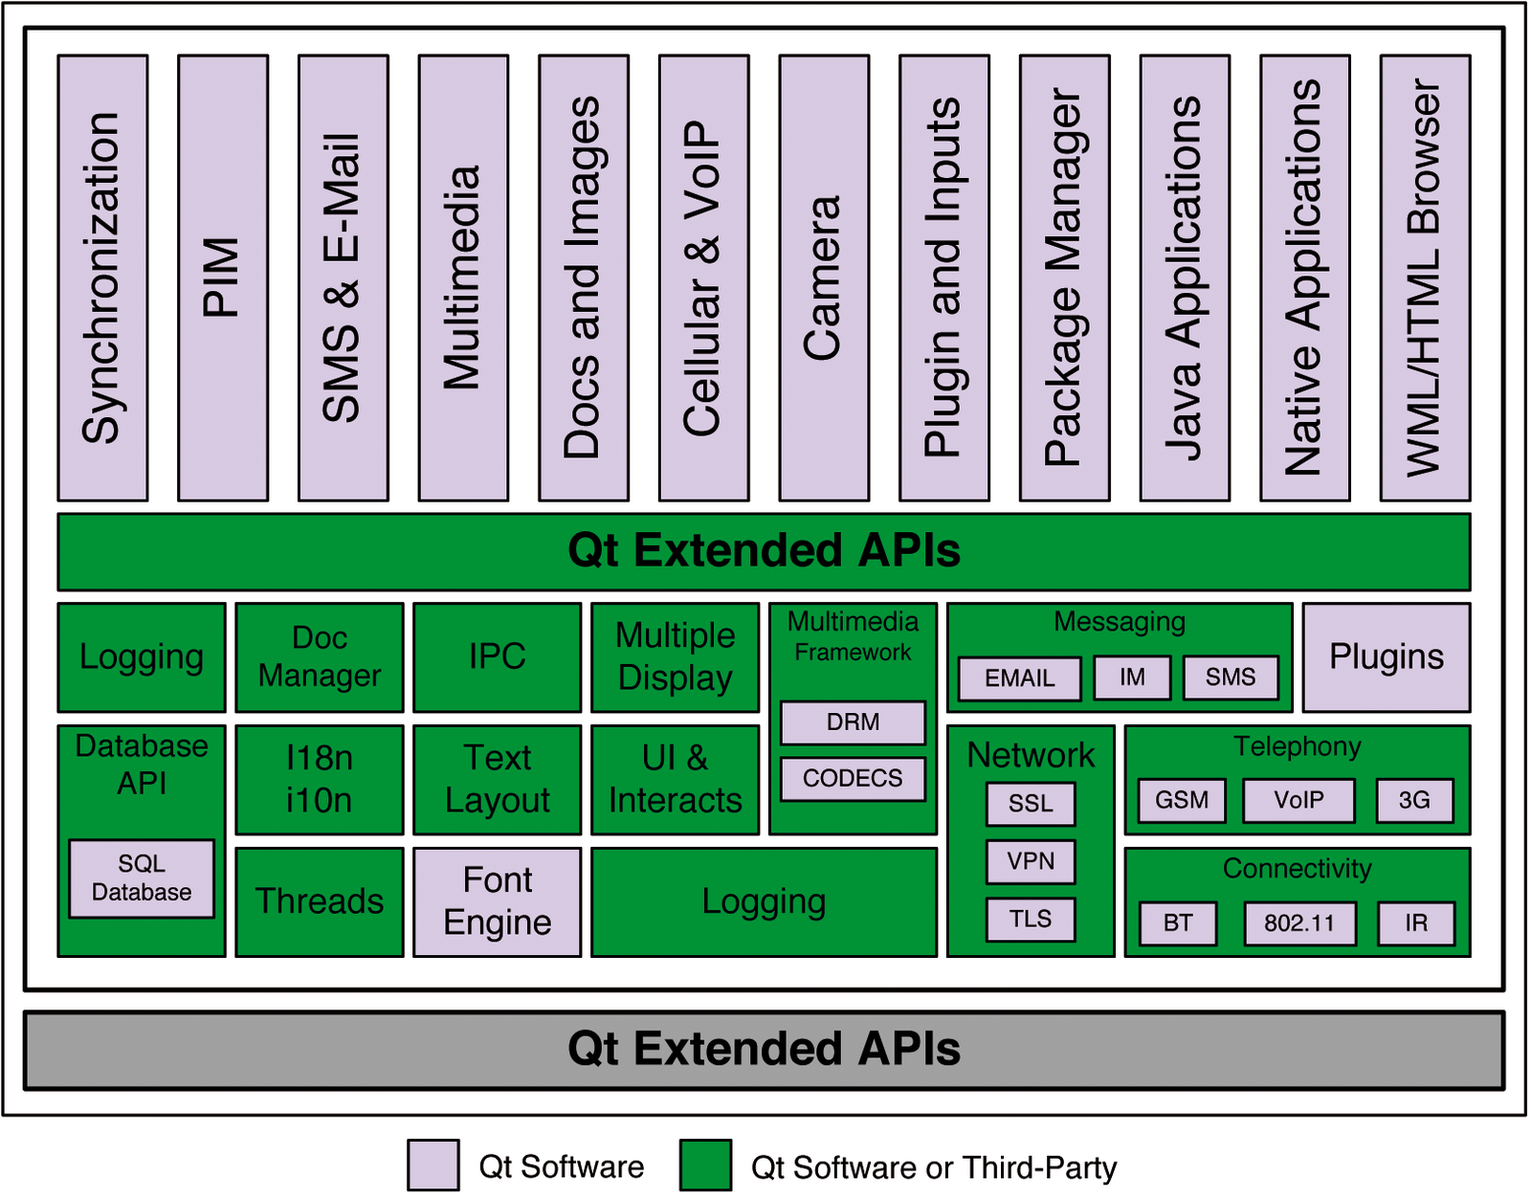
The underlying telephony stack of the Qt Extended architecture (Figure 2) supports GSM, GPRS, and VoIP and supplies reference implementations that hardware makers can replace or extend. These pieces are wrapped with an abstraction layer that gives developers access that is consistent across Qt Extended devices. The Qt Extended messaging component spans the full range of mobile communication technologies, including SMS, MMS, email, and instant messaging. It is built on top of Telepathy, a modular communication framework that is also used on the Maemo platform and is increasingly being adopted on the Linux desktop. The platform includes a messaging library that provides developers with a high-level API for composing messages and manipulating the system's message data store. It also exposes Telepathy-based services, including XMPP communication, via Telepathy's Gabble connection manager.
In addition to including an audio and video playback infrastructure, the multimedia framework in Qt Extended also offers a set of common widgets for building multimedia applications. The top layer of the multimedia stack is the Phonon abstraction library. Qt Extended supports Helix and GStreamer back ends for Phonon, but adopters can also make their own back ends to plug into the stack. The multimedia stack also supports a DRM implementation that is compatible with the Open Mobile Alliance DRM standard.
The platform's built-in personal information management (PIM) layer, constructed on top of the SQLite database library, is fully extensible and can be accessed by multiple applications simultaneously. The toolkit includes synchronization APIs and widgets you can use to develop new PIM applications. The platform even comes with a reference implementation of a very basic PIM suite.
The user interface is, of course, built with the Qt widget toolkit. The layout and design of the menu system, dialer, and window manager can be customized with XML-based theming descriptions. It also includes an extensible input method system that supports basic handwriting recognition, standard phone numerical pads (with predictive text), and qwerty keyboards.
Qt Extended comes with a lot of other useful things, including the QWebKit widget for building mobile browsers and rich Internet applications, support for Bluetooth and WiFi, and some important architectural components, like a policy-based security system for sandboxing applications and an interprocess communication layer that leverages Qt's signal and slot model.
Qt Extended is distributed under the same kind of dual-licensing model as the desktop toolkit - that is, with a commercial and an open source licence under GPL. For more information about Qt in the Maemo platform, check out the Maemo Qt4 website [2].
Scratchbox is a cross-compilation toolkit designed to simplify embedded Linux application development. The Scratchbox toolkit also provides a full set of tools to integrate and cross-compile an entire Linux distribution. Nokia has adopted Scratchbox to facilitate the process of developing those applications in the desktop and to compile it for the ARM architecture that is used in Maemo devices.
First, you need to install Scratchbox and the Maemo Diablo SDK on your host machine [4] [5] [6]. After installing Scratchbox, there are two possible targets: ARMEL, used to emulate applications for Armel-based platforms, and X86-based platforms. For both cases, Qt4 development support is not installed by default, so you must install Qt4 as well as the libraries for both targets. To start, you need to add the extra and extra devel repositories to Scratchbox apt-get sources and install the Qt libraries. See the box titled "Installing the Qt Environment."
| Installing the Qt Environment |
|
To install, open a terminal and type the following command to enter in the Scratchbox environment: /scratchbox/login Then open the /etc/apt/sources.list file with vi. sudo vi /etc/apt/sources.list Use the directions keys to go to the end of the file, and press the Insert or i key to enter the follwing commands for enabling the extra and extra-devel packages in Apt: deb http://repository.maemo.org/extras/ diablo free non-free deb-src http://repository.maemo.org/extras/ diablo free deb http://repository.maemo.org/extras-devel/ diablo free non-free deb-src http://repository.maemo.org/extras-devel/ diablo free Press Esc when you are finished, and type the command :x plus the Enter key to save the changes and quit vi. The next step is to install the Qt4 programming environment with the following commands: apt-get update fakeroot apt-get install libqt4-core fakeroot apt-get install libqt4-gui fakeroot apt-get install libqt4-dev Now you are ready to developing Qt applications for the Maemo platform. |
Next, you need to install Qt4 and PyQt4 on a Nokia N810 Internet Tablet. Although I will use the N810 for this example, you should also be able to follow these steps using a Nokia N800 device. PyQt is a set of bindings that allows programmers to access a Qt library through Python. To install Qt4 and PyQt4 on an N810, you must be running the Maemo OS2008 system with the Python environment installed on your device.
The first step is to enable the extras-devel repository in your N810. Open the web browser on the N810 and go to http://qt4.garage.maemo.org. Scroll down the page until find something similar to Figure 3, and click on the link Click to install DEVEL, which will open the File Download dialog box.

Click on the Open button to open the file after it downloads. This will launch the maemo application manager application. You will be asked if you want to add the Qt4 repository in the sources.list file. Click on the OK button to add the Qt repository.
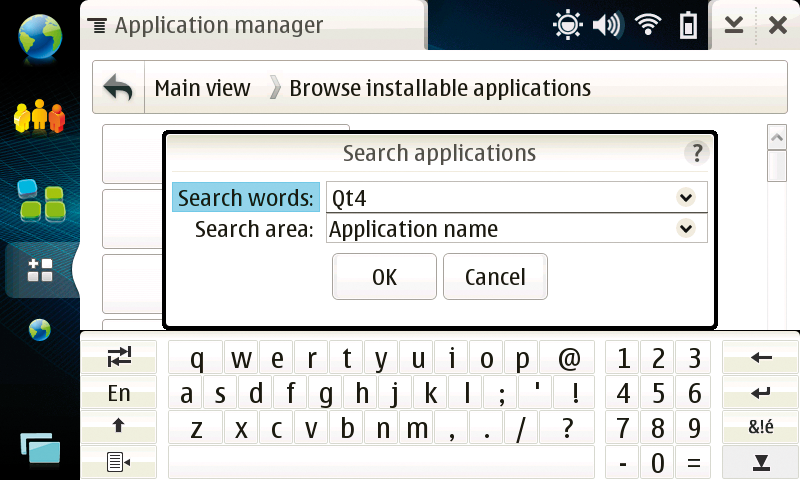
Clicking on the Browse installable applications option and typing Qt4, as shown in Figure 4, lets you search for the Qt packages available in the Maemo Application manager. A list of the Qt4 packages will appear. Install all the Qt4 packages you consider important, but at the very least, install the packages libqt-core, libqt-gui, python2.5-qt4-core, and python2.5qt4-gui.
A simple Hello World program will give you a first look at using Qt inside Scratchbox. The hello_world.cpp file in Listing 1 displays a friendly "Hello" message.
Lines 1 and 2 of Listing 1 include two header files that contain definitions for the QApplication and QLabel type. You will probably include the QApplication header file in all your Qt applications. In lines 5 and 6, the Qt application is instantiated, and a label that is automatically inserted into the Qt application is created. The command in line 7 is used to show the QLabel with the message Hello Linux Magazine!" and, in Line 8, the application's main loop is closed.
To compile and run this application, open a terminal and type the following command to enter the Scratchbox environment:
/scratchbox/login
In vi, create the new file hello_lm.cpp in your home directory:
vi ~/hello_lm.cpp
Paste the contents of Listing 1 and save the file with :x"+Enter.
| Listing 1: hello_lm.cpp |
01 #include <QApplication>
02 #include <QLabel>
03
04 int main(int argc, char* argv[]) {
05     QApplication app(argc,argv);
06     QLabel *label = new QLabel    ("Hello Linux Magazine!");
07     label->show();
08     return app.exec();
09 }
|
Next, run the following to make the .pro file (used to generate the makefile) and compile your application:
qmake -project
qmake hello_lm.pro
make
To execute the application on Scratchbox, start the Hildon application framework, which will launch a screen that emulates the Maemo desktop.
af-sb-init.sh start
To execute the Hello World application, you just need to run the command below and your application will show up on the Maemo desktop emulated and opened in the previous step:
run-standalone.sh ./hello_world
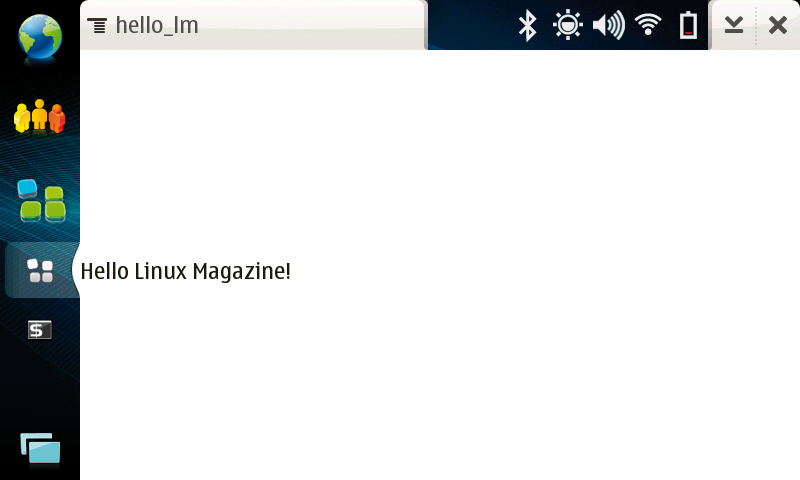
The run-standalone.sh script is responsible for correcting the look and feel for Qt applications. The resulting application is shown in Figure 5.
Another example of a simple Qt application is a very limited text editor written in Qt's Python variant PyQt. To implement the text editor, create a new file on your desktop, paste the source code shown in Listing 2, and save the file as texteditor.py [7].
| Listing 2: texteditor.py |
01 import sys
02 from PyQt4 import QtGui
03 from PyQt4 import QtCore
04
05 class TextEditor(QtGui.QMainWindow):
06
07     def __init__(self, parent=None):
08         QtGui.QMainWindow.__init__(self, parent)
09         self.setWindowTitle('My Text Editor')
10         self.__fileName = ""
11         self.__textEdit = QtGui.QTextEdit()
12         self.setCentralWidget(self.__textEdit)
13         menubar = self.menuBar()
14         action = {"New": self.new, "Open": self.open,                   "Save": self.save, "Exit": self.exit}
15         for (label, action) in action_menu.items():
16             action = QtGui.QAction(label, self)
17             self.connect(action,                 QtCore.SIGNAL('triggered()'), action)
18             menubar.addAction(action)
19
20     def new(self):
21         self.__textEdit.clear()
22         self.__fileName = ""
23
24     def open(self):
25         self.__textEdit.clear()
26         self.__fileName = QtGui.QFileDialog.getOpenFileName          (self, "Open", ".", "Text Files (*.txt)")
27         if self.__userSelectedAFile():
28             try:
29                 fsock = open(self.__fileName, "r")
30                 self.__textEdit.setPlainText(fsock.read())
31                 fsock.close()
32             except Exception, e:
33                 QtGui.QMessageBox.critical                   (self, "Open error", e.message)
34
35     def save(self):
36         if self.__fileName == "":
37             self.__fileName = QtGui.QFileDialog.getSaveFileName(self, "Save As", ".", "Text Files (*.txt)")
38             if not self.__fileName.endsWith               (".txt", QtCore.Qt.CaseInsensitive):
39                 self.__fileName = self.__fileName + ".txt"
40         try:
41             fd = open(self.__fileName, "w")
42             fd.write               (self.__textEdit.document().toPlainText())
43             fd.close()
44         except Exception, e:
45             QtGui.QMessageBox.critical               (self, "Save error", e.message)
46
47 if __name__ == '__main__':
48     app = QtGui.QApplication(sys.argv)
49     text_editor = TextEditor()
50     text_editor.show()
51     sys.exit(app.exec_())
|
Lines 2 and 3 of Listing 2 import the classes QtGui and QtCore. These classes are used to start the basic Qt development library. Between lines 46 and 50, QApplication and the class TextEditor are instantiated. The TextEditor class, which is defined in lines 5 to 45, is the real implementation for the Text Editor example. Between lines 7 and 18, application constructor is defined, in which the Qt main window is created through the instantiation of the QMainWindow class (line 8). A text edit component represented by QTextEdit is instantiated and added to the application GUI (lines 11 and 12). This component allows users to write text on it.
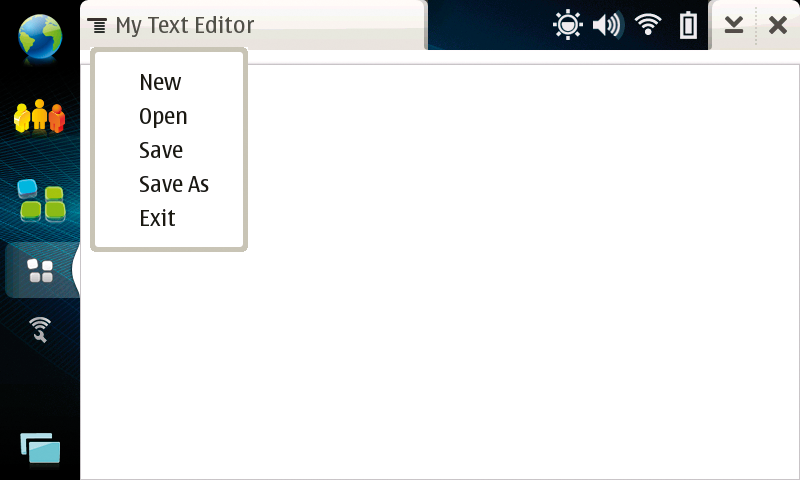
The application menu is built and added to the application by the commands in lines 13 to 18. Note that each option available in the application menu is linked to a specific method defined after the class constructor. The for loop defined in lines 15 to 18 takes an important role. For example, it links the New menu option to the class method self.new. When the New menu option is clicked by the user, it calls the TextEditor class method self.new(), which executes the operation necessary to create a new file. The same behavior occurs with the Open and Save menu options, which invoke the Text Editor class methods self.open and self.save, respectively. For homework, I will let you study the operations of these methods. The result of the TextEditor Application is shown in the Figure 6.
To execute the application, you just need to transfer the file to the device with the scp command, open the terminal, and execute the command python texteditor.py.
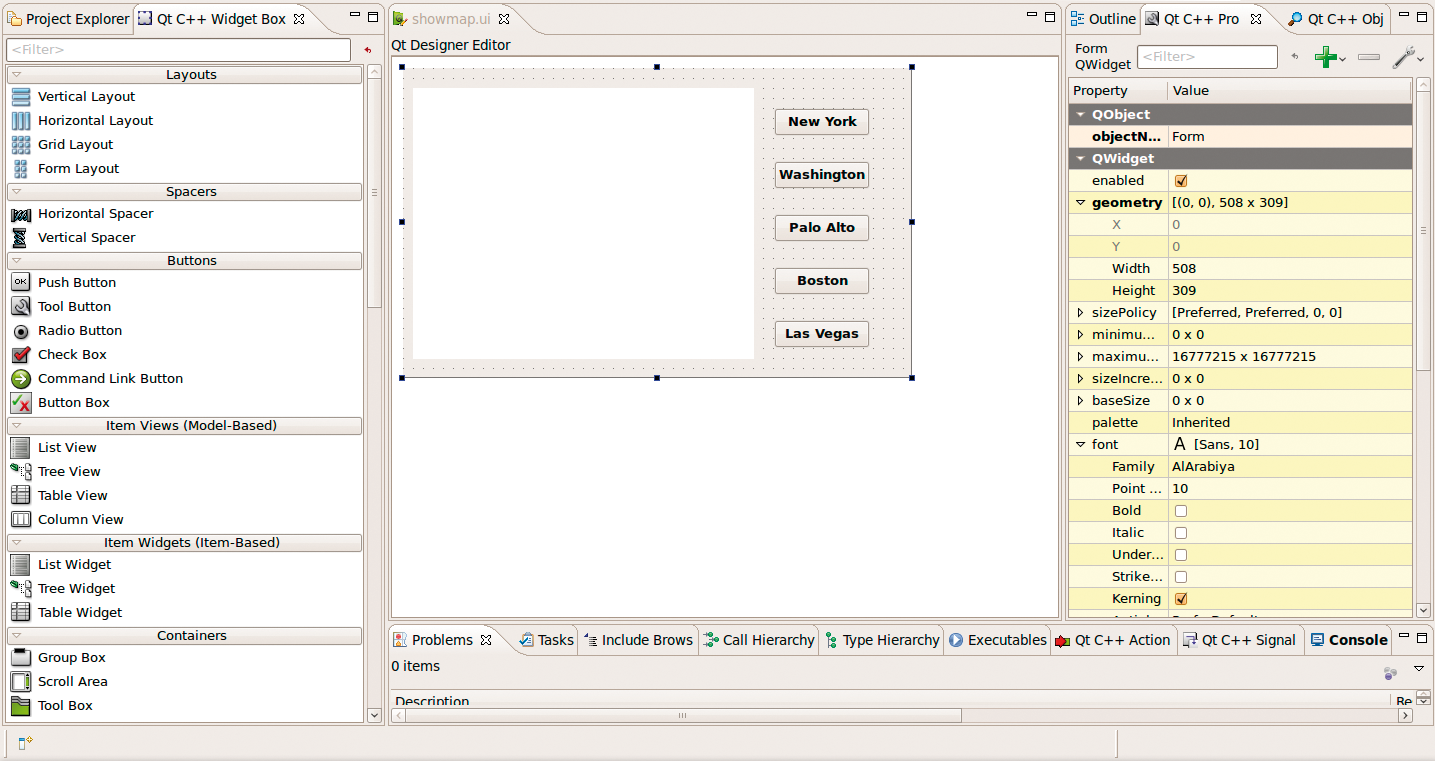
For the last stage of this Qt journey, I will describe a more advanced example that uses Qt to build an application for viewing maps with the Qt WebKit and the Google Maps API. This mapping tool requires its own application GUI, and for this purpose, Qt offers a powerful tool called Qt Designer (Figure 7), which I'll use to build the application form. The form contains five QPushButton buttons and a QWebView web view. You can add new Qt components inside a form by dragging and dropping them from the Widget Box to the form. Through the Property Editor, you can set some component properties of a Qt component, such as the name and label. You can download and install Qt Designer with your favorite Linux distribution package manager, such as apt-get, yum, or emerge, or you can download it from the Qt official website.
Once you have learned a bit more about Qt Designer, you can create a new Qt application, mapsQtGoogleMapsMaemo, that has a QWebView and five QButton components inserted into it with a customized QWebView component that shows a map inside it via the Google Maps API.
First, I'll create a Qt class to communicate with the Google Maps API, which allows you to retrieve and embed maps inside your own components - in this example, the component is a QWebView. To communicate with the Google Maps API, I define a class called Map and a set of methods (Listing 3). The most important role of the Map class is implemented in the Map::geoCode method (line 20), which receives a name and loads the map of the specified city with Google Maps.
| Listing 3: map.cpp |
01 #include <QNetworkRequest>
02 #include <QNetworkAccessManager>
03 #include <QNetworkReply>
04 #include <QDomDocument>
05 #include <QDomElement>
06 #include <QWebFrame>
07 #include <QWebPage>
08 #include <QEventLoop>
09 #include <QApplication>
10 #include <math.h>
11 #include "map.h"
12 #include "ui_showmap.h"
13
14 Map::Map(QWidget *parent) : QWebView(parent),   pendingRequests(0) {
15     manager = new QNetworkAccessManager(this);
16     connect(manager, SIGNAL(finished(QNetworkReply*)),             this, SLOT(replyFinished(QNetworkReply*)));
17     connect(this, SIGNAL(reloadMap()),             this,SLOT(loadCoordinates()));
18 }
19
20 void Map::geoCode(QString local) {
21     clearCoordinates();
22     QString requestStr(tr("http://maps.google.com/maps/                         geo?q=%1&output=%2&key=%3")
23             .arg(local)
24             .arg("csv")
25             .arg("GOOGLE_MAPS_KEY"));
26     manager->get(QNetworkRequest(requestStr));
27     ++pendingRequests;
28 }
29
30 void Map::replyFinished(QNetworkReply *reply) {
31     QString replyStr(reply->readAll());
32     QStringList coordinateStrList = replyStr.split(",");
33     if (coordinateStrList.size() == 4) {
34         QPointF coordinate(coordinateStrList[2].           toFloat(),coordinateStrList[3].toFloat());
35         coordinates << coordinate;
36     }
37     --pendingRequests;
38     if (pendingRequests < 1) {
39         emit(reloadMap());
40     }
41 }
42
43 void Map::loadCoordinates() {
44     foreach (QPointF point, coordinates) {
45         this->page()->mainFrame()->evaluateJavaScript(
46                 QString("Open(%1,%2)").arg(point.x()).                         arg(point.y()));
47     }
48 }
49
50 void Map::clearCoordinates() {
51     coordinates.clear();
52 }
|
The method get, invoked in line 26, generates a response that is handled by the method Map::replyFinished, as defined in line 16. This method parses and stores the latitude and longitude in an array of coordinates when the program emits the Map::reloadMap signal (line 39). As defined in line 17, the Map::reloadMap signal is handled by the method Map::loadCoordinates (line 43). This method uses QtWebKit to invoke a JavaScript function called Open defined in the HTML content loaded in the Map component requested previously in line 26. The Map class definition is shown in Listing 4.
| Listing 4: map.h |
01 #ifndef HEADER_H
02 #define HEADER_H
03 #include <QWebView>
04
05 class QNetworkAccessManager;
06
07 class Map : public QWebView {
08     Q_OBJECT
09 public:
10         Map(QWidget *parent=0);
11 public slots:
12         void replyFinished(QNetworkReply*);
13         void loadCoordinates();
14         void geoCode(QString);
15         void clearCoordinates();
16 signals:
17         void reloadMap();
18 private:
19         QNetworkAccessManager *manager;
20         QList<QPointF> coordinates;
21         int pendingRequests;
22 };
23 #endif
|
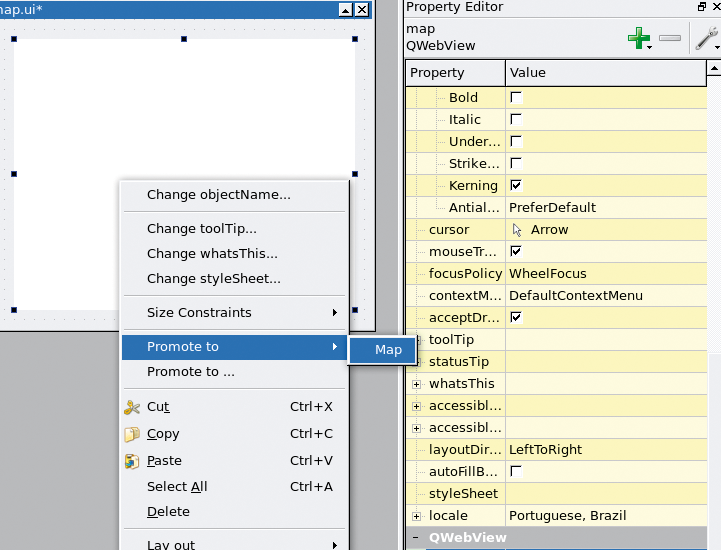
The next step is to promote the QWebView component to be controlled by the Map class. Open the UI file of the Qt project in a text editor and change the base class of your custom component to QWebView by adding the Map class and its header file and specifying that the Map class extends to the QWebView class (Listing 5). After saving the UI file, open it with Qt Designer and promote QWebView to your custom component, as shown in Figure 8.
| Listing 5: Extending the Map Class |
01 <customwidget> 02 <class>Map</class> 03 <extends>QWebView</extends> 04 <headers>map.h</headers> 05 </customwidget> |
The main screen is defined by the class MainScreen, as shown in Listing 6. This class uses the Map component defined previously to show city locations on the map, which is loaded in the QWebView component. Listing 7 shows the MainScreen class definition. Note that the main screen has QWebView promoted to the Map class and five buttons to display city locations for New York, Washington, Palo Alto, Boston, and Las Vegas. You can extend this idea to whatever city you prefer or add a text editor component that allows the user to specify the name of a city. Note in Listing 6 that the click event for each city button invokes the method Map::getCode, passing as an argument the name of the city.
| Listing 6: mainscreen.cpp |
01 #include <QVBoxLayout>
02 #include <QDir>
03 #include <QWebView>
04 #include <QHeaderView>
05 #include <QDebug>
06 #include <QWebFrame>
07 #include <QWebPage>
08 #include <QPointF>
09 #include <math.h>
10 #include "mainscreen.h"
11 #include "ui.h"
12
13 MainScreen::MainScreen(QWidget *parent):QWidget(parent) {
14     setupUi(this);
15     map->load(QUrl("./index.html") ) ;
16 }
17
18 void MainScreen::on_newyorkbt_clicked() {
19     map->clearCoordinates();
20     map->geoCode("New York");
21 }
22
23 void MainScreen::on_washingtonbt_clicked() {
24      map->clearCoordinates();
25      map->geoCode("Washington");
26 }
27
28 void MainScreen::on_paloaltobt_clicked() {
29       map->clearCoordinates();
30       map->geoCode("Palo Alto");
31 }
32
33 void MainScreen::on_bostonbt_clicked() {
34     map->clearCoordinates();
35     map->geoCode("Boston");
36 }
37
38 void MainScreen::on_lasvegasbt_clicked() {
39     map->clearCoordinates();
40     map->geoCode("Las Vegas");
41 }
|
| Listing 7: mainscreen.h |
01 #ifndef  SCREEN_H
02 #define  SCREEN_H
03 #include <QtGui>
04 #include <QWidget>
05 #include <QWebView>
06 #include <QStandardItemModel>
07 #include "ui_showmap.h"
08
09 class MainScreen : public QWidget ,public Ui::Form {
10     Q_OBJECT
11 public :
12     MainScreen(QWidget *parent=0);
13 public slots :
14     void on_newyorkbt_clicked();
15     void on_washinghtonbt_clicked();
16     void on_paloaltobt_clicked();
17     void on_bostonbt_clicked();
18     void on_lasvegasbt_clicked();
19 };
20 #endif
|
In the MainScreen constructor, specifically (line 15, Listing 6), the application loads an HTML file called index.html that contains JavaScript code to show the city location with the Google Maps API. The JavaScript initialize function embedded in the index.html file instantiates a GMap2 object with a center point at (0, 0) and zoom level 1. In this case, the loaded map is shown entirely in the QWebView component. The JavaScript Open function updates the GMap2 center point to the arguments passed as parameters and the zoom level to 11.
The index.html source code is shown in Listing 8. The Google Maps API is retrieved in line 5, and the JavaScript functions initialize and Open are defined in lines 9 and 16, respectively.
| Listing 8: index.html |
01 <html>
02 <head>
03 <meta http-equiv="content-type" content="text/html; charset=utf-8"/>
04 <title>Google Maps JavaScript API Example</title>
05 <script src="http://maps.google. com/maps?file=api& v=2&key=GOOGLE_MAPS_KEY" type="text/javascript"></script>
06 <script type="text/javascript">
07 var map;
08
09 function initialize() {
10 if (GBrowserIsCompatible()) {
11 map = new GMap2 (document.getElementById ("map"));
12 map.setCenter ( new GLatLng(0,0),1 );
13 }
14 }
15
16 function Open(x,y) {
17 map.setCenter ( new GLatLng(x,y),11 );
18 }
19 </script>
20 </head>
21 <body onload="initialize()" onunload="GUnload()" topmargin="0" leftmargin="0">
22 <div id="map" style="width: 521px; height: 381px"></div>
23 </body>
24 </html>
|
To compile and run the map example, make sure you specify the necessary Qt libraries in your Qt project file:
QT += network webkit xml
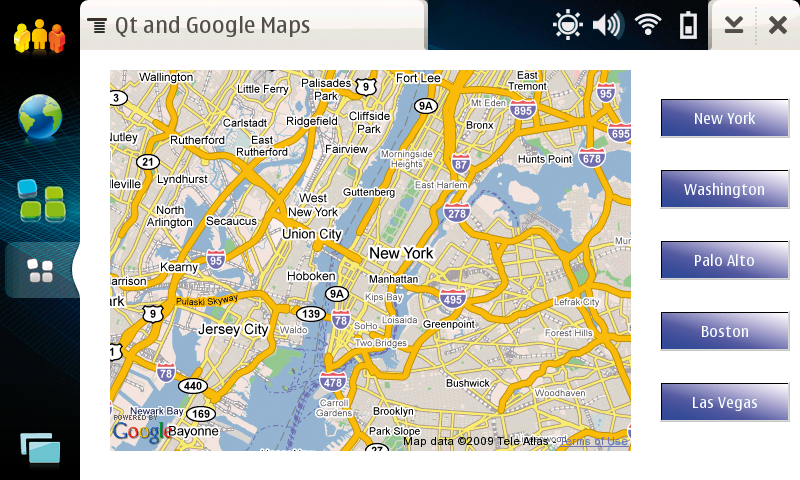
Now compile the example with Scratchbox by executing the commands qmake mapsQtGoogleMapsMaemo.pro and make, copy the generated binary file and the index.html file to the device with the scp command, and execute it by opening a terminal and typing mapsQtGoogleMapsMaemo. The view should be very similar to Figure 9.
Qt provides application developers with all the functionality they need to build applications with state-of-the-art graphical user interfaces, I/O, and networking. In this article, I showed how developers can easily use Qt components to create graphical applications for the Maemo platform. Qt is still a work in progress project because of the natural evolution of smart phones and Internet tablets, but it is getting attention from developers and contributors around the world who are interested in programming for mobile devices.
| INFO |
|
[1] Maemo platform: http://www.maemo.org/
[2] Qt Maemo: http://qt4.garage.maemo.org/ [3] Getting started with Qt for maemo: http://wiki.forum.nokia.com/index.php/Getting_started_with_Qt_for_Maemo [4] Maemo Diablo 4.1 documentation: http://maemo.org/maemo_release_documentation/maemo4.1.x/ [5] Maemo and Scratchbox: http://repository.maemo.org/stable/4.1.2/INSTALL.txt [6] Maemo tutorials: http://maemo.org/development/documentation/tutorials/ [7] Article code: http://www.linuxpromagazine.com/Resources/Article-Code [8] Installing and using Qt for Maemo: http://qt4.garage.maemo.org/diablo.html [9] Qt reference documentation: http://qt.nokia.com/doc/4.5/index.html [10] Nokia launches Linux-based Qt Extended mobile platform: http://arstechnica.com/open-source/news/2008/09/nokia-launches-linux-based-qt-extended-mobile-platform.ars |
| THE AUTHOR |
|
Leandro discovered Linux in 1997 and started developing the BRisa UPnP framework in 2006. Nowadays, he is a computer science professor at Federal University of Alagoas (UFAL) and manages various projects in C, C++, and Python for the Maemo platform at UFAL and Embedded System and Pervasive Computing Laboratory (ESPCL), which is supported by the Nokia Institute of Technology, Brazil. The author thanks others who contributed to this article: Angelo Perkusich, Hyggo Almeida, Flávio Fabrício, and Felipe Coutinho of the ESPCL, as well as Rodrigo Peixoto, Lucas Amorim, and Leandro Dias from the PCL at Federal University of Alagoas. |