
By John Murtari
MySQL and PostgreSQL have become standard open source databases on the basis of their active developer communities, solid performance, and reliable operation.
Despite the power and flexibility of these SQL variants, the options for obtaining historical data on database usage are relatively limited. SQL monitoring tools typically focus on gross monitoring at the server level. The Extended Usage Statistics for SQL (ExtSQL) project is an effort to make a much wider range of statistical information available to database admins through simple commands at the SQL command line. In fact, ExtSQL provides advanced admin features for MySQL and PostgreSQL that are not even available in the "big brother" SQL vendors. Database admins can now use ExtSQL to monitor and account for server usage down to the individual database, user, or even connecting client.
Almost any variable available through the SHOW STATUS command can be tracked. For instance, To see a display of all user activity in hourly increments for the last 24 hours showing the number of queries of each type, enter:
SHOW STATISTICS Com_select, Com_update, Com_insert FROM user WHERE
 Com_select > 100 HISTORY LIMIT 24
My company, Software Workshop Inc., developed ExtSQL and currently makes it available as open source software under the GPL. Our hope is that the features implemented through ExtSQL will eventually be implemented by other databases such as Oracle and DB2 and will become part of the SQL standard. In the meantime, ExtSQL takes the form of drop-in replacements for the server daemons used with MySQL and PostgreSQL.
In this article, I describe how to install and configure ExtSQL for a typical MySQL installation. The process for setting up ExtSQL for PostgreSQL is similar.
The ExtSQL website [1] has compiled binaries for various OS/hardware platforms available for evaluation and licensing. The most current instructions for installing and using ExtSQL are also available at the ExtSQL website.
First, download the ExtSQL patches for your version of the MySQL server and put the .gz file at the top of your MySQL distribution. Type make distclean at the top of your distribution tree to remove all prior build products then enter
tar -zxvf extsql-my-src-5.0.45-rhel4-x86-2-1a-2.0b.tar.gz
to unpack. The result should be files similar to these four:
patch-5.0.2.0b
compat-5.0.1a
do_conf-5.2
README.source_extsql
The first two files are patch files. The patch- file contains the bulk of the changes that make up ExtSQL. The second file (compat-) contains unique fixes for the specific version of MySQL.
The do_conf- file contains the exact configure commands used for the source build, so merge this list with any selections you've made. As always, view the README for the latest information.
The next step is to apply the patches, but apply the compat- file first
patch -V t -p0 -lNu < compat-5.0.1a
patch -V t -p0 -lNu < patch-5.0.2.0b
then run the same configure command you used to create your current build of MySQL with the options you desire.
For ExtSQL 5.0.x, you must add the following option to the current list of CXXFLAGS used in the definition for your configure (e.g., -DEXTSQL_50=1):
'CXXFLAGS=-O2 -DEXTSQL_50=1 -pipe -m32 -march=i386 -mtune=pentium4'.
Then type make as usual to build mysqld. A new mysqld binary in the build directory sql should be the result.
Instead of make install, you manually replace mysqld. I recommend the following procedure. (I assume the base install directory for MySQL is /usr/local/mysql.)
Start by backing up your databases and making a backup of your current mysqld:
cp -a mysqld mysqld.sav
ExtSQL prints status information to the MySQL error file. In another window, monitor the server with the following (use the correct path for your system):
tail -f /usr/local/mysql/var/your-hostname.err &
Now you are ready to install and activate the new server with the basic commands available in MySQL to stop and start the server. If your installation uses other wrapper programs, use them as well:
/usr/local/mysql/bin/mysqladmin -uroot -p"password" shutdown
060612 07:58:08 [Note] /usr/local/mysql/bin/mysqld: Shutdown complete
Note: The path in the logfile shutdown command should be the same path to which you previously backed up mysqld.
Copy the new mysqld into place
cp -a /path/to/your/source-installation/sql/mysqld mysqld
and start the new server:
/usr/local/mysql/bin/mysqld_safe --user=$mysql_user $other_args &

071121 7:42:47 [Note] ExtSQL build: ExtSQL version:
extsql-my-bin-5.0.45-rhel4-x86-2-1a-2.0b
060612 7:58:38 [Note] ExtSQL disabled by user, no extsql_class_list defined
Now take a breather. The preceding lines confirm the server was built with the ExtSQL subsystem, and it is currently disabled because no statistics were requested. We recommend you run the server for at least a day and convince yourself things are operating normally. Server performance should not be affected.
If an error occurs, it could indicate a problem with the build. To get back to a known good configuration, just restore your version of mysqld and restart the server. To start recording statistical data, open /etc/my.cnf and add the following line, which must be in the [mysqld] section of the config file:
extsql_class_list="user, max-100, time-120, units-h, (Com_insert, Com_select, Com_update, Com_delete, Com_replace, Qcache_hits, Questions, Slow_queries)"
The command above should be on one physical line in the file. If you change /etc/my.cnf, be sure to remove this line if you revert to a standard mysqld.
On restart of your server, you should see the following entries in the error log:
060612 8:26:12 [Note] ExtSQL build: ExtSQL version:
extsql-my-bin-5.0.45-rhel4-x86-2-5a-3.0b
060612 8:26:12 [Note] ExtSQL ACTIVE tracking memory: 435600 bytes for 1
class
Errors during initialization or operation will be noted in the error log, and the subsystem will disable itself, leaving MySQL operations intact.
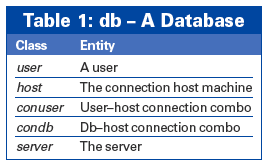
In ExtSQL, the entities that interact with the server are called classes (Table 1). Within a class, specific instantiations are called instances. An instance of a user could be domenic or christina, for example. The server class is unique in that the only instance is the server itself.
For each instance, you can track individual data items called vars. Vars include almost all of the values displayed in the present SHOW STATUS command. Use the name of the var as displayed by SHOW STATUS; for example, Com_select tracks select statements.
More than 100 vars (data items) are available. Configure the ExtSQL server by describing which vars you are interested in tracking and how you want to collect data. For a more complete example, consider this string, which must be one line in the configuration file:
extsql_class_list=" user, max-50, time-60, units-m, (Com_select, Com_update), db, max-50, time-10, units-h, (Com_insert, Com_select, Com_update, Qcache_hits), host, max-5, time-3, units-d, (Com_select, Com_update, Slow_queries), server, max-5, time-3, units-d, (Questions, Qcache_hits)"
As with SHOW STATUS (in this case with historical data), the server will track information on four different classes: user, db, host, and cumulative server stats.
For each class, max- precedes the maximum number of instances of that class. time- precedes the number of historical time units to store, and units- designates the period of interest (m, minutes; h, hours; d, days). After the limits for each class, a comma-separated list of vars is included. The line starting with db is a directive to track a maximum of 50 dbs and record historical data for each of the last 10 hours. The vars addressed in the preceding command are inserts, selects, updates, and query cache hits.
The goal for command syntax was to stay as close to standard SQL as possible. The syntax described here should look familiar, especially if you replace SHOW STATISTICS with SELECT. Listing 1 shows some ExtSQL usage examples.
Significantly different are LIKE, to match specific instances, and the new keyword HISTORY, to produce historical output. LIMIT operates differently if HISTORY is specified. Without HISTORY, it limits the number of results displayed. With HISTORY, it functions as a time limit.
SHOW STATISTICS ( * | Var list) FROM Class [LIKE 'Instance pattern']
[WHERE Var ( '<' | '>' | '=' ) num] [ORDER BY Var] [HISTORY] [LIMIT num]
For example, you can ask:
SHOW STATISTICS * FROM user LIKE '%joe%' WHERE Com_select > 500
In standard SQL, that would be:
SHOW STATISTICS * FROM user WHERE user LIKE '%joe%' AND Com_select > 500
LIKE is a separate clause in the syntax that matched just Class instances. For now, the syntax is limited in the WHERE clause, and ORDER BY is available if INFORMATION SCHEMA is supported in your base version of the ExtSQL server.
| Listing 1: Usage Examples |
01 The examples below show a cross section of ExtSQL commands and output. 02 ## Show number of selects and inserts given by all users: 03 sql> SHOW STATISTICS Com_select, Com_insert, Questions FROM user; 04 +----------+-------------+-----------+------------+ 05 | user | Com_select | Com_insert | Questions | 06 +----------+-------------+-----------+------------+ 07 | bandala | 8302675 | 95973 | 23153940 | 08 | sandymao | 1702812 | 6205 | 3829023 | 09 | ponnetli | 24909 | 4784 | 95646 | 10 ## Show number of selects, total queries, and updates made by all 11 ## client hosts: 12 sql> SHOW STATISTICS Com_select, Questions, Com_update FROM host; 13 +-------------------+-------------+-----------+--------------+ 14 | host | Com_select | Questions | Com_update | 15 +-------------------+-------------+-----------+--------------+ 16 | db2.adomain.com | 17715223 | 44224076 | 4143634981 | 17 | lathe.adomain.com | 2738061 | 9743215 | 3913397495 | 18 | telkomadsl.co.za | 195 | 5390 | 539604 | 19 ## Show number of selects, total queries, and updates made by all 20 ## users@client host with more than 10,000 queries: 21 sql> SHOW STATISTICS Com_select, Questions, Com_update FROM conuser 22 WHERE Questions > 10000; 23 +----------------------------+-------------+-----------+------------+ 24 | conuser (user@host) | Com_select | Questions | Com_update | 25 +--------- ------------------+-------------+-----------+------------+ 26 | bandala@db2.adomain.com | 8306726 | 23163320 | 3439850933 | 27 | sandymao@db2.adomain.com | 1704040 | 3831803 | 3365501841 | 28 | ponnetli@taro.adomain.com | 24920 | 95662 | 156529077 | 29 ## Show number of selects, total queries, and updates to DB allison for 30 ## the last three minutes with activity: 31 sql> SHOW STATISTICS Com_select, Questions, Com_update FROM db 32 LIKE 'allison' HISTORY LIMIT 3; 33 +---------+-------------+------------+-----------+------------+ 34 | db | minutes | Com_select | Questions | Com_update | 35 +---------+-------------+------------+-----------+------------+ 36 | allison | 11/20 13:56 | 216 | 382 | 318343 | 37 | allison | 11/20 13:55 | 642 | 1618 | 1386347 | 38 | allison | 11/20 13:54 | 280 | 699 | 646855 | |
| Information Schema Syntax |
|
Many of you are aware that INFORMATION SCHEMA is already part of the SQL standard, and its purpose is to make SQL databases more "self describing." The ExtSQL project already has an example working implementation for MySQL 5.0.x (see Listing 2). |
| Listing 2: INFORMATION_SCHEMA |
01 mysql> use INFORMATION_SCHEMA; 02 mysql> SHOW TABLES; 03 ## Note: the additional tables configured by the DBA for ExtSQL are 04 ## prefaced with 'EXTSTATS_' 05 | EXTSTATS_condb | 06 | EXTSTATS_conuser | 07 | EXTSTATS_db | 08 | EXTSTATS_host | 09 | EXTSTATS_server | 10 | EXTSTATS_user | 11 ## End of added tables 12 mysql> SELECT user, minutes, Com_select, Questions FROM EXTSTATS_user 13 WHERE TIMEDIFF(now(), minutes) < '10:00'; 14 +---------+--------------------+------------+-----------+ 15 | user | minutes | Com_select | Questions | 16 +---------+--------------------+------------+-----------+ 17 | thebook | 2008-07-19 09:28:00 | 2 | 4 | 18 | thebook | 2008-07-19 09:27:00 | 3 | 3 | 19 | matt | 2008-07-19 09:53:00 | 4 | 4 | 20 | matt | 2008-07-19 09:52:00 | 0 | 1 | 21 ## This makes the full syntax of the SQL parser available, BUT.... it 22 ## exposes that data is recorded in a circular buffer by time interval 23 ## (minutes in our example), with the time '0000-00-00' containing 24 ## totals since server start. 25 mysql> SELECT user, minutes, Com_select, Questions FROM EXTSTATS_user 26 WHERE user='thebook' LIMIT 5; 27 +---------+--------------------+------------+-----------+ 28 | user | minutes | Com_select | Questions | 29 +---------+--------------------+------------+-----------+ 30 | thebook | 2008-07-19 09:27:00 | 3 | 3 | 31 | thebook | 2008-07-19 09:25:00 | 2 | 73 | 32 | thebook | 2008-07-18 16:44:00 | 0 | 14 | |
Performance was a primary design constraint on ExtSQL. With more and more memory available on servers, it made sense to store data in RAM while giving the database administrator complete control over how much memory would be allocated. This resulted in an average performance effect of about 5% - an acceptable number on most servers.
For a better understanding of performance statistics, consider how ExtSQL records and reports time. With the class definition user, max-50, time-10, units-h, ExtSQL will create a buffer that holds 11 time periods. The 0 buffer always holds cumulative numbers since server start and is the number displayed in the command SHOW STATISTICS * FROM user.
Historical activity is captured for 10-hour periods in a circular manner and only when activity occurs (e.g., start the server and 20 hours later enter):
SHOW STATISTICS * FROM user HISTORY
Assume user activity was recorded in each of the first 10 hours of server operation, and then only in the last five hours (i.e., a five-hour gap with no activity). Activity that occurred between server operation hours 5 and 10 is reported by the hour, then the last five hours. Each row is timestamped to the hour. With the command SHOW STATISTICS * FROM user, you would see just one line of cumulative totals for all 20 hours.
Because you might not want to share ExtSQL information with every user, the configuration file lets you specify the users who will have access:
extsql_users="john,domenic,phil,mary"
The root user is always allowed access.
Additional commands (Table 2) allow the database administrator to temporarily suspend data collection, store data, and even change what data is being collected - without a server restart.

A configuration option called extsql_reload_file allows you to store collected data, which is automatically saved and restored during a restart.
Development with ExtSQL should be strong, and we plan to provide a focal point for community discussion, bug reports, fixes, and enhancements.
| INFO |
|
[1] ExtSQL: http://www.ExtSQL.com/
|
| THE AUTHOR |
|
John Murtari has a B.S. in Astronautical Engineering from the Air Force Academy and an M.S. in Computer Science from Syracuse University. He represents Software Workshop Inc. as a member of the INCITS H2 Technical Committee for SQL standards (http://www.incits.org/). Contact John at jmurtari@softwareworkshop.com. |