By Dmitri Popov
Pretty much any device with a GPS receiver can save GPS data as GPX files. But what are these files good for? Quite a lot, provided you have a nifty tool like Prune [1]. This application looks deceptively simple, but it packs some rather useful features that can help you get the most out of your GPX files.
Prune itself doesn't require any installation. Because the application is written in Java, the only mandatory requirement is the Sun Java Runtime Environment. Prune is distributed as a ready-to-use .jar archive, and you can run it by either double-clicking it or using the java -jar prune.jar command in the terminal. Before you do that, though, you might want to install a few additional packages to extend Prune's default functionality. For example, to enable real-time 3D display of GPS data, you should install the Java 3D libraries [2]. To install the libraries, download the .bin installer and follow the instructions in the README.TXT file.
Another useful addition is the ExifTool utility for handling Exif data in JPEG image files. Prune uses this tool to write geotags to the correlated photos. The ExifTool utility is available in the repositories of many popular Linux distributions, so you can install it with the use of your distro's package manager.
On Ubuntu, you have to install the libimage-exiftool-perl package. If you are using a standalone GPS receiver, you can use Prune to read data directly from the receiver. To enable this feature, you need to install the GPSBabel tool, which is also available in the software repositories of most mainstream Linux distros. Finally, if you want to be able to generate various charts, you should install the gnuplot utility.
Although Prune runs perfectly with default settings, you can override them by creating a .pruneconfig configuration file in your home directory then specifying your own set of custom parameters. For example, with the prune.directory parameter, you can specify the working directory:
prune.directory=/home/user/gps/
Prune supports several languages besides English, and with the prune.languagecode parameter, you can set the default interface language as in the following line:
prune.languagecode=DE
If you prefer to use imperial units instead of metric, you can set the prune.metricunits parameter to n:
prune.metricunits=n
By default, Prune uses the Mapnik OpenStreetMap server, but you can specify another server via the prune.mapserverindex parameter:
prune.mapserverindex=2
In this case, 2 refers to the Opencyclemap server, which displays maps with bicycle paths.
Once it is started, Prune displays an empty canvas, so the first thing you have to do is open a GPX file (see the box titled "What Is GPX?") by choosing File | Open file and selecting the desired GPX file. To enable the background map, click on the Show map icon. This displays the map either from Mapnik or from the server specified in the .pruneconfig file. Also, you can switch to a different map server at any time with View | Set map background.
| What Is GPX? |
|
GPX stands for GPS eXchange Format. Based on XML, this format is designed for storing and describing GPS data so it can be accessed by any application that supports the GPX format. A GPX file contains, among other things, information about waypoints (sets of coordinates that identify a point in a physical space), tracks (ordered collections of points), and elevation (height above sea level). If you open a GPX file in a text editor, you'll see that the file's structure consists of a number of nodes, wherein each node represents a waypoint. Each node contains a waypoint latitude and longitude, a timestamp, and an elevation. This information can be presented in a meaningful way by any application that provides support for the GPX format, including Prune. Many GPS devices currently on the market allow you to export GPS data in the GPX format, but it's still a good idea to double-check to see whether the device you are about to buy supports GPX. Otherwise, your options to get GPS data out of the device will be rather limited. |
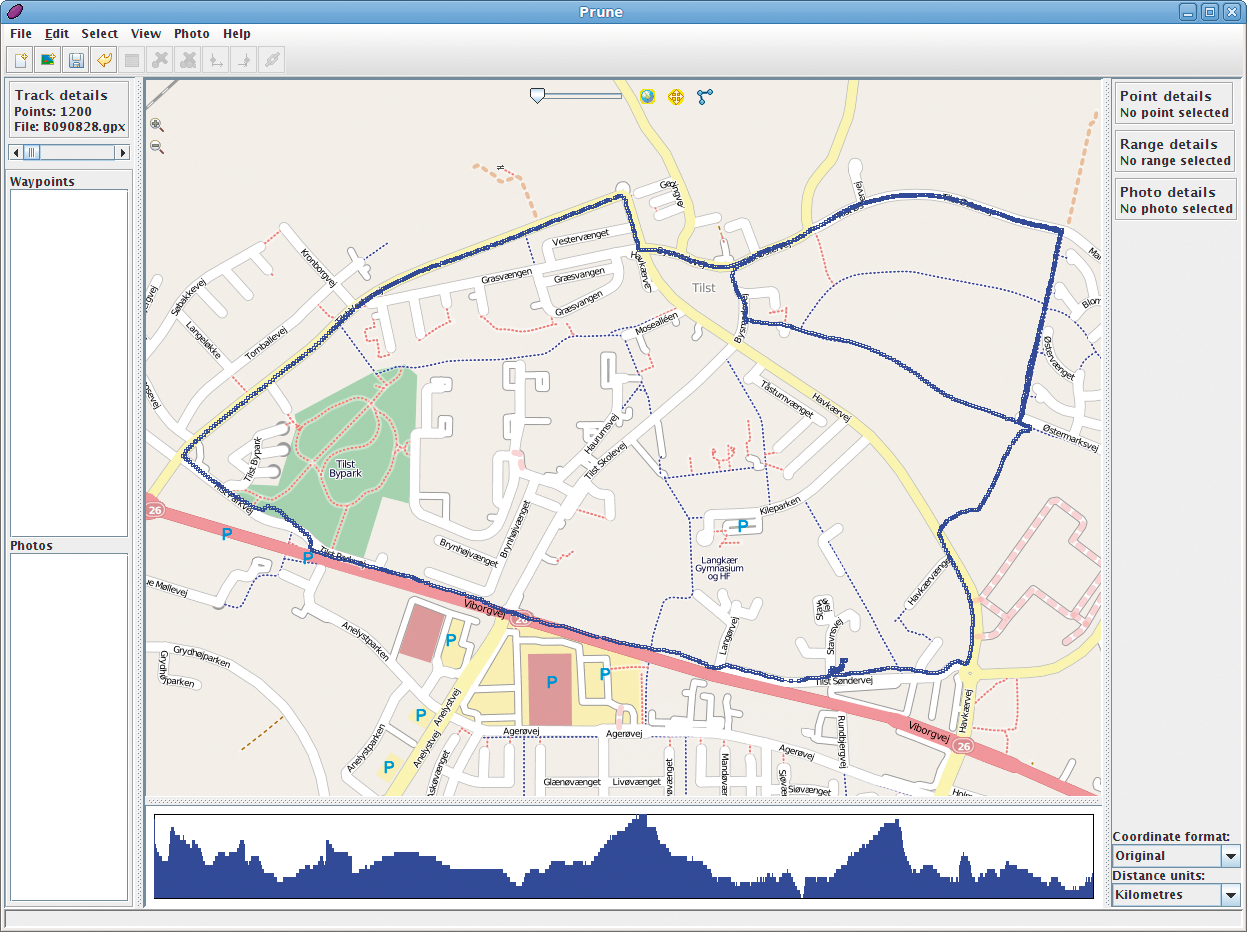
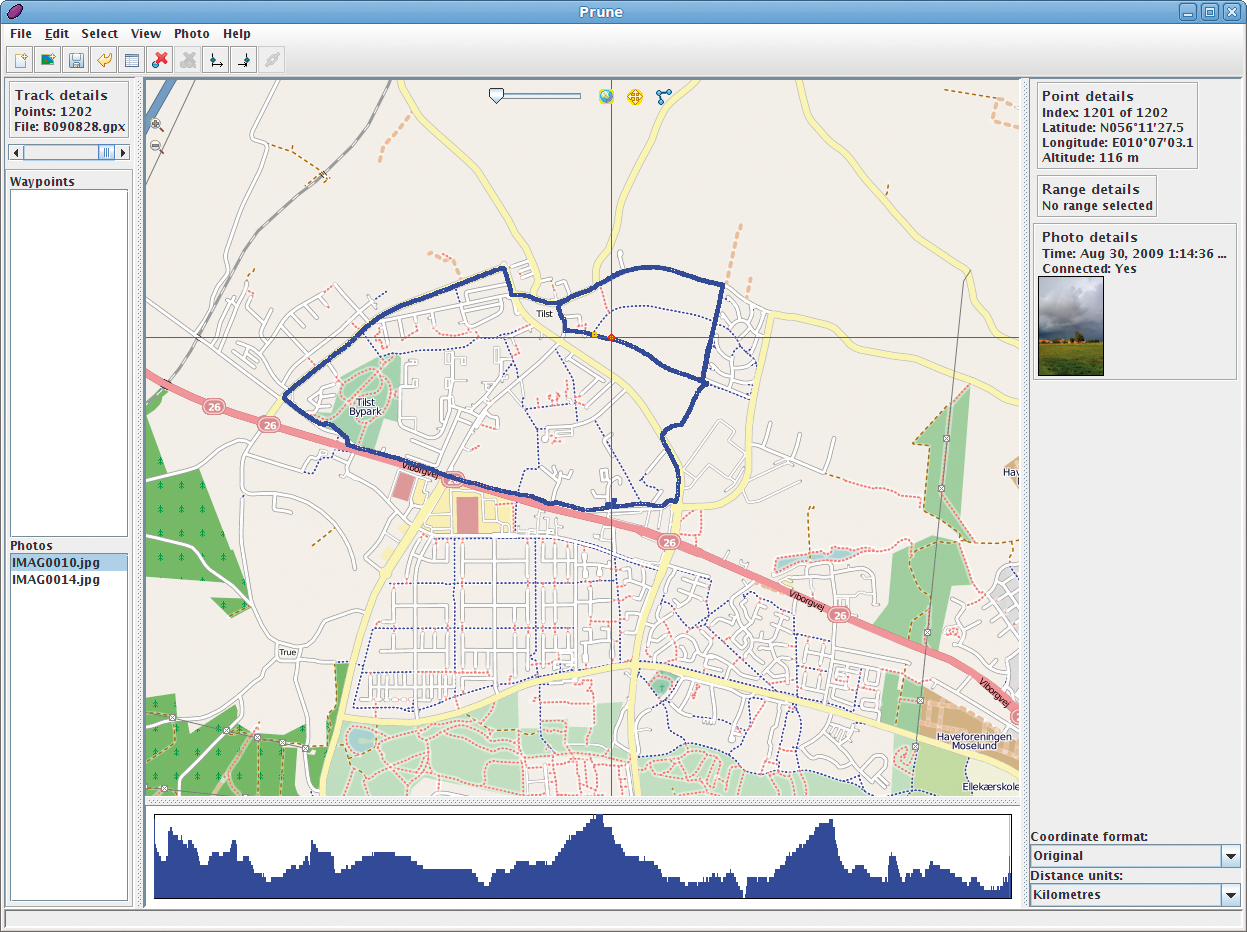
The GPS track displayed on the map consists of track points, and the Track details section in the left pane displays the total number of points in the current track (Figure 1). Below the Track details section is a slider that lets you move from point to point.
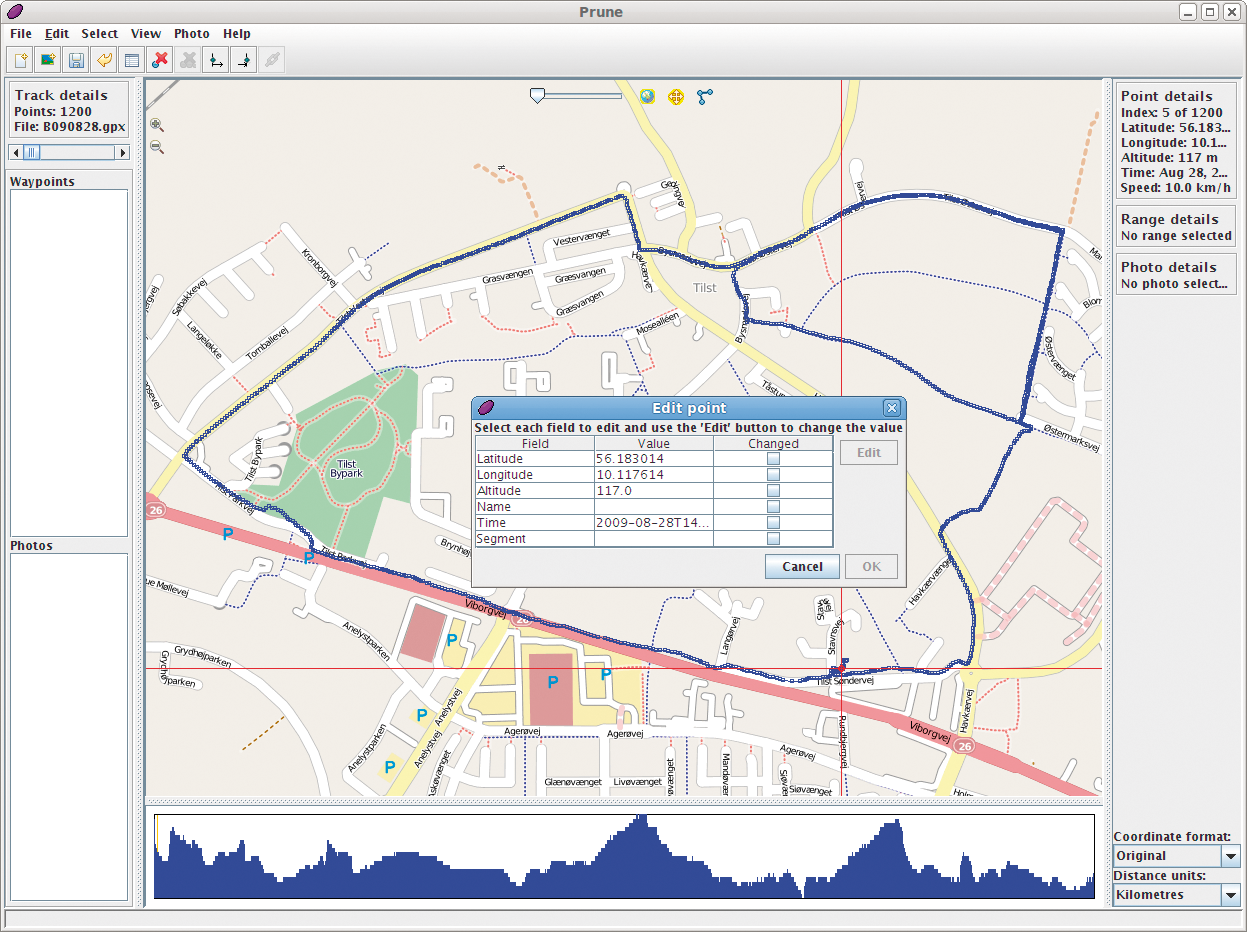
By clicking on a specific point, you can view detailed information about it. (To zoom in and locate individual points, use the Zoom buttons on the map or the mouse scroll wheel.) From here, you can view information for the selected point in the Point details section in the pane on the right. This information includes latitude, longitude, altitude, time, and speed. Prune also allows you to edit the point's data, which comes in handy when you need to make corrections to the track. To edit the point, choose Edit | Edit point, select the property you want to edit, and press the Edit button (Figure 2).
The Edit waypoint name command lets you assign a name to the selected point. This automatically adds the point to the Waypoints list in the left pane, which acts as a bookmark list.
At any time you can locate the "bookmarked" point on the map by selecting it in the Waypoints list. The Edit menu contains a few commands that allow you to tweak the track. The Compress track command, for example, allows you to streamline the track by removing redundant points, and the Delete point command lets you delete individual points on the track.
The Select menu has commands that allow you to specify ranges. For example, if you want to know the total distance of the GPS track, choose the Select all command to select the entire track. Then you can see the range information in the Range details section in the right pane.
Also, you can specify a range for a specific track segment, which can be useful if you need to get information about a specific part of the route (Figure 3). For example, you can use this feature to compare your average speed on a flat stretch of the route to your average speed when you move uphill. Speaking of uphill, the pane directly below the map contains an altitude profile of the current route, and clicking anywhere on the profile automatically selects the related point on the map.

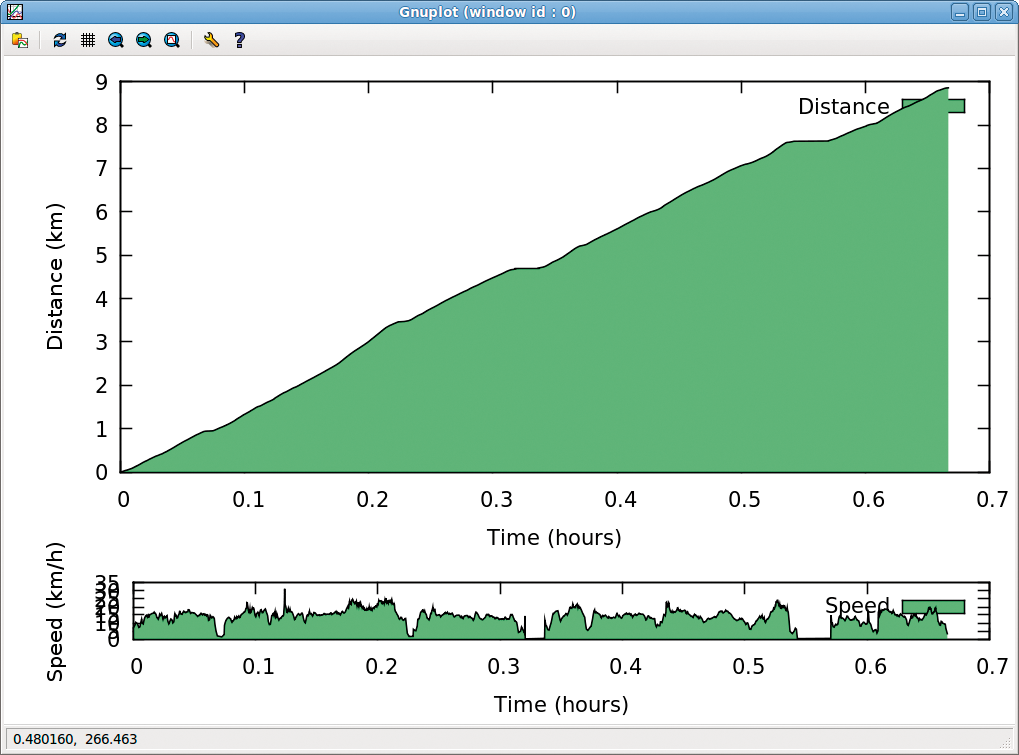
If you have the gnuplot tool installed on your system, you can use Prune to turn the dry GPS data into colorful charts. To do this, choose View | Chart and use the Charts dialog window to specify chart settings. Select, for example, the Time option for the X-axis and Speed for the Y-axis to generate a chart that displays your speed profile (Figure 4). Either output the generated chart directly to the screen or save it as an SVG file that you can tweak in a vector drawing application such as Inkscape.
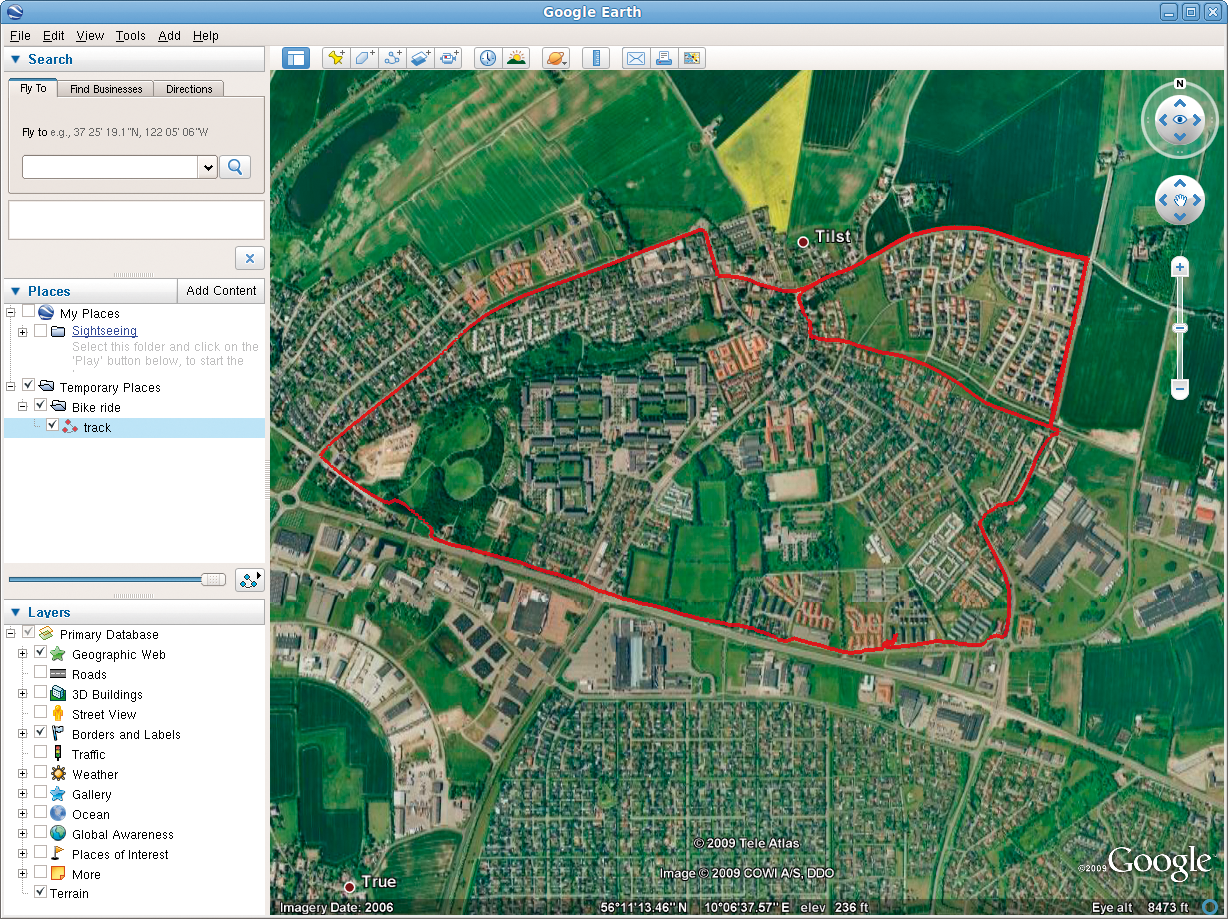
Prune can export the currently opened GPX file in several formats. The File | Export GPX command lets you save a tweaked GPX file under a different name, whereas the Export KML command can be used to save the GPX file in the Google Earth-compatible format, which allows you to display GPS data in the Google Earth application. To do this, export the currently opened GPX file, choose File | Open in Google Earth and select the exported KML file (Figure 5).
Thanks to its ability to correlate photos, Prune can also be an indispensable tool for shutterbugs. But what is photo correlation and how does this feature work in Prune? If you have a digital camera, you can take photos while recording your geographical coordinates with a GPS device. Then you can open the GPX file in Prune, map your photos onto the track, and write the coordinates to the photos (i.e., geotag them). This way, you can geotag photos even if your camera doesn't have geotagging capabilities.
Correlating photos with Prune is a straightforward process. Just choose Photo | Add photos and select the photos you want to correlate. Prune can automatically correlate photos by matching the timestamp of a photo with the timestamp of a track point. To perform the automatic correlation, choose Photo | Correlate photos.
For successful correlation, the clocks in your camera and GPS device must be synchronized; otherwise, Prune will prompt you to specify a time offset. Although you can even map old photos onto a newly recorded GPX track, you will need to correlate all such photos manually.
To do this, go to the Photos list in the left panel, select a photo, press and hold the Ctrl key, and select the point you want on the map (Figure 6). Then, choose the Photos | Connect to point command. To write geotags to the photo, use the Photos | Save to Exif command (this requires that the ExifTool utility be installed on your system).
This feature is nifty, indeed, but Prune has yet another trick up its sleeve. When you export the GPX track containing correlated photos in the KMZ format, Prune generates thumbnails and bundles them with the .kmz file. In this way, you can view the correlated photos in Google Earth.
Prune is the perfect companion to any GPS device because it's simple to use and offers all the essential features needed to view and edit GPX files. Additionally, its correlation capabilities make it a great tool for photographers. Add to this the ability to export GPX tracks as KML files, and you have a very useful application for all your GPS needs.
| INFO |
|
[1] Prune: http://activityworkshop.net/software/prune/index.html
[2] Java 3D libraries: https://java3d.dev.java.net/ |