
By Matthew Sacks
Rocks is a Linux distribution and cluster management system that allows for rapid deployment of Linux clusters on physical hardware or virtual Xen containers. A Rocks cluster [1] is easy to deploy, and it offers all the benefits of virtualization for the cluster member nodes. With a minimum of two physical machines, Rocks allows for simple and rapid cluster deployment and management, freeing the cluster administrator to focus on supporting grid computing and the distributed applications that make clustering an attractive option.
Included in the standard Rocks distribution are various open source high-performance distributed and parallel computing tools, such as Sun's Grid Engine [2], OpenMPI [3], and Condor. This powerful collection of advanced features is one reason why NASA, the NSA, IBM Austin Research Lab, the U.S. Navy, MIT, Harvard, and Johns Hopkins University are all using Rocks for some of their most intensive applications.
The arguments for deploying virtual clusters are the same arguments that justify any virtualization solution: flexibility, ease of management, and efficient hardware resource utilization. For example, in an environment in which 64-bit and 32-bit operating systems must run simultaneously, virtualization is a much more efficient solution than attempting to support two separate hardware platforms in a single cluster.
Before installing the cluster, make sure all of the necessary components are readily available. Rocks clusters can be configured in a multitude of different ways, with various network configurations. Rocks can be installed within virtual containers (VM containers) or directly on physical hardware. The example provided in this article assumes that you have at least two physical machines for deploying a front-end node and at least one VM container. The front-end node requires at least 1GB of RAM, and the VM container should have at least 4GB of RAM (Rocks requires a minimum of 1GB).
It is essential to ensure that the hardware is supported by the Rocks OS distribution. The Rocks OS is based on CentOS, so make sure your hardware complies with the CentOS/Red Hat Hardware Compatibility list. The general rule of thumb is to use widely supported, commodity hardware, especially when selecting network adapters and graphics adapters.
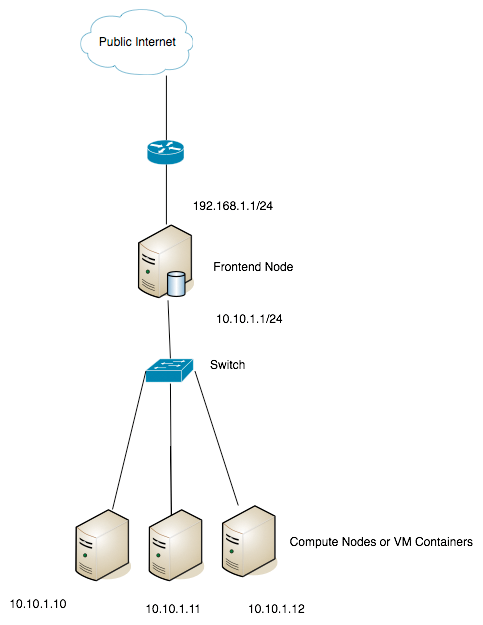
The basic Rocks network configuration assumes the presences of a public network and a private network for the VM container and its compute nodes. The front-end node should have two network interface cards, and the compute nodes require at least one card to connect to the private compute node network. Also, you will need a switch that connects the various VM containers to the front-end node. See Figure 1 for a sample Rocks network configuration.
Insert the Rocks DVD (or boot CD) and boot the system off of the CD/DVD drive. If you are using CDs, insert the Rocks Kernel/Boot CD first. Rocks will prompt for the various rolls. In the Rocks lexicon, a roll is a collection of software intended for a specific task. A base configuration requires the Kernel/Boot roll, Base roll, Web Server roll, and OS roll 1 and roll 2, as well as the Xen roll for cluster virtualization support.
The base configuration is not a very exciting configuration, so research the various rolls that are available [4] and include the various distributed and grid computing rolls as desired to really have fun with Rocks. Sun Grid Engine (SGE), Torque, and the high-performance computing (HPC) roll are good starting points for really making the most out of a Rocks cluster.
A splash screen will prompt for a boot mode. To boot into the front-end installation, type frontend and hit Enter. If this is not done within a few seconds, the Rocks installer will boot into a compute node installation. If this happens, reboot the system and type frontend in the prompt before it automatically boots again.
Once the Rocks install CD boots, it will attempt to contact a DHCP server, but if it cannot find a DHCP server on both network interfaces, it will prompt for a network configuration. Most likely, eth0 will get a lease, but eth1 (private cluster network) will not have a DHCP server on it. In this case, either have a DHCP server on the private network as well or select manual configuration and enter the IPv4 address, gateway, and name server manually. Once network connectivity is established, you should select OK to continue with the front-end installation.
A screen that says "Welcome to Rocks" will appear that lets you launch the installation off the DVDs, the CDs, or the network. The simplest approach is to download the DVD in advance and install from the DVD because it contains most of the rolls or software packages that are offered on the Rocks site.
With the Rocks installation DVD is in the drive, click CD/DVD Based Roll, then select the rolls you want to install. A base Rocks system consists of the kernel, OS, web server, and base rolls. To configure a virtual cluster, the Xen roll is also required (Figure 2).
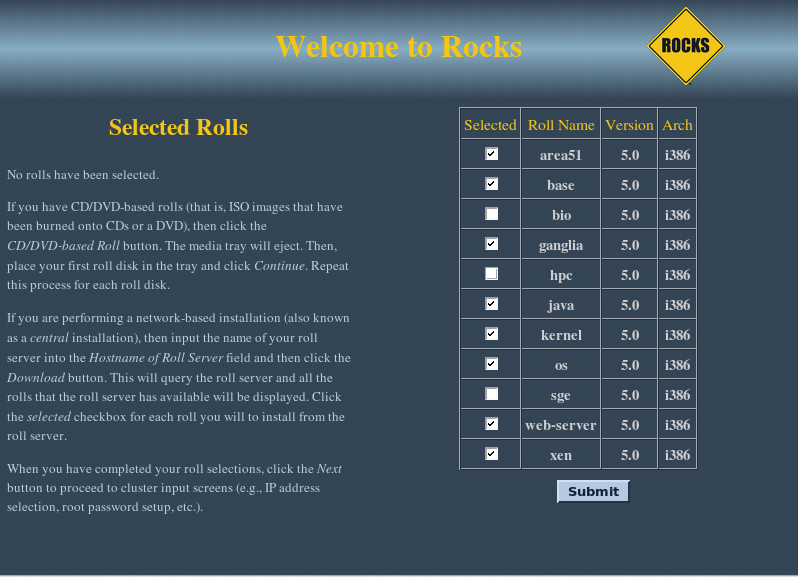
Now select the recommended rolls and click "Submit." The selected rolls will now appear on the left of the installation screen. Clicking Next begins the installation.
Entering the cluster information will provide identification for the cluster if it is registered with rocksclusters.org. Various prompts ask for configuration information, such as the network settings for eth0 and eth1, the root password, the time zone, and the partition scheme.
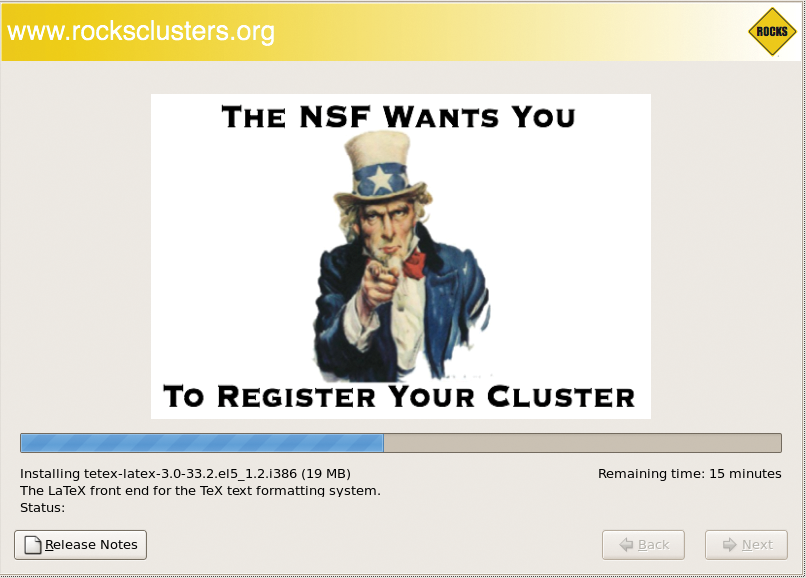
The installer will boot, and you will see a message box that says the pre-installation scripts are running. Then the installer will format the filesystem, and a graphical installer very similar to the Red Hat Enterprise Linux graphical installation will appear with images of the pyramids and Uncle Sam encouraging clustering fans to register their cluster on behalf of the National Science Foundation (Figure 3).
Note: If you selected a network installation, the rolls will be downloaded from the Internet before the installation proceeds. At a certain point during the installation process, the installation media should eject automatically, and you should remove it; otherwise, carefully monitor the installation process, because sometimes if the installation media is not removed, the computer will cycle into another installation.
Once the installation is complete, the system will reboot automatically, and a blue CentOS 5 login screen will appear. Now that you have deployed the front-end controller, you can begin the installation of the various VM containers and compute nodes.
The compute nodes do all of the work and serve as the individual systems within the "supercomputer" you are building, and you can set up compute nodes on any number of single physical machines. A compute cluster could be 500 servers in a large data center, or it could be two machines sitting under the desk. To harness the benefits of virtualization in a cluster, a virtual machine container will be used to deploy compute nodes. Deploying compute nodes on a Xen VM container will allow for rapid deployment and management of cluster compute nodes.
To start deploying cluster compute nodes, log into the front-end node and open a terminal. The first time a terminal window is opened, a prompt will ask you to create an SSH key file. To accept the defaults, hit enter, unless you prefer to enter a passphrase for the SSH key.
Now type insert-ethers in the terminal command line and select VM Container under Choose Application Type. A message box that says Inserted Appliances will appear, and the MAC address of the VM container (which is the physical machine itself) should show up once it is booted up.
Make sure the VM container supports network booting (PXE) and is set to network boot before any other booting method. If the system does not support PXE booting, you'll need to boot the VM container manually with the Kernel roll CD or the Rocks DVD in the VM container by simply inserting the DVD/CD and letting it boot off the installation media.
Keep in mind that if no DHCP server is on the compute node network, when compute nodes boot, they will time out when trying to query for an IP address assignment from DHCP. If a large cluster is provisioned with multiple network segments, you will need a DHCP server because it will simply take too long to wait for the boot timeouts.
Note: If you have a managed switch, Power Unit, or NAS appliance on the private compute cluster network, remember to configure these devices before installing VM containers or compute nodes. Verify the MAC addresses in the insert-ethers console as devices are booted for installation.
The VM container will show up in the Inserted Appliances section with the MAC address of the container. An asterisk (*) will appear within the parentheses once the front-end node requests a Kickstart configuration, which will include the default rolls included during the initial front-end installation.
Now relax and let Rocks do all the work. The beautiful thing about Rocks is that it makes provisioning a cluster very simple - provided the front-end node is performing automated Kickstart-based installations. The Kickstart installation will deploy the installation packages to the VM container. Now is another good time for a coffee break. When you return, you should find a brand new VM container ready for you to deploy Xen-based compute nodes. The default name for the first VM container is vm-container-0-0.
Now that the VM container is installed, you need to create Xen compute nodes in the VM container to perform the work for the cluster. Any number of VM containers can be created and mixed with non-virtual compute nodes. To boot a virtual compute node into a usable, active state, only a few commands need to be executed from the front end to boot a compute node.
To create a compute node virtual machine, execute the following command on the front end:
#rocks add host vm vm-container-0-0 membership="Compute"
To set various virtual machine configuration parameters, such as memory size, disk size, and network information, you can pass optional arguments to the add command. The default memory size for virtual machines created with this command is 1,024 megabytes.
Once the command is executed, the configuration for a new virtual compute node will be added to the Rocks database, and the following output will appear:
Added VM on node "vm-container-0-0" slice "1" with vm_name "compute-0-0-1"
When you try to create the Xen virtual machine with the preceding command, an error message might appear stating that there is not enough memory on the machine. In such cases, make sure you have enough physical memory on the VM container as well as for the guest virtual machines. As a last resort, the amount of memory allocated per VM can be scaled back by configuring the Xen domain memory configuration dom0-min-mem parameter in the /etc/xen/xend-config.sxp configuration file.
Now that the VM container has been assigned to the physical VM container, the installation of the Xen VM on the target container is executed by typing rocks create host vm compute-0-0-1. This command will read the configuration from the Rocks database and start provisioning the Xen virtual machine on the target container automatically. By typing rocks-console compute-0-0-1, you can view the progress of the installation.
Once you have created the virtual machine, you can boot it by running this command from the front-end node:
rocks start host VM compute-0-0-1.
If the virtual machine starts successfully, the terminal will output the following:
Using config file '/etc/xen/rocks/compute-0-0-1"
Started domain compute-0-0-1
Now repeat the process of associating the virtual machine with a physical machine, creating and starting the VM as often as desired or up to the amount of free physical memory on the VM container. The cluster is ready now to do the bidding of the mad scientist who brought it to life.
| Quick Command Reference |
|
Stop a cluster compute node: # rocks stop host vm compute-x-x-x Start a cluster compute node: # rocks start host vm compute-x-x-x Query information about all nodes: # rocks list host Query information about virtual compute nodes: #rocks list host vm |
After a virtual compute node is created, you can query the VM state from the front-end node to make sure the virtual machine boots successfully. To query the state of the compute nodes, execute the command rocks list host compute-0-0-1; output similar to Listing 1 will provide information about the currently installed virtual machines and their states on all VM containers. (The status output is blank because processes have not been scheduled to run on the newly created VM.) Also, you can check the state of the VMs on the VM container itself with Xen xm commands (Listing 2).
| Listing 1: Checking Vitual Machine Status |
01 [root@cluster ~]# rocks list host vm 02 03 VM-HOST SLICE MEM CPUS MAC HOST STATUS 04 compute-0-0-1: 1 512 1 00:16:3e:00:00:02 vm-container-0-0 active 05 compute-0-0-2: 2 512 1 00:16:3e:00:00:03 vm-container-0-0 active 06 compute-0-0-3: 3 512 1 00:16:3e:00:00:04 vm-container-0-0 active |
| Listing 2: The xm Command |
01 [root@vm-container-0-0 ~] xm list 02 Name ID Mem(MiB) VCPUs State Time(s) 03 Domain-0 0 1024 1 r------ 4035.5 04 Compute-0-0-1 2 512 1 -b----- 23174.3 05 Compute-0-0-2 3 512 1 r------ 3228.3 06 Compute-0-0-3 4 512 1 -b----- 2114.3 |
The rocks command is the primary administration command for the entire Rocks management system. The basic command-line structure is rocks <command> <arguments>. A full list of Rocks commands is available at the rocksclusters.org website or by typing rocks list help at the command line. The rocks command allows you to start and stop compute nodes, change configurations, and query configuration entries.
Rocks includes distributed administration utilities for executing commands against an entire cluster or group of cluster nodes. The default command for distributed command execution is tentakel, which is described as a program for executing the same command on many hosts in parallel. Tentakel is simple to use, and Rocks automatically adds all cluster nodes to /etc/tentakel.conf in various groupings. To execute a command against all nodes in /etc/tentakel.conf, type tentakel <command>. To execute a command against a group of nodes, execute tentakel -g <group_name> <command>.
To utilize all of the cluster nodes in a single application, it must be designed for the cluster. OpenMPI is a software library that is commonly used to design distributed applications for running on clusters. Sun Grid Engine and Torque are queuing systems for distributing jobs among the elements of the cluster. Although the problem of designing and implementing applications to use all cluster resources is an extensive topic, you will find resources online about the use of Sun Grid Engine, Torque, and Condor for these purposes.
Rocks' ease of use and support of the most common distributed applications makes it a favorite among scientific supercomputing facilities working on unlocking the mysteries of the universe.
| INFO |
|
[1] Rocks Clusters: http://www.rocksclusters.org
[2] Sun Grid Engine: http://gridengine.sunsource.net/ [3] OpenMPI: http://www.open-mpi.org/ [4] Sun Grid Engine Roll Users Guide: http://www.rocksclusters.org/roll-documentation/sge/4.3/roll-sge-usersguide.pdf [5] Rocks Documentation Page: http://www.rocksclusters.org/wordpress/?page_id=4 |
| THE AUTHOR |
|
Matthew Sacks is a Systems Administrator and writer from Los Angeles, CA. Check out his blog at http://matthewsacks.com/techblog/. Special thanks go to the Rocks teams at NSF and to the UCSD Supercomputing Center. |