
By Andreas Bohle and Jörg Luther
Many recent distributions hide the Linux system's start messages behind a colorful image with a progress indicator. The bootsplash [1] has long become the trademark of each distribution - and is a well-known phenomenon in the world of Windows. A customized system needs a fair amount of manual attention.
Thus far, modifying the bootsplash meant manually modifying the kernel [2]. For one thing, you needed to enable support for the framebuffer device with support for at least 16-bit color. For another, it also meant installing a patch from the bootsplash homepage, although the makers of the original bootsplash system refer to more state-of-the-art approaches on their front page.
Several alternative approaches are available to Linux users now: Splashy [3], USplash [4], and Red Hat Graphical Boot. Splashy and USplash run in userspace, which means on a user account. This offers a number of advantages. For one thing, it does not affect system stability if the program code turns out to be buggy. For another, it makes configuration and customization easier.
OpenSUSE still relies on the legacy, kernel-based bootsplash method. After installing the system, YaST2 takes you to two packages with data for the bootsplash: bootsplash contains the framework and bootsplash-branding-openSUSE has the files with the current openSUSE theme (Figure 1).

On your local filesystem you need the files from the second package in /etc/bootsplash/themes. Check the directory for the folder openSUSE, which contains all the critical files for an animated bootsplash along with the background for the kernel and startup messages. Pressing F2 at boot toggles between the normal startup screen and detailed messages.
The hierarchy in the openSUSE folder does not completely reflect the instructions on the bootsplash homepage. According to the HOWTO, if you want to define a new theme, you need images/, config/, and animations/ directories for the graphics data and configuration. The additional bootloader folder stores the files with the text that openSUSE displays in the boot menu.
Whether or not you get to see a bootsplash, and which one if so, is configured in the /etc/sysconfig/bootsplash file with two variables: SPLASH and THEME. The first of these can be set to yes or no to enable or disable the boot screen. The second variable references the folder (below /etc/bootsplash/themes) with the bootsplash data.
The variety of screen resolutions makes working with a generic theme for distribution on the Internet difficult. To avoid seeing black borders or just a section of the original image, you will need a separate background image for each screen size. The easiest way of handling this is to create a copy of the openSUSE directory.
To modify the background image, use an image manipulation tool like GIMP (see the GIMP article on page FIXME ff.) or a vector drawing program such as Inkscape [5]. In this way, you can create the required files by scaling the original image to the right size or by cropping the image. The Convert tool from the Imagemagick package does this for you automatically; you just need to modify the original graphic.
To add animation to your boot screen, create a series of PNG-formatted images, which you should number in the correct sequence. Make sure you pad the start of the file name with zeros to help the filesystem sort files in the right order. Then use convert to add individual files to the animation:
convert -delay 20 anim*.png anim.mng
The next step is to put the pieces together. All the central settings are located in the config/ directory, and you can edit the files for the individual screen sizes, all of which start with the word bootsplash- and have a .cfg suffix. Various configuration commands are available, depending on the bootsplash package version you are using.
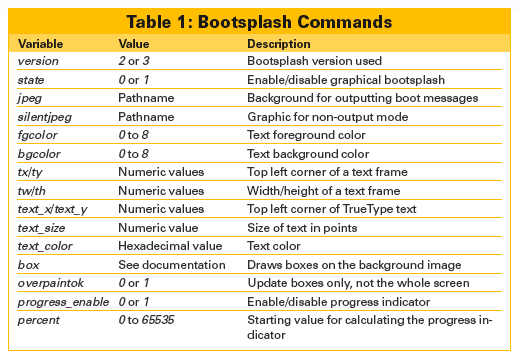
The current openSUSE uses commands from version 3. The "Bootsplash Commands" table gives you an overview, and more details are available on the web [6] or in the/usr/share/doc/bootsplash/README.config file on any openSUSE machine with the bootsplash package installed.
Finally, you need to create a new initial ramdisk. The following command takes care of this for you:
mkinitrd -s Screen width x Screen height
This completes the package deal, and after you shut down your machine and restart, you should see the new graphics and texts you created.
The Grub boot manager supports the use of individual splash screens; however, the process for modifying and integrating them is fairly convoluted [7]. The steps for creating splash screens for the USplash system introduced by Ubuntu, which displays the Ubuntu logotype and a progress indicator when you boot the distribution, turns out to be even more complex. To do this, you need to integrate the required image with a shared library (.so) and dump it at the right place on the system.
Fortunately, an easier approach lets users of Debian, Ubuntu, and their derivates define splash screens for Grub and USplash via a graphical interface. The tool for this is the StartUp Manager [8], which can modify a number of other startup settings into the bargain. On Ubuntu and its derivatives, you need to install the StartUp Manager by loading the startupmanager package from the Universe repository. After loading the package, the StartUp Manager will be available in System | System Management in your Gnome menu.
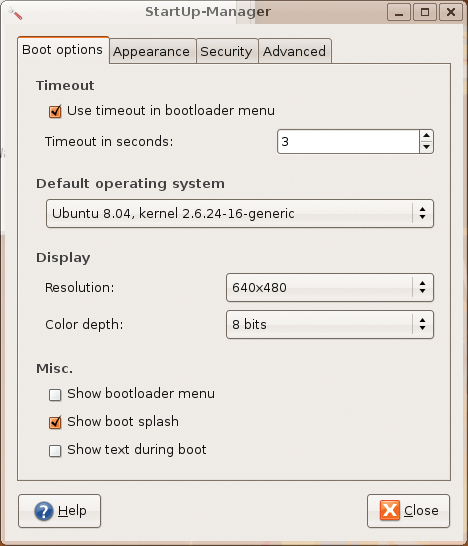
The tool has four tabs with various options for the boot environment. The options you need for configuring the Grub and USplash settings are located in the first two tabs: Boot Options and Appearance.
In the Display tab in Boot Options (Figure 2), you can set the resolution and color depth for displaying the USplash image. Others lets you specify whether the boot menu and bootsplash should be visible and whether system messages should appear in the bootsplash. The Appearance tab has Boot menu themes and Usplash themes sections in which you can specify the images to use. To do so, you need to populate the lists with candidates from your filesystem by pressing Manage....
Boot menu themes can be practically any graphic in a format that Linux supports (e.g., GIF, JPG, PNG). The StartUp Manager will then attempt to use Imagemagick to convert the file to a format that Grub can handle.
Some fairly strict rules apply to the formats, and the results are not always what you expect. In most cases, some TLC makes sense (see the "Bootsplashes for Grub" box).
Images for the USplash theme must be packed in a shared library, as mentioned earlier. For a selection, check out Ubuntu-art.org [9] or Gnome-look.org [10] (Figure 3) - type "usplash" as your search key. Typically, you can then download tarballs with packed USplash themes and unpack the library (file suffix .so) in any directory. Then browse and select by pressing Manage Usplash Themes.

| Bootsplashes for Grub |
|
The maximum resolution for a Grub bootsplash is 640x480 pixels, with a maximum of 14 colors. Despite these restrictions, it is still possible to define attractive boot screens if you choose the right background image. Vector graphics and cartoons in particular are an excellent choice for use with Grub. Images with fewer colors can best be converted to a Grub-compatible format with the command: $ convert -resize 640x480 -colors 14 image.png image.xpm For images with a higher color depth, the use of GIMP is a better choice. After modifying the image size, select Image | Mode | Indexed... and reduce the number of colors. Gimp has a selection of algorithms for this task, and choosing the right one can vastly improve the results. Now pack your future Grub bootsplash by typing gzip image.xpm. Although this is not strictly necessary, it will normally reduce the time required to load the graphic. Finally, copy the resulting file image.xpm.gz to the directory that your StartUp Manager accesses. |
After setting up everything to your satisfaction, you can save the settings and click Close. Depending on how much material the StartUp Manager has to convert and configure, saving the settings can take 20 to 30 seconds.
Don't interrupt the tool whatever you do. Doing so will leave Grub's configuration file, /boot/grub/menu.lst, in an inconsistent state, which could cause the system to do something strange the next time you boot.
The next time you launch Linux you will (hopefully) see a neat, new splash screen. The text in the Grub selection menu might be difficult to read depending on your choice of background image, but don't worry. After booting, you can launch the StartUp Manager again and modify the background, selection bar and text colors in the Appearance tab. Also, don't forget to check Apply colors to boot menu.
Very little can go wrong with the USplash image. In the worst case - for example, if you choose the wrong resolution or color depth - the screen might go blank for a couple of seconds until the Display Manager comes up with the login screen. If this happens, modify the Display settings in the StartUp Manager's Boot Options tab. Although higher resolutions and color depths will typically give you more attractive results, you do need to keep to the physical limits of your graphics adapter and display.
Just a couple of manual steps lets you customize some important system files to suit your own tastes. In addition, you do not need to be well versed in configuration syntax to achieve some attractive results.
| INFO |
|
[1] Bootsplash: http://en.wikipedia.org/wiki/Bootsplash
[2] Bootsplash with kernel patch: http://www.bootsplash.org [3] Splashy: http://splashy.alioth.debian.org/wiki/ [4] USplash: https://help.ubuntu.com/community/USplash [5] Inkscape: http://www.inkscape.org [6] Bootsplash configuration commands: http://www.bootsplash.org/Config [7] "DeskTOPia: Desktop Customizing" by A. Bohle and J. Luther, Linux Pro Magazine, April 2006, http://www.linuxpromagazine.com/issues/2006/65/getting_personal [8] StartUp Manager: http://web.telia.com/~u88005282/sum/index.html [9] Artwork for Ubuntu: http://www.ubuntu-art.org [10] Artwork for Gnome: http://www.gnome-look.org |