
By Bruce Byfield
The GNU Partition Editor (Parted for short) has a special place in my memory. It appeared in the months when I was first finding my way around GNU/Linux, and, more than any other program, it convinced me that free software was the future. If a community effort could create an alternative to Partition Magic, which I had learned to appreciate while dual-booting Windows and OS/2, then I reasoned that there was no limit to what free software could accomplish.
In practice, I was overly optimistic. To this day, Parted has limitations. However, it has largely replaced older partitioning tools like fdisk and cfdisk, although both are still part of many standard installations.
Many installers depend on Parted, and its graphical interfaces, such as GParted and KDE Partition Manager, have become standard utilities for disk partitioning in most distributions. However, I still prefer Parted unadorned because it does not waste memory with unnecessary graphics.
As the name suggests, Parted is an editor for partitions, the divisions of hard drives or external devices like USB sticks. With Parted, you can create or remove; move, resize, or copy; and format partitions.
In other words, Parted works at a very basic level to organize your computer and external drives. But Parted is a powerful tool, and its potential for destruction is as strong as its potential for usefulness. Luckily, Parted is well documented, so you can get help at each step.
To minimize Parted's potential for destruction, do not even consider using it before you have a basic understanding of partitions under GNU/Linux.
Regardless of which operating system you are using, computer partitions are of three types: primary, extended, and logical. Primary partitions were the original type and are limited to four per device, but as devices grew in size and their uses became more complicated, a way around this limitation became necessary. As a result, extended partitions were created - partitions that could be divided into smaller or logical partitions.
Windows ignores these differences. It names partitions starting with C:,; A: and B: are reserved for floppies, even though hardly anyone uses them any more. By contrast, GNU/Linux refers to partitions by a system that gives more information. All names for partitions begin with /dev/sd - /dev/ is the directory that refers to all the system hardware, and sd tells you it is a storage device. Until recently, hd was used, with sd reserved for SCSI devices, but sd is used in most major distributions today.
The sd is followed by more information. The primary master device is designated a. A second hard drive is b or, if no second hard drive exists, an external device until it is unmounted. If two hard drives are present, the external device would be c. The next external device takes the next available letter.
On each device, primary partitions are numbered 1 to 4. Extended partitions begin with 5, and their logical partitions follow in order.
This system is complicated by innovations like RAID and logical volume managers but remains at the root of all computers running GNU/Linux. Its advantage is that the identifier for each partition gives you precise information about it. Thus, you know, for example, that /dev/sda1 is the first primary partition on the first device on the system and that /dev/sdb6 is the first logical partition on the first extended partition on the second device.
To see how your primary device is partitioned. enter the command cat /etc/fstab or run fdisk -l as root. Studying the information produced by either command will help you understand the naming conventions and, therefore, help you use Parted without difficulty.

Generally, Parted is safe to run, but do take some basic precautions. Back up all your data to a separate drive, just in case your editing is interrupted by a power surge or loss. Also, you should unmount all partitions that you plan to edit to minimize the chances of file or partition corruption - especially if you will be editing the root partition, where some processes will be running.
If you umount device before running Parted, be sure you unmount the correct device. If you want to organize an external USB drive, unmounting the drive is safe enough. Usually, the external drive will be /dev/sdb1, although you should run fdisk -l as root to check. In other cases, by far the safest way to run Parted is from a Live CD or rescue disk, either of which boots without mounting any partitions on the hard drive.
Also, you should be aware that Parted works completely only with ext2, FAT16, FAT32, ReiserFS, and Linux swap partitions. It can edit ext3 partitions but not create them, and it can view but not edit NTFS (the standard Windows filesystem), JFS, UFS, and XFS, as well as the new ext4 format. These limitations are being addressed, but Andrew Clausen and Lennert Buytenhek, Parted's main developers, have always maintained that Parted is a partition editor and formatting is secondary to its purpose.
To start, enter parted at the command line. Parted opens at its own command prompt, which reads (parted). At any time, you can return to the regular Bash prompt by entering quit.
The only guide that the Parted prompt gives you is to enter help to get a list of possible commands. The list is somewhat useful, but if you type help followed by one of the listed commands, you can get detailed information about the parameters available for that command. These parameters might be obvious or guessable from other commands, but a reference is always useful. Alternatively, you can use Parted's help page [1], although be warned that it is not written for absolute beginners.
Before doing any editing, you might want to customize Parted by changing the units used to measure hard drive size with the command unit measurement. In recent editions, the default measurement is gigabytes (GB), but you might prefer megabytes (MB) or even terabytes (TB). Also, you can choose a percentage of the total available space (%), or, if you are an expert, disk cylinders (cyl), sectors (s), or mebibytes (MiB), among other choices.
Another customization option is to give existing partitions a label with name label to tell them apart easily.
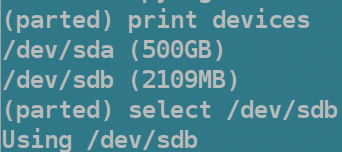
The first step in editing is to make sure you are working with the right device. The available devices and their sizes list with the command print devices. Then, you can set Parted to use the device of your choice with the command select device. A brief response confirms which device Parted will edit.
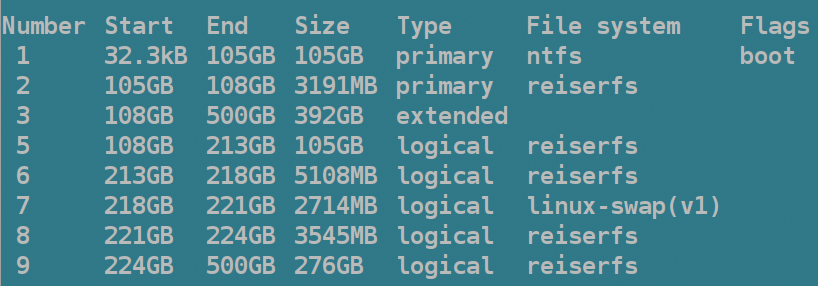
Next, you need to see the free space available on the drive - that is, which part of the drive is not partitioned - and which partitions are already on the drive. The print free command shows free space, and print alone lists the existing partitions with abundant information: start and end points on the device, size, type of partition, filesystem, and any flags.
Somewhat annoyingly, partitions are identified by Parted's own system in the Number column. This system begins at the start of the drive and lists extended partitions separately from their logical partitions. However, the system is not cross-referenced with the standard GNU/Linux names, which means that you have to deduce which partition is which from the information provided.
Fortunately, unless you have an unusually complicated system, it is rarely difficult to tell. The filesystem for a swap partition is unique, and only a Windows installation is likely to use NTFS. Any remaining filesystem is apt to be for GNU/Linux. The main difficulties come when you have multiple partitions or multiple installations of the same operating system. But, even then, the /home partition is usually the largest. If your system is really complicated, you might want to run fdisk -l before using Parted and write down the information.
Whatever you do, take your time and be sure that you know which partition you will be working with before you start. Otherwise, you might find yourself needing to do more work than you expected - and resorting to the backup you made before starting.
Once you have oriented yourself to the existing partitions, take the time to figure out how to accomplish what you want. For instance, if a device lacks the free space to create a partition of the size that you want, you will have to resize the existing ones.
Similarly, if you are preparing a device for the first time, ask yourself what partitions you need. If you are dual-booting Windows, you need an NTFS or FAT32 partition - probably FAT32, because, although it is less efficient than NTFS, Parted can work fully with it.
If you are partitioning a new hard drive, another consideration is the size of the swap partition. The conventional wisdom used to be that a swap partition should be twice as large as the amount of RAM available. However, now that most machines have several gigabytes of RAM, most users should not need more than a 2GB swap partition.
As for the rest of the device, most users assign it to the root partition. Some users, in the hopes of preserving their data when a partition becomes corrupted, put /home on a separate partition. Other directories, such as /tmp and /var, are sometimes given separate partitions to control their size.
Whatever your preferences, choose carefully, or you might find yourself running into problems, such as not having enough space on the root partition to install another kernel. If you plan to have more than one partition, research the pros and cons of each partitioning scheme on the web.
![]()
Besides its own system for identifying partitions, Parted has a number of quirks and limitations. For instance, some filesystems or partition usages are not fully supported, such as NTFS, logical volume managers, or RAID arrays. For this reason, it is always useful to check online help for a command before you use it.
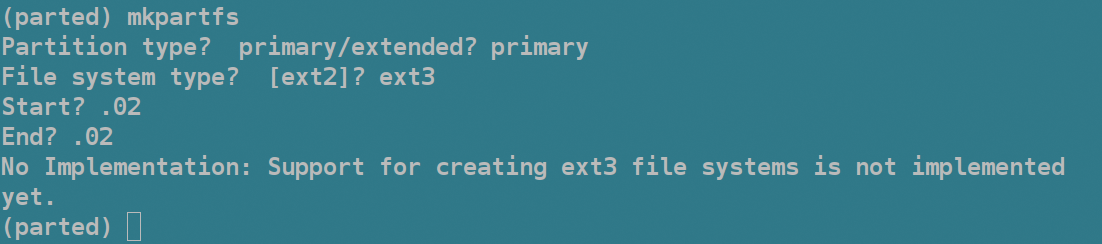
Parted's online help lists the format for each command. Conveniently, however, you do not need to use the complete format to start a command. If you omit any part of the format or enter an unsupported parameter, Parted starts the command and prompts you for the information it needs, giving suggested defaults. If you enter an unsupported or nonsensical request, such as creating an ext3 partition or a partition that ends before it starts, Parted cancels the command.
As soon as you offer Parted all the parameters it needs, it does its best to carry them out, subject to inescapable limitations. For example, you cannot resize a partition so that it is smaller than the space needed for the data it contains. Nor can you start a partition at 0GB on the hard drive or start a partition 1KB after the previous one, because a certain amount of space is needed to store information about the partition.
Note that, in the classic Unix tradition, Parted does not return a message when it completes an action. The one sign you have that an operation is complete is that the Parted prompt is available for new input. If you are formatting a drive of a few hundred gigabytes, Parted could be unresponsive for several minutes at a time - but don't try to cancel it or close the terminal window, or you will interrupt the current operation and possibly leave your system unusable.
The simplest operation is to create a partition or filesystem in free space. If you want to create only the partition (e.g., to format a filesystem that Parted does not support), the command is mkpart <partition-type> <start> <end>, with the start and the end in any of the units of measurement supported by Parted. However, most people will probably prefer to create the partition and format it all at the same time with mkpartfs <partition-type> <filesystem-type> <start> <end>. If the partition already exists, mkfs <partition-number> <filesystem-type> will format it with the use of Parted's partition number.
Having created a partition, you might want to edit its attributes with set <partition-number> <flag> <state>. Useful flags are boot, root, swap, hidden, raid, and lvm, all of which are either on or off.
Also, you can use Parted to edit existing partitions. Most of these commands are self-explanatory. Move and resize, which often amount to the same thing, both require that you enter the partition number, followed by the start and the end as parameters. Similarly, to delete a partition, all you need is enter rm <partition-number> - so be careful you know the correct partition number.
In addition to these operations, Parted has several other tools. For instance, the cp command copies the information on from one partition to another of the same size on the same device. This command can be useful during a major reorganization of a device.
If a partition is corrupted and unaccessible, you can use mklabel or mktable to try to create a clean partition table. Note that this label is not the same as a partition label - what Parted calls the name - and that running this command will leave the partitions on the device inaccessible.
After using one of these commands, you need to rebuild the table entries with the rescue command, running the command once for each partition and specifying its start and end. The same command also can be used when a single partition is corrupted. In both cases, rescue works best when run as soon as possible after a problem occurs so that nothing is overwritten. Even so, it might not always work.
Parted might not be quite the wonder application that I once imagined, but it is still an immensely powerful utility. The precautions I suggest might seem excessive, but they are proportional to Parted's power. Some people like to boast that they never read help, but if you take that attitude with Parted, you could wind up with a trashed machine.
Far better is to take the time to understand partitioning, back up your data, and read Parted's online help, even if you think you don't need to. Otherwise, you just might suddenly have the opportunity to learn more by doing. If you learn how to use Parted safely, you'll be glad that it's available.
| INFO |
|
[1] GNU Parted manual: http://www.gnu.org/software/parted/manual/
|