
By Kenneth Hess
Microsoft has always navigated carefully around the question of Unix (or Linux) connectivity. Historically, Windows desktop operating systems have included a Telnet client as a standard component, although Telnet dropped out of the mix with Vista.
Windows 7 [1] is also missing a Telnet client in the default configuration; however, if you're up for a separate download, a near-complete set of Unix tools called Subsystem for Unix-based Applications (SUA) is available for no cost. SUA, which was formerly known as Windows Services for UNIX, includes utilities, commands, shell scripts, and shells that make it easier to interact with Unix and Linux systems. Combining the native Windows executables and shell utilities, Microsoft presents you with a set of familiar and powerful tools to integrate your new Windows desktop into a heterogeneous enterprise.
In addition to SUA, Windows 7 also provides an optional Telnet server that supports remote connections from Linux systems, along with a long-overdue native NFS client for Windows. In this article, I explore this promising collection of Linux interoperability components, and I describe how to set up your Windows 7 system so that it will coexist with your Linux system.
You can install all of the interoperability components at once via the Windows 7 Control Panel. Begin with Start | Control Panel | Programs and Features | Turn Windows features on or off. It might take a few minutes for the list of Windows features to fully populate the menu, but once it does, all of the necessary components are close together (Figure 1). Scroll down until you see them.
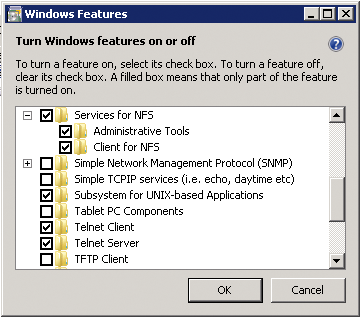
Select Administrative Tools, then choose Client for NFS under Services for NFS, Subsystem for UNIX-based Applications, Telnet Client, and, optionally, Telnet Server. (Some other components that you might consider as well include Simple Network Management Protocol (SNMP), TFTP Server, and Simple TCPIP services.)
After clicking OK to finish, you'll see a message that says, Please wait while Windows makes changes to features. This might take several minutes.
On completion, you're returned to the Control Panel`s Program and Features applet. After closing this screen and closing the Control Panel, you'll notice few changes to your system. One reason for this is that the changes made to your system are subtle and incomplete. You've installed one service (or more, if you also installed the Telnet Server, TFTP Server, and other optional components), a few new executables, and some support files to make the installed components work.
To complete the installation of your previously selected components, navigate to Start | All Programs | Subsystem for UNIX-based Applications | Download Utilities for Subsystem for UNIX-based Applications. Clicking the Download link opens Internet Explorer and places you onto the Microsoft download site for the Utilities and SDK for UNIX-based Applications. Now select your computer's architecture (32 or 64 bit) and download the almost 500MB executable file. Make a note of where you saved the file.
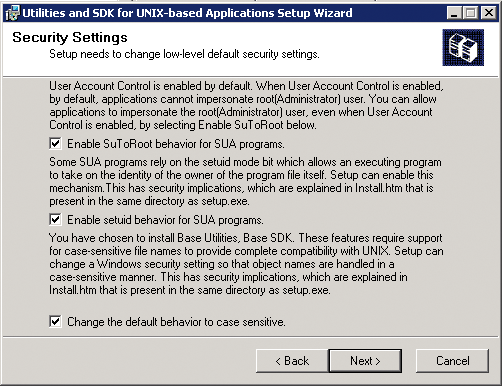
The file is a zipped executable that unzips into your AppData\Local\Temp directory with approximately 14,000 files. Setup starts automatically. Next, click through the installation prompts, accept the license agreement, select Standard or Custom installation, select Security Settings - all three, as shown in Figure 2 - and choose Install. When the installation completes, a final screen informs you that you've successfully completed the install. You'll also see the message: To enable the daemon, modify the inetd.conf file located in the /etc directory. And the customary reboot just lets you know that you're using Windows. By selecting all three of the options shown in Figure 2, you're enabling true Unix-like behavior for your new Unix utilities.
A Telnet client program is an essential part of any system or network administrator's troubleshooting toolkit. Telnet is an inherently insecure protocol because it passes all information between client and server in plain text. Even the least knowledgeable hacker can grab usernames and passwords with a network sniffer, compromising security of your valuable computing and network resources. However, Telnet is a useful testing and troubleshooting tool. For example, to test that your Apache server administrator has configured services correctly, you could use the interactive Telnet session shown in Listing 1.
| Listing 1: Checking Apache with telnet |
01 $ telnet server port 02 $ telnet apache 80 03 Trying 192.168.1.50 04 telnet: Unable to connect to remote host: Connection refused 05 $ telnet apache 8080 06 Trying 192.168.1.50 07 Connected to 192.168.1.50. 08 Escape character is ^]'. |
The first attempt in Listing 1 informs you that the Apache server isn't listening on port 80. The second attempt succeeds and connects successfully to Apache's actual listening port: 8080.
The Telnet server installs to your Windows 7 system in a disabled state for the security issues mentioned earlier. To enable the Telnet Server service, navigate to Start | Control Panel | Administrative Tools | Services and scroll down the list until you see the Telnet service. Now right-click Telnet, select Properties, change the Startup type to Manual, and click the Start button. Because of its weak security, you don't want the service available at all times, so enable the service for manual use. The Telnet Server service now accepts connections on port 23.
If you attempt a connection now, it will fail (see Listing 2) because you must add your user account to the TelnetClients group to allow logins via the Telnet service. This additional security measure helps protect your system from other users who might have accounts on your local system from connecting via Telnet.
| Listing 2: You Need an Account to Connect |
01 Trying 192.168.1.50... 02 Connected to 192.168.1.50. 03 Escape character is '^]'. 04 Welcome to Microsoft Telnet Service 05 login: fred 06 password: 07 Access Denied: Specified user is not a member of TelnetClients group. 08 Server administrator must add this user to the above group. 09 10 Telnet Server has closed the connection |
Add your local user account to the TelnetClients group by navigating to Start | Control Panel | Administrative Tools | Computer Management | Local Users and Groups | Users. Right-click user fred, Properties, Member Of, Add..., Advanced, Find Now, then scroll down to TelnetClients and click OK on each screen until you return to Computer Management. User fred can now initiate a Telnet connection and log in to the local computer.
The Telnet server attempts to authenticate you using NTLM (NT LAN Manager challenge/response) authentication. The system uses the username and password under which you're currently logged in for the connection. If the current username and password don't match with an eligible user on the server side, authentication fails, and you're presented with a standard login prompt.
Connecting from a Unix or Linux system only yields a standard Telnet prompt. Remember to stop the Telnet service when you don't want any users attempting logins to your Windows 7 computer. To stop the service, return to Services under Computer Management or issue the following command at a cmd prompt (Start | All Programs | Accessories | Command Prompt (Right-click-> Run as Administrator)):
C:\> net stop telnet
To start the Telnet server, use the command:
C:\> net start telnet
Network File System, or NFS, was a protocol for sharing files between Unix computers before Samba even existed. A Unix system administrator sets up a shared directory by editing the /etc/exports file and issuing the exportfs command.
On the client side, a system administrator mounts the exported (shared) directory from the remote computer to the local computer's filesystem. Users on the client computer may cd into the mounted directory and use files on it as if it were local. UNIX administrators and users have enjoyed the convenience of NFS shares for years.
In the past, Windows users had to purchase expensive third-party programs to gain access to NFS shares, which limited adoption of the protocol. Native and free client software makes bridging the compatibility gap much easier on both sides of the abyss.
When you installed the NFS client software on your Windows 7 system, you acquired a new service (Client for NFS) along with some new associated commands, some support files, and an administrative interface for NFS. The administrative interface is a Microsoft Management Console (MMC) snap-in.
The Client for NFS service installs and starts automatically, and it remains available after restart of your computer without manual intervention.
Earlier in this article, you installed Administrative Tools and Client for NFS under Services for NFS. Let's look at the most used function first: Mounting exported (shared) Unix filesystems. Open an administrator-level command prompt (Start | All Programs | Accessories | Command Prompt (Right-click Run as Administrator) and use the following command syntax to mount an NFS-shared filesystem:
mount computer_or_IPAddress :/shared/dir drive_letter
For example:
C:\> mount lenny:/files N:
Now you can use the NFS share as a mapped drive (N:) from your Windows 7 computer. Notice the Windows version of mount closely resembles the pure Unix version. To unmount an NFS-connected drive, use similar UNIX syntax:
C:\> umount N:
Disconnecting N: \\lenny\files
The command completed  successfully.
As in Unix, you can issue the mount command with no options to display all currently attached (mounted) NFS shares (Listing 3).
| Listing 3: Checking NFS Shares with mount |
01 C:\> mount 02 Local Remote Properties 03 N: \\lenny\files UID=-2, GID=-2 04 rsize=32768, wsize=32768 05 mount=soft, timeout=0.8 06 fileaccess=755, lang=ANSI 07 casesensitive=no 08 sec=sys |
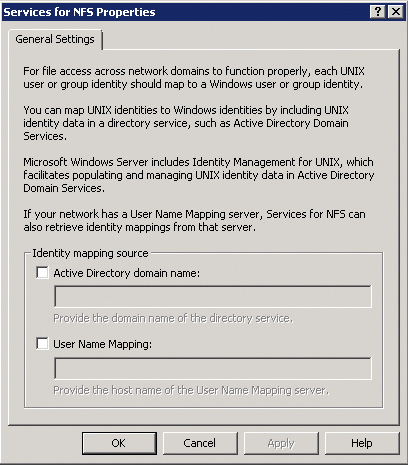
The administrative tools you already installed will help you configure the parameters shown in Listing 3. The client for NFS administrative tools resides in an MMC plugin. To use the plugin, open MMC by clicking Start | Control Panel | Administrative Tools | Services for Network File System (NFS). At first glance, there isn't much to see, but the configuration parameters lie just beneath the surface of this simple interface. Just right-click the Services for NFS icon and select Properties from the list. Figure 3 shows the General Settings tab of the Services for NFS Properties dialog. These settings are used in Active Directory environments.
To view the configurable properties for the NFS client software, right-click on the Client for NFS icon and select Properties from the list. The Client for NFS Properties window, shown in Figure 4, presents you with the configurable settings for your NFS client software.
On the first tab, Client Settings (Figure 4), you may select the transport protocol (TCP, UDP, or TCP+UDP). For maximum compatibility, use the default setting TCP+UDP. Next, select the type of mount (soft or hard) for your mounted NFS filesystems. Microsoft recommends soft mounts and a low number of retry intervals for best performance. Hard mounts try indefinitely to mount the remote filesystem, and, if the remote filesystem isn't available, system performance suffers significantly.

Figure 5 shows the default file permissions settings for all new files created on a writable NFS mount. The default permissions are 755 or rwxr_xr_x.
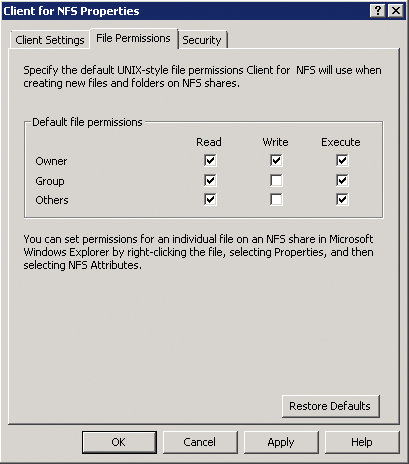
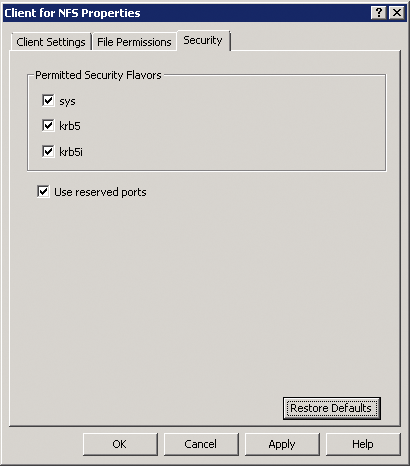
Figure 6 shows the Security tab for the NFS client software. Windows 7 supports the standard Unix AUTH_SYS or sys, where the user's UID and GID pass in clear text over the network and require no authentication by the NFS server. Krb5 and krb5i are new to Windows 7 for systems that use Kerberos V5 authentication. Microsoft added these advanced protocols to keep up with the latest technology changes. The defaults are set for maximum compatibility.
Two additional NFS client-related commands with which you should be familiar are showmount and nfsadmin. showmount reads a remote NFS server's export properties and displays results, depending on which switch you use (Listing 4). The nfsadmin command displays information about your NFS client settings (Listing 5).
| Listing 4: Working with showmount |
01 C:\> showmount -e lenny 02 Exports list on lenny: 03 /files * 04 C:\> showmount -d lenny 05 Directories mounted on lenny: 06 /files 07 C:\> showmount -a lenny 08 All mount points on lenny: 09 192.168.1.100 : /files |
| Listing 5: Displaying NFS Client Settings |
01 C:\> nfsadmin client 02 The following are the settings on localhost 03 Protocol : TCP+UDP 04 Mount Type : SOFT 05 Case Sensitive : No 06 Retries : 1 07 Timeout : 8 seconds 08 Read Buffer Size : 32 KiloBytes 09 Write Buffer Size : 32 KiloBytes 10 Use reserved ports : yes 11 Security flavors : sys,krb5,krb5i 12 File Settings 13 User : rwx 14 Group : r-x 15 Others : r-x |
SUA began as a set of POSIX-compliant utilities called Interix. Microsoft acquired Interix, integrated these tools into what they called Services for Unix (SFU), and charged a fee for the package. Microsoft now distributes the latest SFU incarnation as SUA for its operating systems. Most of the utilities are GNU originals with source code included.
After installing the huge SUA suite, you might wonder where the files are installed. They're installed under C:\Windows\SUA. Also, you'll find a set of Unix-style directory names and one link.
The lib directory is a link to /usr/lib and is for use inside the Korn and C shells. The common directory is where you'll find 29 Windows/DOS versions of familiar Unix utilities. The SUA installer edits your PATH variable to include the paths to the 200+ UNIX utilities for use inside and outside Unix shell environments.
If you find that your Windows commands (ls.exe, cat.exe, file.exe, touch.exe) all work as expected at the prompt but that those same commands don't work in the Korn and C shells, your PATH variable needs a quick edit. To do so, go to Start | Computer (Right-click) | Properties | Advanced system settings | Environment Variables | System Variables | Path | Edit. Add the following to the end of the list, with the leading semicolon: ;C:\Windows\SUA\bin;C:\Windows\SUA\usr\X11R6\bin. Hereafter, when you open a cmd prompt, your PATH variable will allow you to run Unix commands from within your selected Unix shells.
Most of the standard Unix file and process manipulation tools are included in the SUA collection, so you can effectively write portable UNIX shell scripts with Windows 7 or port scripts from your Linux system with few changes.
SUA also provides a development environment (the SDK part of the download) complete with GCC and other programming utilities to make it easier to recompile your Unix and Linux source code into usable Windows executables.
Although, the NFS client surpassed my expectations in functionality and in speed, the documentation felt incomplete. My experience with SUA was less than impressive because the installer omitted important PATH variables. It left me wondering why they don't use Cygwin [2], whose tools are covered by GPL, Public Domain, and X11 licensing, instead of their own lackluster subset of common Unix utilities.
I'm also a little taken aback with the conspicuous absence of utilities such as ssh, sftp, and scp and their inclusion of a Telnet server instead of the more secure ssh server. How many Unix or Linux systems run Telnet Server services? For real interoperability, you'd need at least an ssh client.
If you're looking for a Microsoft-to-Unix interoperability solution, it's included with Windows 7. The solution certainly isn't perfect, but it's a step in the right direction, and it's a significant departure for Microsoft to include interoperability components with its desktop operating system.
| INFO |
|
[1] Microsoft Windows 7: http://www.microsoft.com/windows/windows-7
[2] Cygwin: http://www.cygwin.com |
| THE AUTHOR |
|
Ken is a freelance technical writer and journalist. He covers a variety of open source topics, including Linux, databases, and virtualization. You may contact him via his website at http://www.kenhess.com. |