By Michael Schilli
YouTube offers a fascinating number of how-to movies that cover various topics. Whether you want to see amateur chefs cooking their favorite dishes, handymen demonstrating their lock-picking skills, or practically inclined car owners repairing their vehicles, YouTube almost always has a movie to match your interests.
After shooting the video, you will want to add the opening credits. Amateur moviemakers can always afford to take a couple of seconds to tell their audience a little bit about the coming attraction. To do so, you could use some proprietary Windows program like Adobe Premiere or a Mac program like iMovie or Final Cut, or you could even go for a Linux application like Cinelerra. However, instead of using these 800-pound gorillas, I'm going to take a quick but clean command-line approach with the help of a small Perl script that relies on two external sound and video helpers: sox and mencoder.
Movies are made up of individual images played in quick succession known as frames. Normal video cameras capture about 30 frames per second, and a program like mplayer will play the frames back at a fixed rate. A stationary video title is easily converted from a series of identical JPG images to an AVI file with the use of Mencoder. If you then concatenate the two video files, you get a movie with opening credits - at least in theory. In real life, you can expect a couple of pitfalls.
Multimedia files in the AVI format act as containers for video and audio streams, both of which are played back simultaneously by a video player. Both the video and the audio data in an AVI container can be saved in a variety of formats. The audio track typically uses the fairly raw PCM format or is compressed as an MP3 file.
Video data requires a comparatively huge amount of memory, as you can easily imagine, given that you have 30 image files for every second of video. This also explains why the encoding method, or codec, is so crucial: A good codec can compress the data to a great extent without compromising the image quality. Among the codecs available, many are patented.
Although an AVI container can hold a variety of encoded video and audio data, you can't simply change the encoding method midstream. In other words, to concatenate the credits and a video file, you have to make sure that both use the same codec from the start, or you at least need to use a tool like mencoder to convert the different encodings to the same output format.
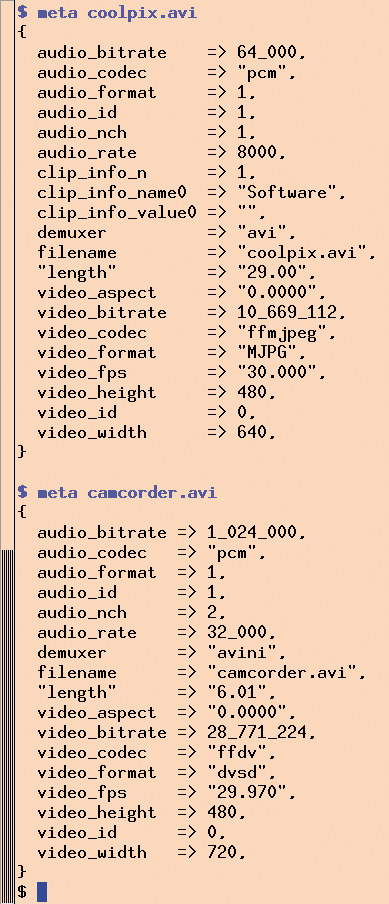
Figure 1 is a listing of the metadata that was parsed from two video files by the program in Listing 1. The program uses the CPAN Video::FrameGrab module's meta() method to retrieve the video file's characteristics, then it stores them in a hash.
Figure 1 compares the metadata from two movies, coolpix.avi and camcorder.avi. The first movie was shot with a small pocket camera, a Nikon Coolpix S52, and the second movie was shot with a digital camcorder by Canon, an Elura 100. Both cameras shot the movie at around 30 frames per second (video_fps), but the Canon recorder used the ffdv codec (see the video_codec field), whereas the Nikon used ffmjpeg.
The two cameras also used different formats to store the audio data. Whereas the camcorder used two channels (for stereo; the number of channels in audio_nch is 2), the Nikon only supports mono (audio_nch is 1). The audio quality is also different, with the camcorder using a sampling rate of 32,000 samples per second for the recording (audio_rate field), compared with the Nikon's 8000 samples per second.
Figure 1 also shows that the Nikon, with an audio_rate of 8000, has an audio_bitrate of 64000 (which is the total memory requirement in bits per second). Each sample is thus 8 bits, which results in a so-called "sample size" of exactly 1 byte. The camcorder, in comparison, uses a 32-bit (1,024,000 divided by 32,000) sample rate, which results in 16 bits per channel and a sample size of 2 bytes.
As you can see from this data, these silent opening credits can't simply be glued onto a video shot with an unknown camera without some kind of conversion taking place. Fortunately, the Mencoder and Sox tools provide the functions you need to modify the different formats and thus allow the credits and the movie to coexist peacefully in the AVI container.
| Listing 1: video-meta |
01 #!/usr/local/bin/perl -w 02 use strict; 03 use Data::Dump qw(dump); 04 use Video::FrameGrab; 05 06 my ($file) = @ARGV; 07 die "usage: $0 file" 08 unless defined $file; 09 10 my $grabber = 11 Video::FrameGrab->new( 12 video => $file ); 13 14 my $meta = 15 $grabber->meta_data(); 16 print dump($meta), "\n"; |
Users encountering Mencoder commands for the first time are typically scared off by its apparent complexity. Even the most simple of functions seems to require a totally absurd combination of options. On closer inspection, Mencoder isn't that hard to use: To convert a video file to another format, Mencoder expects the first file as the first argument, followed by the conversion action, followed by the -o parameter setting the output file, as in:
mencoder input.avi [options] -o output.avi
Also, you can easily create a single output file from multiple input files by entering the file names one after another at the command line in place of input.avi (input1.avi, input2.avi, ...).
Two groups of conversion options exist for audio and video components. To pass the audio stream from the input file to the output file without any modification, you would just write -oac copy (a for audio). If you want to recode the audio track, you would type -oac pcm for PCM format (Pulse Code Modulation) or -oac mp3lame for an MP3 format created by the Lame MP3 encoder. If the encoder you use (Lame in this example) also needs some options, such as vbr 3, you just add them to the Mencoder command line with the help of the -lameopts option:
-oac mp3lame -lameopts vbr=3
A similar approach is used for the video component of an AVI file. To copy the video format without change, just use -ovc copy (with v for video). To recode the video format to MJPEG format and pass in an option of vcodec=mjpeg to the encoder, enter -ovc lavc -lavcopts vcodec=mjpeg at the Mencoder command line. Armed with this knowledge, you should be able to transform any video from one format to another with little trouble.
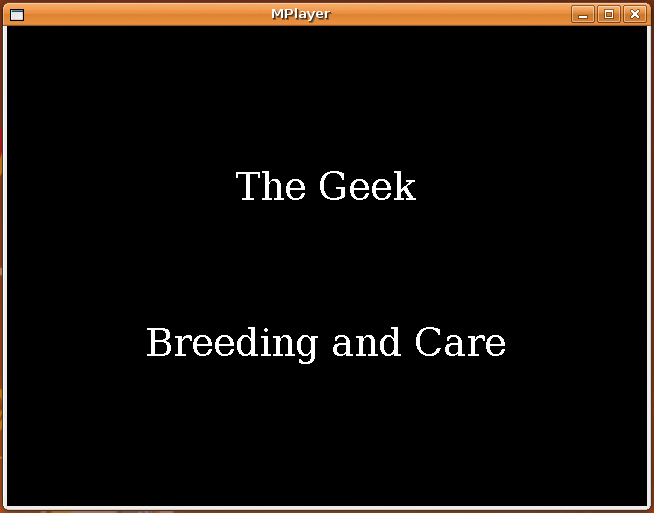
The credits generator in video-title-add (Listing 2) expects three parameters: the video file to which you will be adding the credits and two strings that are used as the first and second lines in the opening credits of the video track. If you call the generator with the parameters
video-title-add testvideo.avi "The Geek" "Breeding and Care"
it will create a new .avi file called testvideo-withtitle.avi that gives you two seconds of opening credits before the main feature, as shown in Figure 2.
The script starts by calling the jpeg_dir_create function, defined in Listing 2 beginning with line 127, which creates $n identical JPG images with a width of $w and a height of $h in a temporary directory. The images show the text lines passed in as $upper and $lower on a black background. All told, a two-second video with a frame rate of 30 frames per second requires exactly 60 images; the main program thus sets $n to 60.
The script then uses the CPAN Imager module to create a new Imager image object with dimensions of $w by $h. It defines the color black as an Imager::Color class object, which it initializes with an RGB value of 0-0-0. The path stored in the $FONT_FILENAME variable points to a TTF file with the required font and can be modified to reflect your local environment as needed.
The font object's align() method takes a character string and draws it at a predefined position in the image. The center directive aligns the string around the middle of the x-axis. The first call to align() draws the $upper line about one third of the screen height from the top; the second call draws $lower two thirds of the way down the screen. The JPG image, created by a subsequent call to write(), is then stored in a temporary directory created for this purpose. The for loop in line 184 adds 59 hard links pointing to the c.jpg file that was just created. This fools Mencoder in line 61 into thinking that it has 60 files in this directory, although only the space for one is actually occupied. The codec used here is mjpeg, because the little Nikon camera uses it, and the quality of the glued-together movie will suffer if I convert one lossy encoding method into another.
The credits created by Mencoder in line 61 do not have a soundtrack right now; I have not assigned an audio signal to the JPG images, and I told Mencoder to stop complaining about this by setting the -noaudio option. Unfortunately, I can't glue a video without audio to one with audio; this means that I need a script to create a sound file containing two seconds of silence.
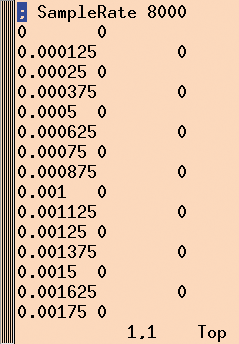
The silent_wav() function that begins in line 197 expects the length in seconds, the name of the resulting file, the sample $rate, the number of $channels, and the $sample_size of the silent audio track. It creates a new, temporary file with a file extension of .dat and stores the raw data as null bytes (Figure 3). The Sox utility grabs this file in line 222 and converts it into the WAV file that I need.
Back in the main program, all I should really need to do is glue the soundtrack onto the credits and then glue the AVI files together. Unfortunately, Mencoder can't do this without badly offsetting the audio tracks, leading to unacceptable synchronization problems between the audio and video tracks in the resulting movie. What I can do, however, is extract the audio track from the original video, weld it onto the silent audio track created previously, and fuse the complete audio track with two silent videos that I have already glued together.
The call to mplayer in line 81 dumps the audio track from the original video into a file called audiodump.wmv. Line 85 prepends the silent audio track, thus creating the complete audio track, which is stored in the $audio_total file. Line 89 launches Mencoder, glues together $video_title and $video_file with the -nosound option, and converts the result into an AVI file with an MJPEG-encoded video stream.
One would think that Mencoder would be able to add the MJPEG-formatted video file created from the JPEG photos to another MJPEG-formatted video file without messing around with the codec. Strangely, Mencoder quit outputting a message to the effect that it wasn't happy with the encoding I was using. However, if you let Mencoder convert the camcorder file to MJPEG, you can append without any trouble. This is a pity actually, because recoding a video takes almost as long as it does to play the movie, whereas the -ovc copy option zooms through the format much more quickly. Mine is not to reason why!
All I need to do now is add the complete audio track, $audio_total, to the silent, but otherwise complete, video. The mencoder command in line 96 uses the -audiofile option to do just that, and -ovc copy tells it not to mess with video encoding. The resulting .avi is written to the file defined by $video_out (i.e., to testvideo-withtitle.avi).
The script uses a couple of utility functions, some of which it defines itself and others it draws from the CPAN Sysadm::Install module. For example, the throwaway_file() function defined beginning in line 103 creates a temporary file with the file extension in $suffix, which is important because some utilities use the file extension to guess the file format. The CPAN File::Temp module manages the temporary files, deleting them when the script completes.
The shell() function defined beginning in line 116 executes a shell command passed in as a list, checks to see that it works, and bails out if something goes wrong. The function declaration in line 11 allows calling the function later without parentheses. Shell uses the tap() function from the CPAN Sysadm::Install module to call an external program, capture the standard and error output, and return them along with the return code.
The Mencoder, Mplayer, and Sox tools are often preinstalled on Linux systems: If they are not, you can install them on Debian, for example, as follows:
sudo apt-get install sox mencoder mplayer
The CPAN Sysadm::Install, Log::Log4perl, Imager, and Imager::Fill modules are also available as Debian packages. If this is not the case for your distribution, a CPAN shell will help you with the install. In any case, you will need to use it to install the Video:: FrameGrab module. Additionally, you might need to modify the path to the True Type font file for VeraSe.ttf, as defined in line 15, to match your local environment.
Besides opening credits, a trailer can also enhance the utility value of a movie. To add one, just modify the script to create a second silent movie for the trailer, patch in a silent sound track, $audio_trailer (or just use the $audio_title file if the opening credits and trailer are the same length), and modify the call to Sox in line 85 to finish the work:
shell "sox", $audio_title, "audiodump.wav", $audio_trailer, "-o", $audio_total;
The silent $video_trailer, created from JPEG images just like the $video_title, is then appended to the $video_file parameter in the mencoder command in line 89. The camera operator will appreciate being mentioned in the credits, and web links can point to more detailed information for interested viewers.
| Listing 2: video-title-add |
001 #!/usr/local/bin/perl -w
002 use strict;
003 use Sysadm::Install qw(:all);
004 use Imager;
005 use Imager::Fill;
006 use Log::Log4perl qw(:easy);
007 use Video::FrameGrab;
008 use File::Temp
009   qw(tempdir tempfile);
010
011 sub shell;
012
013   # length in seconds
014 my $title_length = 2;
015 my $FONT_FILENAME =
016  "/usr/share/fonts/truetype/"
017  . "ttf-bitstream-vera/"
018  . "VeraSe.ttf";
019
020 Log::Log4perl->easy_init(
021   $ERROR);
022
023 my ( $video_file, $upper,
024   $lower ) = @ARGV;
025
026 die "usage: $0 ", "vidfile ",
027  "upper_text lower_text"
028   unless defined $upper;
029
030 ( my $video_out =
031     $video_file ) =~
032   s/(\.[^.]+$)/-withtitle$1/;
033
034 my $video_mum =
035   throwaway_file(".avi");
036 my $video_title =
037   throwaway_file(".avi");
038 my $audio_title =
039   throwaway_file(".wav");
040 my $audio_total =
041   throwaway_file(".wav");
042
043 my $grabber =
044   Video::FrameGrab->new(
045   video => $video_file );
046
047 my $meta =
048   $grabber->meta_data();
049
050 my $height =
051   $meta->{video_height};
052 my $width =
053   $meta->{video_width};
054
055 my $dir = jpeg_dir_create(
056   $width, $height,
057   $upper, $lower,
058   $meta->{video_fps} *
059     $title_length);
060
061 shell qw(mencoder -nosound),
062   "mf://$dir/*.jpg",
063   qw(-mf fps=30 -o),
064   $video_title,
065   qw(-ovc lavc -lavcopts
066      vcodec=mjpeg);
067
068 my $sample_size =
069   $meta->{audio_bitrate} /
070   $meta->{audio_rate} /
071   $meta->{audio_nch} / 8;
072
073 silent_wav(
074   $title_length,
075   $audio_title,
076   $meta->{audio_rate},
077   $meta->{audio_nch},
078   $sample_size
079 );
080
081 shell qw(mplayer -vc null
082         -vo null -ao pcm),
083       $video_file;
084
085 shell "sox", $audio_title,
086   "audiodump.wav", "-o",
087   $audio_total;
088
089 shell "mencoder", "-nosound",
090   $video_title, $video_file,
091   qw(-ovc lavc -lavcopts
092   vcodec=mjpeg -o),
093   $video_mum;
094
095   # add sound
096 shell "mencoder", $video_mum,
097   qw(-oac copy
098   -audiofile), $audio_total,
099   qw(-ovc copy -o),
100   $video_out;
101
102 #############################
103 sub throwaway_file {
104 #############################
105   my ($suffix) = @_;
106
107   my ( $fh, $file ) =
108     tempfile(
109     UNLINK => 1,
110     SUFFIX => $suffix,
111     );
112   return $file;
113 }
114
115 #############################
116 sub shell {
117 #############################
118   my ( $stdout, $stderr,
119        $rc ) = tap @_;
120
121   if ($rc) {
122     die "@_ failed: $stderr";
123   }
124 }
125
126 #############################
127 sub jpeg_dir_create {
128 #############################
129   my ( $w, $h, $upper,
130     $lower, $n )
131     = @_;
132
133   my $img = Imager->new(
134     xsize => $width,
135     ysize => $height
136   );
137
138   my $black =
139     Imager::Color->new( 0, 0,
140     0 );
141   $img->box(
142     color  => $black,
143     filled => 1
144   );
145
146   my $font =
147     Imager::Font->new(
148     file => $FONT_FILENAME )
149     or die Imager->errstr;
150
151   $font->align(
152     string => $upper,
153     size   => 38,
154     color  => "white",
155     x      => $width / 2,
156     y      => $height / 3,
157     halign => "center",
158     valign => "center",
159     image  => $img
160   );
161
162   $font->align(
163     string => $lower,
164     size   => 38,
165     color  => "white",
166     x      => $width / 2,
167     y => $height * 2 / 3,
168     halign => "center",
169     valign => "center",
170     image  => $img
171   );
172
173   my ($dir) =
174     tempdir( CLEANUP => 1 );
175
176   my $img_file =
177     "$dir/c.jpg";
178
179   $img->write(
180     file => $img_file )
181     or die
182     "Cannot write ($!)";
183
184   for ( 1 .. $n - 1 ) {
185     cd $dir;
186     ( my $link = $img_file )
187       =~ s/\./$_./;
188     link $img_file, $link
189       or die $!;
190     cdback;
191   }
192
193   return $dir;
194 }
195
196 #############################
197 sub silent_wav {
198 #############################
199   my ( $secs, $outfile,
200     $rate, $channels,
201     $sample_size) = @_;
202
203   my ( $fh, $tempfile ) =
204     tempfile(
205     UNLINK => 1,
206     SUFFIX => ".dat"
207     );
208
209   print $fh
210     "; SampleRate $rate\n";
211   my $samples =
212     $secs * $rate;
213
214   for ( my $i = 0 ;
215         $i < $samples;
216         $i++) {
217     print $fh
218         $i / $rate, "\t0\n";
219   }
220   close $fh;
221
222   shell "sox", $tempfile,
223     "-r", $rate, "-u",
224     "-$sample_size", "-c",
225     $channels, $outfile;
226 }
|
| INFO |
|
[1] Listings for this article: ftp://www.linux-magazin.de/pub/listings/magazin/2010/01/Perl
|
| THE AUTHOR |
|
Michael Schilli works as a software engineer with Yahoo! in Sunnyvale, California. He is the author of Goto Perl 5 (German) and Perl Power (English), both publisched by Addison-Wesley, and he can be contacted at mschilli@perlmeister.com Michael's homepage is at http://perlmeister.com |