
By Marcel Gagné
Many of you, myself included, have probably had this embarrassing event take place. You're at the checkout getting ready to pay for something, and you've just swiped your debit card, when the unthinkable happens. Transaction declined. You've got funds to cover the purchase, so that's not the issue. What you've done is entered the wrong PIN. Try as you might, though, you can't seem to recall that number, which you enter automatically and without thought, from the gray matter mass storage system. The password or number is simple, but you can't call it up.
Touch typists understand this as well. Sure, you can type 120 words per minute, but if you stop to think about where the keys are, you freeze. Only when you pull your hands away, or clear your mind, does the automatic access to the location of the keys, or your PIN, return. The typist issue is easily resolved, but the PIN problem is getting worse by the day. That's because we modern computer-using humans are asked to remember countless numbers and passwords. From online banking sites to those newspapers that require an account to read the articles, the number of passwords we build up over time is staggering. Eventually, you're going to need help.
The trouble with finding a safe place to store private information like passwords, credit card numbers, old love letters, and anything else that should remain private, is keeping that safe place safe. In essence, you need one password to protect all the other passwords, and that's where password managers come into play.
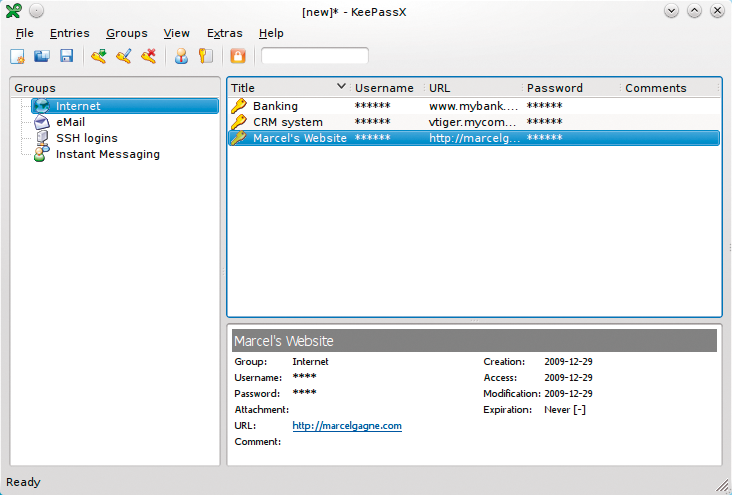
KeePassX is a cross-platform password manager designed to provide easy but secure access (AES encryption) to those countless passwords you need to keep track of (see Figure 1). Because it is cross-platform, you'll find source code; Fedora, Ubuntu, and openSUSE packages; a Mac OS X binary; and even a Windows installer. Either find these in the repositories of the major distributions, or download a copy from the website [1]. KeePassX stores user names, passwords, site URLs, and free-form comments in a hierarchical format organized by groups. These groups can represent whatever you like but can be things like websites, email accounts, SSH logins, and so on.
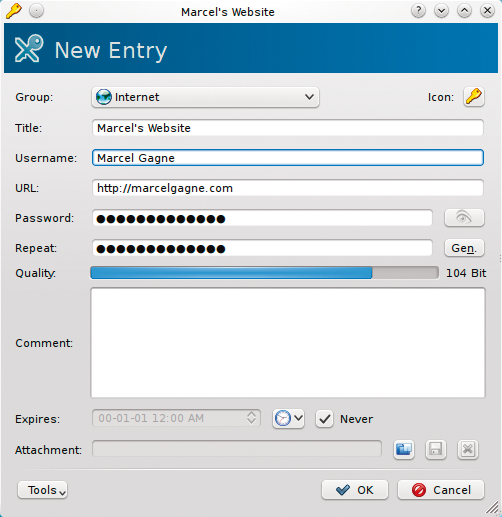
The first time you run KeePassX, it will generate a database and ask you for a master key (password). Two groups are created by default, but you can add, modify, or delete groups as you see fit. To create an entry, click the add key icon (or select Add New Entries from the Entries menu) and fill in the blanks (see Figure 2).
To view the password information at a later time, double-click on an entry and click the eyeball icon next to the password field. The data you store in KeePassX's database can be used with the various platform implementations of KeePassX or exported to text or KeePassX XML formats.
KeePassX is an excellent little program, especially if you need to work with different operating systems, but it doesn't automatically take that information and log you in to the various websites, email accounts, ftp sites, and so on, that are out there. Is there such a thing that integrates directly into the desktop?
Users running KDE as their desktop environment already have a powerful, fully integrated password manager built into their system: the KDE Wallet Manager (the program name is kwalletmanager).
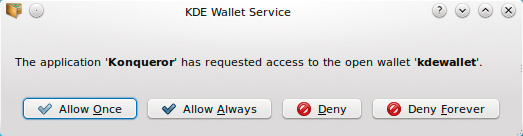
Most people's first experience with the KDE Wallet Manager tool comes when they use Konqueror to visit a website in which they are asked to enter a login name and password, or when they use Kopete to create an instant messaging user. When you store the password, the KDE Wallet Service window appears (see Figure 3).

When you first open the wallet manager, it needs to create a wallet for you. In doing so, it will ask you for a master password. This master password makes it possible to access every other password you will need while working with email programs, a web browser, an instant messaging application, and more. Enter the password, verify it, then click Create to continue.
The KDE wallet system goes into the background waiting for you to visit another site or store another password. When you log in to your system at a later time, sites or accounts requiring a password will request access to the KDE wallet service. Either approve a one-time access or always allow the application (e.g., Konqueror) to access the wallet without asking (see Figure 4). Also, you might want to deny, either once or forever.
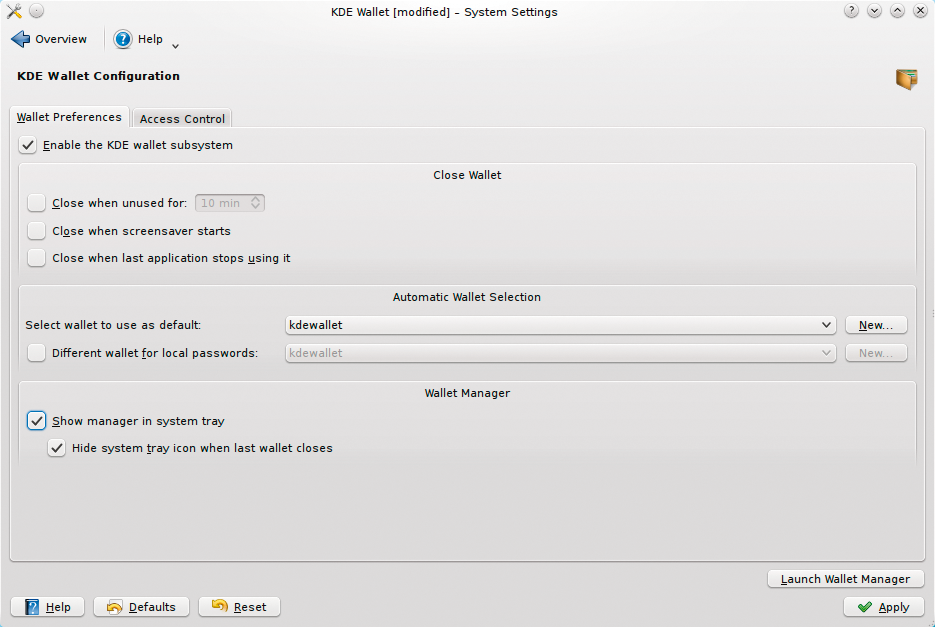
The above scenario is a perfect segue to how the wallet can be fine tuned and accessed later. KDE has a System Settings program (named systemsettings) from which you can access the Wallet Configuration tool. Look under the Advanced tab, then Advanced User Settings, and click on KDE Wallet. The KDE Wallet Configuration tool will appear (see Figure 5). From here you can select different wallets for local and remote passwords, create new wallets, and change the functionality of the wallet. For instance, in older versions of KDE, there was a system tray icon for the wallet that is no longer there by default. If you want that icon to appear, you may check the appropriate box here.
Also, the Access Control tab on this configuration tool provides a list of applications and the type of access that you allow. If you chose Deny Forever when an application asked for access to the Wallet and you really meant Allow Always, you can change it here.
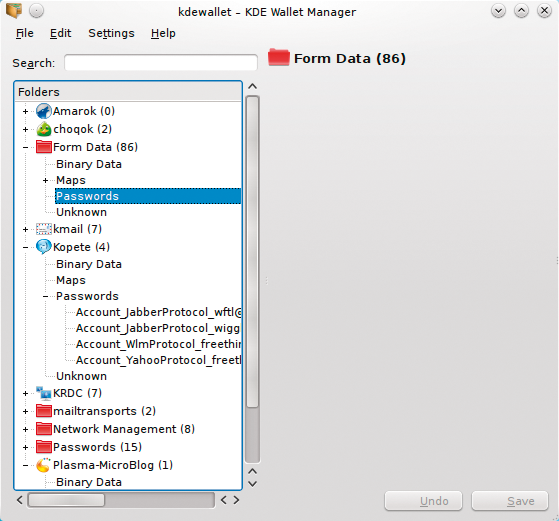
By clicking on the Launch Wallet Manager button, you can view the stored password information. The KDE Wallet Manager will open, showing you all the wallets you currently have. Odds are that you will only see one here. Double-click on the wallet, and you'll be presented with a tree view of all the apps that use the wallet. This includes usernames and passwords, web form information, and more (see Figure 6). When viewing a username, you can then click Show Contents to display the password.
The beauty of using the KDE Wallet is that all the information you need to log in to a site is magically entered for you the next time you visit that site from any KDE application that asks for a password, such as Kopete, your instant messenger.
The one catch, however, is a big one. As I mentioned, you'll only need to enter your master password once per KDE session and that makes things easy, but beware ... . Now that you've got your system automatically filling in passwords for you, securing your desktop becomes important. Make sure you lock your desktop before you walk away. Another way to protect yourself is to go back into the KDE Wallet Configuration tool and look in the Close Wallet section. Here, you can set it to close automatically after a defined period of time (the default is 10 minutes), when the screensaver starts (when you would normally walk away), or when the last application using it is closed. Doing it that way, you have one less thing to remember.
| Nagscreen |
|
Every once in a while, Clipperz pops up a donations reminder. Whether or not you choose to support the project is up to you, but it's easy to turn off these reminders. Click on account, select Preferences, and uncheck the box provided. |
The last program I want to show you, Clipperz, does require that you run it from a web server (see Figure 7), and it's really a brilliant idea. Aside from being a secure place to store passwords, Clipperz lets you store, ad hoc, any information you like, whether it be your driver's license, your social security number, or the credit cards you carry. Any kind of information you want to keep confidential is fair game.
Additionally, it's a great solution for signing on to your favorite secure websites with a single click. The people behind Clipperz allow anyone to create an account and use the site for storing information, but they also release all the code under the aGPLv3, which means you are free to run your own server if you so desire.
To download your copy of the source, visit the Clipperz website [2] and click the Community Edition link. Next, unzip the file into your web server's hierarchy, then rename the folder to something more amenable to you. Most of the installation takes place through the browser interface, but you do need to create a MySQL database ahead of time with the use of whatever tools you prefer or simply from the command line (Listing 1).
| Listing 1: Creating a MySQL Database |
01 $ mysql -u root -p 02 Enter password: 03 Welcome to the MySQL monitor. Commands end with ; or \g. 04 Your MySQL connection id is 646790 05 Server version: 5.0.75-ubuntu10.2 (Ubuntu) 06 07 Type 'help;' or '\h' for help. Type '\c' to clear the buffer. 08 09 mysql> create database clipperz; 10 Query OK, 1 row affected (0.02 sec) 11 12 mysql> grant all privileges on clipperz.* to 'yourdbuser'@'localhost' identified by 'somepasswd'; 13 Query OK, 0 rows affected (0.08 sec) 14 15 mysql> flush privileges; 16 Query OK, 0 rows affected (0.03 sec) |
To finish the setup, visit your new Clipperz site's setup page. If your website was at address clipperz.mysite.dom, you would use the following setup address:
http://clipperz.mysite.com/php/setup/index.php
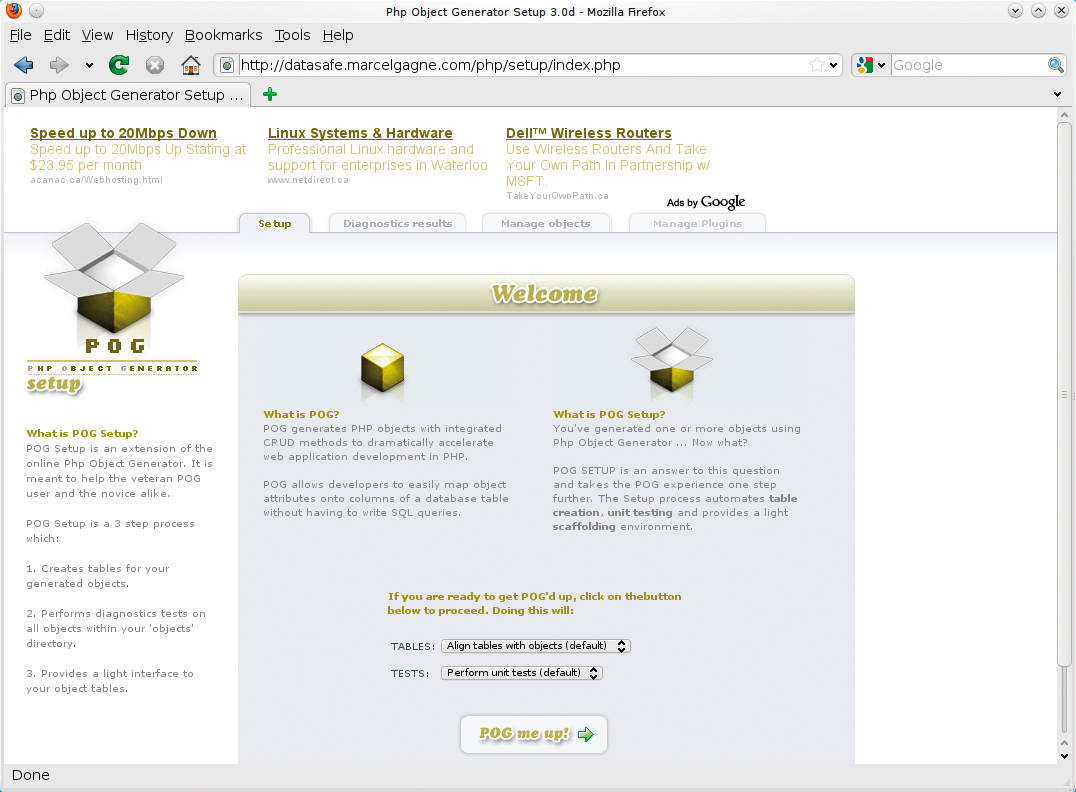
The first setup page really threw me for a spin. It uses POG, the PHP Object Generator, to create the database objects, run tests, and otherwise make sure things are ready to roll.
In other words, nothing on this page says "Clipperz," which is why it's so confusing. Once the page is loaded, click the Pog me up! button (see Figure 8); then, assuming all is well, you should see a Proceed button (with a little green arrow above it). The next screen (or tab) takes you to a page where you can review the database structures that have been created.
That's pretty much it. Now you should remove the /php/setup folder (not the php folder, but the setup folder beneath it) and log in to Clipperz with http://clipperz.yoursite.dom/index.html (see Figure 9). Clipperz has no administrative interface and no maintenance.
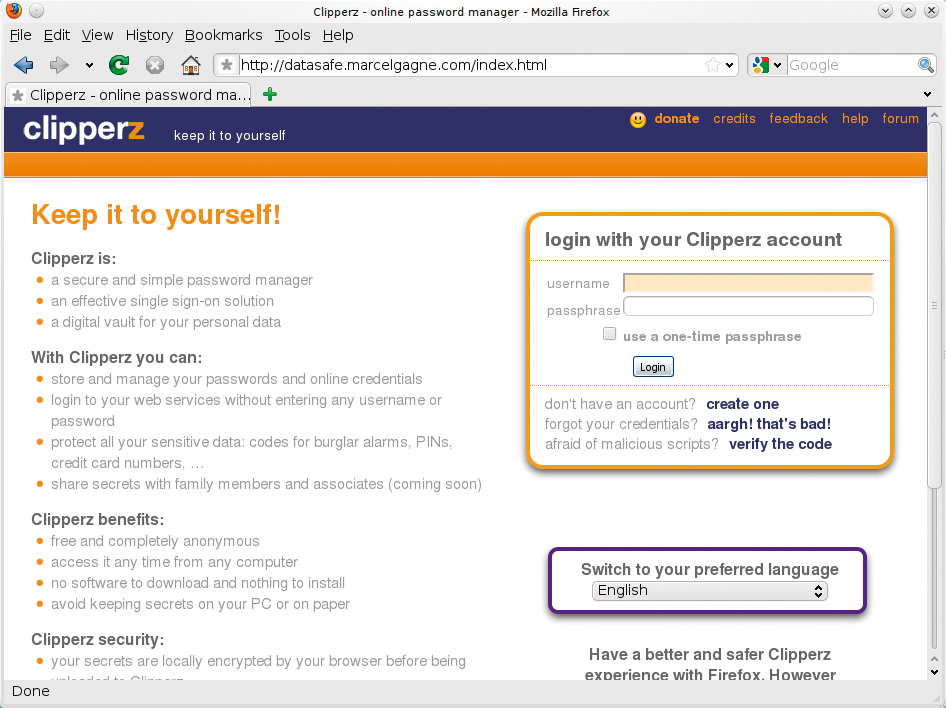
Notice the box labeled login with your Clipperz account. Because this is the first time, you won't have an account, so click the create one link below the login form. Before you do, however, you might just do a double-take on the words forgot your credentials? aargh! that's bad! Consider this a warning not to forget your username and passphrase, because there is no way to get it back. On the other hand, if you feel the need for some good news, the link below reminds you that this is free open source code (licensed under the aGPLv3) and that you can inspect the code if you are worried about malicious code or back doors.
So, to create an account, click the create one link. All you do is select a username and choose a passphrase. The longer your passphrase, the better. A security meter will appear below your passphrase, moving from red to green as your passphrase choice becomes more secure (see Figure 10).
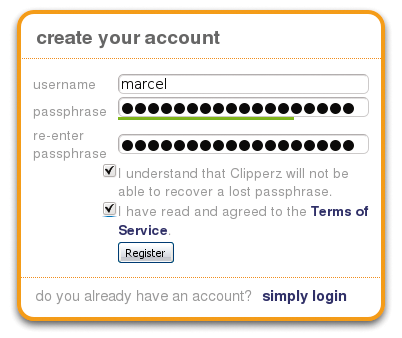
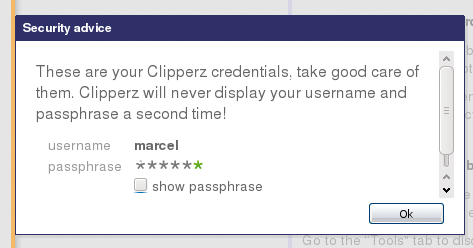
Two checkboxes need your attention at this point. One is to let you know, once again, that if you lose your passphrase, there is no way to recover it or the information you stored. The second is an agreement to the Terms of Service. Once you click the Register button, a final window will appear, giving you one last opportunity to view your username and password (see Figure 11). Simply check the show passphrase checkbox and click Ok.
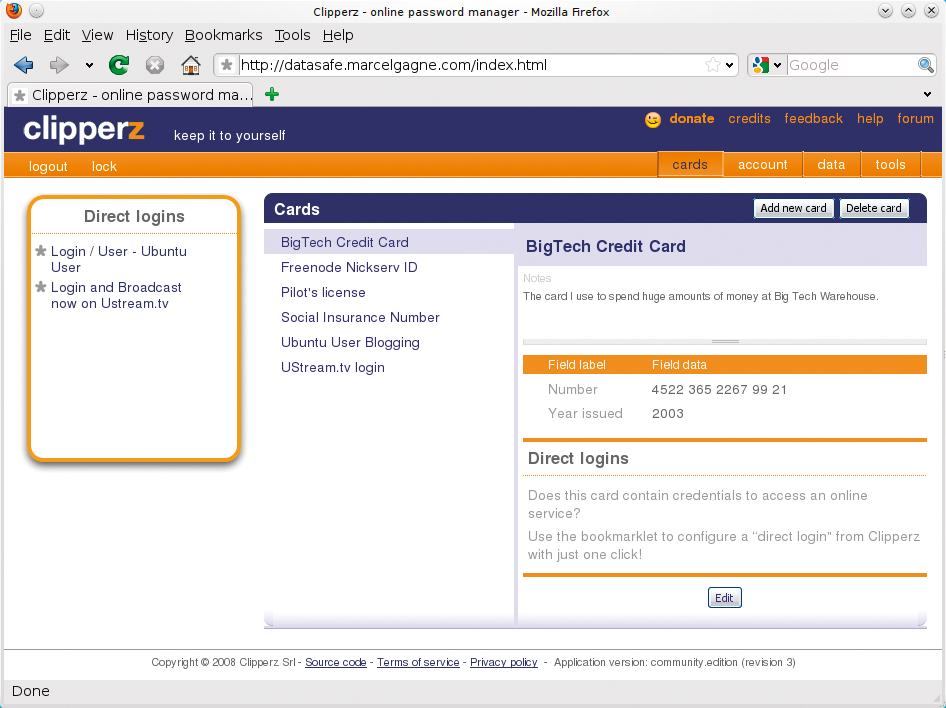
Now you're logged in and ready to start storing your personal information. Along the top, you'll see a menu bar with logout and lock on the far left (see Figure 12). The logout is obvious. In this case, lock acts much the same as a screensaver lock on your desktop. The browser session is still active, but to access anything further, you must reenter the passphrase.
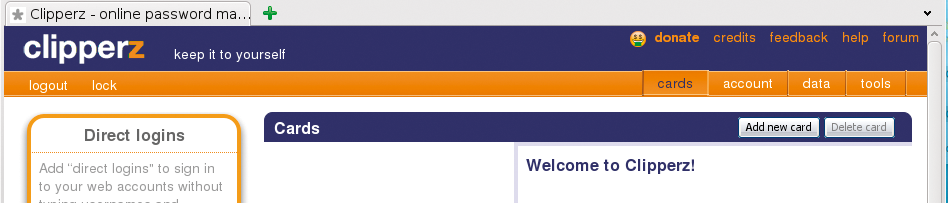
On the left are cards, account, data, and tools. To begin, I'll look at these choices in detail, starting with the cards button.
Cards are the heart and soul of Clipperz. They represent a whole variety of personal information that you can access. Clicking on Add new card lets you store user names and passwords to websites you visit, which is not to be confused with Direct logins, another form of card that you can use to open a new window and log in with a single click automatically.
A web password is just a stored and encrypted password (click unscramble to see it), whereas a direct login contains all the information you need to visit and log in to a site automatically. Under the tools button, there's a bookmarklet that you can add to your Firefox bookmarks toolbar to capture every piece of information you need for that login.
Credit card numbers are exactly what they sound like. Data entry fields are provided for the card number, expiry date, card verification number (CVV2), PIN, and even the login information for the credit card company's website. Another type of card is an address book entry. Although the number of fields provided is limited, you can add fields on the fly, which leads me to the last type of card, the custom card (Figure 13). Essentially, this is a collection of fields organized and itemized as you see fit without constraint. Store whatever you want, however you want.

The next button to look at is account, which is where you can change your current passphrase, view login history, and even delete your account (and everything that goes with it). The coolest thing here is the generation of one-time passphrases that you generate with a click and then print to take with you. Why? Say you need to access your data from a public terminal at an Internet cafe or a well-meaning but Windows-using friend's house. Naturally you are concerned about trojans or key-loggers. One-time passwords can, as the name suggests, be used only once.
On to the data button (or tab). The beauty of Clipperz is that you can access it from anywhere. Private information is as close as your web browser. But what if you don't have Internet access? What if you want to print out the information and take it with you? Under data, you can generate an offline version of your Clipperz data (think USB key or thumb drive) to carry with you and access locally on whatever machine you might be using. Just click on the exported HTML file and you've got a read-only copy of your Clipperz data.
Also, you can Import data from several sources directly into Clipperz (e.g., CSV, Excel, Roboform). An Export function lets you create a printed copy or a JSON file (the offline copy is preferred for security reasons).
Finally, look under tools for the bookmarklet I told you about earlier. If you want some complicated, hard to remember, passwords, a password generator is also available.
In this online world, where we find ourselves with countless accounts, passwords, credit card numbers, PINs, and so on, it's only natural that the very world that demands you keep track of all this information should deliver the tools to manage that same information. In a strange and twisted way, it's not unlike the casinos offering gambling addiction counseling.
So, when the stress of trying to remember too many passwords starts to become too much, don't be afraid to ask for help. A password manager is the tool you need. Just don't forget the master password.
| INFO |
|
[1] KeePassX: http://www.keepassx.org/
[2] Clipperz: http://www.clipperz.com/ |
| THE AUTHOR |
|
Marcel's just this guy, you know? He's also an award-winning columnist, book author, public speaker, radio and television personality, and a well-known voice in the Linux and open source universe. He's also a published science fiction author and editor, a private pilot, and was once a Top 40 disc jockey. He folds a mean origami T-Rex. |