
By Bruce Byfield
Most users think of editing images as a desktop operation. After all, if you can't see the changes you are making, how do you know they are correct? Yet, in defiance of this logic, ImageMagick [1] remains one of the oldest and most widely used tool suites for graphics editing - and it is at its most efficient at the command line.
ImageMagick is most often used in routine editing where seeing the changes is unimportant. For instance, it might be called in a script or used to edit an entire directory of images in a single operation instead of laboriously opening one image at a time in GIMP or Krita. Once you are familiar with ImageMagick, you might also find it faster than desktop equivalents for editing an image, even though you will still probably want a desktop tool for composing an original image. But, within its limits, ImageMagick often proves the most efficient tool for the job.
ImageMagick is not an application in itself, but a cross-platform suite of tools that works with more than 100 different image formats - from standard formats like JPEG, GIF, and PNG, to the raw formats for major brands of digital cameras, to - with the help of Ghostscript - PDF and PostScript files [2]. Generally, it relies on the signature format to identify a file type, although it can fall back on using the extension if necessary.
The suite consists of 11 commands that share a common structure and - mostly - the same options. These tools gather information about files, take screen shots, edit graphics, and allow you to view graphics on the desktop - in short, everything you are likely to do with graphics, including several advanced tasks that are beyond what average users are likely to need. Although you can easily learn the basics, these commands and their options have enough complexity that you will quickly see that ImageMagick is an open-ended tool that you can spend months or even years learning thoroughly.
Because ImageMagick is mainly a command-line application, you won't find it on your desktop. Nor will you find anything by typing ImageMagick at the prompt - instead, you must enter the name of one of its commands.
The syntax of ImageMagick commands is similar to most Bash commands: [command] [options] [input file] [output file]. However, one point to be aware of is that, although ImageMagick options may be words or phrases like GNU commands, they are not prefixed by two hyphens like GNU commands. Instead, they use only one.
The choice of options varies with the command. Often, you can use an option that is unrelated to the command to edit on the fly. For instance, you could use the option -size [geometry] with the composite command to change the dimensions while you combine two images. At other times, an option does not work with a command, which is the case with -size [geometry] and display. To avoid confusion, you might prefer to avoid on-the-fly editing and do most of your editing with convert or mogrify, the main commands intended for detailed editing.
ImageMagick offers dozens of options [3], each with its own set of possible values. Some options, like -debug and -verbose, provide more information to help you troubleshoot and keep track of what you are doing.
But most options are editing functions comparable to those you would find in a desktop graphics editor. For instance, you can use -border [geometry] and -bordercolor [color] to place a border around an image, caption [string] to annotate it, -contrast to improve its appearance, -crop [geometry] to shear it, -flip to reverse its sides, or -size [width]x[height] to alter its dimensions.
ImageMagick even has a limited number of filters to distort an image by adding interesting effects. For example, you can use -blend [percent] to overlay one image on another, -paint to simulate an oil painting, or -sepia-tone to make an image resemble an old photograph.
Other options range from those that anybody can use to those that require a strong knowledge of color theory to understand, let alone use. However, learning the basics of ImageMagick becomes simpler if you adopt the general rule that if you don't understand an option or its possible values, you shouldn't be using it.
Be aware, too, that one option can have subtly different effects depending on the tool you are using. For example, convert -monochrome arrival.png arrival-gray.png produces a copy of an image in grayscale, whereas display -monochrome arrival.png only displays the image in monochrome without altering the file.
Before you edit, you might want to examine a file's characteristics, if only to make sure that you have the right file. The tool for gathering information is identify. As the name suggests, it shows basic information about a file. At its most basic, identify is used with a file name.
For instance, if I enter identify masthead.png in the archived directory of my old website, the resulting output is shown in Figure 1. From left to right, this is the file name, its image format (since not all files will have an identifying extension), the image dimensions, the pseudo-canvas dimensions (which in this case you can tell is not in use by the zeros that follow), the color depth, and the size of the image.
![]()
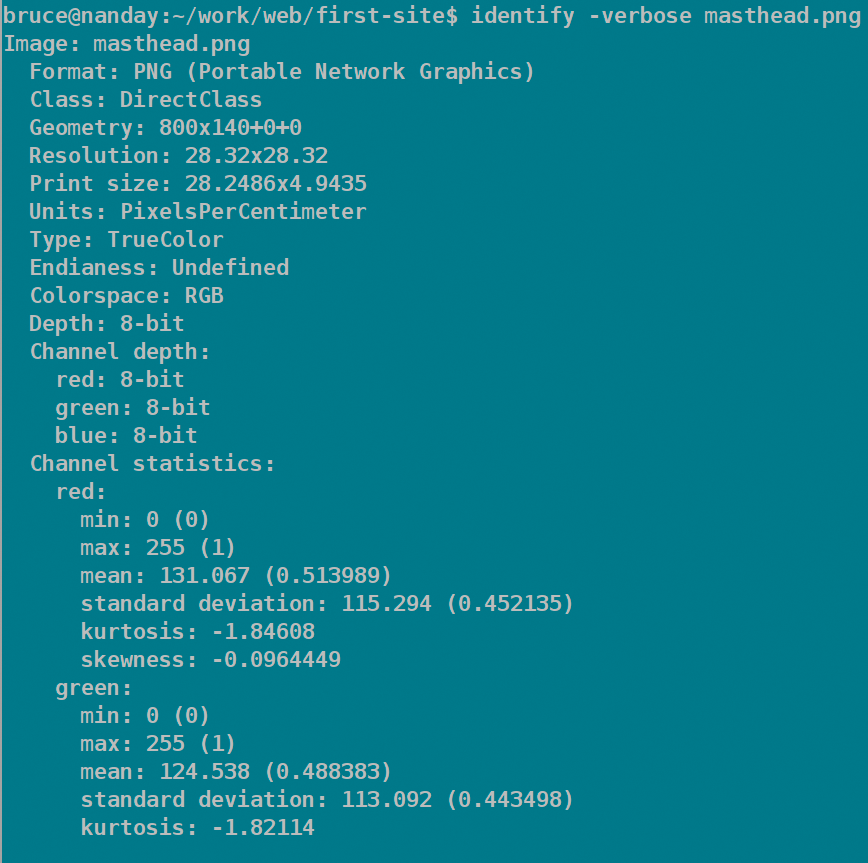
Many users might feel that this is already too much information. However, if you choose, you can add the -verbose option to the command to receive several screens full of detailed information (see Figure 2), including the color model, channel statistics, and compression mode. Alternatively, you can query for individual statistics; for instance, identify -format `%k' masthead.png gives you the number of colors in the image.
Another way to gather file information is to use the compare command (Figure 3), which can be useful if you have different versions of the same image or keyframes in an animation sequence. Its structure requires two input files and an output file. For instance, if I enter compare masthead.old.jpg masthead.png masthead-compare.png, I get an image in which pixels that are different in the second file are colored red - or, if I am unlucky, a message that the files are too different to make this kind of comparison possible.

If I don't care to save the comparison, then the command compare ./masthead.old.png ./masthead.old2.png x: displays the differences on the default X server - that is, on the unnetworked workstation I am working on, my current desktop. Once I am finished looking, I can right-click on the display on the desktop and select Quit from the menu to close it.
Another way to select the material you work with is to use the import command as a screen capture utility. To use import, just enter the command followed by the file in which to save the screen capture. When you press the Enter key, a crosshairs cursor appears, and you can either click in a window or choose a section of the screen to capture. If you want to capture the entire screen, then the command is import -window root capture.png. Should you need a delay to get the terminal out of the way, you can add the option -delay [seconds] immediately after the command.
The basic editing commands in ImageMagick are convert and mogrify. Originally, convert was intended for producing copies of files in another format, but gradually, it has replaced mogrify as the preferred editing command.
The reason, I suspect, is that convert produces copies, requiring that you specify both input and output files. By contrast, whereas mogrify can also produce copies, doing so requires the addition of the format [type] option, which is slightly more convoluted and easier to forget. Because ImageMagick does not include an undo function, convert has a clear advantage if you make a mistake. Otherwise, there are few, if any reasons to prefer one of these commands over another. Just add the options and values you require.
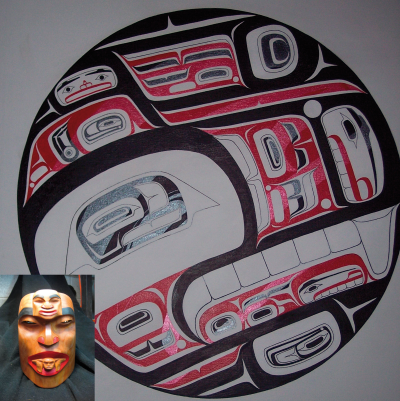
Moving beyond basic editing, the composite command overlays one image over another (Figure 4). For instance, if you want to overlay painting.png with mask.png, you would enter composite mask.png painting.png combined.png, the last file being the output file. If you want to position parrot.png more exactly, you could add the -gravity [value] option, which takes such values as Center, East, or Southwest.
Sooner or later when you use ImageMagick, you will want to see the changes that you have made. When that moment comes, you can use the display command to put an image on your desktop (Figure 5). By default, all the files indicated in the command are displayed at their full size in separate windows, but you can easily view them in a single window with a command such as composite `vid .png", which displays all the files in the current directory that have a PNG extension.
However, that is not all that display does. Click one of the windows that display creates for a single image and you open a floating window with a menu (Figure 6). This menu looks and acts primitive by modern desktop standards, but it provides easy access to the options that most uses are likely to want.
Almost every major programming language has implemented a slightly more sophisticated interface [4], ranging from C's MagickWand to Java's JMagick and Ruby's RMagick. If you are curious, you can see an example of PerlMagick at ImageMagick Studio [5].
Most of these interfaces are not designed with ordinary users in mind, but all of them are functional. The one drawback is that, like all graphical interfaces, they are designed for working with one image at a time, which negates ImageMagick's main advantage.
Because this article is a basic orientation to ImageMagick, I have omitted some commands, such as conjure, which is used to run additional scripts [6]; stream [7], which extracts pixel components to a storage file; and the self-explanatory animate [8] because they are unlikely to be of interest to those just learning their way around ImageMagick. Similarly, I have not tried comprehensively to cover ImageMagick's options, many of which could be articles in themselves, especially when the technical information behind them is added.
Still, the little I have given should be enough to get you up and running. When you need more help - and, if you keep learning about ImageMagick, you certainly will - you can find an overview of ImageMagick's tools in both man and info formats. To find out more about each tool, you need to look it up separately in online help.
However, none of this information is nearly as complete as the information given on the ImageMagick website, both about command structure in general [9] or about tools or options specifically [3]. The project site [10] also has practical examples of complex commands.
More immediately, if you want to know the valid values for an option, you can run the option -list list to see a list of commands whose values are available in a summary. Then you can run -list [command] to see the possible values.
Meanwhile, take what you want from ImageMagick and ignore the rest. Even if you never dig deeply into it, you will find it a powerful tool whenever you have to edit more than a single file.
| INFO |
|
[1] ImageMagick: http://www.imagemagick.org/script/index.php
[2] ImageMagick formats: http://www.imagemagick.org/script/formats.php [3] ImageMagick command-line options: http://www.imagemagick.org/script/command-line-options.php [4] ImageMagick APIs: http://www.imagemagick.org/script/api.php [5] ImageMagick Studio: http://www.imagemagick.org/MagickStudio/scripts/MagickStudio.cgi [6] Conjure: http://www.imagemagick.org/script/conjure.php [7] Stream: http://www.imagemagick.org/script/stream.php [8] Animate: http://www.imagemagick.org/script/animate.php [9] ImageMagick command structure: http://www.imagemagick.org/script/command-line-processing.php [10] ImageMagick examples: http://www.imagemagick.org/Usage/ |