By Klaus Knopper
Knoppix, a Debian-based Linux distribution, is optimized to run from the DVD as a Live system. System administrators and other IT professionals use Knoppix to troubleshoot downed Windows (and Linux) computers, but Knoppix also comes with a big collection of desktop tools, games, and other apps. Knoppix's Live boot orientation makes it a great choice for a flash drive system that puts your documents, settings, and desktop on a keychain.
The latest version of Knoppix comes with new features, such as:
So far, owners of nVidia graphics cards have done without the accelerator functions needed mainly for Compiz Fusion, the 3D window manager, because of a lack of capable free drivers. Although the vendor provides drivers, licensing issues are difficult in a free distribution. Version 6.3 includes drivers for nVidia cards that match the provided kernel. The drivers are pre-built and match the graphics libraries in the Drivers folder. Also, a short script facilitates the install (install-drivers.sh) - in the GUI or in text mode.
After completing the installation, your nVidia graphics card should work in accelerated mode with Compiz support. If your card is not supported, you need to remove the drivers you installed with ./install-drivers.sh -u to get the graphical system working again (because the nVidia libraries are not compatible with the free graphics modules).
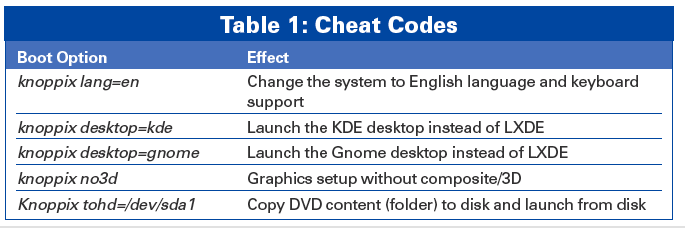
Some machines don't fully support automatic hardware detection. In other cases, a component might be disabled at a very early system state. Knoppix cheat codes help the user troubleshoot problems by defining important features of the boot configuration. You can specify the desktop, language, or keyboard configuration through cheat codes (as shown in Table 1). You'll find a comprehensive list of Knoppix cheat codes in the KNOPPIX directory on the DVD.
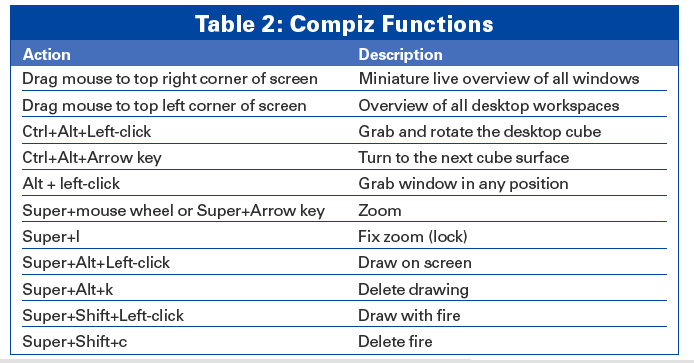
Compiz Fusion was the result of merging the 3D window manager projects Beryl and Compiz; it extends the desktop, adding new functions and effects. Many Intel onboard chipsets and ATI/Radeon cards include the required hardware acceleration and composite (transparency) support out of the box, but nVidia cards and other proprietary cards require the user to install a proprietary driver. Compiz comes up with a wobbling logo shortly after you launch the LXDE desktop. On KDE and Gnome, you can launch Compiz as an add-on from the Settings menu.
Some of Compiz's most useful functions are listed in Table 2. The Super key is somewhere left of the Space key on most keyboards. It may be labeled with a house, a penguin, or a broken window.
You will find the hotkeys and mouse gestures that enable and disable the individual functions through the Compiz-fusion settings in the Bindings tab.
| Knoppix on a USB Flash or SD Card |
|
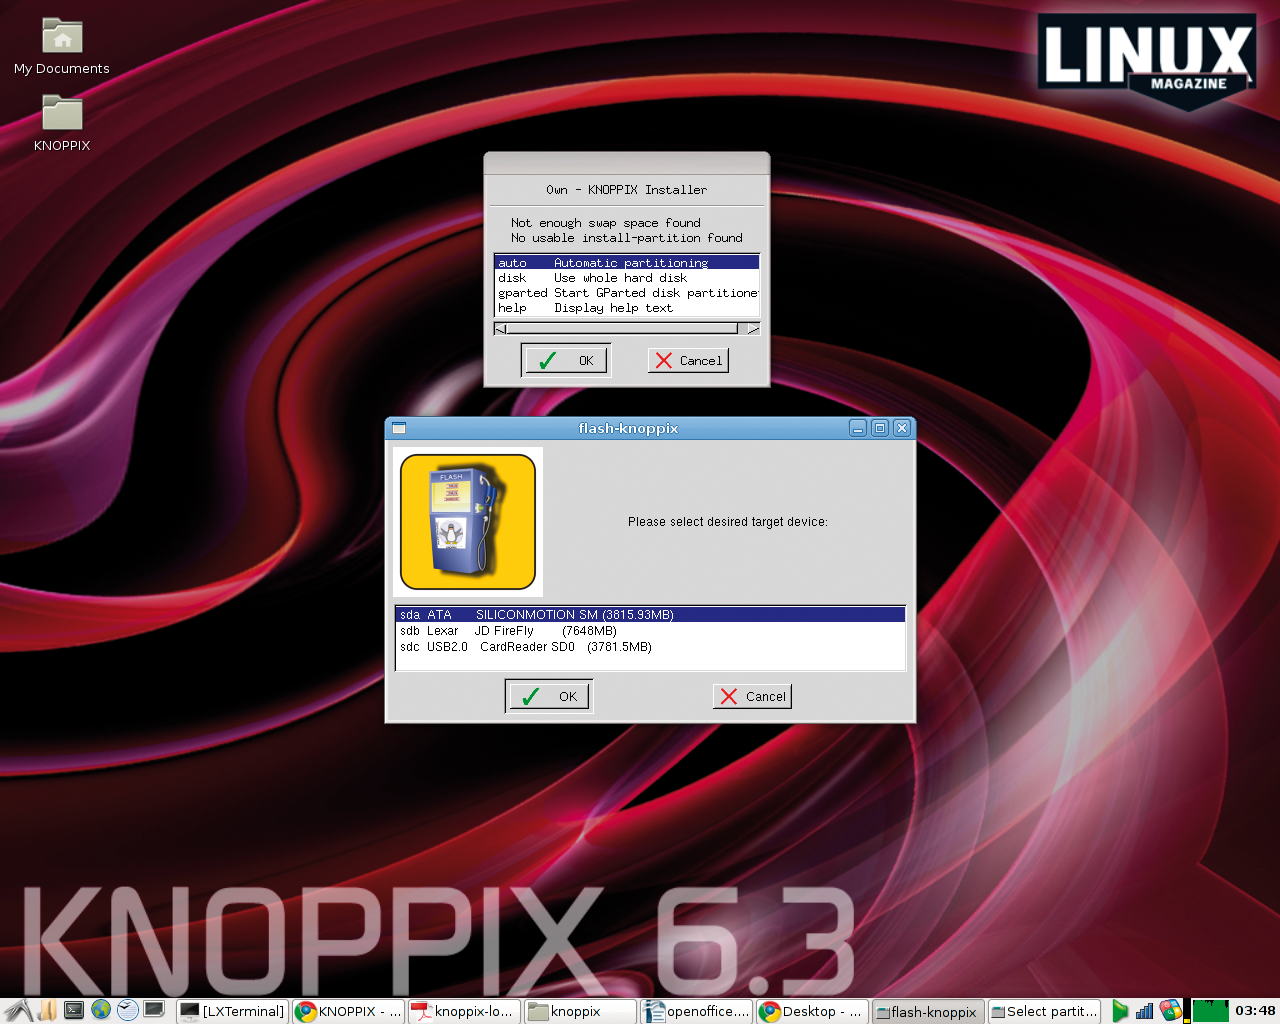
A flash drive or SD card is definitely the most convenient means for creating a mobile version of Knoppix. Installing on a flash disk combines the benefits of automatic hardware detection with the ability to permanently store data such as the system settings. Flash-knoppix (Figure 2), which you will find below Install KNOPPIX on Flash in the Knoppix Settings menu, requires a medium with an existing partition table for the install; the primary partition has to be FAT32. This is the case with most USB flash disks and SD cards, although some operating systems use floppy mode - that is, they do without a partition table. In this case, this method will not work, and you will need to rewrite the partition table. Flash-knoppix creates a copy of the boot folder (and of Knoppix) on the flash medium and installs the Syslinux bootloader, which uses the same syntax as the Isolinux loader used on the DVD. The configuration file for Isolinux, isolinux.cfg, which also contains the default boot options, simply needs to be renamed to syslinux.cfg. If your computer does not support booting from a USB stick, simply insert the USB stick and boot from a DVD, which you can then quickly remove as soon as the kernel and the ramdisk have been loaded. The mini-ramdisk then searches all the existing drives for a KNOPPIX folder, which it finally finds on the USB stick. The first time you boot from the flash disk, you will be prompted to define the size of the persistent Knoppix image in which settings and personal data such as documents and downloads are stored. The maximum size is 4000(MB); the minimum size 200(MB). Please enter a number (without the "MB"!). |
Knoppix is a Debian GNU/Linux system optimized and configured for a Live boot. Many distros, including Debian itself, have more comprehensive installation programs that offer more configurable details. The Knoppix Installer simply unpacks the system running from the DVD or flash disk and copies it, along with a boot manager, to the disk. My only motivation for offering an installer was that many people requested a feature that installs Knoppix quickly to disk. Because Knoppix is reduced to a minimum size, the Knoppix installer is one of the quickest approaches to dropping a ready-to-use Debian system onto a disk. To install to the local hard disk:
1. Create a Linux (data) partition and a swap partition,
2. Decompress the cloop container images on the Linux partition,
3. Set up a bootloader.
The bootloader can launch other operating systems on the same disk. Please make sure you have an easily restorable external backup of all your critical data and the backup medium is not connected to your computer during the install. You could easily make a mistake selecting the medium or modifying a partition, and restoring your system will require a great deal of trouble and effort.
The installer needs a Linux partition of at least 15GB and a swap partition of at least 1GB to install Knoppix. You'll have the choice of manual partitioning using gparted, automatic partitioning of the free (unpartitioned) disk space, or a complete repartition the whole disk.
After installing, update the whole system or individual packages using the typical Debian tools - for example:
sudo aptitude update
sudo aptitude install frozen-bubble
Some caution is advised for kernel updates; the kernel used for Knoppix integrates all the drivers needed for accessing hard disks and drives, whereas you need to create the initial ramdisk with the required modules for the Debian kernel. Normally, the kernel is not automatically updated, unless you explicitly specify that you want an update.
I would be happy to answer your technical questions about the current version of Knoppix - this doesn't include complaints about transport or packaging damage. I tend to collect frequently asked questions and publish the answers. You can use the contact form on http://knopper.net/kontakt/?kontakt=knoppix or mail me at bugs@knopper.net.
| FAQ |
|
Question: Why does Knoppix still have this totally obsolete command-line boot menu? There are so many neat, graphical boot managers that let you use the arrow keys or have menus with color highlighting. Answer: True enough; however, Isolinux and Syslinux are tried-and-trusted boot managers that just keep on working, even if you attach really rare input devices that can completely confuse the graphical boot managers. Question: What is the root password? There must be one; why don't you want to tell us what it is? Answer: Actually, there are no predefined passwords; in other words, all logins are blocked by default. You can easily verify this by looking at the /etc/shadow file: sudo egrep -e '(root|knoppix)' /etc/shadow root:x:14627:0:99999:7::: knoppix:x:14627:0:99999:7::: The x in the second column represents an invalid encrypted password that does not match the password entered. This makes it impossible to log in, if you are not already logged in via Knoppix auto-login. By default, root shells run on the first four text consoles to support rescue and report work on the computer, whereas the GUI-based console runs an LXDE session for the non-privileged user knoppix. You can use the sudo command, or its GUI variants gksudo or kdesu, to switch to superuser mode; all of this works without a password on Knoppix. If you do need to run a program that insists on you entering a password, and which you can't teach to do otherwise, just set a password like this: sudo passwd root sudo passwd knoppix In both cases, you are prompted to type the new password twice. Question: I've heard that you can boot Knoppix across a network without needing a DVD drive or USB flash disk. How do you do this? Answer: Knoppix includes all the components it needs to run as a terminal server. To allow this to happen, one computer on the LAN, which has been configured as a DHCP server and file server using the knoppix-terminalserver starter, has to boot Knoppix from a DVD or flash disk (you can optionally configure this machine as a web cache and DNS proxy). After starting these services, other machines on the same network that have boot-capable network cards or a PXE emulation disk (available from http://www.rom-o-matic.net/) can boot and pick up the exported Knoppix DVD off the network. This means that you can run a complete pool of Linux PCs without having to install Linux on a single machine. Before you try this out, make sure that the DHCP server you launch on Knoppix doesn't collide with an existing server to avoid unpleasant surprises for other users on the network. Question: How do you build Knoppix? Answer: Ever since Microknoppix (Version 6.0), I have used a makefile-based build system with the Debian installation in a subdirectory, which is defined as the working directory using chroot if the filesystem needs to be updated or modified. Boot and graphics files are located outside of this folder. When I put this together, the content of the installation folder was compressed using mkisofs in combination with create_compressed_fs and stored in Knoppix/Knoppix as an image file. The other visible files on the DVD are copied into this, and mkisofs is then used to create an ISO image that boots Isolinux. The whole thing is easily automated using the makefile so that the compression and mastering process is easily reproducible. |