
By Johan Thelin
The KDE desktop and the underlying Qt application framework are developed independently but in parallel. The needs of KDE result in new functionality in Qt, and new functionality in Qt quickly leads to new features for KDE. The latest Qt version 4.6 release is packed with new features that are making their way to KDE desktops around the world. You'll find many of these enhancements in KDE 4.4.
Many of the KDE 4.4 changes are focused on improving the user experience. For instance, the system tray has received a lot of love, and in this era of social networking, the blogging client Blogilo makes its debut. This article takes a deeper look at some of the technical goodies available in KDE 4.4. Specifically, I'll show you a practical example of how to use Qt's animation framework, and I'll describe a scenario for integrating multi-touch technology. Unless you're a KDE programmer, you probably won't have to interact directly with these components, but a quick look behind the scenes at how they work will give you some context for understanding the new generation of special effects that will soon begin appearing in future updates of your favorite KDE applications.
Much of the focus with KDE 4.4 has been to provide a smoother, more polished, user experience. Part of this work has been about animating transitions - for instance, hovering over the buttons of the window frame causes them to fade in and out, instead of just snapping to the current state.
Another area of KDE where smoothness is high on the priority list is the Plasma desktop. The goal is to make it easy for developers to add animations and effects, which will, in turn, make KDE more intuitive for the user. In Qt 4.6, this goal is addressed through a brand new animation framework based on the QAbstractAnimation class. During the development of Qt 4.6, this framework became known as Qt Kinetic.
The animation framework centers around the concept of animating properties. Animation is not limited to movement, rotation, and scaling, but can also affect such things as transparency and color. How does all this look from a developer's point of view? For one thing, the Plasmoid desktop is built around the graphics view classes.
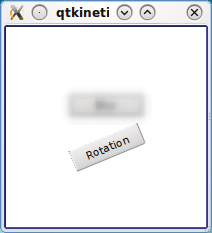
As an example of how this works, I'll animate a set of graphics items in a scene. The important source code for this example is shown in Listing 1. The listing describes two different animations of two widgets that are shown through a graphics view. The resulting window, without effects, is shown in Figure 1.
Listing 1 shows the constructor of the viewing widget, which inherits QGraphicsView. The QGraphicsView class is used to show the contents of a QGraphicsScene. The contents of scenes are built from QGraphicsItem objects.
| Listing 1: Animation |
1 ViewWidget::ViewWidget(QWidget *parent)
 2 : QGraphicsView(parent)
 3 {
 4 setRenderHints(QPainter::Antialiasing | QPainter::SmoothPixmapTransform);
 5
 6 QGraphicsScene *scene = new QGraphicsScene(-100, -100, 200, 200, this);
 7 setScene(scene);
 8
 9 QPushButton *blurButton = new QPushButton("Blur");
10 QGraphicsProxyWidget *blurItem = scene->addWidget(blurButton);
11 blurItem->setPos(-blurButton->width()/2, -10-blurButton->height());
12 QGraphicsBlurEffect *blurEffect = new QGraphicsBlurEffect(this);
13 blurEffect->setBlurRadius(0);
14 blurItem->setGraphicsEffect(blurEffect);
15
16 QPushButton *rotateButton = new QPushButton("Rotation");
17 QGraphicsProxyWidget *rotateItem = scene->addWidget(rotateButton);
18 rotateItem->setPos(-rotateButton->width()/2, 10);
19 rotateItem->setTransformOriginPoint(rotateButton->width()/2, rotateButton->height()/2);
20
21 QPropertyAnimation *blurAnimation = new QPropertyAnimation(blurEffect, "blurRadius", this);
22 blurAnimation->setStartValue(0.0);
23 blurAnimation->setKeyValueAt(0.5, 10.0);
24 blurAnimation->setEndValue(0.0);
25 blurAnimation->setDuration(1500);
26 connect(blurButton, SIGNAL(clicked()), blurAnimation, SLOT(start()));
27
28 QPropertyAnimation *rotateAnimation = new QPropertyAnimation(rotateItem, "rotation", this);
29 rotateAnimation->setStartValue(0.0);
30 rotateAnimation->setEndValue(360.0);
31 rotateAnimation->setDuration(2000);
32 rotateAnimation->setEasingCurve(QEasingCurve::OutBounce);
33 connect(rotateButton, SIGNAL(clicked()), rotateAnimation, SLOT(start()));
34 }
|
Line 4 simply sets up the view render, anti-aliased to transform pixmaps as smoothly as possible. This provides the best possible rendering quality at a computation cost that can be handled by most desktop computers.
Lines 6-7 create a scene and make sure it is shown through this view. The scene is given a rectangle stretching 200 pixels wide and high from the coordinate (-100, -100). If no scene rectangle is specified, the scene will grow as needed - causing the animations to change the dimensions of the scene. This, in turn, will result in sliders being added or the contents being moved around - something that I need to avoid.
Lines 9-11 create the first item on the scene. An item can be anything you can imagine - a bitmap, an SVG drawing, a basic shape such as a rectangle or circle, or even your own code-generated contents. In this example, I embed a widget, which is considered heavy lifting and not recommended when performance is of essence. However, I want to have access to the clicked signal so that I can act on mouse events. This can be done directly using a non-widget item, but that requires that I sub-class the item and catch the mouse button press event.
The button is first instantiated and then added to the scene, which automatically places it inside a QGraphicsProxyWidget. This class takes care of all the details of passing events and drawing operations between the widget and graphics scene. When the button is added, the setPos call centers the button and places it slightly over the middle.
At lines 12-14, one Qt 4.6 enhancement enters the scene: graphics effects. The latest version of Qt lets the developer add graphics effects to any widget or item. The standard effects shipped with Qt are blur, colorize, drop shadow, and add opacity. If you find these effects insufficient, you can create custom effects, as well as combine existing ones. In the source code, a blur effect is applied to the proxy item holding the widget. However, the blur radius is set to 0, so the effect cannot be seen at first. But rest assured, I will use this effect later.
Lines 16-19 are spent on adding another button to the scene with almost the same code I used for the first button. This button appears under the previous button. By default, the transform origin point is located in the upper left corner, but I have centered it in the middle of the button. The caption of the button is Rotation, which gives away why it is important to change the origin point. The rotation looks better if it rotates around the center and not around the upper left corner of the button.
Having created the two buttons, I can start looking at the animation classes. Line 21 roughly shows the idea behind the new property animation class. Given a target object, in this case blurEffect, and a property to animate, "blurRadius", the property animator is ready to go. All that is left is some data on how the property should change over time.
For all animations, a time value moves between zero and one. In lines 22-24, start and end values are set, but also a key value of 5.0 for the time value of 0.5 - that is, halfway through. The result is that the blur radius is increased from zero to five, and then back to zero again. Line 25 tells how long this process will take: one and a half seconds.
Lines 28-31 set up another animation for the rotation property of the other button. The button spins full circle during two seconds. However, line 32 specifies an easing curve, which describes how the animation time value is to go from 0 to 1. In this case, I picked OutBounce, meaning that the rotation will end with a slight bounce. This will make the animation look more attractive than just a simple linear speed rotation.
Take time to pause at line 33 (the final line) to see how the animation framework fits into the graphics effects classes. Also, notice that setting up the scene took just as much code as setting up the animations.
In KDE 4.4, you are bound to see much more animation. A whole set of stock animations are ready to apply to plasmoids. For example, to make an item pulse, simply use the animator to create a pulse animation, apply a widget to it, and connect it to a starting signal, as I have done in the following code:
Animation *pulseAnimation = Animator::create(Animator::PulseAnimation);
pulseAnimation->setWidgetToAnimate(button);
connect(button, SIGNAL(clicked()), pulseAnimation, SLOT(start()));
Another technology that is finally appearing in Qt and KDE is multi-touch. Popularized through advanced phones, multi-touch technology has reached tablet PCs and desktop software. Multi-touch technology lets the user operate a touchscreen device by simultaneously touching with two fingers.
The introduction of multi-touch presents the developer with two problems. First, multiple parts of the user interface can be altered by the user at once - just as if multiple mouse pointers were available - which limits the number of assumptions that can be made when widgets depend on each other. This problem is not really something that can be addressed from Qt or even KDE; instead, each application developer must consider the implications of this before enabling multi-touch support.
Second, interpreting what multiple touch points are telling you is addressed through gestures, which let Qt interpret touch point movements. Gestures can be considered at a higher level API, which is far easier than trying to decode and interpret the interaction manually between multiple touch points.
Listing 2 includes the better part of the PinchWidget class (Figure 2), wherein the scaled and rotated rectangle is controlled by the pinch gesture. The dark rectangle represents the original location before rotation and scaling.
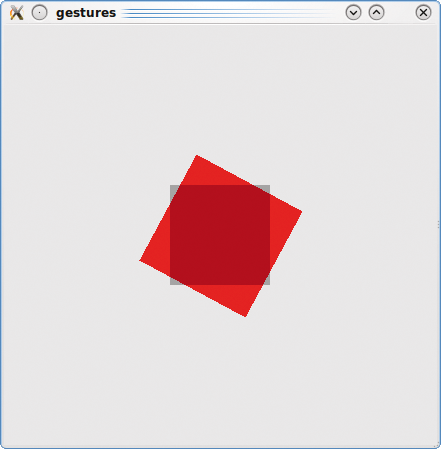
Note: The pinch gesture is the two-finger gesture that made the iPhone famous. Move the fingers apart to zoom in, and move them together to zoom out. Rotating the finger grip rotates the image. The PinchWidget does all this, but to a simple rectangle.
Outside the listing, in the constructor of PinchWidget, a call to grabGesture(Qt::PinchGesture) is made. Without this call, the widget will not receive any pinch gesture events. When the gesture has been grabbed, the program can intercept it as an event.
The event method (lines 1-6 of Listing 2) intercepts gesture events and passes them to the gestureEvent method (lines 8-16), which in turn, determines whether the gesture is a pinch gesture. If so, it passes it to the pinchGesture method.
The pinchGesture method (lines 18-37) interprets the gesture and updates the state of the widget accordingly. The QPinchGesture class keeps track of what has changed, which I use in the first if statement (line 21) to test if the rotation angle has changed. If so, the program updates the rotationAngle variable. If the scale has changed (line 27), the program updates the currentScaleFactor (the scale of the current resize operation).
The if statement at line 31 checks if the gesture has finished. If so, I update the scaleFactor and reset the currentScaleFactor to 1 to prepare for the next pinch gesture to take place. Regardless of what happens next, the program repaints the widget in line 36.
| Listing 2: PinchWidget Class |
1 bool PinchWidget::event(QEvent *event)
 2 {
 3 if(event->type() == QEvent::Gesture)
 4 return gestureEvent(static_cast<QGestureEvent*>(event));
 5 return QWidget::event(event);
 6 }
 7
 8 bool PinchWidget::gestureEvent(QGestureEvent *event)
 9 {
10 if(QGesture *pinch = event->gesture(Qt::PinchGesture))
11 {
12 pinchGesture(static_cast<QPinchGesture*>(pinch));
13 return true;
14 }
15 return false;
16 }
17
18 void PinchWidget::pinchGesture(QPinchGesture *gesture)
19 {
20 QPinchGesture::ChangeFlags flags = gesture->changeFlags();
21 if(flags & QPinchGesture::RotationAngleChanged)
22 {
23 qreal value = gesture->rotationAngle();
24 qreal lastValue = gesture->lastRotationAngle();
25 rotationAngle += value - lastValue;
26 }
27 if(flags & QPinchGesture::ScaleFactorChanged)
28 {
29 currentScaleFactor = gesture->scaleFactor();
30 }
31 if(gesture->state() == Qt::GestureFinished)
32 {
33 scaleFactor *= currentScaleFactor;
34 currentScaleFactor = 1;
35 }
36 update();
37 }
|
Handling these events will be more and more important for new applications as the input devices are updated. However, for KDE developers, it need not be so complicated. For instance, all Plasmoids can be pinched for rotation and scale out of the box. In addition to pinching, Qt 4.6 enables panning - that is, scrolling by touch (for example, moving to the next picture in a picture viewer) - and swiping. All these gestures are available to KDE application developers and, in the end, the users.