
By Bruce Byfield
When you turn on a GNU/Linux computer, one of the first things you see is a bootloader that allows you to choose which kernel or operating system to use. These days, the bootloader you see is almost always GNU GRUB (GRand Unified Bootloader).
GRUB currently exists in two versions: Legacy GRUB, which has been in widespread use for more than a decade, and GRUB 2, which is now nearing completion. However, with the exception of Ubuntu 9.10, most of the major distributions are still using Legacy GRUB. Some distributions, especially minor ones, I suspect will continue using Legacy GRUB, because it is easier to edit manually. For these reasons, in this article, I will discuss Legacy GRUB and leave GRUB 2 for next time.
As the name indicates, GRUB is designed to be a flexible bootloader, capable of starting a wide variety of operating systems from an equally wide variety of internal and external devices and filesystems. This flexibility is the main reason why GRUB is the most popular bootloader in free software. No matter what your distribution or the complexities of your configuration, GRUB manages them reliably, with remarkably few problems.
The first 512 bytes of any bootable device or partition is known as the master boot record (MBR) and contains the primary bootloader along with the device's partition table. GRUB works by replacing the primary bootloader with its Stage 1. Often, GRUB is installed on the first partition of a hard drive, although you can also install to a different partition.
Because the MBR is so small, Stage 1 is mainly a pointer to Stage 2, which is located outside the MBR and works with configuration files in /boot/grub/ to give you a menu of the different kernels and operating systems configured for use.
An optional Stage 1.5 is also sometimes used, depending on the operating systems and the filesystems involved. For instance, FreeBSD uses Stage 1.5 routinely, as do the JFS and XFS filesystems.
Once you make a selection in Stage 2 (or the default begins after the timeout expires), GRUB either starts your selection itself or passes control to another bootloader, such as the one used by various versions of Windows. Because Stage 2 does not need to be squeezed into the MBR, GRUB can be far more versatile than most bootloaders and can allow more options.
To configure the details of how Legacy GRUB works, use a command line, either at the Stage 2 menu or from the operating system itself, or edit the configuration file in a text editor. Both methods require a bit of background knowledge (although some distributions like Debian add extensive comments to menu.lst to guide you), but both methods are also relatively safe as long as you observe elementary precautions, such as backing up key files and always keeping at least one bootable menu item at all times.
Before you edit GRUB, you need to know the naming system it uses for bootable devices. Annoyingly, the naming system is different from that of GNU/Linux or Windows; fortunately, though, it is simple enough to use.
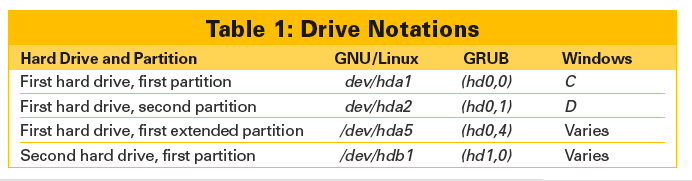
Under Legacy GRUB, each partition is described by five characters enclosed in parentheses. The first two characters are lowercase and describe the type of device, such as hd for hard drive or cd for CD drive. The third character is the number of the device, starting with 0, followed by a comma, then the number of the partition on the drive: 0-3 for a primary partition and 4 or higher for extended partitions.
Under this system, (hd0,1) refers to the second primary partition on the first hard drive, whereas hd1,5) refers to the second extended partition on the second hard drive). The logical partitions that you can see when using Fdisk or GNU Parted, are not included in GRUB's reckoning at all.
If you find this confusing, that's understandable. After all, if you are running GNU/Linux and Windows on the same machine and using Parted for a reference, you could have four different notations to identify the same drive number. To avoid problems, the first time you use Legacy GRUB, you might want to create a table of equivalents to help you avoid making mistakes (e.g., Table 1). Otherwise, you could easily enter the wrong drive as you edit.
Legacy GRUB's configuration file is /boot/grub/menu.lst. Like many configuration files, you can edit menu.lst by opening it in a text editor when logged in as the root user.
The menu.lst file is divided into sections, or stanzas. The first stanza sets the general features of GRUB (Figure 1). The other stanzas define the characteristics of each operating system or kernel that you can boot; however, they can also serve as dividers. For instance, if you are dual-booting Debian and Windows, Debian adds a stanza with the title "Other operating systems:" before the Windows stanza. In all stanzas, a field is usually separated from its entry by a tab, but, just to make editing confusing, some fields use an equal sign after the field.

Many of the possible entries in the first stanza are optional, but they help you customize Legacy GRUB's behavior. Others can be added for special cases, such as the use of Xen hypervisors.
Perhaps the most commonly used is timeout <seconds>, which sets the number of seconds before the default is booted if you make no other choice. The default is either the operating system or kernel defined in the second stanza or the one defined with default <stanza>, which numbers stanzas from 0, starting with the second stanza.
Another widely used first-stanza option is howmany=<number>, which sets up the number of entries that can be added to menu.lst when it is edited automatically by a process, such as the addition of a packaged kernel. This field becomes important when you have the /boot directory on a separate partition with limited space. However, howmany can be dangerous if set too low; if anything goes wrong, it can leave you without a bootable kernel.
Also, you can secure GRUB by assigning a password in the first stanza and adding the lock field to the other stanzas. To add a password, first run /sbin/grub-md5-crypt to encrypt a password. Then add to the first stanza password --md5 <password hash>. Although you can use password with an unencrypted password, if you do, you should change the permissions on menu.lst so that only the root user can read it.
Other first-stanza options are cosmetic. To customize the menu with a limited number of colors, use color <normal background>/<normal-foreground> <highlighted background>/<highlighted foreground> [1]. This option is popular with distributions that want to brand GRUB with their own colors - or at least an approximation of them. More elaborately, you can add a message by creating a text file and pointing to it specifying the partition and directory - for example, gfxmenu (hd0,0) /boot/grub/message.
If you really want to customize GRUB's appearance, you can add a splash image. Many distributions include a splash image package, but you can also create your own in .xpm.gz format in GIMP with dimensions of 640x480 pixels and no more than 16 colors. Then you must point GRUB to the image with a command like splashimage=(hd0,0) /boot/grub/message/splash.xpm.gz, modifying it to the specific circumstances.
The other stanzas in menu.lst define an entry so that Legacy GRUB can use it to boot your computer. Typically, a Linux kernel or distribution will have four fields (Figure 2):
For a Windows stanza (Figure 3), the first two fields are title and root, just as for GNU/Linux, then:
To add a stanza as a divider, all you need is a title.
Besides lock, which is used when GRUB is password-protected, dozens of other options can be added to a stanza as the circumstances require [2]. For different operating systems, you might also need a specific set of fields [3]. However, in most cases, these instructions should be sufficient.


Instead of editing menu.lst, you can also use the GRUB command line (Figure 4). Most people use the GRUB command line primarily for rescue operations, although it is also useful for testing a configuration.
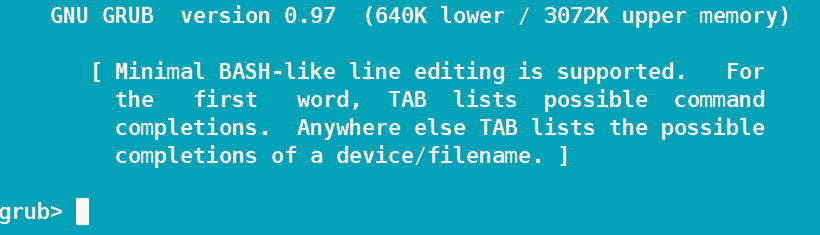
To open the GRUB command line, press the e key when the menu appears as you turn on your computer. Alternatively, enter grub from a Bash terminal, from a hard drive. If you want to start a Legacy GRUB command line from a Live CD, you will have to mount hard drives and possibly use chroot first. In all these cases, your action will take you to a prompt that reads grub>.
At its simplest, the GRUB command line is useful to boot a kernel or operating system. Simply enter the same fields that define an item in the menu.lst, one at a time. However, you can omit title, because you have no need to distinguish the entry from any others in GRUB.
If you are unsure what you can boot or if you need to repair GRUB, the command line has a set of several dozen commands that you can view by entering help. Some of these commands are the same as in Bash, such as cat, which displays files, or find, which locates them (Figure 5). Similarly, you can use md5crypt to encrypt a password and halt or reboot to turn off the computer. Just as when you log in to the Bash command line as another user, you can return to Bash from the GRUB command line by entering quit.
![]()
Additionally, the GRUB command line has other Bash features, including a scrollable history and tab completion. Tab completion can be especially useful when you are gathering information to repair a machine. For example, entering root (hd and pressing the Tab key shows all bootable partitions on the machine. If only one hard drive is present, you can use root (hd0, plus tab completion to get a list of partitions and their filesystems. Similarly, once you know or have set GRUB's root partition, you can then enter kernel /boot/vmlinuz and press Tab to list all the possible kernels.
Armed with this information, you can use root to set GRUB's location, then setup to reinstall GRUB. After that, open menu.lst in a text editor to make any changes necessary to the stanzas so you can boot all the possible kernels and operating systems present.
The command line and menu.lst are only the most common ways to interact with Legacy GRUB. If you have trouble with either of these methods, you can use the command update-grub to add entries for any installable updates to the end of menu.lst - although you might still have to hand edit the results. Similarly, you can use grub-install to install or reinstall GRUB.
Still another option is to use another bootloader. Although I cannot recommend using the Windows bootloader with GNU/Linux because the procedure makes working with Legacy GRUB seem simple, you might consider the Linux Loader, or LILO [4], the boot manager that GRUB replaced in most distributions 11 years ago.
And if none of these options work for you, or if you want the very latest info, then you might want to read about GRUB 2 next month.
| INFO |
|
[1] GNU GRUB manual - Color: http://www.gnu.org/software/grub/manual/html_node/color.html
[2] List of commands: http://www.gnu.org/software/grub/manual/html_node/Command_002dline-and-menu-entry-commands.html#Command_002dline-and-menu-entry-commands [3] OS-specific notes: http://www.gnu.org/software/grub/manual/html_node/OS_002dspecific-notes.html#OS_002dspecific-notes [4] Configuring LILO: http://www.control-escape.com/linux/lilo-cfg.html |