
By Dmitri Popov
By using the shell scripting capabilities of Linux, you can automate virtually any task on your system. Even if you are not a programming guru, you can still write scripts that can take care of mundane tasks - from mounting remote shares to performing backup.
Despite all of its power, shell scripting has one serious limitation: Scripts are only good for controlling and automating command-line tools and graphical applications that support command-line arguments. Therefore, if you want to automate graphical desktop environments like Gnome or KDE or automate GUI-based applications, traditional scripts won't cut it.
Enter Sikuli [1], a unique scripting environment that lets you automate GUI-based applications with consummate ease. Sikuli doesn't rely on any application programming interfaces and uses plain screenshots of GUI elements as building blocks. Basically, instead of describing where to click or which menu item to choose, you simply feed Sikuli a screenshot of the specific area into the script.
Sikuli analyzes the image pattern, finds the appropriate element in the graphical interface, and performs the specified action on it. Needless to say, this dramatically simplifies the process of writing scripts. In fact, Sikuli's approach is so intuitive that you can start writing scripts in a matter of minutes, even if you don't have any programming experience.
Sikuli is written in Java, so the first order of business is to set up the Java Runtime Environment on your system. Additionally, you'll need to install a couple of required packages. On Ubuntu, this can be done by running the following command in the terminal:
sudo apt-get install libcxxtools6 libcxxtools-dev libhighgui1 libhighgui-dev libcv1
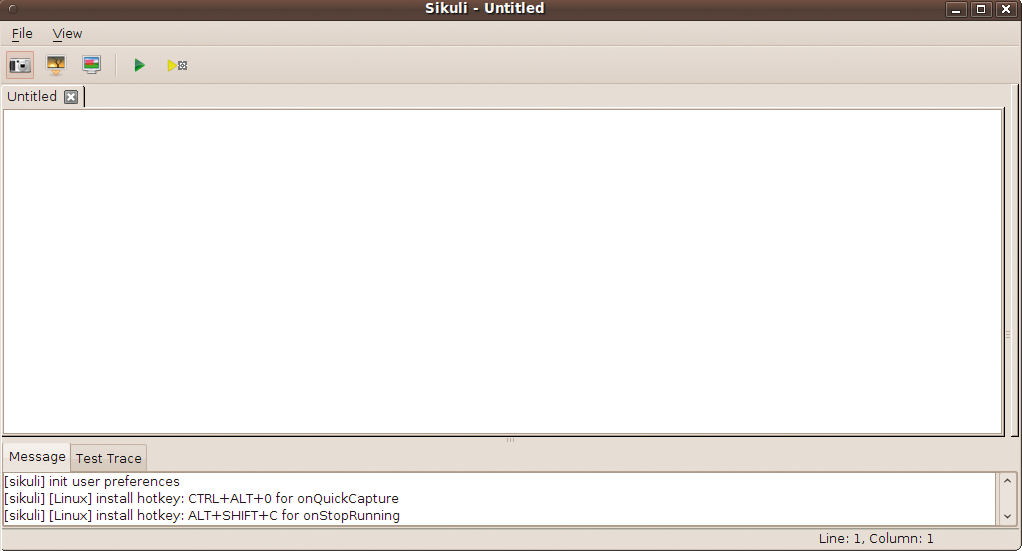
Once all the pieces are in place, grab the latest version of Sikuli and unpack the downloaded archive in the directory of your choice (e.g., your home directory). In the terminal, switch to the resulting Sikuli-IDE directory and launch the Sikuli IDE with the sikuli-ide.sh script. Alternatively, you can launch Sikuli by double-clicking on the sikuli-ide.jar archive, provided the .jar file type is associated with the Java Runtime engine.
Sikuli's interface is pretty easy to understand. The main toolbar offers a handful of buttons that provide quick access to all Sikuli's essential functions. The three most important buttons here are Capture, Load, and Run. The Capture button lets you grab a screenshot of a desired element or area of the graphical interface, whereas the Load button lets you insert an existing screenshot into the current script. As you might have guessed, you can use the Run button to execute the currently opened script. Thanks to the support for tabs, you can use the Sikuli IDE to open and manage multiple scripts at the same time.
When working with Sikuli, you should keep a few things in mind. For one, Sikuli doesn't cope well with multiple displays. So, if you want to make sure that your scripts do what they are supposed to, make sure you don't have any external monitors connected to your machine.
In the beginning, most of my scripts refused to work properly. It turned out that because I enabled the left-handed mouse option, all click actions were interpreted as right-clicks. So for all left-handed users, the fix is simple: Use the right-click action instead of click, and vice versa.
The Linux version of Sikuli doesn't support keyboard shortcuts yet, so you have to use the Capture button to take screenshots. Alternatively, you could use an external utility like Shutter to take screenshots and then import them into your script using the Load button. The use of a dedicated screenshot tool gives you more control and speeds up the entire process. However, just remember that all screenshots must be in the PNG format.
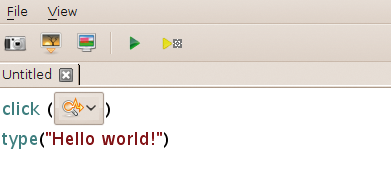
To learn the ropes, I'll start with creating a simple script that clicks on the Deskbar applet icon in the panel and types "Hello world!" in the Search field. Obviously, for this script to work, you have to install the deskbar-applet package first and add it to the panel. A Sikuli script consists of a series of actions such as click, wait, type, and so on. Each action can use a screenshot that specifies the target GUI element or area. For example, if you want the script to click on a specific button in the desired application, you add the click action followed by the screenshot of that button. In this case, the script should do two things: click on the Deskbar applet in the panel and type the "Hello world" string into the Search field.
To achieve that, you have to specify two steps: click, with a screenshot of the Deskbar's button, and type, with the "Hello world!" string specified, as shown in Figure 2. Now hit the Run button in Sikuli's main toolbar and behold the magic performed by the script.
Now that I've shown how Sikuli works, I'll create a script that actually does something useful - for example, mounting a remote share via SSH using the Places | Connect to Server tool. The entire script is shown in Figure 3, and most of its steps are obvious.
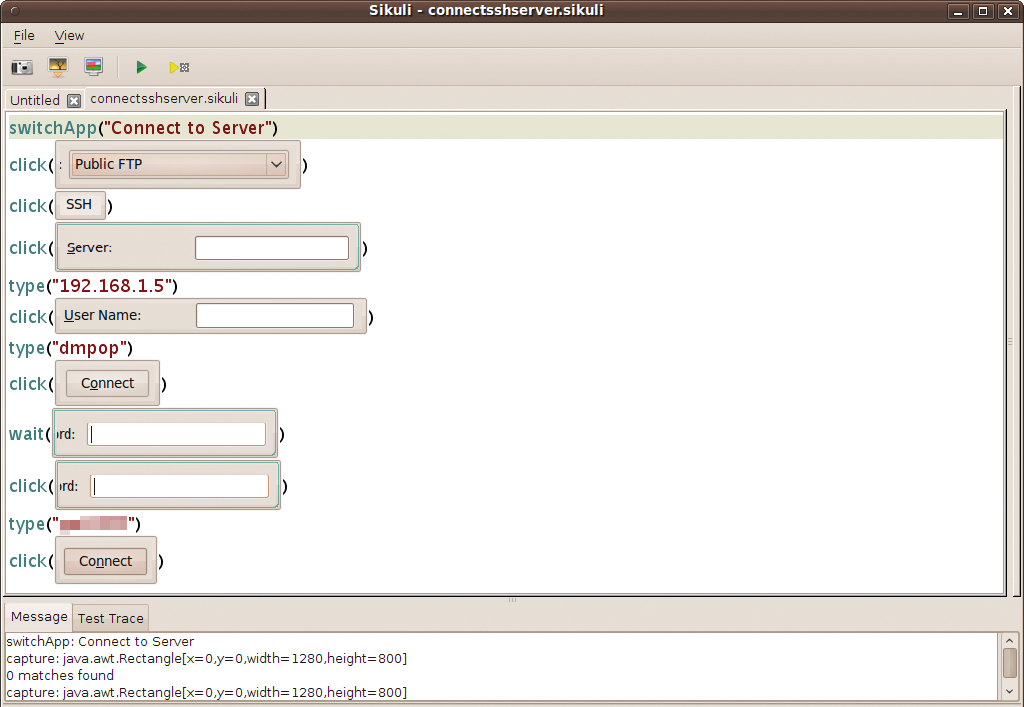
A series of click and type actions are used to enter the fields in the dialog box and type the specified strings, such as server address and user name. However, two steps require closer examination. As the name suggests, the switchApp action points the script to a specified application (in this case, it's the Connect to Server utility). Selecting an item from the drop-down list requires two click actions: The first one clicks on the drop-down list itself (i.e., the Server type list), whereas the second clicks on the desired list item (i.e., SSH). To grab the list item using Sikuli, you have to adjust the capture delay, so you have enough time to click on the drop-down list before Sikuli enters screenshot mode. To adjust the capture delay, choose File | Preferences and specify the delay in seconds in the Capture delay field.
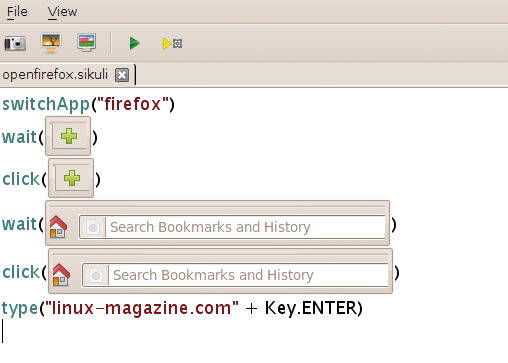
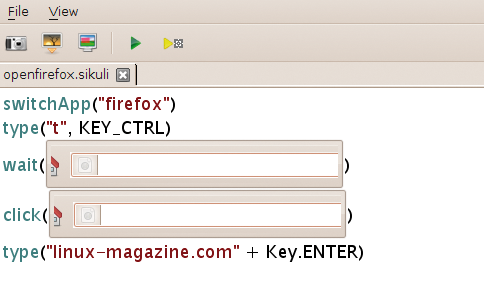
Besides the ability to type specified strings, Sikuli can also handle keyboard key presses and modifier keys, which provide a more efficient way to automate applications. For example, take a look at the script in Figure 4. The script switches to the Firefox browser, clicks on the New Tab button, enters the specified URL, and triggers the Enter key press. To do the latter, the script uses the Key.ENTER argument.
Because Sikuli supports key modifiers, you can replace actions that click on the New Tab button with the type("t", KEY_CTRL) command that emulates the Ctrl+T keyboard shortcut (see Figure 5). Other supported modifier keys include KEY_ALT (the Alt key), KEY_META (the "Meta" or Windows key), and KEY_SHIFT (the Shift key).
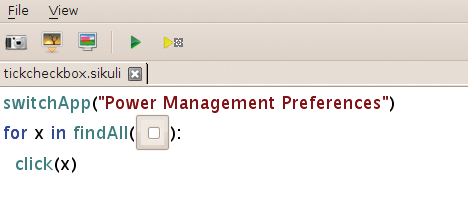
Using the click action, you can also tick and untick a desired checkbox in a dialog window. But, what if the dialog contains several checkboxes and you want to tick them all at once? This is where the findAll action comes in handy. This action finds all occurrences of the specified image. So, if you use a screenshot of a checkbox with the findAll action, it will find all checkboxes in the specified dialog window. Now you only need to wrap this action into a for ... in loop to make the script go through all the found checkboxes and tick them.
The script in Figure 6 ticks all the checkboxes in the Power Management Preferences dialog box. If you've ever tried to work with Python, the code in the script will look familiar to you. This is no coincidence, because Sikuli uses Jython as its scripting foundation. Jython is an implementation of the Python programming language written in Java, which explains why Sikuli scripts look suspiciously like regular Python scripts. Although working with Sikuli doesn't require any programming skills, a working knowledge of Python can help you to put Sikuli to some advanced uses.
Although Sikuli usually does a good job of recognizing image patterns in screenshots, the Sikuli IDE provides a handy feature that lets you test and adjust recognition precision. To do this, click on the desired screenshot in the script, and Sikuli opens the Preview window, where the areas that match the image pattern in the screenshot are marked with red rectangles. This can help you troubleshoot the script, just in case it doesn't hit the right spots in the specified interface. Also, you can use the Similarity slider to make recognition more or less precise. Once the script is ready, you can export it as an .skl executable package by choosing the Export executable command from the File menu. Then, you can execute the script without opening it in the Sikuli IDE using the following command in the terminal:
path/to/sikuli/sikuli-ide.sh script.skl
Replace path/to/sikuli/ with the actual path to the Sikuli IDE directory and script.skl with the name of the script you want to run.
Sikuli is a fascinating project with tremendous potential. The project is still in its infancy, though, so it has room for improvement. Most notably, the documentation that covers Sikuli's features is still lacking. For now, the best way to come to grips with Sikuli is to dive right in to it and discover its possibilities by writing scripts. To start, you can use the "Sikuli Script Commands for Jython" section [2] of the documentation and the project's blog [3].
| INFO |
|
[1] Sikuli: http://groups.csail.mit.edu/uid/sikuli/
[2] Sikuli Script commands for Jython: http://sikuli.org/documentation.shtml#doc/pythondoc-python.edu.mit.csail.uid.Sikuli.html [3] Sikuli official blog: http://blog.sikuli.org/ |