
By Johan Thelin
When the KDE desktop made the transition from version 3 to 4, many things changed. One of the larger changes was the introduction of the plasma desktop. Instead of a background image with icons, the desktop is now host to plasmoids, also known as desktop widgets.
Plasmoids can do everything from showing icons or presenting a slide show of your favorite pictures to monitoring your RSS feeds and letting you update your Twitter feed. In this article, I will look at how to develop plasmoids as well as the architecture behind plasma.
The plasma desktop is built from several components. Two are of particular interest: the visualization and the data sources. The important thing here is not these two parts specifically but the fact that there are two parts. The reason for this is that the plasmoid visualization usually is separated from the data. This gives results in a good model-view architecture, but also provides the ability to visualize common data in multiple ways without having to re-implement the code for the data source.
In this separation, the data engines have been equipped with common goodies, such as support for polling, control of the minimum polling period, the ability to support asynchronous events, a mechanism to provide multiple values, and so on. All of these abilities are given from simply inheriting the Plasma::DataEngine base class.
In the same manner, by inheriting from Plasma::Applet, you get a good starting point for creating applets. These applets, when combined with a desktop file, graphics and more, are what make up plasmoids. So, I'll get started and build a plasmoid of my own.
The plan is to build a simple system load monitoring applet. It will show the load average from the last minute in a traffic light, as shown in Figure 1. The light indicates low, high, and too high load levels with the colors green, yellow, and red, respectively. Luckily, a data engine is already available for this: the system monitor. Before I go into detail about it, I'll show you how to lay out some boilerplate code.

To start, look at the header file shown in Listing 1. In the file, the class PlasmaLoadLight is derived from the Plasma::Applet class. The constructor, paintInterface, and init provide implementations of virtual functions. The idea with init is to push complex parts of the initialization from the constructor to init. The paintInterface constructor is called when the visualization needs to be updated.
Then follow the two slots sourceAdded and dataUpdated. A slot is a callback function that you can connect to a signal. More on this later. The last part of the class contains the m_load private that contains the current load level.
The interesting code follows in the implementation of the class shown in Listing 2. Starting from the top, lines 5-12 show the constructor implementation. Here, I simply tell plasma to use the standard background and set a reasonable starting size. The other part of the class's initialization takes place in the init function (lines 14-18). Here, I request the data engine systemmonitor and connect the signal sourceAdded to a slot with the same name in the applet. This means that for every source of information that the system monitor data engine adds, the sourceAdded slot of the applet will be called. This brings me to the next function in the implementation: sourceAdded (lines 20-28). The data engine emits a signal that will trigger this function once for each source it makes available. The system monitor data engine simply lists its sources, whereas other engines could have sources that appear and disappear during its lifetime. Examples include data engines supporting removable hardware and networking services that appear and disappear. Therefore, the sourceRemoved signal is available from the data engine class, but I ignore it in this case.
When the source cpu/system/loadavg1 is added, I ask the data engine to connect me to the source by way of the connectSource method. The arguments of this function are, from left to right: source name, receiving object, and sample period in milliseconds. So, in line 24, I ask to be updated about the cpu/system/loadavg1 every second.
The connectSource method only takes a receiver object pointer, not a slot to connect to. This is because it assumes the receiver to have a slot with the following signature present:
dataUpdated(const QString &sourceName, const Plasma::DataEngine::Data &data)
When the requested source has new data available, the dataUpdated slot is triggered. It is important to understand that the sampling period given when connecting to a source is a hint (i.e., the period can be forced longer by the data engine). Also, this controls the period between requests, not necessarily the period between new data.
For instance, imagine an RSS feed-monitoring data engine. It might not make sense for this data engine to request new data at a shorter period than 10 seconds. This means that you will not get shorter periods. Also, when making a request across the network, the reply is asynchronous, and the time for the result to return is arbitrary. Thus, your dataUpdated slot might be triggered at uneven intervals as the data ticks in.
Next in the source code, the dataUpdated method implementation appears in lines 30-41. Because this slot is called for all data sources, I start by ensuring that it is indeed the expected source cpu/system/loadavg1. The data is then given as a hash table with key-value pairs. A little oddity of the system monitor data engine is that it tends to return a couple of results without any proper data before the actual expected data starts coming in. This issue is not really too important, but to avoid any problems, I also check that a key actually exists in the data. In this particular case, I only get one value, so if there is a key, I pick the first value and use it to update the m_load member variable.
Having updated m_load, I call update to trigger a repaint event. This in turn results in a call to the paintInterface method, where the data is used to paint a circle with the value as text inside of it.
The last step of the implementation is to export the class as a plasma applet in line 64. The K_EXPORT_PLASMA_APPLET macro takes two arguments: a name for the library followed by the name of the class to expose. After that, the .moc file from the meta-object compiler is included in the file because only a single class is involved in this case.
Exporting the class as an applet is the first part of building a plasmoid. So that the plasma desktop is able to find your applet, you must create a desktop file for it. The desktop file is a list of key-value pairs and can be downloaded together with the source code for this project [1].
The keys used are:
Now all that is left is to build and install the plasmoid in your KDE environment. The KDE project uses the CMake tool for building. To control CMake, a CMakeLists.txt file is used. This file is more or less a boilerplate piece of code with the right library name in it and can be downloaded together with the source code for this project.
To build the project, you must know the prefix of your KDE installation. To find this, you can use the kde4-config application. In my case, the prefix is /usr.
$ kde4-config --prefix
/usr
Now enter the source directory and run cmake and make to build the project. For the CMake call, add the prefix as the value to the CMAKE_INSTALL_PREFIX definition:
cmake -DCMAKE_INSTALL_PREFIX=/usr
make
To install the plasmoid, run make install with the required privileges, then run the kbuildsycoca4 utility to force KDE to:
sudo make install
kbuildsycoca4
Then, you can either restart your plasma session or use the plasmoidviewer utility to test your plasmoid. To find out about known plasmoids, along with each plasmoid's comment from the desktop file, use the --list argument. Or, simply give the name of your plasmoid to the viewer as an argument, and it will show it:
$ plasmoidviewer --list | grep loadlight
plasma-applet-loadlight -- Load Light Plasmoid, monitoring the systems load average
$ plasmoidviewer plasma-applet-loadlight
This is all it takes to add an applet to the plasma desktop. As you can tell, it is a fairly straightforward process of harvesting data, implementing the applet interface, and exposing your code to the plasma.
However, to add real functionality to the desktop, you must also provide your own data engines.
| Listing 1: loadlight.h |
01 #ifndef LOADLIGHT_H
02 #define LOADLIGHT_H
03
04 #include <Plasma/Applet>
05 #include <Plasma/DataEngine>
06
07 class QSizeF;
08
09 class PlasmaLoadLight : public Plasma::Applet
10 {
11     Q_OBJECT
12
13 public:
14     PlasmaLoadLight( QObject *parent,
15                      const QVariantList &args );
16
17     void init();
18
19     void paintInterface( QPainter *painter,
20                          const QStyleOptionGraphicsItem *option,
21                          const QRect &contentsRect );
22
23 protected slots:
24     void sourceAdded( const QString &name );
25     void dataUpdated( const QString &sourceName,
26                       const Plasma::DataEngine::Data &data );
27
28 private:
29     double m_load;
30 };
31
32 #endif // LOADLIGHT_H
|
| Listing 2: loadlight.cpp |
01 #include "loadlight.h"
02
03 #include <QPainter>
04
05 PlasmaLoadLight::PlasmaLoadLight( QObject *parent,
06         const QVariantList &args )
07     : Plasma::Applet( parent, args ),
08      m_load( 0.75 )
09 {
10     setBackgroundHints( DefaultBackground );
11     resize( 100, 100 );
12 }
13
14 void PlasmaLoadLight::init()
15 {
16     connect( dataEngine( "systemmonitor" ), SIGNAL(sourceAdded(QString)),
17            this, SLOT(sourceAdded(QString)) );
18 }
19
20 void PlasmaLoadLight::sourceAdded( const QString &name )
21 {
22     if( name == "cpu/system/loadavg1" )
23     {
24         datangine( "systemmonitor" )->connectSource( name, this, 1000 );
25         disconnect( dataEngine( "systemmonitor" ), SIGNAL(sourceAdded(QString)),
26             this, SLOT(sourceAdded(QString)) );
27     }
28 }
29
30 void PlasmaLoadLight::dataUpdated(
31    const QString &sourceName,
      const Plasma::DataEngine::Data &data )
32 {
33     if( sourceName != "cpu/system/loadavg1" )
34         return;
35
36     if( data.keys().count() == 0 )
37         return;
38
39     m_load = data[data.keys()[0]].toDouble();
40     update();
41 }
42
43 void PlasmaLoadLight::paintInterface( QPainter *painter,
44        const QStyleOptionGraphicsItem *option,
45        const QRect &contentsRect )
46 {
47     if( m_load < 0.5 )
48         painter->setBrush( Qt::green );
49     else if( m_load > 0.95 )
50         painter->setBrush( Qt::red );
51     else
52         painter->setBrush( Qt::yellow );
53
54     painter->drawEllipse( contentsRect );
55
56     QFont f;
57     f.setPixelSize( contentsRect.height()/4 );
58     painter->setFont( f );
59     painter->drawText( contentsRect,
60                    Qt::AlignCenter,
61                    QString::number( m_load, 'f', 2 ) );
62 }
63
64 K_EXPORT_PLASMA_APPLET(loadlight, PlasmaLoadLight)
65
66 #include "loadlight.moc"
|
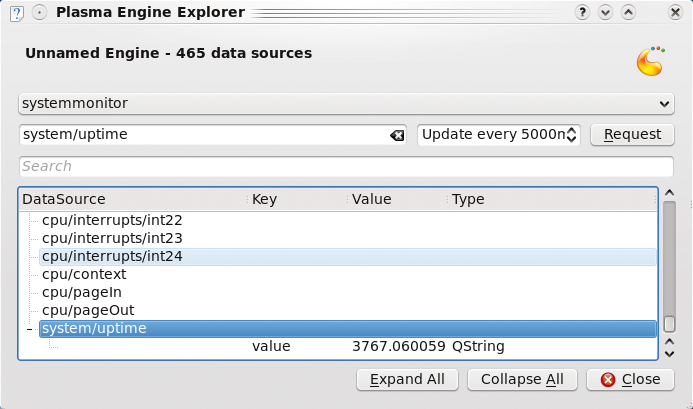
When developing data engines, your best friend will be the plasmaengineexplorer utility. This tool allows you to browse and query the available data engines and gives you a mechanism to explore the available sources of data, as well as test your own implementations. Before I look at a custom data engine, I'll give it a try and explore the available data engines. For example, Figure 2 shows the uptime from the system monitor data engine.
Creating a custom data engine is very similar to the process of creating a plasmoid. For instance, the CMakeLists.txt and desktop files are still there. The only difference is that desktop file declares the service type to be Plasma/DataEngine.
When it comes to the C++ class, the base class used is Plasma::DataEngine instead of the Plasma::Applet class; thus, I have another interface to implement. To illustrate this, I will implement a data engine that serves random numbers and is queried by the Engine Explorer utility.
Now look at the class declaration as shown in Listing 3. It shows one of the most basic data engine interface implementations possible. Continuing to the class implementation, Listing 4, you can see that the implementation is just as simple.
| Listing 3: randomnumberengine.h |
01 #ifndef RANDOMNUMBERENGINE_H
02 #define RANDOMNUMBERENGINE_H
03
04 #include <Plasma/DataEngine>
05
06 /**
07  * An engine that provides random numbers.
08  */
09 class RandomNumberEngine : public Plasma::DataEngine
10 {
11     Q_OBJECT
12
13 public:
14     RandomNumberEngine( QObject *parent, const QVariantList &args );
15     QStringList sources() const;
16
17 protected:
18     bool sourceRequestEvent( const QString &name );
19     bool updateSourceEvent( const QString &name );
20 };
21
22 #endif // RANDOMNUMBERENGINE_H
|
| Listing 4: randomnumberengine.cpp |
01 #include "randomnumberengine.h"
02
03 #include <QDateTime>
04
05 RandomNumberEngine::RandomNumberEngine( QObject *parent, const QVariantList &args )
06     : Plasma::DataEngine( parent, args )
07 {
08 }
09
10 QStringList RandomNumberEngine::sources() const
11 {
12     return QStringList() << "Number";
13 }
14
15 bool RandomNumberEngine::sourceRequestEvent( const QString &name )
16 {
17     if( name != "Number" )
18         return false;
19
20     qsrand( QDateTime::currentDateTime().toTime_t() );
21     return updateSourceEvent( name );
22 }
23
24 bool RandomNumberEngine::updateSourceEvent( const QString &name )
25 {
26     if( name != "Number" )
27         return false;
28
29     setData( name, qrand() );
30     return true;
31 }
32
33 K_EXPORT_PLASMA_DATAENGINE(randomnumber, RandomNumberEngine)
34
35 #include "randomnumberengine.moc"
|
It starts with a straightforward constructor (lines 5-8). Commonly, the setMinimumPollingInterval is called if you want to prevent being polled too often. In this case, however, I can serve an almost unlimited amount of random numbers per second, so I do not set a limit here.
The sources method that follows in lines 10-13 is also quite trivial. Here, simply state that the source "Number" is supported. The two functions, sourceRequestEvent and updateSourceEvent, that follow are where the real work is performed.
A request event occurs when a source is requested the very first time. It is still expected to set a value, so the implementation first initializes the random number generator with the use of qsrand() before it calls the update event method.
An update event occurs every time the data are meant to be updated. Note that the updateSourceEvent method does not return an actual value; instead, it uses the setData method to announce that new data are available. By using this approach, you can implement asynchronous data engines easily with the use of exactly the same mechanisms. Simply set your request for data from the update event and then call setData from your code where you receive the data.
Building and installing the data engine follows exactly the same pattern as building an applet, so I will not go into it again. To test your engine, you can then use the Engine Explorer and request a number or two.
As you can see, building plasmoid applets and data engines is not very hard to do. The object is to implement a given API. If you want to look into the art of building plasmoids, the next place to visit is KDE TechBase [2]. There, you can find tutorials as well as detailed API reference documentation.
| PlasMate |
|
In this article, I've only looked at developing plasmoids with C++. However, it is easy to develop plasmoids using a range of languages, including JavaScript, Ruby, and Python. To get everyone started with creating plasmoids, the KDE people have started working on an editor called PlasMate. Figure 3 shows PlasMate's main editing window with the components at the top, the current file in the middle, and a preview at the bottom. The tool is not fully usable yet, but the project is described at KDE TechBase, and the existing code can be checked out from the KDE playground using Subversion: svn co svn://anonsvn.kde.org/home/kde/trunk/playground/base/plasma/plasmate Once checked out, you can build the code with CMake. However, the source code requires KDE 4.3, so you might have to upgrade your distributions version of KDE. |

| INFO |
|
[1] Listings for this article: ftp://ftp.linux-magazin.com/pub/listings/magazine/114/plasmoid/
[2] KDE TechBase: http://techbase.kde.org |