
By Ankur Kumar Sharma
In the age of colorful and convenient GUI-based applications, old-fashioned command-line programs often appear quite boring and user unfriendly. Wouldn't you like to add friendly GUI features to your simple, custom scripts without a lot of tedious GUI programming? A pair of tools called Dialog [1]and Xdialog [2] can add GUI-like desktop widgets to your programs. You can use Dialog and Xdialog from C, C++, Python, Ruby, Perl, or Bash.
Dialog uses the curses/ncurses libraries [3] to create various interactive controls or widgets. As you'll learn in this article, you can add these widgets to your existing command-line applications without any serious programming effort.
Xdialog is a counterpart of Dialog that produces various widgets in an X Window environment. Because Xdialog uses the Gtk+ library, it integrates easily with the Gnome desktop environment.
Later in the article, I'll describe some alternative tools for adding widgets to your scripts, such as Gtkdialog [4], Whiptail, and Zenity. If you are a KDE user, you might want to consider using Kdialog [5], which serves a similar role for the KDE desktop environment.
Both Dialog and Xdialog come pre-installed on Puppy Linux 4.2.1. On Ubuntu 9.10, install Dialog as follows:
sudo apt-get install dialog
To build Dialog from source code, you first have to build the ncurses library because Dialog requires ncurses source headers. The latest source version from the Dialog website is 1.1-20080819, and the same version string is shown when you type dialog at the command line.
Setting up Xdialog requires a little more work. In Ubuntu 9.10, I had to install Xdialog from source because I couldn't find a candidate in the Ubuntu 9.10 repository. To install Xdialog from source, download and install the following .deb packages in this order:
libgtk1.2-common_1.2.10-18_all.deb
libglib1.2_1.2.10-10.1build1_amd64.deb
libgtk1.2_1.2.10-18_amd64.deb
libglib1.2-dev_1.2.10-10.1build1_amd64.deb
libgtk1.2-dev_1.2.10-18_amd64.deb
(Note that Xdialog requires the 1.2 series of the Gtk library.) After installing the preceding dependency packages, download the latest Xdialog source code from the Xdialog website [2], uncompress the TAR archive, and move to the source directory by typing:
tar -jxvf Xdialog-2.3.1.tar.bz2
cd Xdialog-2.3.1
To finally build and install Xdialog, enter the following commands:
./configure
make
sudo make install
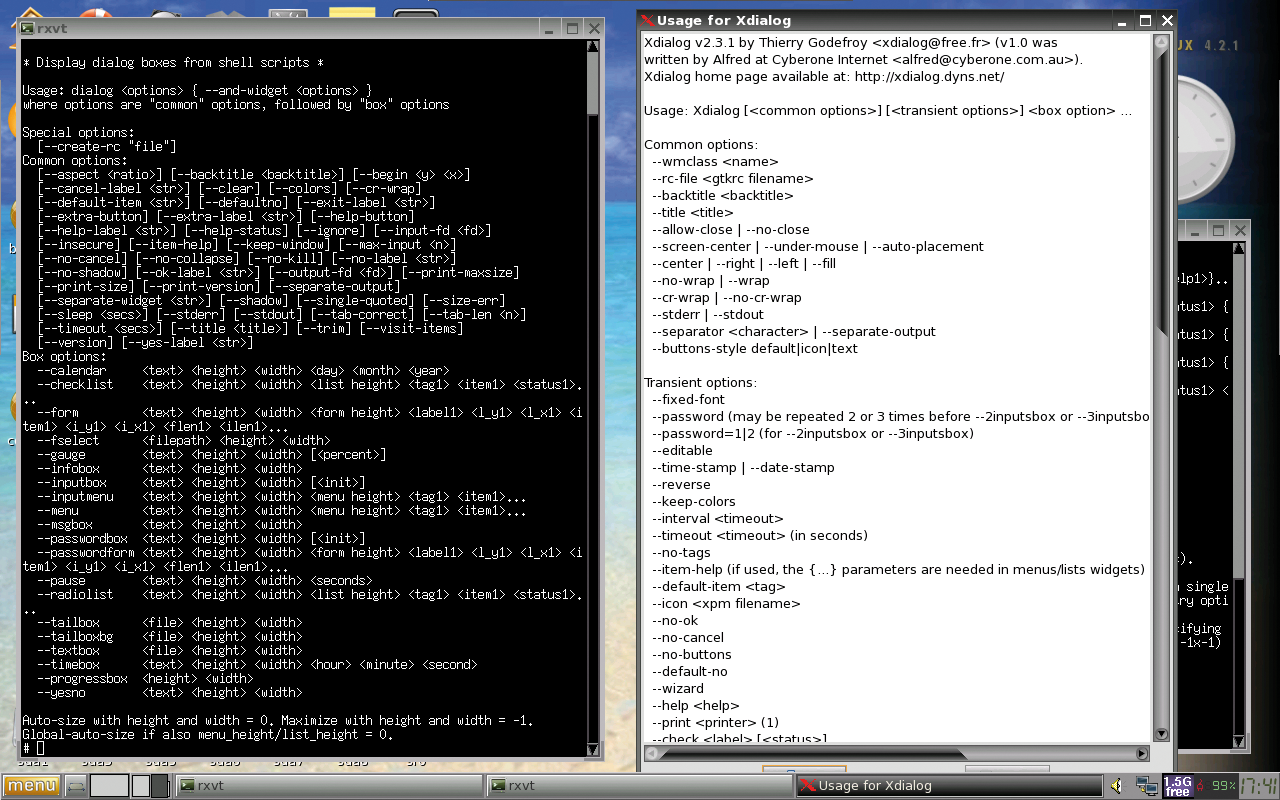
Now, if you type Xdialog at the command line, an Xdialog widget containing help contents appears, as shown in Figure 1.
Think of Dialog as nothing more than a shell command. The command selects a Dialog widget and specifies a number of options. The general form is:
dialog <common options> widget <widget options>
The common options are optional settings that modify the appearance and behavior of the widgets.
The widget options are combinations of required and optional settings to create widgets. In the man pages, the widget options are referred to as box options.
If you type man dialog, you will see the Help screen shown in Figure 1. Some of the most important common options are as follows:
The latest version of Dialog provides a large collection of widgets (see the box labeled "Dialog Widgets.")
To get started with Dialog's infobox widget, type the following line:
dialog --infobox "This is just an infobox widget from dialog." 0 0
As shown in Figure 2, you will have created an information box widget. After creating the infobox widget, the dialog returns immediately to the command prompt, which is the default behavior of this kind of widget. The only purpose of the widget is to show some informational text.
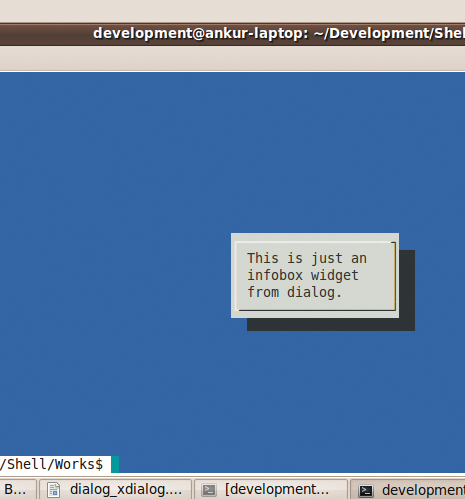
The preceding command included two 0s for the height and width of the widget. If you pass in zeros, Dialog takes care of defining the height and width. So 0 0 for height and width are very safe values most of the time.
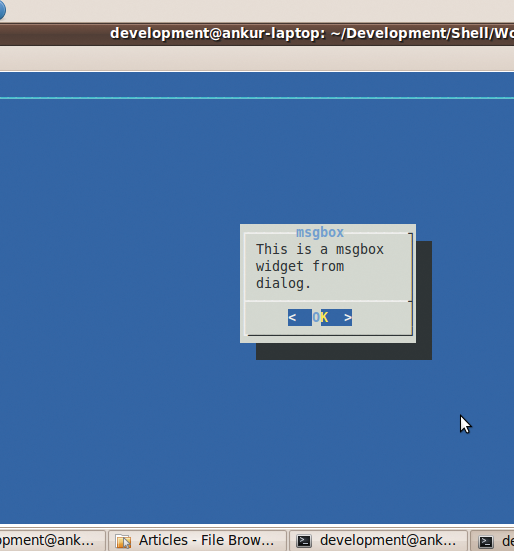
This infobox widget was created without any title text or a background. To add some background and widget title text, enter:
dialog --backtitle "Message Box" --title msgbox --msgbox "This is a msgbox widget from dialog." 0 0
Now you can see a background title and widget title for the msgbox widget (Figure 3). Also, if you press the Esc or Enter key (or click OK) the dialog returns.
Until now, you have only seen the boring default colors for different texts in dialog widgets. To change the color attributes passed to Dialog, you simply need to embed \Z sequences with the different texts that are passed to Dialog, along with the --colors common option, as follows:
dialog --colors --backtitle "\Zr\Z1Pause\Zn" --title "\Zu\Z5pause\Zn" --pause "\Zb\Z6This is a pause widget from dialog." 10 20 15
This time you can see some colorful text in and around the pause widget shown in Figure 4. A pause widget shows a meter bar that keeps on decreasing with every elapsed second.
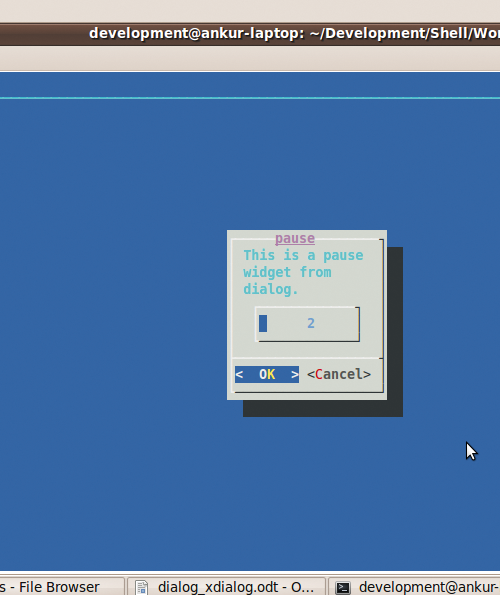
If the Esc key is not pressed, or either of the OK or Cancel buttons is not pressed or clicked during the remaining seconds, the pause widget returns when the timeout value passed to the widget has elapsed. The text attributes and color values for embedded \Z sequences in title strings are as follows:
r : reverse
b : bold
u : underline
n : restore normal settings
0 : black
1 : red
2 : green
3 : yellow
4 : blue
5 : magenta
6 : cyan
7 : white
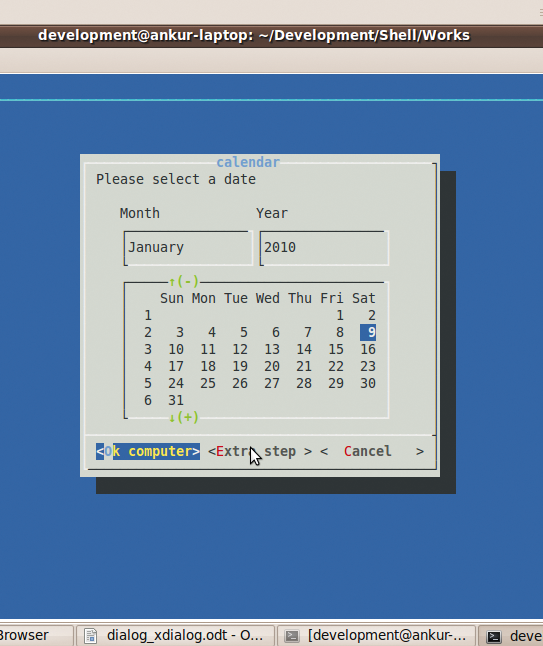
You can also change the default titles for the OK and Cancel buttons or display an extra button with additional text. Enter the following command to see these features in action :
dialog --backtitle Calendar --title calendar --extra-button --extra-label "Extra step" --ok-label "Ok computer" --exit-label "Bye bye" --calendar "Please select a date" 0 0
See Figure 5 for a view of this widget. You can move between the different subwindows of the calendar widget using the Tab key. If you select, press, or click any of the buttons except the Esc key or Cancel button, you will see that the selected date is printed on the widget itself. This is the default behavior of all the dialog widgets that return some value. You can change this behavior using the --stdout common option.
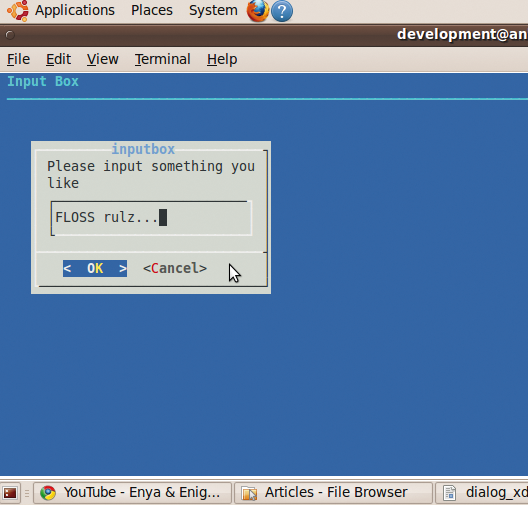
You might also want to specify the location of the widget and turn off the widget shadow:
dialog --no-shadow --begin 4 4 --backtitle "Input Box" --title inputbox --inputbox "Please enter something you like" 0 0 "FLOSS rulz..."
The resulting widget (Figure 6) is drawn at the location specified with the --begin option and without any widget shadow (as tweaked by the --no-shadow option). The inputbox widget shows a default string provided with the command, but you can change this string by using the Delete or Backspace key and entering the desired input.
Rather than entering the complete commands at the command line, you can also specify a common option to read Dialog parameters from a file. The --file option specifies a filename:
dialog --file paramfile
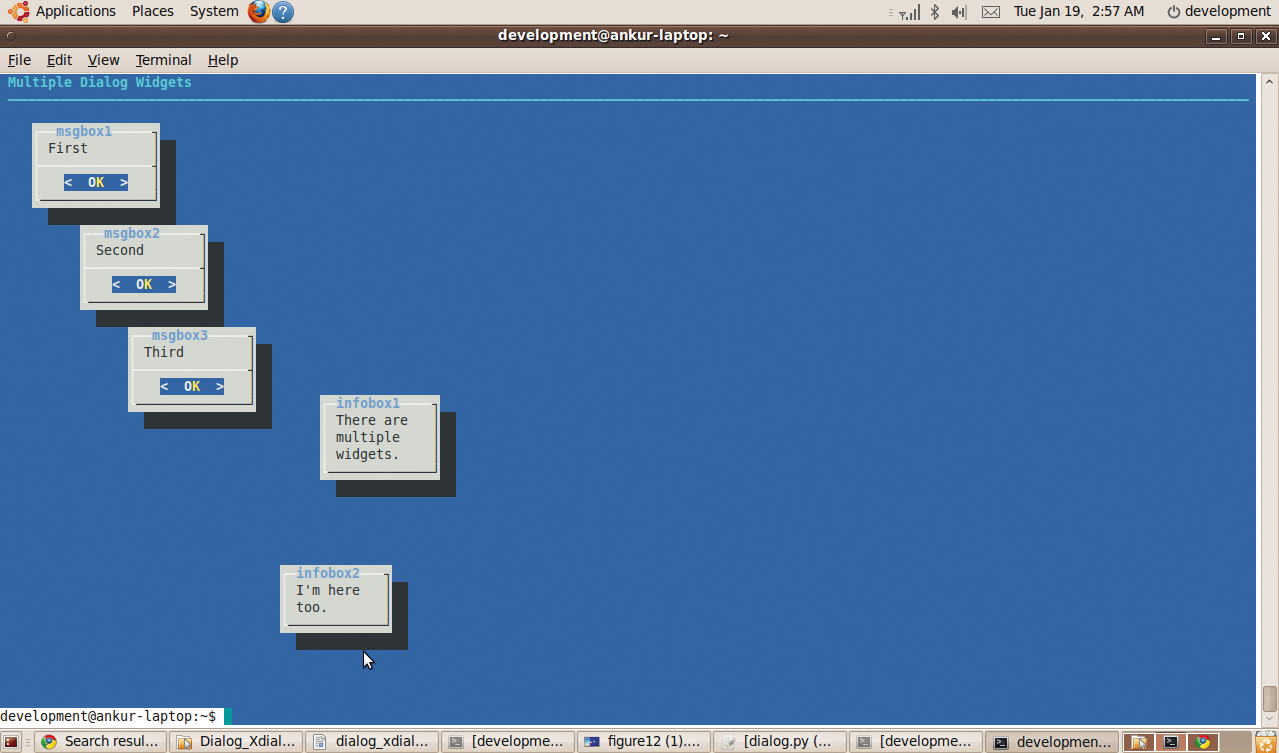
where parafile contains other dialog parameters. You can also chain various widgets using the --and-widget common option. The commands in Listing 1 produce the widgets shown in Figure 7.
| Listing 1: Adding add-widget |
01 dialog --backtitle "Multiple dialog widgets" --begin 4 4 --title msgbox1 --msgbox First 0 0 02 --and-widget --begin 10 10 --title msgbox2 --msgbox Second 0 0 03 --and-widget --begin 16 16 --title msgbox3 --msgbox Third 0 0 04 --and-widget -begin 20 40 --title infobox1 --infobox "There are multiple widgets." 0 0 \ 05 --and-widget -begin 30 35 --tile infobox2 --infobox "I'm here too." 0 0 |
To incorporate Dialog widgets, just add the Dialog commands to your scripts. The widget returns a value for further processing, as well as a return status that lets you determine the keyboard or mouse action performed on the widget.
To gather the value returned by a widget, add the --stdout option to the dialog command line and use the command substitution mechanism of shell scripts. To determine the kind of action taken on a widget, you have to examine the built-in shell variable ?, which returns the exit status of the previous command.
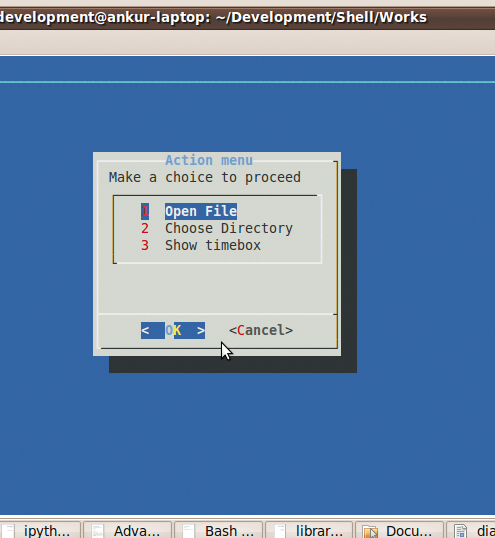
The script in Listing 2 combines these concepts to incorporate some Dialog widgets. This script presents a menu with various options, and information is displayed on the basis of the option chosen. See Figures 8 and 9 for shots of the widgets referenced in Listing 2.
Dialog widgets have turned this otherwise boring text-based shell script into an appealing GUI-based script without any GUI programming.
| Listing 2: Widget in Your Script |
01 #! /usr/bin/env bash
02
03 # variables to hold command and common options.
04 dlg=dialog
05 stdo=--stdout
06 titl=--title
07 titlbg=--backtitle
08
09 # function to handle open file choice.
10 fileselect() {
11
12     file=$($dlg $stdo $titlbg "Menu choice was file selection dialog" $titl "Select file" \
13                 --fselect ~ 0 0
14               )
15
16     if [ $? -eq 0 ]
17     then
18         $dlg $titlbg "Selected file content" $titl $file -textbox $file 0 0
19     fi
20
21 }
22
23 # function to handle choose directory choice.
24 dirselect() {
25
26     directory=$($dlg $stdo $titlbg "Menu choice was directory selection dialog" $titl "Select directory" \
27                         --dselect ~ 0 0
28                        )
29
30     if [ $? -eq 0 ]
31     then
32         $dlg $titlbg "Selected directory info" $titl "Directory Info" \
33         --infobox "Your chosen directory is  : $directory" 0 0
34     fi
35
36 }
37
38 # function to handle show timebox choice.
39 timebox() {
40
41     time=$($dlg $stdo $titlbg "Menu choice was Time Box." $titl "Select time" \
42                  --timebox "Choose your favourite time" 0 0
43                 )
44
45     if [ $? -eq 0 ]
46     then
47         $dlg $titlbg "Selected time info" $titl "Time Info" \
48         --infobox "Your favourite time is : $time" 0 0
49     fi
50
51 }
52
53 # menu widget to show various choices.
54 choice=$($dlg $stdo $titlbg "Dialog usage in shell script" $titl "Action menu" \
55                  --menu "Make a choice to proceed" 0 0 0                                           \
56                  1 "Open file"                                                                                       \
57                  2 "Choose directory"                                                                           \
58                  3 "Show timebox"                                                                               \
59                 )
60
61 # we are interested only in Ok button event.
62 If  [ $? -eq 0]
63 then
64
65 # now handle the selcted choice.
66     if [ "$choice" = "1" ]
67     then
68         fileselect
69     elif [ "$choice" = "2" ]
70     then
71         dirselect
72     elif [ "$choice" = "3" ]
73     then
74         timebox
75 fi
76
77 <end of shell script code>
|

Xdialog provides a fuller range of GUI options and integrates more readily with the Gnome desktop environment. The two apps are similar enough that you can apply your working knowledge of Dialog. The general form of the Xdialog command is:
Xdialog <common options> <transient options> widget <widget options>
In the preceding command, transient options refers to some of the Dialog options, plus a few additional options associated with Xdialog.
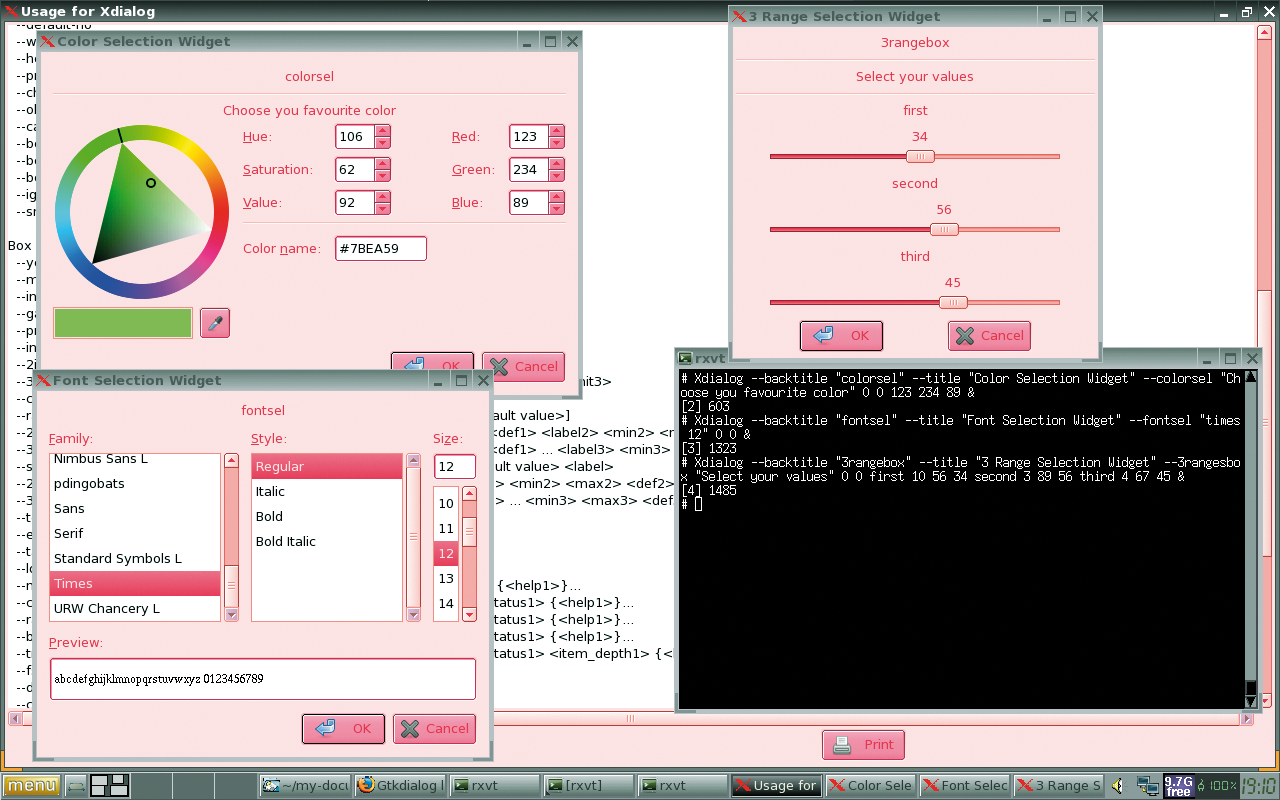
If Xdialog is installed on your system, you can explore a few of the Xdialog widgets with the following commands:
Xdialog --backtitle "colorsel" --title "Color Selection Widget" --colorsel "Choose your favourite color" 0 0 123 234 89

Xdialog --backtitle "fontsel" --title "Font Selection Widget" --fontsel "times 12" 0 0

Xdialog --backtitle "3rangebox" --title "3 Range Selection Widget" --3rangesbox "Select your values" 0 0 first 10 56 34 second 3 89 56 third 4 67 45
Some new widgets provided by Xdialog are shown in Figure 10. Note that the Xdialog widgets are more like the true graphical elements found in desktop environments.
| Dialog Widgets |
|
Dialog lets you spice up your scripts with any of the following widgets.
|
If you are using any of the programming languages that support calling external executables, you can use Dialog and Xdialog. This means you can make use of Dialog and Xdialog widgets from C, C++, Python, Perl, Ruby, and other languages.
By using Dialog and Xdialog from these languages, you avoid the complicated, time-consuming GUI programming that is associated with maintaining separate text and graphic versions of the program. You can also use Dialog and Xdialog for rapid prototying a GUI-based application.
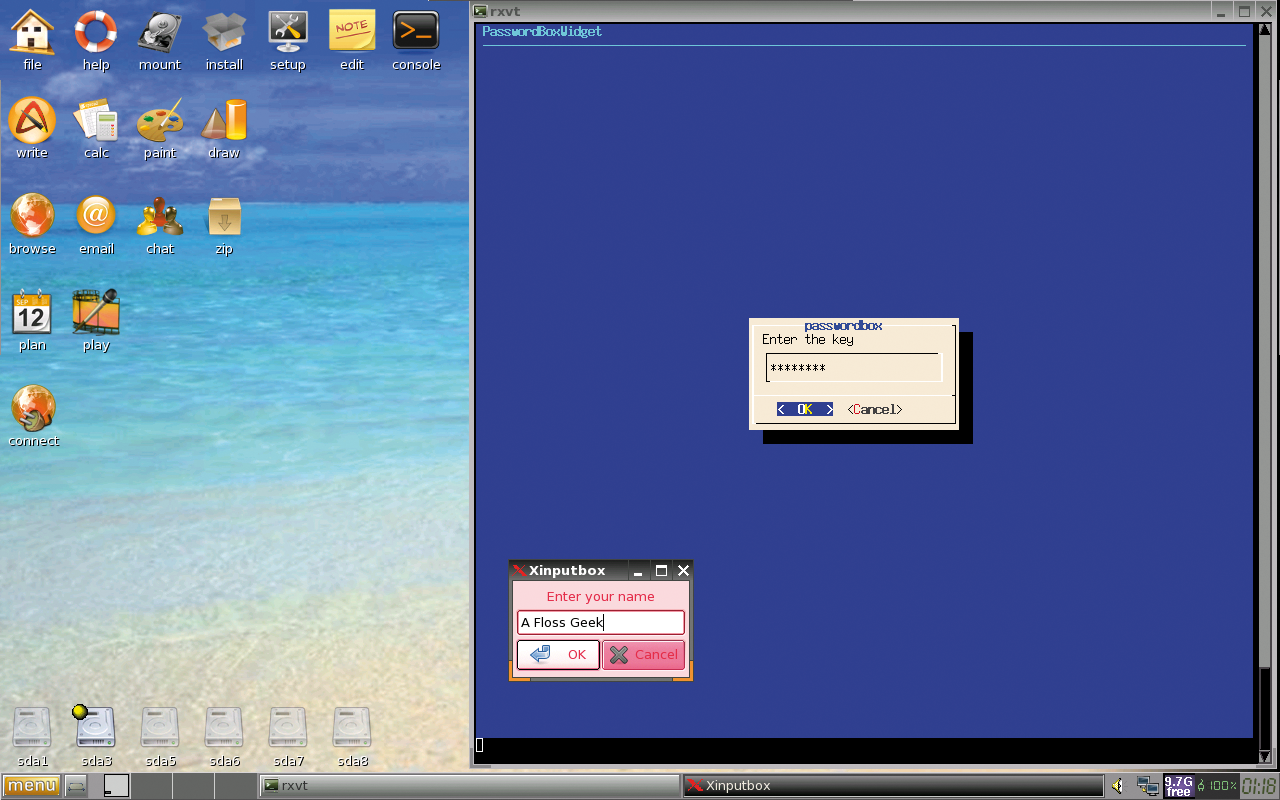
The Python script in Listing 3 integrates various widgets from Dialog and Xdialog. First, it asks you the password key (lpmrockz in this case), and then, after asking for some additional input, it provides a message at the end.
Please note that, in the dictionary of Dialog and Xdialog commands, the various parameters are separated by a pipe character ( | ) to allow spaces in the various strings passed. Copy and paste this Python code to a file and run that file with the command python filename.py. You can also run the file by typing ./filename.py after making the file executable by issuing the command chmod u+x filename.py.
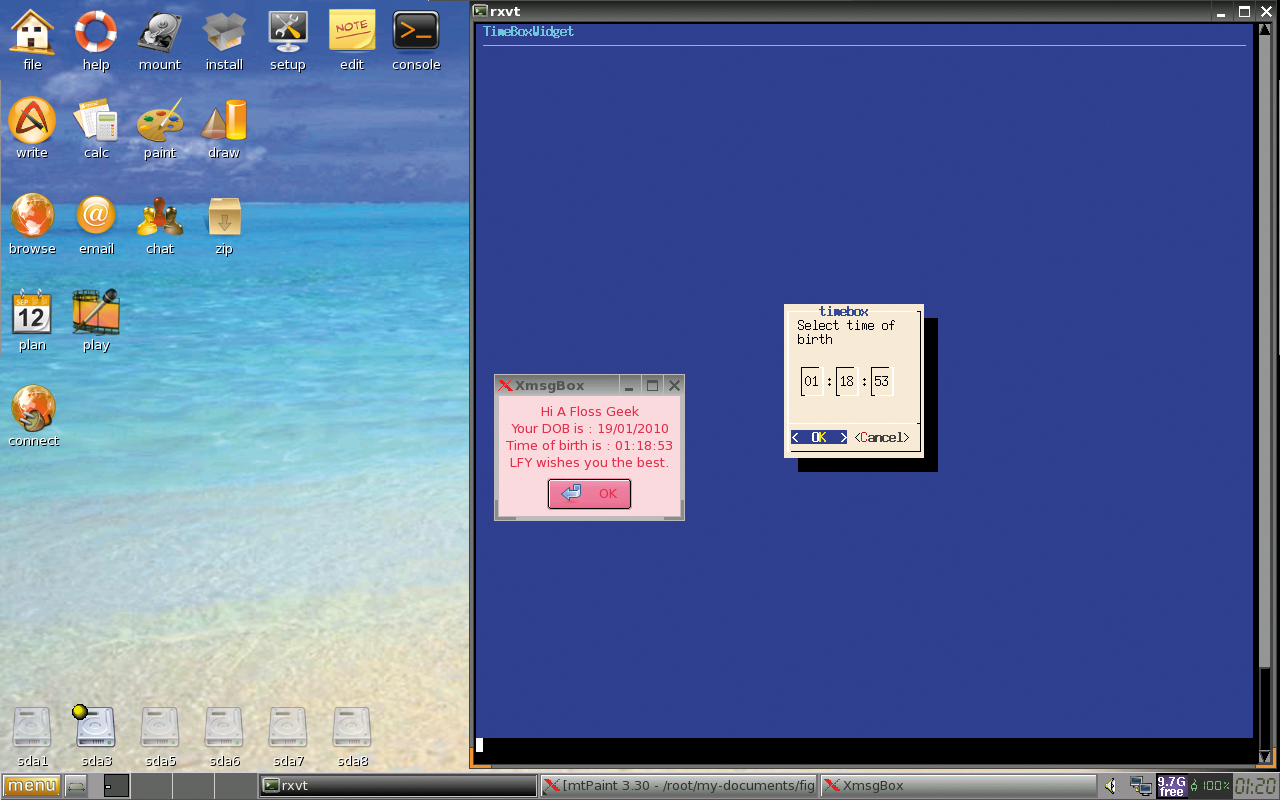
The displays resulting after the execution of the code in Listing 3 is shown in Figures 11 and 12. Note the coexistence of Dialog and Xdialog widgets in the screenshots.
| Listing 3: Widgets in Python |
01 <start of python code>
02
03 #! /usr/bin/env python2.6
04
05 from subprocess import Popen, PIPE, STDOUT
06
07 # dictionary to hold various dialog and Xdialog commands.
08 dwdgtsatrb = {
09               'dlgpswd' : 'dialog|--stdout|--insecure|--backtitle|PasswordBoxWidget|--title|passwordbox|--passwordbox|Enter the key|0|0',
10               'xdlgnme' : 'Xdialog|--title|Xinputbox|--inputbox|Enter your name|0|0',
11               'xdlgdob' : 'Xdialog|--title|Xcalendar|--calendar|Select your DOB|0|0',
12               'dlgtme'  : 'dialog|--stdout|--backtitle|TimeBoxWidget|--title|timebox|--timebox|Select time of birth|0|0',
13               'xmsg'    : 'Xdialog|--title|XmsgBox|--msgbox|message|0|0',
14              }
15
16
17 def execute(scommand):
18     '''
19         Routine to execute a command string and return (output, error, status) of the command.
20     '''
21
22     l   = scommand.split('|')
23     p   = Popen(l, stdout=PIPE, stderr=STDOUT)
24     toe = p.communicate()
25
26     return (toe[0], toe[1], p.returncode)
27
28 def main():
29     '''
30         Application driver routine.
31     '''
32    tpswd = execute(dwdgtsatrb['dlgpswd'])
33
34     tnme = ()
35     tdob = ()
36     ttme = ()
37
38     if 'lpmrockz' == tpswd[0].strip():
39
40       if not tpswd[2]:
41         tnme = execute(dwdgtsatrb['xdlgnme'])
42
43         if not tnme[2]:
44           tdob = execute(dwdgtsatrb['xdlgdob'])
45
46           if not tdob[2]:
47              ttme = execute(dwdgtsatrb['dlgtme'])
48
49              if not ttme[2]:
50                 smsg = ('Hi ' + tnme[0].strip() + '\n' +
51                         'Your DOB is : ' + tdob[0].strip() + '\n' +
52                         'Time of birth is : ' + ttme[0].strip() + '\n' +
53                         'LPM wishes you the best.')
54                 execute(dwdgtsatrb['xmsg'].replace('message', smsg))
55
56     else:
57       smsg = 'Incorrect password, better luck next time.'
58       execute(dwdgtsatrb['xmsg'].replace('message', smsg))
59
60 if '__main__' == __name__:
61
62     main()
63
64 <end of python code>
|
Several other Linux apps provide functionality similar to Dialog and Xdialog. Ubuntu 9.10 comes with a utility known as Whiptail that is based on the Newt library. I found Whiptail very limiting with regard to the widgets offered and the configuration options provided.
Although Whiptail provides fewer widgets and options than Dialog, the widgets that are available include a yes/no box, a menu box, an input box, a message box, a text box, an info box, a checklist box, a radiolist box, a gauge box, and a password box.
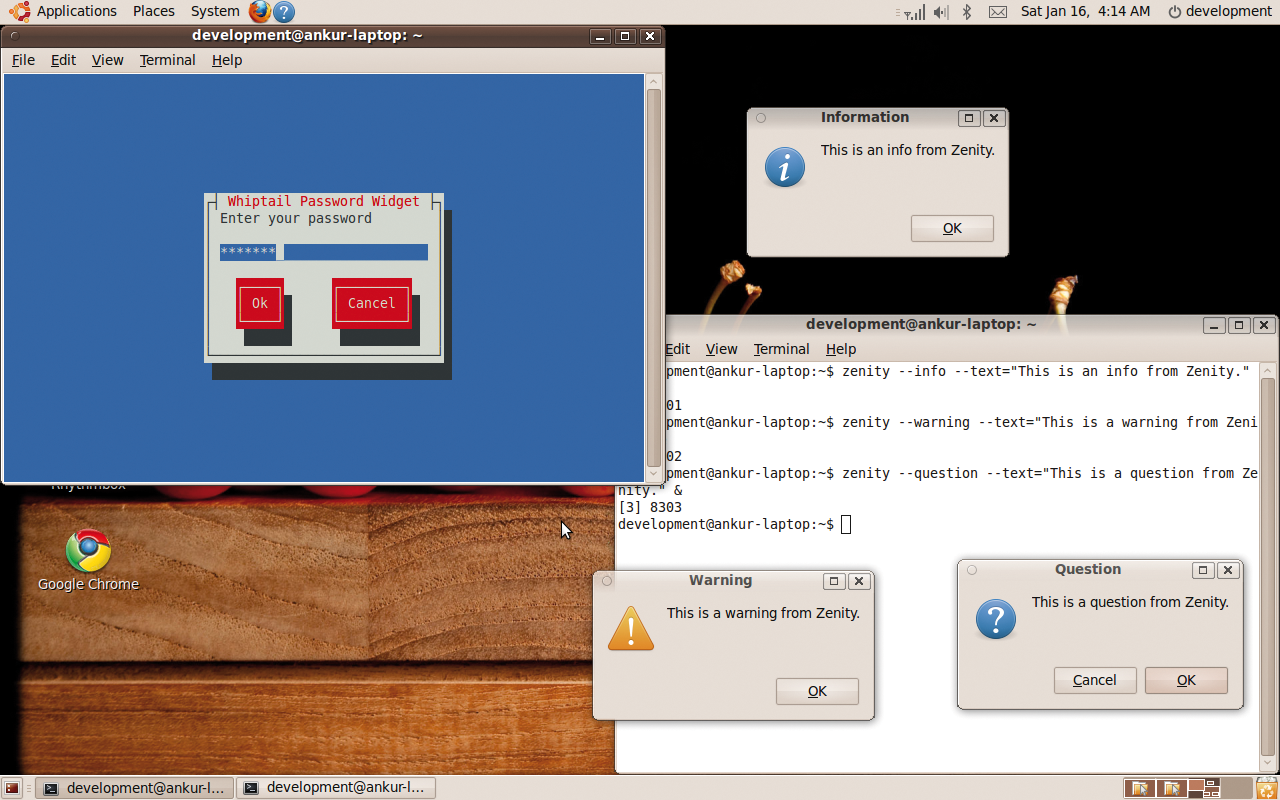
To see the Whiptail password widget, type the following command:
whiptail --fb --title "Whiptail Password Widget" --passwordbox "Enter your password" 10 0
Another utility known as Zenity [6] also came preinstalled with Ubuntu 9.10. The purpose of Zenity is to show Gtk+ dialog boxes from command-line or shell scripts. Zenity provides some useful Gtk+ widgets. The following commands give you a glimpse of Zenity in action:
zenity --info -text="This is an info from Zenity."

zenity --warning -text="This is a warning from Zenity."

zenity --question -text="This is a question from Zenity."
The widgets that were created with the Whiptail and Zenity tools are shown in Figure 13.
The number of widgets and configuration options provided with Zenity is more limited than for the Xdialog set, but Zenity is much more useful than Whiptail.
Other tools that provide quick GUI features from a script include X Message and Gtkdialog, both of which I found on Puppy Linux 4.2.1.
X Message [7] is actually a command that generates very limited graphical GUI widgets, in that it only shows a message with user-defined buttons. Typing the following command shows X Message in action:
xmessage -file ~/.bashrc -buttons "Ok:1, Cancel:2, Help:3" -print -nearmouse
The -file option used here reads a message from the file that's been supplied. On clicking a button, the corresponding return code is returned from the xmessage command.
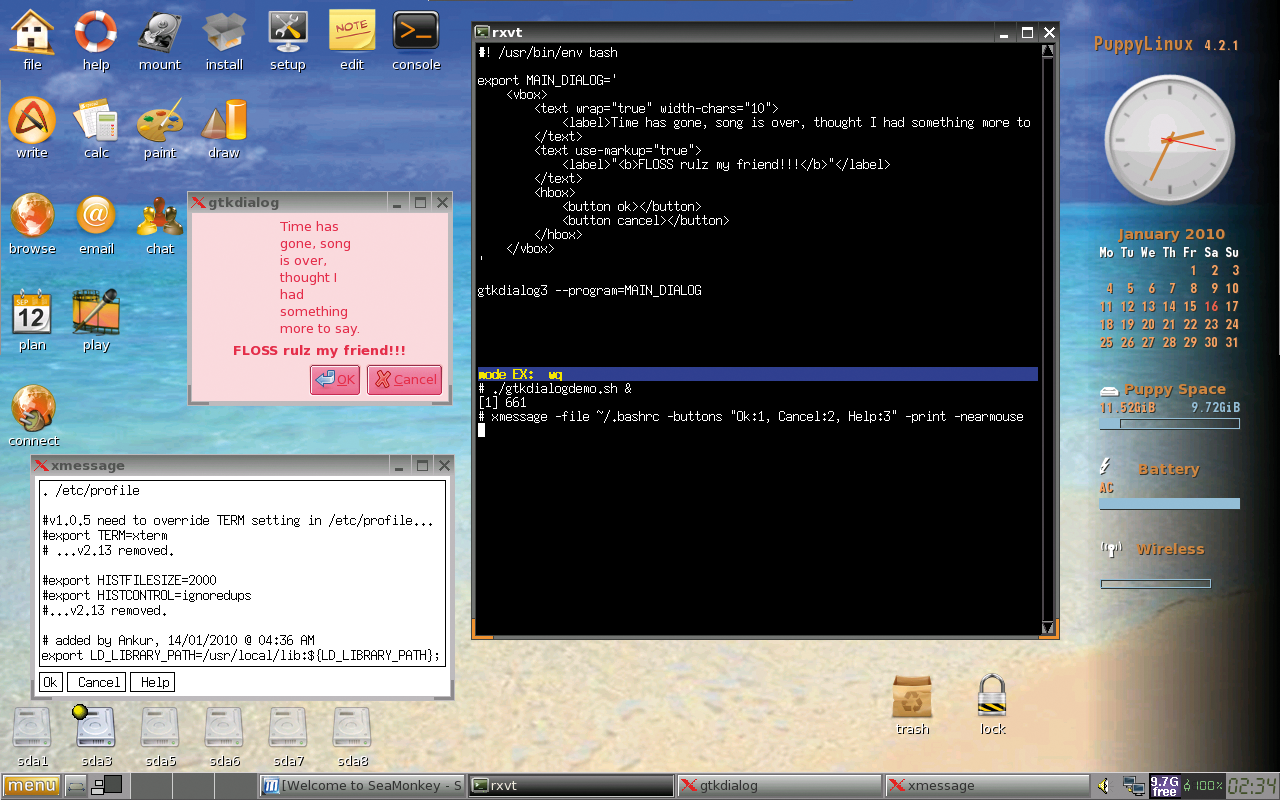
Gtkdialog [4] is fairly different from the other utilities I have discussed so far. This tool creates various widgets with the use of an XML-like description, known as the dialog description language. Through this description language, you can create very complex dialog boxes containing other widgets and boxes. The downside is that Gtkdialog involves much more work than other utilities that create graphical widgets for the desktop, but it is still easier than GUI programming.
Listing 4 shows an example of a script with Gtkdialog. Save the code in Listing 4 to a file with the .sh extension, then change the permissions with the command chmod u+x filename.sh and issue the command ./filename.sh to see Gtkdialog in action.
The output of the Gtkdialog shell script (as well as an example of the alternative X Message tool) are shown in Figure 14.
| Listing 4: Using Gtkdialog |
01 <start of shell script> 02 03 #! /usr/bin/env bash 04 05 # dialog discription assigned to an environmental variable. 06 Export MAIN_DIALOG=' 07 <vbox> 08 <text wrap="true" width-chars="10" > 09 <label>Time has gone, song is over, thought I had something more to say.</label> 10 </text> 11 <text use-markup="true"> 12 <label>"<b>FLOSS rulz my friend!!!</b>"</label> 13 </text> 14 <hbox> 15 <button ok></button> 16 <button cancel></button> 17 </hbox> 18 </vbox> 19 ' 20 gtkdialog3 --program=MAIN_DIALOG 21 22 <end of shell script> |
Dialog, Xdialog, Whiptail, Zenity, Gtkdialog, and X Message can transform any command-line utility into a user-friendly GUI-based application.
Without even a single bit of conventional GUI programming, you can add some sophisticated GUI features to your applications.
| INFO |
|
[1] Dialog home page: http://invisible-island.net/dialog/
[2] Xdialog home page: http://xdialog.dyns.net/ [3] ncurses: http://www.gnu.org/software/ncurses/ncurses.html [4] gtkdialog home page: http://linux.pte.hu/~pipas/gtkdialog/index.html [5] Kdialog tutorial: http://techbase.kde.org/Development/Tutorials/Shell_Scripting_with_KDE_Dialogs#Introduction_and_Scope [6] Zenity: http://live.gnome.org/Zenity [7] X Message: http://sourceforge.net/projects/xmsgd/ |