
By Bruce Byfield
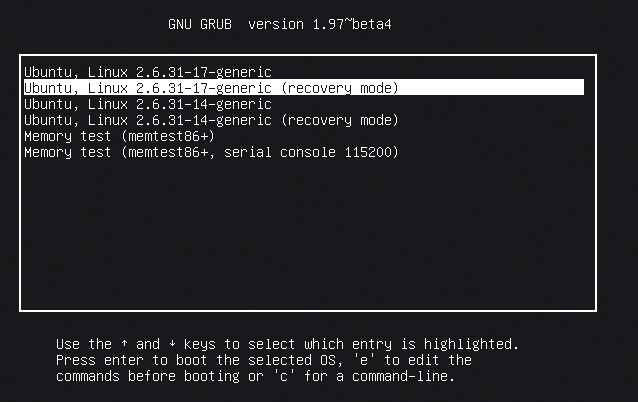
The way you start your computer is poised for a change. After more than a decade, the GRUB bootloader (Figure 1), which allows you to choose the operating system or kernel to run your computer, is about to be replaced by its successor, GRUB 2 [1]. You will find that the change takes some getting used to - particularly if you prefer hands-on configuration of your system.
As I write, one difference between old and new GRUB is a lack of documentation. Last month, when I described the workings of the older GRUB (a.k.a. Legacy GRUB), I could refer to dozens of references on the Internet. By contrast, GRUB 2's site currently includes more placeholders than actual documentation, and other resources are scarce, although they are starting to appear as works in progress [2].
Another problem is that, so far, GRUB 2 is used only by Ubuntu 9.10, whose mail forums provide much of the little documentation that is available [3]. However, because GRUB 2 is not yet officially released, Ubuntu is using a beta version. This beta version might differ from the final release and seems to have required some quick fixes to make it work, so some of what I write here might eventually prove to be specific only to Ubuntu 9.10.
GRUB 2's biggest challenges are all the ways that it differs from Legacy GRUB. GRUB 2 is not only a complete rewrite of Legacy GRUB but a complete re-thinking of it as well. Concepts such as the intermediate Stage 1.5 in Legacy GRUB have disappeared altogether, and some operations, such as adding a splash screen to the boot menu, have become easier and include more options.
Also, you will notice changes in behavior at bootup. To the display the boot menu, you no longer press the Esc key; instead, you press the Shift key. Nor will any menu display if only one option is configured.
Just as importantly, Legacy GRUB was designed to be configured in a text editor. By contrast, the emphasis in GRUB 2 is on the use of scripts for configuration. You can still edit manually, but the architecture of GRUB 2 discourages you from doing so.
If you choose, you can let GRUB configure boot options automatically. Whenever you install another operating system or add a kernel without going through your distribution's packaging system, you can run update-grub (or, in some early development versions of Ubuntu, update-grub2).
This script will call grub-mkconfig to write the changes to grub.cfg. You should not need this extra step when adding another kernel because the package scripts will run update-grub without prompting.
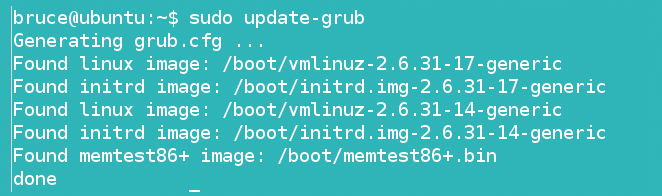
Unfortunately, update-grub`s feedback shows only the bootable items it has located (Figure 2) and not any scripts that have been added or edited. It exists solely for the purpose of updating grub.cfg, the main configuration file.
Otherwise, in my experience, running update-grub is reliable and thorough. However, if you run into problems or simply prefer hands-on administration, you can still edit through configuration files and then run update-grub to register your changes.
In Legacy GRUB, both general behavior and settings for individual operating systems and kernels were listed in the file /boot/grub/menu.lst; in GRUB 2, however, general behavior is set in the /etc/default/grub file.
"Helper scripts," as they are described in the documentation - including custom boot options - are stored in the /etc/grub.d folder. To edit either of these scripts, just use a text editor.
A third choice is to edit /boot/grub/grub.cfg, GRUB 2's replacement for menu.lst. Technically, grub.cfg is not meant to be edited.
In fact, in Ubuntu 9.10, the first line in the grub.cfg file warns DO NOT EDIT THIS FILE. However, in practice, this warning is an effort to steer you in the direction of /etc/default/grub and /etc/grub.d and not a description of what you can do.
In practice, you can edit grub.cfg, although, as with any configuration file, you should make a backup first in case you make mistakes. Also, you will need to change the permissions on grub.cfg so that you can edit. When you finish your editing by running update-grub, the permissions on the file will be reset automatically.
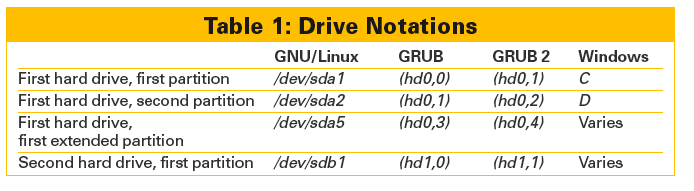
Regardless of which files you edit manually, you should be aware of the changes to the partition naming conventions. As in Legacy GRUB, no distinction is made between primary and logical partitions. But remember how, in Legacy GRUB, the first partition on the first hard drive was designated as (hd0,0)? Now, in GRUB 2, that same hard drive is referred to as (hd0,1). In other words, drives are still labeled from 0, but partitions are labeled from 1.
This change makes GRUB 2 even more confusing than Legacy GRUB. So, now more than ever, you should figure out which drives and partitions you are dealing with before you start editing (see Table 1).
In GRUB 2, the file /etc/default/grub sets the behavior of the boot menu (Figure 3). It begins with fields to set the most general of behavior. You can set the default choice with GRUB_DEFAULT, using 0 (zero) to boot the first entry in grub.cfg or 1 to boot the second entry. Alternatively, you can use a value of saved to book the last menu item that successfully started the computer or a menu entry listing from grub.cfg (see below) placed in quotation marks - for example, "Ubuntu, Linux 2.6.31-17-generic", on my Karmic installation.
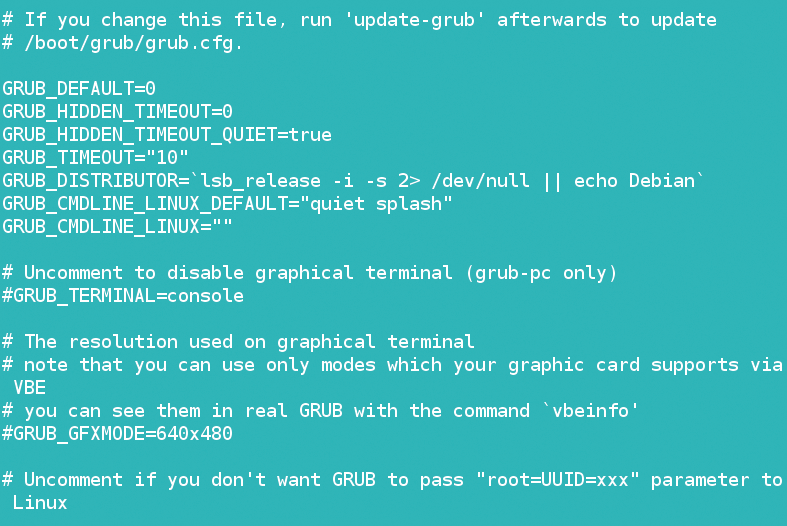
The GRUB_TIMEOUT field sets the number of seconds that the boot menu displays if more than one operating system is listed (GRUB 2 can determine whether one operating system has more than one kernel because of the GRUB_DISTRIBUTOR field, which creates a convention for naming kernels installed via the package management system).
However, in a system with only one operating system, you can also set the number of seconds before the menu appears, by using GRUB_HIDDEN_TIMEOUT. By default, Ubuntu sets this value to 0, which means that ordinarily the menu does not appear at all. You can disable this delay by adding a # at the start of the line. Alternatively, you can complete the field with another value, during which time any splash screen you have added will display. To create this interval without a countdown, set the field GRUB_HIDDEN_TIMEOUT_QUIET to True. To display a countdown, set the field to False.
If you want to add kernel options to an entry, you need GRUB_CMDLINE_LINUX="" in /etc/default/grub. In Ubuntu, the GRUB_CMDLINE_LINUX_DEFAULT field is set to "quiet splash", but you can leave its value blank to see a screen that displays the boot process, or you can set it to "splash" to see the splash screen and a summary of actions. Additionally, GRUB_CMDLINE_LINUX_DEFAULT is the place to add options, such as acpi=off.
Most of the rest of /etc/default/grub consists of fields that are commented out with a hash mark (#) at the start of the file and can be enabled by removing it. One of the most useful of these options is GRUB_GFXMODE, with which you can set the menu's resolution to anything your video card supports. If you are unsure which resolutions your card supports, enter c at the GRUB command line when booting and type vbeinfo to see a list of available resolutions. Should you want to keep single-user-mode kernels from displaying in the menu, you can use GRUB_DISABLE_LINUX_RECOVERY=true. Similarly, you can disable the probing for other operating systems with GRUB_DISABLE_OS_PROBER="true".
After you have made all your revisions to /etc/default/grub, do not forget to run update-grub to have them take effect the next time you start the system.
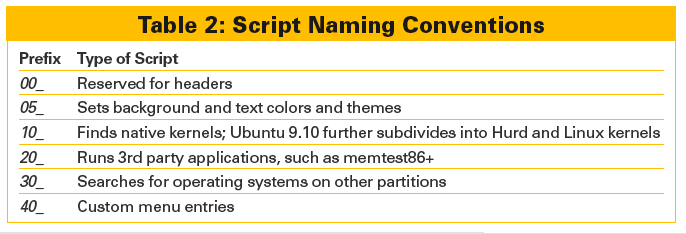
The behavior of GRUB 2 is also affected by any scripts in the /etc/grub.d directory (Figure 4). These scripts have a specific naming convention, which determines the order in which they are run (Table 2). More advanced users might want to write their own scripts, at least after GRUB 2 is fully documented. Meanwhile, for everyone else, Ubuntu 9.10 includes some sample scripts, which you can modify for your own purposes (remember to make a backup copy first).
![]()
One way you might want to edit these scripts is by changing the colors used in the menu. Open /etc/grub.d/05_debian_theme and find the lines:
set menu_color_normal=white/black
set menu_color_highlight=black/white
The color values are listed with the foreground text first, followed by the background color. Here, replace the existing values with the colors of your choice. If you are unsure which colors to use, those listed in the Legacy GRUB manual should work [4].
Another way to edit 05_debian_theme is to set a splash screen to appear behind the menu, either for a commercial distribution or to personalize your installation. After creating a splash screen compatible with GRUB 2 and your computer [5], copy the image to /boot/grub/ or /usr/share/images/desktop-base. Then open the script /etc/grub.d/05_debian_theme and find the line:
for i in {/boot/grub,/usr/share/images/desktop-base}/moreblue-orbit-grub.{png,tga} ; do
Replace moreblue-orbit-grub.{png,tga} with the name of your new image, and you are done.
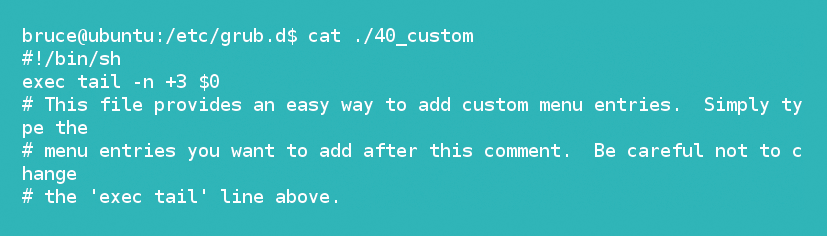
However, the most common use of these scripts will probably be to add a custom entry to grub.cfg, either because an operating system or kernel has gone undetected or because users want to tweak options. Ubuntu's 40_custom script provides the basic structure for adding entries, as well as comments to help you use it (Figure 5).
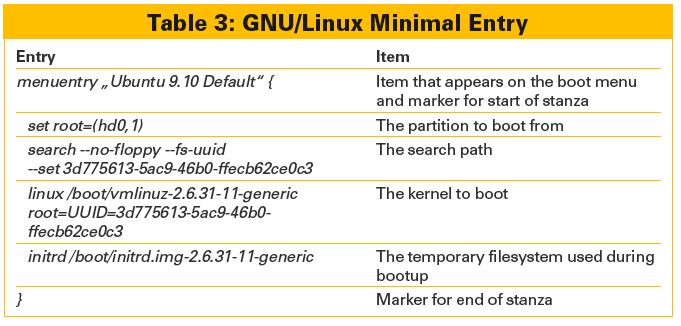
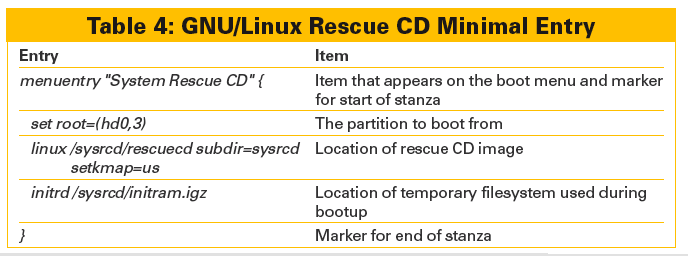
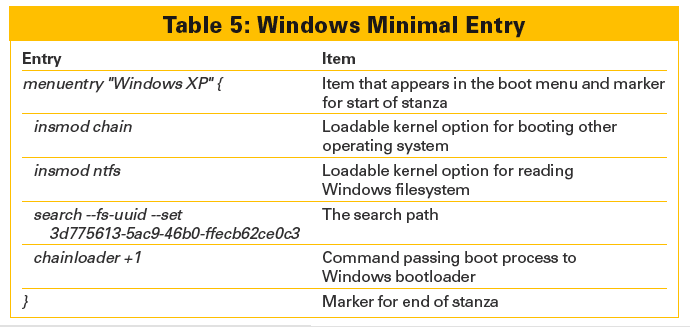
The easiest way to create a new entry is to copy an existing one from grub.cfg and modify it. To be usable, each entry must begin with a line for menuentry that ends with { (an open curly brace) and end with } (a closed curly brace) on a separate line. As with Legacy GRUB, the rest of the settings are contained in a stanza or group of options and depend on the type of operating system being loaded. The minimal requirements are mostly similar to those in Legacy GRUB, but the names are frequently changed (Tables 3-5).
Other options possibly are also available, but, if so, I was unable to find them. However, these samples, modified to your computer, should work both as a custom script or if you are directly editing grub.cfg. Once you have created the custom entries, make sure the script is executable by running the command chmod +x /etc/grub.d/<filename>. Then, run update-grub to make GRUB 2 aware of the new script.
In Legacy GRUB, you can start a command line in a virtual terminal or open one by pressing c at the boot menu. In keeping with the emphasis on scripts, GRUB 2 has eliminated the command line on the desktop - at least in Ubuntu 9.10 (Figure 6). You can still open a terminal at the boot menu, but many of the commands used in Legacy GRUB appear to be missing or renamed. For example, find seems to have been replaced by locate. GRUB 2 also has many new but undocumented commands, as well as some annoying absences, including less, whose lack means that the help and many of the GRUB 2 files scroll by too fast for you to read.

If you run into trouble, you might be able to use the GRUB 2 command line to help you find your way into a damaged system. In particular, you can locate a bootable kernel using set and then specify the settings to boot it, one at a time. But, at this stage, how GRUB 2's command line compares with that of Legacy GRUB is difficult to say.
For now, your best chance for using the GRUB command line is to work your way through the alphabet with Tab completion to see the list of available commands. This process is so cumbersome, however, that I suspect that, for now, many users will avoid it unless absolutely necessary.
As GRUB 2 becomes more widely used, I predict that debates will erupt around it. On the one hand, GRUB 2's scripting options and features, such as the ability to add a more sophisticated splash screen than in Legacy GRUB, make it a distinct improvement. Supporters might also argue that GRUB 2 conforms more closely to GNU/Linux conventions by placing configuration files in /etc where they belong, rather than in /boot.
On the other hand, GRUB 2 is a step away from the hands-on editing that has been the norm in GNU/Linux. You can still edit the boot process, but, with the advent of scripts, the level of expertise required to do so is higher - a change that is less likely to scare users away from trying than to increase the possibilities of disaster. Nor does there seem any reason to change the names of some of the fields that define a menu entry, such as replacing label with menuentry.
No doubt, the final version of GRUB 2 and the release of complete information will affect the debate - although in what way is impossible to predict. Some distributions might even insist on staying with the easier to understand Legacy GRUB. However, what's more likely is that there will be a period of intense discussion, and then, over the months and the years, everyone will slowly get used to it, no matter what they originally thought.
| INFO |
|
[1] GNU GRUB: http://www.gnu.org/software/grub
[2] GRUB 2 wiki: http://grub.enbug.org/Manual#head-21f23e1d0efb30d818a9f54c4c9f796d6ebc8787 [3] Ubuntu GRUB 2 basics: http://ubuntuforums.org/showthread.php?t=1195275 [4] Legacy GRUB menu colors: http://www.gnu.org/software/grub/manual/html_node/color.html [5] Add a splash image: http://members.iinet.net/~herman546/p20/GRUB2%20Splashimages.html#make_your_own_ |