
By Marcel Gagné
In my lighter moments, I've been known to suggest that we (the open source community) shouldn't have to work with Microsoft. They, Microsoft, should be forced to work with us. As it turns out, I'm also a realist and someone who works in the real world, where Windows desktop systems are the rule, not the exception.
Although my office might have half a dozen Linux desktop computers within reach, odds are pretty good that isn't true of the office next door. Windows is still very much a part of the average business IT department. Despite the obvious advantages of Linux, many of us must be able to move easily (or at least exchange information) between these two platforms.
Nevertheless, Linux desktops aren't the curiosity they used to be. Management increasingly sees a use for Linux workstations, and some of you have managed to convince them to let you run Linux on your workstations instead of Windows. Whatever the reason, Linux admins sometimes need to configure Linux to join a Windows workgroup or domain to access shared files and printers. In a larger, more secure environment, Active Directory servers might be present. Although Tristan in accounting isn't particularly fond of his XP box, it's part of his job, and many important files are shared from that machine - files that are shared from a Windows two-thousand-and-something server.
The Samba client software necessary to access Windows resources tends to come as part of the standard installation on most modern Linux systems. Whether you are using KDE or Gnome as your desktop environment, rest assured that all the tools you need to access Windows resources are at your disposal, although some of the more advanced features might not be installed.
In KDE's Dolphin file manager, if you look at the left-hand sidebar, you will see some of the basic storage locations on your system, including your home directory, the main system root, and fixed or removable media attached to your computer. Also, you will find an item called Network.
To see any network resources already connected and the means to attach other networked resources, click on that label (Figure 1). To view Windows systems and shares, click on the Samba Shares icon.
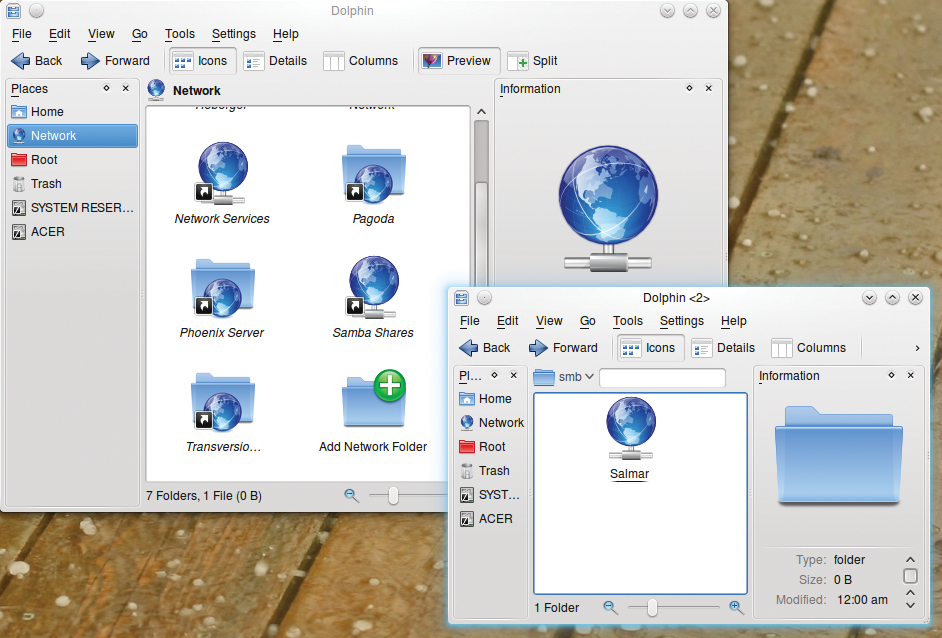
Samba servers [1] or Windows machines advertising network shares will first appear in the browser window under their workgroup name (e.g., ACCOUNTING or SALESGRP). Click on the workgroup name, and you'll see client computers, printers, network storage, and so on that are available to the Windows network.
To read, write, or otherwise make use of the files shared on those computers, click on the corresponding folder for that computer. All of the available shared directories (or folders) are then visible (see Figure 2).
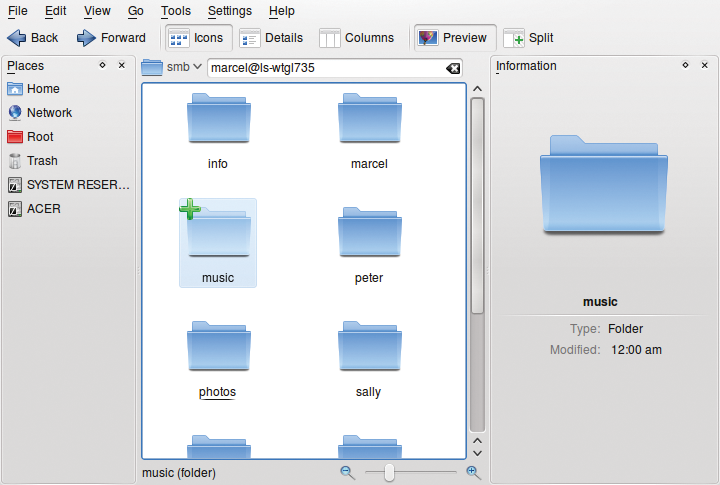
From here, it's all classic drag and drop, graphical file manager browsing.
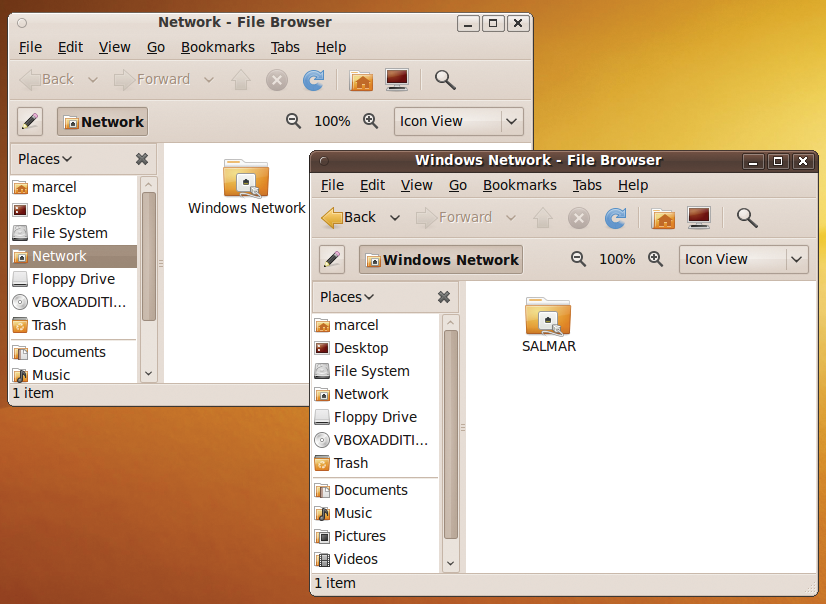
The steps for accessing Windows shares from Gnome are similar. To begin, start Nautilus by clicking Places in Gnome's top panel and selecting Network. When Nautilus opens, you will see a folder called Windows Network. Double-click on it to see the Windows domains or workgroups in your network (see Figure 3).
From there, you can double-click on one of the workgroups to select a computer. Then, from the list of computers, double-click on your choice, and you can browse the individual resources. Be aware that you might occasionally be asked for a username and password to access a computer or even a specific folder (see Figure 4).

In modern Windows environments, particularly within larger organizations, authentication becomes a little more complicated. Faced with hundreds of machines and possibly thousands of users, companies often turn to some kind of central authentication system, preferably something that delivers single-sign-on capabilities.
Given the nearly ubiquitous presence of Windows in the enterprise, the task for this kind of centralized authentication is often given to a Windows server providing Microsoft's Active Directory Domain Services.
Active Directory offers a directory service system similar to LDAP, with Kerberos authentication and encryption, domain naming services, and more. To access resources within Active Directory environments, your Linux computer must join the active directory. The rest of this article describes how to join an Active Directory domain from Linux.
As is often the case in the open source world, the problem of connecting to an Active Directory has more than one solution.
First, the hard way. Now, before you think about skipping this discussion entirely and proceeding to the easier alternative (discussed later in this article), you should know that the hard way is infinitely more flexible. It can provide you with a degree of control that you might not have otherwise, and it's a good way to understand what actually happens during this whole process.
Kerberos is a strong authentication protocol that uses encryption based on a secret-key cryptography. Although more than one flavor of Kerberos (including Microsoft's own spin on it) is out there, I will focus on the open source version.
For my test system, I used a Debian-based Linux system running Ubuntu 9.10. Out of the box, a handful of packages are missing, so the first step is to install them:
apt-get install krb5-user libpam-krb5 krb5-config libkadm5clnt6
For domain services and password authentication, this is probably a good time to make sure you add the IP addresses into your /etc/hosts file of the various hosts you'll need to connect to. For instance:
172.16.59.21 adserver.realm.mydomain.dom
Also, you should make sure you can get to all these machines. If I can ping the various hosts, I'm probably good to go.
Kerberos depends on keeping consistent network time. For proper Kerberos functionality, the clients and servers must be properly synchronized. The network time protocol (NTP) provides this time synchronization for Linux systems. Your system almost surely already has the ntpdate package, so you just need to configure it to get its time from the Active Directory controller. Edit the /etc/default/ntpdate configuration file and make the following changes:
NTPSERVERS="adserver.realm.mydomain.dom"
Then you can restart NTP.
/etc/init.d/ntpdate restart
So far, so good. To get anywhere else, you'll need to get the Kerberos configuration setup. When you install the krb5-config package, it will actually take you through a question and answer session, asking you about your default realm and whether your DNS contains pointers to the various hosts. This is a great way to create your initial configuration, but it adds a lot of information you probably don't want or need. Also, you could just edit the /etc/krb5.conf file (Listing 1).
| Listing 1: /etc/krb5.conf |
01 [libdefaults]
02         default_realm = REALM.MYDOMAIN.DOM
03         kdc_timesync = 1
04         ccache_type = 4
05         forwardable = true
06         proxiable = true
07
08 [realms]
09         REALM.MYDOMAIN.DOM = {
10            kdc = adserver.realm.mydomain.dom
11            kdc = adserver2.realm.mydomain.dom
12            admin_server = adserver.realm.mydomain.dom
13         }
14
15 [domain_realm]
16         .realm.mydomain.dom = REALM.MYDOMAIN.DOM
17            realm.mydomain.dom = REALM.MYDOMAIN.DOM
|
Listing 2 confirms that I can now get a Kerberos ticket from the AD server. To release the ticket, use:
kdestroy
If you can get a ticket from the server, you know that Kerberos is working.
| Listing 2: Getting a Ticket |
01 root@adilaptop:~# kinit Administrator@REALM.MYDOMAIN.DOM 02 Password for Administrator@REALM.MYDOMAIN.DOM: 03 04 root@adilaptop:~# klist 05 Ticket cache: FILE:/tmp/krb5cc_0 06 Default principal: Administrator@REALM.MYDOMAIN.DOM 07 08 Valid starting Expires Service principal 09 03/10/10 17:05:06 03/11/10 03:05:20 krbtgt/REALM.MYDOMAIN.DOM@REALM.MYDOMAIN.DOM 10 renew until 03/11/10 17:05:06 |
That means it's time to Samba. As you might already know, Samba is an open source suite of programs that make it possible for a Linux desktop or server to access use of file and printer services in a Windows network. On a server, Samba can provide those services to Windows clients, effectively taking the place of a Windows server. In fact, Samba can act as an Active Directory server, but that's an article of its own. To use Samba for client-side Active Directory needs, make sure you install the following packages:
apt-get install winbind samba smbclient smbfs nfs-common
The last two packages are optional but useful if you want to mount your network folders using SMB or NFS.
The main Samba configuration file is usually found in /etc/samba/smb.conf (unless, of course, you built from source and specified another path). You don't need a whole lot in this file, but the basics are shown in Listing 3.
| Listing 3: /etc/samba/smb.conf |
01 [globals] 02 workgroup = AD-DOMAIN 03 netbios name = ADILAPTOP 04 password server = adserver.realm.mydomain.dom 05 realm = REALM.MYDOMAIN.DOM 06 server string = My Linux Test Machine 07 security = ads 08 idmap uid = 1000-2000000 09 idmap gid = 1000-2000000 10 winbind enum users = yes 11 winbind enum groups = yes 12 winbind use default domain = Yes 13 winbind nested groups = Yes 14 winbind separator = + 15 winbind refresh tickets = yes 16 template homedir = /home/%U 17 template shell = /bin/bash |
I want to emphasize that the settings in Listing 3 are the basics. A huge number of parameters can be used to configure Samba and the winbind authentication daemon, which supports Linux logon to Windows resources. A great number of these parameters default, which doesn't mean they aren't used. If you are curious, type testparm -v to check your configuration for possible errors, but -v also returns a complete list of all the parameters that are defaulted.
Before you start Samba and Winbind, edit the /etc/nsswitch.conf file and look for the passwd and group lines. The big change is to add winbind to the passwd and group lines:
passwd:   files winbind
group:    files winbind
shadow:   files

hosts:    files mdns4_minimal [NOTFOUND=return] dns mdns4
networks: files
Then start the Samba and Winbind services:
sudo /etc/init.d/samba start
sudo /etc/init.d/winbind start
And now, the moment we've all been waiting for. Time to join the domain:
# net ads join -U Administrator
Enter Administrator's password:
Using short domain name -- AD-DOMAIN
Joined 'ADILAPTOP' to realm 'realm.mydomain.dom'
To see whether everything is really working as expected, try some of the tools that come with the Winbind package.
To call up a list of users in the domain, type wbinfo -u. Because of the large number of users, you might have to wait a minute or two for the request to be filled. The result should be a list similar to the following:
user1
user2
user3
user4
Similarly, you can get a list of groups with wbinfo -g, the result of which looks like this:
engineering_group
financial_group
humanresources_group
In particular, if you have a huge number of users in your Active Directory, you might want to make one other change to the smb.conf file. Under those circumstances, user and group enumeration is a huge performance hit, subjecting you to timeouts, login failures, and other unpleasantness. The change is simple to implement:
winbind enum users = no
winbind enum groups = no
So far, I can join and talk to the Active Directory server, but I still have to set up authentication. The last little bit of configuration takes places with PAM (Pluggable Authentication Module). The files I need to edit are in the /etc/pam.d directory. The following installs a couple of additional modules for PAM support:
apt-get install libpam-mount libpam-encfs
These modules add support so that PAM can mount network shares, such as NFS or CIFS, and do so using encrypted file systems. To complete the configuration, you'll need to edit some files. Listing 4 shows some settings for the common-auth, common-account, and common-session files.
| Listing 4: PAM Configuration Files |
01 # common-auth 02 03 auth sufficient pam_winbind.so 04 auth sufficient pam_unix.so nullok_secure use_first_pass 05 auth required pam_deny.so 06 07 # common-account 08 09 account sufficient pam_winbind.so 10 account required pam_unix.so 11 12 13 # common-session 14 15 session required pam_unix.so 16 session required pam_mkhomedir.so umask=0022 skel=/etc/skel |
Likewise Open [2], which is based on Winbind, makes it much easier to set up, configure, and prepare a Linux desktop to join an Active Directory domain. Mac OS users can also use Likewise Open. Likewise Software provides a commercial, enterprise-class enhanced version in addition to supporting the Likewise Open project.
What's great about Likewise is that you can effectively do all that work described in the previous section in one or two steps - no files to configure and no additional packages beyond the basic Likewise Open packages. With a quick reboot, you can take advantage of single-user sign-in so that you can operate in both the Windows and Linux world with your own user ID.
To download the latest bundle for your Linux system, visit the Likewise Open site; 32- and 64-bit packages are available, as well as deb and RPM-based packages. Installation is just a matter of providing the downloaded files execute permissions and running the installers. There is a package for the base Likewise Open package and one for the GUI. The first package, LikewiseIdentityService, is required, but the GUI is optional.
To start, change the execute bits on both of these packages:
chmod +x Likewise*installer
Then, you can go ahead and run the installation for the packages:
sudo LikewiseIdentityServiceOpen-5.3.0.7724-linux-i386-deb-installer
Once this is done, you have the option of joining the Active Directory using either the command line or the graphical installer. To use the domain line, run:
sudo domainjoin-cli join YOUR.AD.DOMAIN Administrator
You'll be asked for the Administrator password, after which, assuming the correct information has been entered, you'll be able to log in. To use the graphical version of domainjoin, simply run sudo domainjoin-gui. You'll see a screen such as the one in Figure 5.

Next, enter the fully qualified name of the domain you wish to join, then click the Join Domain button at the bottom of the window. Then, you will be asked for the login and password of the Administrator account (see Figure 6).

The password won't be echoed back to you, so make sure you type it correctly. If everything has gone according to plan, you'll be faced with one final requirement. Yes, it's the dreaded system reboot (see Figure 7).

When you reboot your system, you are ready to log on using your Active Directory credentials. In Figure 8, I am using a GDM login manager on an Ubuntu Linux system. Because your AD account does not exist on this computer, click Other to select an alternative user to those you might already have on that computer.
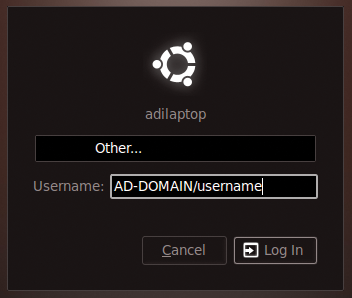
In the Username field, enter the domain username in this fashion:
DOMAIN_NAME/username
When prompted, enter your password to finish logging in to the Active Directory. When logging in for the first time with the AD account, the home directory will not exist. Have no fear; the system will create it for you based on /etc/skel.
If you prefer, you could also log in with your regular account and log in to the local workstation with SSH (you'll need to have openssh-server installed, of course). To do so, do the following:
ssh AD-DOMAIN\\user_name@localhost
Note the double back slashes. One slash escapes the special meaning of the other. When prompted for your password, enter it and log in.
As you can see, a Linux desktop can work within a Windows network in many ways. From simple shared domain space to secure Active Directory environments, running Linux on your desktop PC doesn't mean you can't be part of the neighborhood.
| INFO |
|
[1] Samba: samba.org
[2] Likewise Open: http://likewise.com/active-directory-authentication/ |
| THE AUTHOR |
|
Marcel's just this guy, you know? He's also an award-winning columnist, book author, public speaker, radio and television personality, and a well-known voice in the Linux and open source universe. He's also a published science fiction author and editor, a private pilot, and was once a Top 40 disc jockey. He folds a mean origami T-Rex. |