
By Joe "Zonker" Brockmeier
There are two types of people in the world. Well, that's not really true, there are more than two types of people - but most folks settle into one of two camps: those who think a Mac OS X-type dock is a really spiffy way to manage windows and applications, and those who prefer the Windows-style task bar. The major Linux desktops only offer the task bar, but with open source, there's always more than one way to do it.
It should be pretty clear from the name that Docky [1] is all about the Dock. This highly configurable shortcut bar provides easy access to running applications, folders, and a rich set of applets. Basically, it offers a lot of the same functionality as the Dock in Mac OS X, but you can enjoy the goodness of the Linux desktop and still have access to a application dock as well.
Docky has recently split out as its own application. Previously, Docky was part of Gnome Do, a search/launcher application for Gnome (and other desktops) that's popular with power users. However, the developers decided it made more sense to develop the two apps separately. Which is a good thing: Some users may or may not want to run Gnome Do in conjunction with Docky. Some users just want to replace the Gnome taskbar (or supplement it) with an easy to use Mac-like Dock.
If you want to run Docky at present, you might need to compile it or add a Personal Package Archive (PPA) [2] to your system if you're running Ubuntu. Docky is in the default repositories for Ubuntu 10.04, but before installing it, you'll have to add the Docky PPA. If you're running Ubuntu 9.10, all you need to do is run a single command:
sudo apt-add-repository ppa:docky-core/ppa
After you've added the repository, go ahead and install Docky. Make sure that you install the docklets, too.
sudo apt-get update
sudo apt-get install docky gnome-do-docklets
The update command is necessary to ensure that the system "sees" the new PPA repository. Now you're ready to get started with Docky! Almost. Before you start Docky, you'll need to be sure that you have compositing running. This means, at least if you're in Gnome, you either need to be using Compiz or have Metacity set as your compositing manager. If you're running Compiz, you should be good to go. If not, Metacity probably isn't set as compositing manager, but that's easy to fix.
Open the Gnome Configuration Editor by running gconf-editor in a terminal. On the left-hand side, choose Apps from the tree menu and then select metacity, and under that folder, select "general as shown in Figure 1.
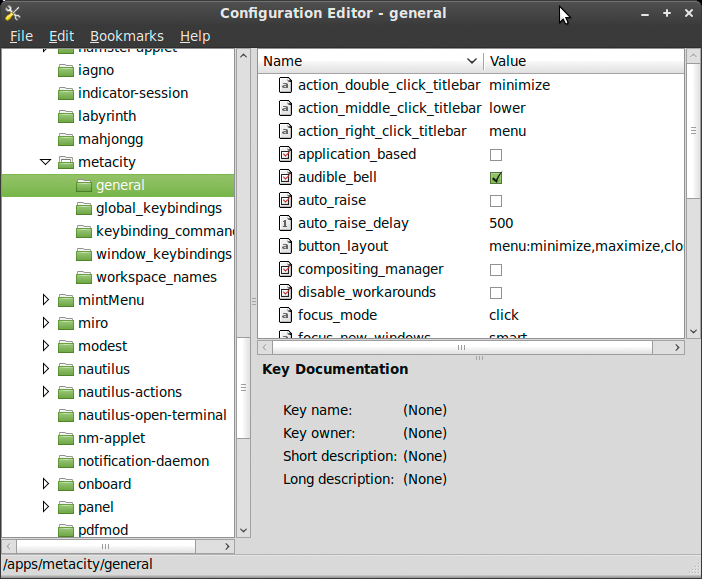
Click compositing_manager (you might need to scroll down just a bit), and your screen will probably flicker for a few seconds and then redraw normally. After this, you'll be able to run Docky normally. Without this, Docky will probably start but could have an ugly black band or other visual artifacts that you do not want.
Now it's time to configure Docky to your heart's content. The first time you run Docky, it will be pretty plain - just icons for your running applications and a few launchers for default applications like Firefox and the Terminal. Docky can do much more than just launch programs and switch between running apps.
To begin, you have to configuring Docky. Clicking the anchor icon shown in Figure 2 will launch the Docky configuration window.
![]()
The configuration window has three tabs, one for the main Docky settings and two to manage Docky's helpers and docklets. Later, I'll touch on the add-ons, but I'll start with the Docks tab. That's right, Docky lets you configure more than one dock. At the bottom of the dialog, you'll see the New Dock button with a plus icon (Figure 3).
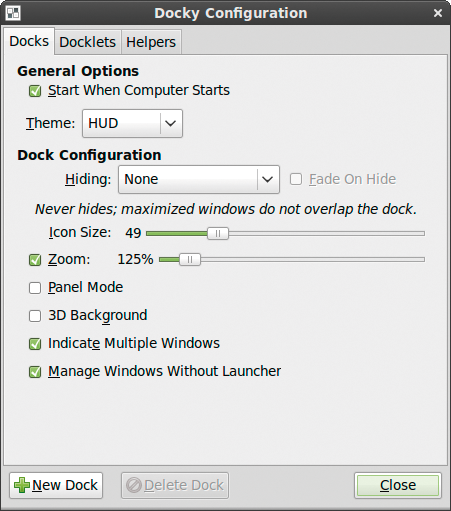
This tab has quite a bit packed in. The first thing to do is decide whether you want to use Docky all the time. If so, click the Start When Computer Starts checkbox so you don't need to start Docky each and every time you reboot or restart your computer.
Naturally, you can configure the theme for Docky, with a choice of five, and they're all attractive. Also, you can choose to position Docky nearly anywhere on the screen. "Nearly," that is, because Docky only allows itself to be positioned in the middle of the edges of the screen. That means you can't have a free-floating dock, but you can put the dock on the top, bottom, or either side. Docky also has a "panel" mode, which expands Docky to the full width of the screen, as shown in Figure 4.
If you enable the "3D Background" checkbox, it will emulate the look of the modern Mac OS X Dock from Mac OS 10.5 and 10.6. As you can see from the screenshots, it's also possible to set the Icon Size and Zoom, which enlarges the icon as the mouse passes over it. Some people like this effect, because they find it aesthetically pleasing. Some hate it, because the icons can change position, and, if you're not familiar with the action, it's easy to click the wrong icon. Although I enjoy the effect, it's something to get used to.
Generally, Docky is pretty straightforward to use and not at all hard to configure. With a little tweaking, you should have Docky's behavior just the way you like it.
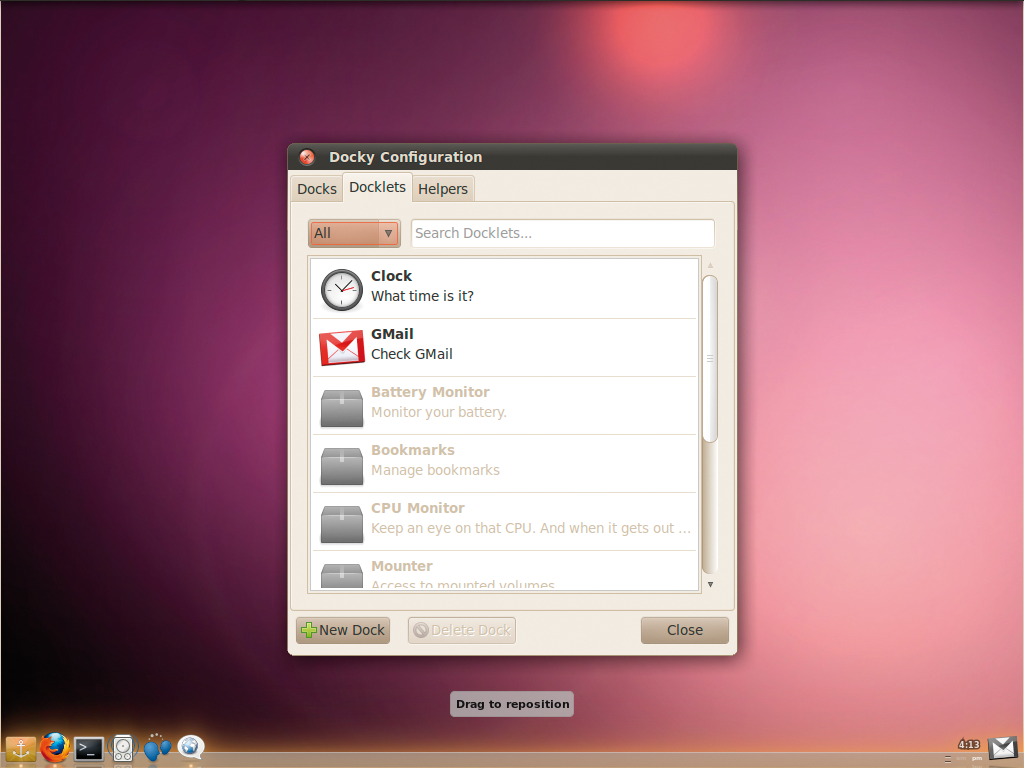
The next two tabs, Docklets and Helpers, allow you to enable additional features in Docky. Docklets are buttons that provide new features. Helpers don't add new buttons, but they add additional features to existing items on the dock. This can be confusing at first, because when a helper is enabled, nothing changes visibly on the dock.
The Tomboy helper appears to do nothing if Tomboy isn't open or pinned to the dock. But if Tomboy is running and shown in the dock, you can right-click on the Tomboy icon and access Tomboy notes, create new ones, and so forth when the helper is running. Without the Tomboy helper, the Tomboy icon on the dock is just like any other.
Like many Linux users, I've never broken the habit of doing my file and package management via the command line. I can't stand having to click-and-drag my way through file management when I can just do something from the shell. The same is true for package management. I'd rather use the apt-get or zypper tool to work with packages than a GUI tool.
To keep things simple, I want fast access to a terminal window whenever possible. The Open Terminal Here helper is really useful in conjunction with the Bookmarks docklet.
The Bookmarks docklet displays a folder for each "bookmarked" directory in Nautilus. That is, the directories that show up in the left-hand navigation bar in the Nautilus viewer. When the Open Terminal Here helper is running, you can right-click on those folders to open a terminal with the directory as the present working directory.
So, for example, if you have added /home/user/Documents/Writing/2010/Work to the bookmarks, you can pop open a terminal with that directory as the starting point.
If you use Getting Things Gnome, the Getting Things Done application for Gnome, you can run the helper to allow you to manage tasks directly from the dock. Helpers are available for Banshee, Gajim instant messenger, Liferea feed reader, Rhythmbox, Pidgin, and others.
Part of the point of the Docklets and Helpers is to make Docky extensible so developers don't have to add features to the Docky core to make it more useful. Because Docky is still heavily in the development stage, there's not a lot of that yet. However, you can add new extensions to Docky even if they're not shipped as a package. To add a new extension, just click the Install button under the Helpers tab. They should be packaged as a tarball and will be copied to your local directory.
I also recommend the Session Manager docklet. This will let you manage your session and quickly lock the screen, log out, restart, or reboot your computer from the dock.
Because Docky doesn't have a menu like the standard Gnome panel, the best way to access frequently used applications is to "pin" the icon to the dock. To do this, right-click the application when it's running and select Pin to Dock.
But what if you don't want a icon on your dock? Just drag it off, and it'll go "poof." Literally. When you drop an icon off the dock, it'll show a little cloud of smoke.
When an application has more than one window running, you can right-click on the application icon and select the window to which you want to switch rather than Alt+Tabbing through the windows to find what you're looking for.
Most of Docky's docklets have useful context menus. For example, if you right-click on the Clock docklet, you'll get a handy calendar display.
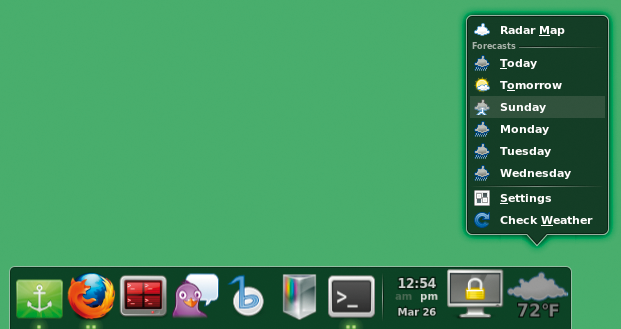
Right-clicking to get the context menu on the Weather docklet, as shown in Figure 5, will open up the week's forecast and let you bring up the settings to configure your location. When you click on the days of the week, the Weather docklet will launch Weather Underground in your default browser to display the forecast.
If you spend an hour or so with Docky, you'll probably be hooked. Although it's not a direct replacement for the Gnome Panel, it will give you most of the functionality, along with a few additional features.
For my desktop, I like to keep the Gnome Panel available but use the autohide feature so I don't see it unless I mouse right over the panel. I prefer the look of Docky and find it a bit more usable. In particular, I prefer the per-application context menus for managing windows rather than the standard Gnome taskbar.
Docky is very intuitive once you start using it, and I'm enthusiastic about the community that's building up around it. Keep an eye on Docky throughout the next year; my money is on it becoming a must-have app for the Linux desktop.
| INFO |
|
[1] Docky: http://www.go-docky.com/
[2] PPA: https://help.launchpad.net/Packaging/PPA |
| THE AUTHOR |
|
"Zonker" is a freelance technology journalist, editor, community builder, and Software Freedom advocate. Brockmeier was the openSUSE Community Manager from 2008 to early 2010. He now writes for Linux Pro Magazine, OStatic, Linux.com, Linux Magazine, and a number of other technology publications. His personal site can be found at http://www.dissociatedpress.net/, and you can follow him on Twitter and Identi.ca as @jzb. |