
By Michael Badger
If you want to teach a child or yourself how to program, which language would you choose? Depending on who you are and what you're trying to accomplish, you'd expect to hear a wide range of traditional answers, such as Python, Ruby, or Perl. The Lifelong Kindergarten group at the Massachusetts Institute of Technology (MIT) created Scratch as an alternative introductory language to teach children as young as eight years old how to write computer programs.
Scratch is a relatively new programming language based on Squeak. It allows you to stack color-coded blocks together instead of typing text-based commands. This approach eliminates the need to worry about mundane items such as data types and syntax rules. If the blocks fit, the program runs; thereby eliminating syntax errors.
By eliminating syntax errors, Scratch makes it easy for novice programmers to create programs that work sooner. The quick, positive experience of creating a project that does something other than generate errors hooks the new programmer and encourages experimentation.
The Scratch Team designed the software as an educational tool to help teach students important skills for the 21st century, such as critical thinking, troubleshooting, logic, and collaboration. To teach these skills, Scratch uses several common computer programming concepts, such as variables, conditional statements, loops, arrays, and design.
However, Scratch does not support all programming concepts. The Scratch Team deliberately chose which features to deploy, balancing functionality with accessibility. For example, Scratch does not support file input/output, passing parameters, or return values. For a list of the supported programming concepts and educational theory behind Scratch, visit the Scratch Educators page [1].
The Scratch Team distributes installers for Windows, OS X, and Linux via the download page [2]. The link to the Linux installer is at the bottom of the page.
Scratch runs with Wine on any Linux distribution. Ubuntu users can add a Personal Package Archive (PPA) to their software sources (see the "Adding a PPA" box) or install the .deb directly. Source installation is also available.
The Linux version is beta, with some known issues as a result. The Lego WeDo Robotics kit is not currently supported. Sound recording is choppy in Karmic Koala (9.10). In Jaunty (9.04), the Scratch window doesn't repaint after leaving full-screen mode if Compiz is enabled. However, other hardware, such as webcams and external sensor boards from PicoCricket work well in the Linux version.
After you've installed Scratch, follow the sample project in the next section to see how the language works.
| Adding a PPA |
|
If you are an Ubuntu user, adding a repository to the Synaptic package manager simplifies the installation process. To begin, open Synaptic in System | Administration. When it appears, choose Settings | Repositories, then click on the Other Software tab. To add a repository for Karmic Koala, press the Add button. At APT line, type ppa:scratch/ppa and press Add Source. When you're done, press Reload. Your new repository is now available, and you can find Scratch by entering its name in the Quick search box. For other Ubuntu versions, see the Scratch documentation page [3] for the name of the repository you'll need. |
Everything you need to create, run, and share projects is available from a single interface. After you open Scratch, notice that the interface is divided vertically into three sections (Figure 1).
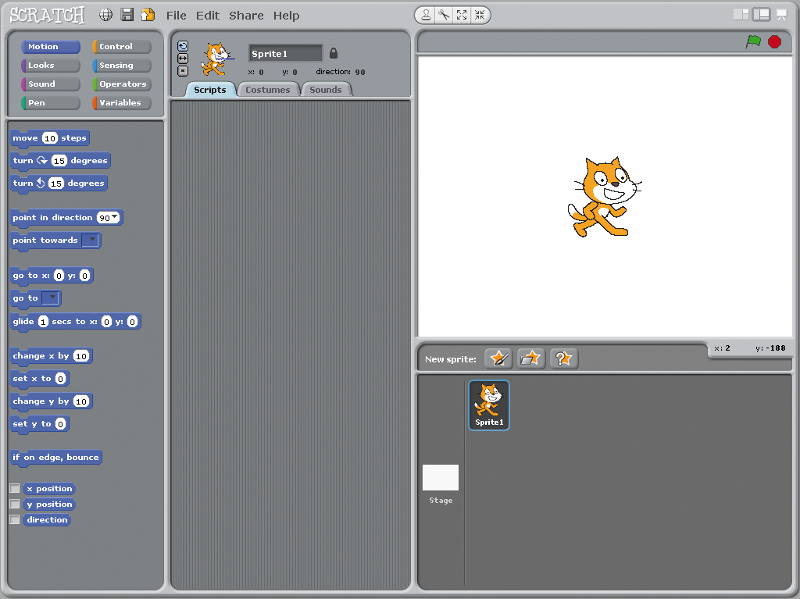
On the left side are palettes of blocks organized by Motion, Looks, Sound, Pen, Control, Sensing, Operators, and Variables. To display a block, click on its palette. The middle section of the interface includes information about the selected sprite. Sprites are the characters in your program that you control with scripts, costumes, and sounds. Scripts are collections of blocks. Costumes are different appearances for the sprite, and sounds let you add audio to the project.
The scripts play out on the stage located on the right side. A list of all sprites displays under the stage. Note that the default Scratch project includes the Scratch cat on a white background.
To begin, build a simple game that makes a cat jump a random height each time you click a button. The first step is to add a button from the list of sprites.
Between the stage and the list of the sprites is a row of three buttons labeled New sprite. To Choose new sprite from file, click the second button. The New Sprite dialog box displays. From the Things folder, select the sprite named button and click OK to add it to the stage.
Before I continue with code, I want to add a costume to that button. By adding a second costume to the button, I will visually represent a pressed button, like defining a custom appearance for moused-over links on the web.
To add a costume, select the button from the sprites list, click on the Costumes tab at the top-middle of the Scratch interface, then click the Import button to open the Import Costume dialog box. From the Things folder, select the buttonPressed costume (the gray button), and click OK. The buttonPressed costume becomes costume 2, as shown in Figure 2. Next, I'll write a script to generate a random height value, save the value to a variable, and create a visual button click.

To store the random value of the button click, create a variable. From the Blocks palette, click Variables then the Make a variable button.
When prompted for a variable name, enter height. The value of this variable needs to be available to other sprites, so select the for all sprites option, which creates a global variable. Click OK and a new set of variable blocks appear, all containing the new variable name, height. Note that a new block displays on the stage that reports the current value of the variable, which is 0.
The set height to variable block contains a drop-down list of variables with an associated value. Drag this block to the scripts tab of the button Sprite2. As the name of the block implies, it will assign a value to the height variable. Next, you'll want to assign a value other than 0 to the height variable. From the Operators palette, drag the pick random ... block into the value field of the set height to block. Scratch evaluates the value of the random number generator and uses the result as the new value for height.
Next, you should replace the numbers in the pick random ... block with something meaningful. The Scratch stage is 480 pixels wide by 360 pixels high and is divided into a Cartesian coordinate system. To use the available space, think about the stage in terms of X, Y coordinates, both positive and negative. Therefore, replace the number 1 in the pick random ... block with a value of -165. Use 180 as the second number in the random range. I chose -165 instead of -180 so that the cat will always jump. The -165 assumes that my cat will start at a position below -165, which I will set later.
Each time you click on the script block now, the height reporter on the stage updates.
Clicking a block of scripts is an easy way to test a script without running the entire project; however, Scratch contains several other control blocks. In this case, I'll use a button click to make the cat jump. From the Control palette, drag the when Sprite2 clicked block to the top of the set height to block.
Now, give it a test. With each click of the button on the stage, the height value updates. If you don't like the position of the button or the cat on the stage, you can drag them around to reposition them.
Eventually, you will need to coordinate the cat's actions with the button click. For this, use the broadcast block from the Control palette by dragging it to the end of the script. The broadcast block takes a message value, which you need to create.
To create the broadcast message, click on the down arrow in the block and select New. When prompted for a message name, enter jump and click OK.
Before you program the cat, you need to create an effect that makes the button look like it has been clicked. From the Looks palette, add a next costume block between the when Sprite2 clicked and set height to blocks. Then add a second next costume block to the end of the script.
If you try to the click the button now, you might not notice anything because the costumes change too quickly. To delay the second next costume block, add the wait block between the broadcast and second next costume blocks. The wait block is in the Control palette.
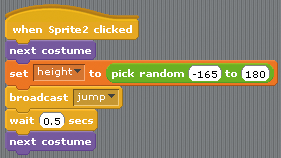
Now when you click the button, you should see that the appearance of the button changes, in addition to setting a new height value. Figure 3 shows the entire script for the button.
With each button click, a new height variable is broadcast. The next step is to make the cat listen for the "jump" message.
Select the cat (Sprite1) from the list of sprites. From the Control palette, add the when I receive block to the Scripts tab. This particular block specifies a message. At the moment, only one message, jump, appears. Now that the cat is listening for the jump cue, you need to add the programming to make your cat do something.
From the Motion palette, add the set y to block to the script and replace the default value to the value of height, which can be found in the Variables palette.
Give it a try by clicking the button on the stage. The cat moves up and down the stage according to the randomly generated height value. However, it defies gravity.
To bring the cat back down, you need to trigger a second script that lets the cat fall when it has finished jumping. A broadcast block can trigger the fall, so add a new broadcast block after the set y to height block and create a new message named fall.
The second script for the cat will make it drop down the stage when it receives the fall message. Because you want to let the cat fall until it reaches a specific spot on the stage, you need to check its position continuously.
To begin, grab another when I receive block from the Control palette, place it below the script so far, and set the variable to fall. Next, add the forever if block under the when I receive fall block. The condition you want to check in the forever if block is the y position of the cat (Sprite1) relative to a y coordinate. Scratch has a block in the Sensing palette that reports the position of the sprite, but before you use it, you need to add an operator block to the script.
From the Operator block, snap the greater than (>) block into place as the condition in the forever if block. From the Sensing palette, snap the x position of Sprite1 block into the first empty placeholder of the greater than block; then, click on the x position drop-down box and select y position instead.
In this case, you want to evaluate the y position to see if it is greater than -125. Even though the bottom y coordinate of the Scratch stage is -180, I chose -125 because Scratch measures the coordinates at the center of the sprite by default. This value will keep the sprite from falling through the stage.
To complete the script, move the cat down the stage five pixels at a time. From the Motion palette, add the change y by block. Feel free to experiment with different values here, but remember, you're moving down, so use a negative number.
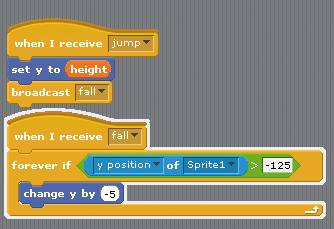
Now click on the button on the stage to see the cat jump and then fall smoothly back to the bottom of the stage. Figure 4 shows both scripts for the cat (Sprite1).
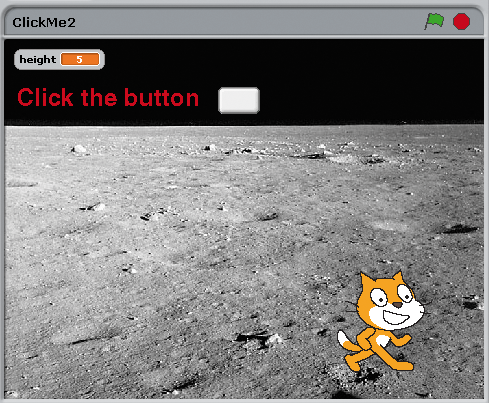
The white stage makes the game appear sterile, so you should add a background. To do so, click on the Stage icon from the list of sprites, then, in the top-middle of the interface, click on the Backgrounds tab. Add a new background by clicking the Import button. From the Import Background dialog box, open the Nature folder, find and select the image of the moon, then click OK to add the new background to the stage.
Also, you can import images from your computer to use as backgrounds, sprites, or costumes by browsing your local filesystem instead of the Scratch media directories. Figure 5 shows my finished project; notice that I created a new sprite to provide some on-screen game instructions: Click the button.
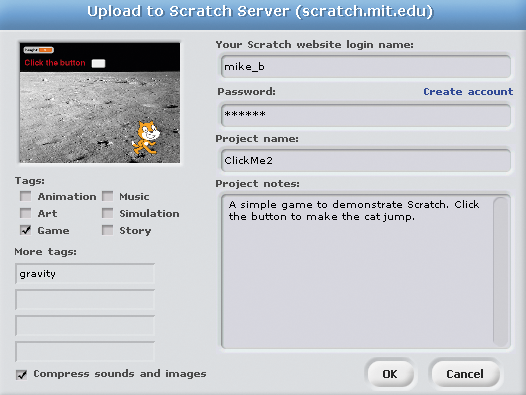
Scratch maintains a thriving community of users [4], and sharing your project with them is as easy as selecting the Share menu from the Scratch interface. Figure 6 shows the options to upload the project to the Scratch server, for which you will need an account. Follow the Create account link in the upload dialog box to set one up.
Sharing a project via the Scratch website means other people can play your game from a browser via a Java applet. Other Scratch community members will be able to download your game, remix it, and share it again. For example, you can play my version of this game and download the project code at the Scratch website [5]. This remix attitude is the basis for the project's name.
Also, you'll find a set of kid-friendly forums on the website. However, if you want to speak with other people who teach with Scratch, check out the Scratch Ed site [6].
Creating projects in Scratch is fun and slightly addictive. Feel free to use this game as a starting point for something bigger and better. Although I did not cover it, Scratch includes a basic built-in image editor. Any sprite, costume, or background can be edited within Scratch. Likewise, you can create new images. The Paint new sprite button can be found in the row of New sprite buttons located under the stage.
Happy Scratchin', and don't forget to share this with a child - of any age - near you.
| INFO |
|
[1] Information for Educators: http://info.scratch.mit.edu/Educators
[2] Scratch download page: http://info.scratch.mit.edu/Scratch_1.4_Download [3] Scratch documentation site: http://info.scratch.mit.edu/linux_installer [4] Scratch website: http://scratch.media.mit.edu [5] Jump, Cat, Jump game: http://scratch.mit.edu/projects/mike_b/943286 [6] Scratch Ed website: http://scratched.media.mit.edu/ |
| THE AUTHOR |
|
Michael Badger is a technical communicator and the author of Scratch 1.4: Beginner's Guide, published by Packt Publishing. To learn more about Scratch, surf to his Scratch Beginner's Guide Tutorial blog at http://www.scratchguide.com |