
By Bruce Byfield
Text editors are basic command-line tools that you can use to edit configuration files and write scripts, for example; the one you are most likely to find in any Linux distribution is a Vi-like editor such as Vim [1]. This statement is likely to evoke howls of protests from Emacs [2] users.
Emacs, as you probably know, is the other great contender for the standard text editor at the command line, and the flame wars between Emacs and Vi users started the day that humans discovered fire. However, the statement is simply factual: For better or worse, these days a default install is more likely to include Vim than Emacs. That's not to say that Emacs isn't worth exploring, but I will save that for next month's column.
Nor is Vim the only Vi-like editor available. On BSD, you'll find nvi [3], whereas on Minix you'll find Elvis [4]. The BusyBox utilities [5], too, include their own Vi clone. However, Vim is undoubtedly the most popular Vi-like editor today, in no small part because it can be highly customized with macros and plugins. Vim is so popular that today many people refer to it as Vi, forgetting that it is technically a separate editor, its name being short for "Vi IMproved."
Yet despite Vim's ubiquitousness, many users are intimidated by it. First released officially in 1991, Vim's interface can seem awkward today. As a result, many users prefer to rely on a more modern command-line text editor, such as JOE [6] or Nano [7]. The trouble is, when you boot into single-user mode to troubleshoot, you can't always be sure that these tools are available, especially on a strange machine. Moreover, if Internet connectivity is what you're trying to configure, you can't always stop and install them, although many alternative editors are found in most major distributions.
By contrast, you can always count on Vim being ready to use. For most people, a few basic commands are enough to be functional. The more you learn, the more convenient you'll find Vim, but most people can learn to function within Vim inside of an afternoon. Moreover, most of what they learn will also apply to other Vi-like editors.
The command to start Vim is the editor's name. If you enter simply vim, you create a new file; if you enter vim followed a file name or path, you edit an existing file. In many distributions, Vim is aliased to vi, so you can save yourself one letter of typing.
When you start Vim, you are confronted with an alarmingly blank screen (Figure 1). A square in the upper left corner marks your current position in the file, and you might (correctly) deduce the tildes down the left side indicate lines and the two asterisks at the bottom reserve space for notification messages.
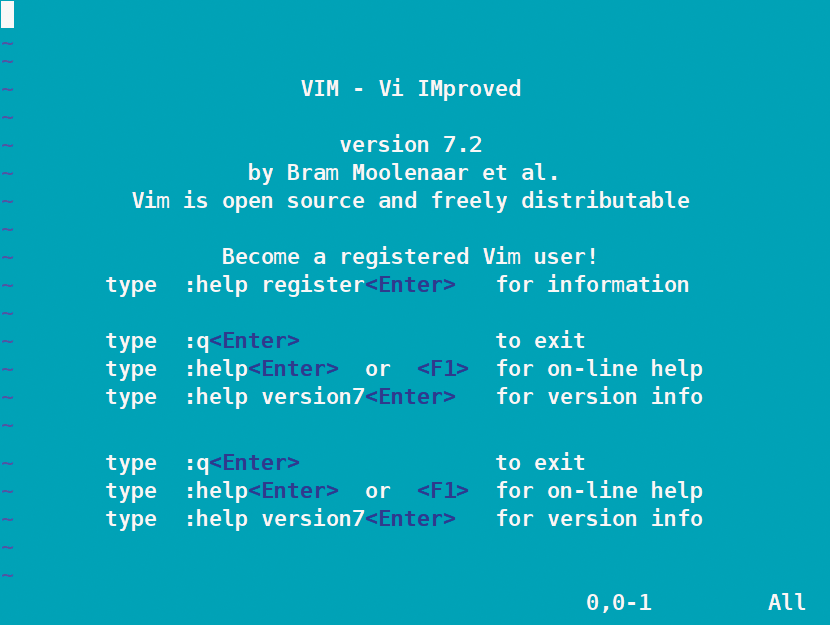
The numbers in the lower right indicate your current position in the document - line and character. The puzzling notation All is another way of indicating the current position in the document (in fact, it reports your position as the percentage of the document from its start). However, when you try to enter some text, nothing happens.
These peculiarities are what scare most users new to Vim. Why can't you just start typing? The answer is that, for reasons obscure to modern users, Vim operates in two editing modes: It starts in command mode - which you use to save the file, navigate the file, and delete characters - but to enter text, you must type i to enter insert mode. When the bottom of the screen reads - INSERT - on the bottom left, you know you are in insert mode (Figure 2).

Once you are in insert mode, you can type normally. In modern versions of Vim, you can use the arrow keys to move around while in insert mode, press the Delete key to make corrections, and press the Enter key to start a new line. When you are finished, press Esc to return to command mode. The absence of any status message on the bottom left will tell you that you are back in command mode.
The reason I have made no mention of using the mouse is simple: By default, Vim is a keyboard-operated editor. Although you can get Vim to work with a mouse [8], and a graphical version called GVim is available on Windows, the standard Vim was written at a time when mouse support for the command line was almost non-existent. At any rate, you might want to enable mouse support for your system. The advantages of not depending on the mouse are faster editing for expert users and less chance of sustaining repetitive stress injuries associated with the use of a mouse.
Vim does not always use the entire keyboard. Modern versions generally support the use of arrow keys to scroll around, but Vim is also designed for use on a minimal keyboard.
Notice, too, that, like the rest of the command line, Vim is case sensitive. A lowercase j is not the same as an uppercase J when you are entering a command. Often, the two letters do complementary actions; for instance, r replaces the current character, whereas R replaces multiple characters. However, the differences can be large enough that you will want to keep the case of the command clear in your mind.
Another thing you might notice if you load an existing file is that Vim does not wrap words the way that most desktop text editors or word processors do. Instead, Vim ends words when it reaches the edge of the window, breaking lines with no regard for syllables. If too many lines break unevenly, you might want to resize the window to minimize the problem, although you are unlikely to eliminate every awkward break.
As if these complications weren't enough, often you cannot simply enter keystrokes in command mode unless you are editing. Instead, you have to preface them with a colon (:) or some other prefix or control key. For instance, if you want to read the online help, you type :help and press the Enter key (and type :q to exit help). Other commands can have their own prefixes, such as the screen navigation tools, which begin with pressing and holding Ctrl (see the "Navigation" section).
Similarly, to save and quit the file you are working on, press :qa or :qw. If you want to quit without saving changes, then enter :q!. Also, you have the option of entering :w new filename to save your work to an entirely different file.
All the commands you enter in command mode appear on the bottom left part of the screen. If you make an error, such as trying to exit without explicitly entering :q! to indicate that you do now want to save, error messages will appear in the same position (see the message in Figure 3).
![]()
| Extreme Vim |
|
Although you do not need to make Vim a way of life before you can be productive in it, for some, it is a way of life - going so far as to use Vim to write their Ph.D. dissertations. |
The information in the previous section is enough to allow you to use Vim adequately, but not elegantly. If you want to do more with Vim, you have seemingly endless choices, starting with enhanced means of moving around a file while you are in command mode.
The latest version of Vim supports navigation via the arrow keys. However, should you be using a minimal keyboard or an older version of Vim, you can use j to move down a line and k to move up a line. Similarly, l moves the cursor one space to the right, whereas h moves the cursor one character to the left. Other keys might give you the same result - for instance, the Enter key moves the cursor one line down, and the Backspace key moves the cursor one character to the left.
If you want to move longer distances, use 0 (zero) to move to the start of the current line and $ to move to its end. These commands are more useful than you might think at first because, in Vim and most other editors, a line only ends when you specifically end it. If you are writing a paragraph in HTML, for instance, an entire paragraph is a single line in Vim because you do not start a new line until after the end tag. Similarly, w jumps to the start of the next word and b jumps to the start of the previous word.
In a long text file, you might also want to jump from one screen of information to another, moving several paragraphs in a single move. Ctrl+f moves forward one screen, Ctrl+b moves back one screen. Should a screen be too large a jump for you, then Ctrl+d moves forward half a screen, and Ctrl+v moves back half a screen.
Yet another way to move around a file in Vim is to enter numberG, in which number stands for the line number. Also, you can enter simply G to jump to the last line in the file. The jumps enabled by such commands can be disconcerting, but once you are used to them, they are far more efficient that moving along one character or one line at a time.
| Keyboard History |
|
"Minimal" keyboards, like those common in the early days of Vi, had no arrow keys, as well as no Home, End, Page up, Page down, or function keys. |
Most of the time, you will probably want to work in insert mode. Besides the basic i command, you can enter insert mode in several time-saving ways, taking advantage of command mode's superior navigation tools, then jumping into insert mode when you see a correction you want to make.
For example, if you use a, text is added after the cursor instead of before it, an option that might seem more logical to some users than adding text before. If you use I, the text you type will be added to the start of the current line. A adds text to the end of the current line. If you trust your touch-typing, you will not even have to check the positioning. Similarly, o (lowercase letter) adds text to a new line below the current line, whereas O (uppercase letter) adds text to a new line above the current line.
If you are looking for a more advanced way to enter insert mode, cw replaces the current word with whatever you type, and R begins replacing characters from the cursor's current position. Even more powerfully, C replaces characters in the current line until you stop typing, whereas cc deletes the current line entirely and replaces it with what you type. Alternatively, if you want to change a single character, r makes the change without actually putting you into insert mode.
To delete a single character without leaving command mode, use x; to delete a set number of characters starting with the cursor, use number of charactersx. D removes the rest of the line to the right of the cursor and - more powerfully and dangerously still - dd removes the entire current line. These commands need to be used with caution - all the more so because they do not shift into insert mode. That means that a single typo can have unintended consequences, so check your work carefully before saving.
Should you find that you have made a mistake, you can take advantage of Vim's undo feature by pressing u. Vim has a large Undo history, so if necessary, you can regress a long way. Of course, if you really have trouble, you might have to exit without saving any of your work.
By this point, you should be starting to conclude that Vim has more to it than the interface first suggests. All the same, some of Vim's other tools might still surprise you.
For example, although cutting and pasting is usually thought of as a mouse function, the command yy can cut the current line, allowing you to reposition it by moving the cursor and entering p. To cut multiple lines, starting with the current one, the command is number of linesyy.
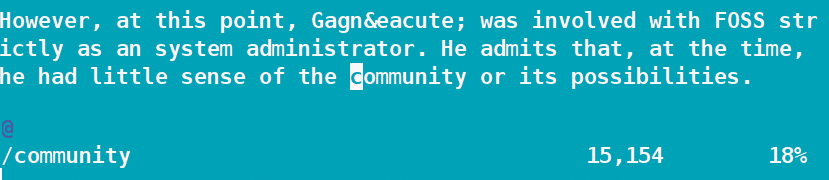
Searching is equally easy. The command-mode instruction /string searches for the set of characters that you enter. Pressing n moves the cursor to the next occurrence of the string, and N moves it to the previous instance (Figure 4).
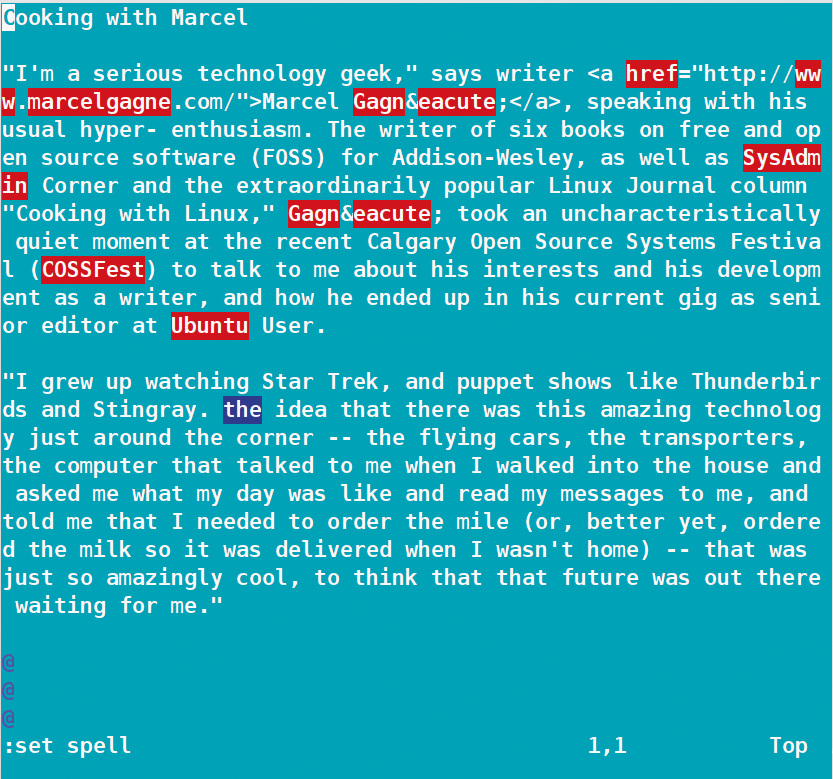
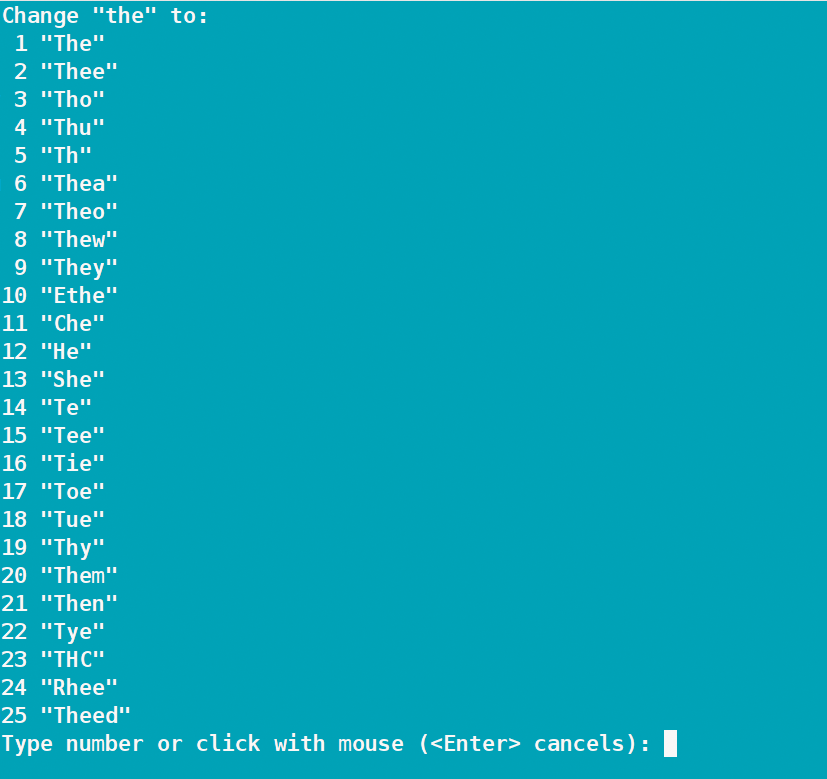
If you want to check spelling and grammar, you can do that in Vim, too, with :set spell. The command highlights potential misspellings in red, and possible grammatical or layout mistakes in blue (Figure 5). Entering ]s moves forward through the flagged errors, and ]s moves backward. At each possible error, z= displays a series of alternatives, from which you can select a correction by number or press Enter to ignore altogether (Figure 6). If you want to add a flagged word to the dictionary, the command is zg.
Vim has countless other features, many of which depend on the scripts and plugins that are installed with it. However, when you consider the few I have mentioned, you might be less surprised than you were at the beginning of this article that some people use Vim instead of a graphical word processor. Doing so is not just an example of command-line machismo - that is, using a text-based tool as a means of impressing people. Once you have memorized even a few of Vim's basic commands, you can start to appreciate how well-suited the tool really is.
Like many command-line tools, Vim offers a trade-off to users: Although it takes longer to learn than a desktop equivalent like OpenOffice.org or KOffice, as you gain expertise, you also enjoy ease of use and efficiency.
Still, no one can deny that learning Vim takes a certain commitment. All users should learn enough about Vim to edit a file and save it properly, because you can never be sure when the ability will come in handy. Beyond that, I suggest that Vim novices learn it slowly.
To begin, add half a dozen commands to your repertoire. Should a function have an alternative command, choose one form rather than trying to learn both. Then put the half dozen commands and what they do on a file card beside your computer and keep using the commands until you are comfortable with all of them. When you are, repeat the process with another half dozen commands. In surprisingly few days, you should start to amass expertise and will have taken a major step toward making yourself comfortable at the command line. If, at the end of the process, you decide that you dislike Vim, then consider exploring Emacs ...
... which I'll discuss next time.
| INFO |
|
[1] Vim: http://www.vim.org/
[2] GNU Emacs: http://www.gnu.org/software/emacs/ [3] nvi: http://en.wikipedia.org/wiki/Nvi [4] Elvis text editor: http://elvis.the-little-red-haired-girl.org/ [5] BusyBox: http://www.busybox.net/ [6] Joe's own editor: http://sourceforge.net/projects/joe-editor/ [7] GNU nano: http://www.nano-editor.org/ [8] Using the mouse for Vim in an xterm: http://vim.wikia.com/wiki/Using_the_mouse_for_Vim_in_an_xterm |