
By Joe "Zonker" Brockmeier
When I was a kid, the school accessory to have was the Mead Trapper Keeper binder, the pinnacle of organization for kids besieged by six subjects a day plus the usual assortment of administrivia from the school. Although I haven't had a Trapper Keeper in decades, RedNotebook for Linux is just as nifty, and I didn't even have to spend my allowance.
RedNotebook [1] is a desktop journal application for Linux. Licensed under the GPLv2 (or later), it provides a simple but powerful application for capturing your thoughts, to-do lists, and notes, and it even helps organize important files.
RedNotebook also makes it simple to export your journals so they're not just locked into a desktop app. Want to publish your notebook of poems? It's a snap. Need to back up your work notes? In a couple of clicks, it's all done.
Most major distros have packages for RedNotebook, or you can find them fairly easily. The project page has downloads [2] and instructions for Ubuntu, Fedora, Debian, openSUSE, Slackware, and others. You'll even find Windows and Mac OS X info if you happen to be running multiple OSes.
For the purposes of this article, I'm using RedNotebook 1.0 on Linux Mint 9. This version is newer than the one shipped with Ubuntu Lucid Lynx (and therefore Linux Mint 9), but the differences between the versions are not great. You can find instructions on the download page if you really want to run the most recent release.
To start RedNotebook, enter rednotebook at a command line or Run dialog to see a three-paned window that looks almost exactly like Figure 1. On the left-hand side is a calendar and search window; on the right-hand side is the Categories pane (more on that in a minute); in the middle is the text for any given day. Looks simple, right? Actually it is, but if you dive in a bit, you'll find some interesting features beneath the surface.

Starting with the obvious, out of the box, RedNotebook comes with some helper text that describes its markup and features. If you've spent any time using wikis, the markup will look really familiar.
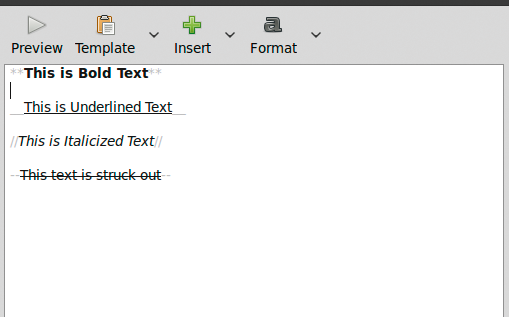
Four basic text-formatting options that use asterisks, underscores, slashes, and dashes are available. Enclosing the text between two sets of asterisks (like **this**) bolds the text, two underscores (__such as this__) underlines text, and two forward slashes (//like this//) results in italics. If you want to strike through text, use two dashes (--like so--). These options are shown in Figure 2, and, as you can see, the text is not separated from the markup by spaces. If you do leave space between text and markup, the formatting won't take effect.
If you want multiple "entries" for a day, separate them with a set of three equals signs on each side of your text.
Finally, you might want to use RedNotebook for code snippets or other structured text that should not be formatted with underscores, italics, and whatnot. If that's the case, use backticks (`) to enclose the text. This notation tells RedNotebook that the text should be left as it is.
A handy formatting button in the toolbar lets you forgo memorizing the formatting conventions. However, I recommend using the formatting and ignoring the toolbar here. It's much faster to learn the markup than to grab the mouse to add formatting to your text.
If you want to see what your text looks like, click the Preview button in the toolbar to render much prettier text. This view shows what your text looks like with the markup interpreted and is very close to what your notes would look like as a web page or PDF.
RedNotebook is a really awesome application, but that doesn't mean it is without its quirks. Usually when you think of "categories" you think of, well, categories - as in categorizing notes. However, that's not quite what categories mean in RedNotebook, although they're still useful.
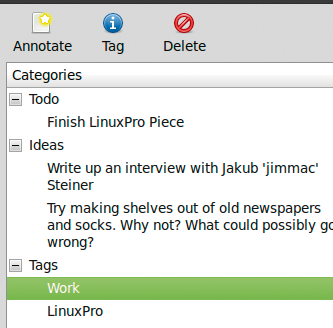
By default, RedNotebook comes with a few categories pre-defined, like Ideas and Todo. If you right-click in the Categories pane, you'll be able to select an existing category or add a new one, along with an entry for the category. In Figure 3, you can see an example of categories with some longer form examples.
What you see in the current view are categories for any given day, but that's not the useful part. To see categories for each day, scroll through the journal by using the calendar on the left-hand side. When you start a new daily journal, it won't have anything in the Categories pane by default. What happened to the to-do list? What about those ideas? Relax. On the left-hand side, click the search tab and select the category you want to view. RedNotebook will display all of the items under that category by date. Double-clicking any of the entries lets you see the notebook from that day and edit the category.
One of the best things about the Categories feature is the ease with which you can make a flexible to-do list that can be structured or very unstructured. If you want to have a flat to-do list or you want to implement the Getting Things Done (GTD) methodology, those are no problem either. Although you could accomplish it by creating categories for each action category, it would be a bit labor-intensive. One way RedNotebook could improve is to add checkboxes or fields to make managing entries under Categories a little easier. Having to add markup to check off a to-do list is a bit less than convenient, but it's workable.
Also, it'd be nice if the dialog for adding entries under Categories had a larger text field. Although I'm not sure whether text is limited in the existing field, it provides very little room to type at the moment. Tags are basically a subset of categories, so you can add tags to any entry and then search by that tag later.
If you have a note that you save often, you can create a template to insert it quickly. For instance, RedNotebook ships with a few default templates like Meetings and Journey, which insert a basic framework for meetings or trip plans.
The templates are stored by default in ~/.rednotebook/templates as plain text files. By placing a text file (with the .txt extension) in that directory, you can create a new template, or you can make it even easier by using the Template button and selecting Create New Template. The resulting dialog lets you select the name of the template and opens Gedit (or another editor if Gedit is not present) to edit the template. If you can put $date into the template, the current date shows. This handy function lets you keep an accurate timestamp of when you were in a meeting or made or received a call.
Templates use the standard RedNotebook markup. When you call one of the existing templates, it simply pastes the template into the notebook and lets you go from there.
Something that makes RedNotebook better than that old-fangled Trapper Keeper is being able to search through your notes, categories, and tags faster than you can say "Mead." Under the calendar on the left-hand side of the RedNotebook window, you'll see a dialog for searching. You can select any of the categories or tags available, or you can search for any term you might have used. So, if you had a meeting with Wile E. from Acme Corp. sometime last month but don't remember which day, just search for Acme or Wile E.
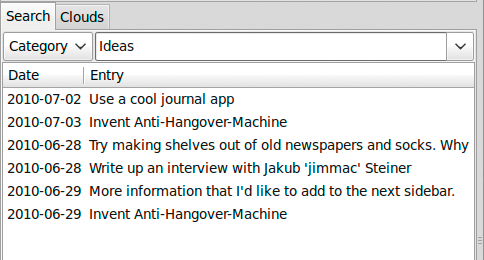
If you know what day you are looking for, that makes it even simpler; just choose the date from the calendar. Selecting a category or tag will display all entries with those categories or tags, as shown in Figure 4.
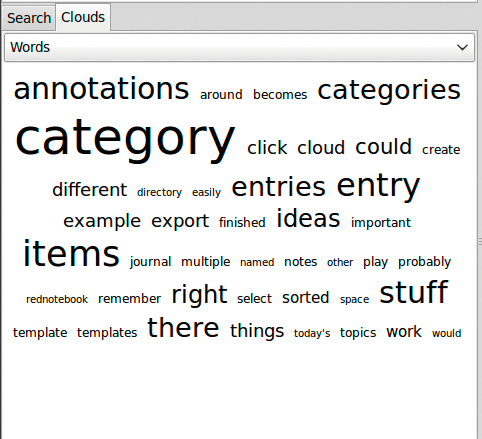
RedNotebook also builds a "cloud" of terms you use often. By clicking the Clouds tab, a word cloud of frequently used terms appears, as shown in Figure 5. With the drop-down box, you can select Category or Tag clouds as well. When you click on any of the terms, you'll see all entries that have the specific term, tag, or category.
If RedNotebook were restricted to text, it would be useful but fairly limited. However, you also can use images in your notebooks to link to other types of files. When in edit mode, you'll just see a link to the file, but in preview mode or when exporting the file, you'll have a view of the file itself. Because RedNotebook doesn't provide tools for resizing the file or controlling how large it is in the final export, you might need to tweak files if you're using RedNotebook to produce printed works.
Once you start using RedNotebook frequently, you should make backups on a regular basis. Unlike system and other types of backups, RedNotebook makes it dead easy to create and keep backups: Just go to the Journal menu and select Backup. RedNotebook will create a ZIP file with a complete backup of all your notebooks.
One caveat to note: RedNotebook only links to files on your system. Backing up your notebook will not save the files you link to, so make sure you're also backing up other important files.
For printing or publishing, you might want to export a day's entry, or your entire notebook, to a more suitable format. RedNotebook is really flexible in that regard, by offering HTML, LaTeX, text, and PDF output formats, and from LaTeX, you can get to all kinds of other formats.
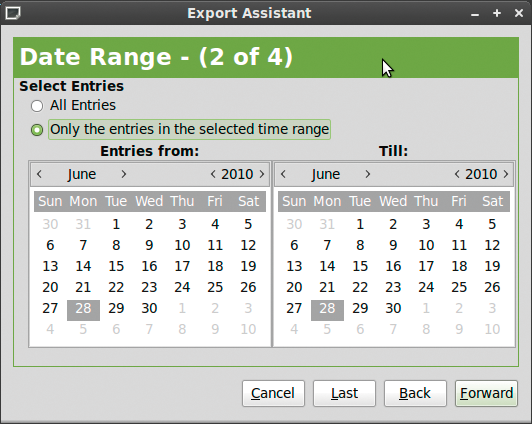
To export your journal, go to Journal | Export. Next, you'll see the Export Assistant dialog that will walk you through choosing the format you want and will help narrow down the dates and categories. Figure 6 shows the date range selector, and - here's what really rocks about the Export feature - you can export a day's entry, all your entries, or a specific date range.
To just print off a quick to-do list, look at Figure 7 to see the content dialog. Here, you can choose to export categories, or not, and choose whether you want to export the text that goes with it. If you want a to-do list, just uncheck the Export Text field, select just the Export only the selected categories field, then, choose Todo from the Available Categories box.

Additionally, you could use this to export text without the categories from the selected dates. If all you want are the notes from specific days, without any of the to-do lists and so on, use this feature.
Finally, after you're asked to select a file name, you'll have your export. RedNotebook produces pretty nice looking PDFs - maybe not suitable for publishing as a book, but definitely decent enough to pass in a corporate environment.
For the most part, RedNotebook is very self-explanatory, and you should be up and running in minutes - not hours or days. It helps that RedNotebook includes some sample text to get you started. If you don't want it cluttering up your notebook, just delete it. All of the information you'd want can be found on the RedNotebook website in the help section. Just go to Help | Get Help Online.
RedNotebook is a very simple but fairly powerful tool. Although it's very unstructured out of the box, it provides the framework to be a very useful and structured tool. It's up to you to make the most of it, so get started!
| INFO |
|
[1] RedNotebook: http://digitaldump.wordpress.com/projects/rednotebook/
[2] RedNotebook downloads: http://digitaldump.wordpress.com/projects/rednotebook/download/ |
| THE AUTHOR |
|
Joe "Zonker" Brockmeier is a freelance technology journalist, editor, community builder, and Software Freedom advocate. Brockmeier, the openSUSE Community Manager from 2008 to early 2010, now writes for Linux Pro Magazine and other open source and technology publications. His personal site can be found at http://www.dissociatedpress.net/, and you can follow him on Twitter and Identi.ca as @jzb. |