By Marcel Gagné
There's got to be an easier way. That statement is possibly the number one best starting point for improvement, even of good things. After all, almost anything, even a good thing, can be improved upon. Almost anything.
Drupal is a really good content management system (CMS). Essentially, it's a collection of PHP code that is used to create rich, dynamic websites (Figure 1). Whether you are running a business, maintaining a personal blog, or serving an online community, charity, or neighborhood organization, Drupal makes that website possible. Think of a website and you can probably build it with Drupal. Across the vast expanse of the Internet, thousands and thousands of websites are built with Drupal.

What isn't included "out of the box" with Drupal can be added by using an incredible variety of add-on modules. Create a social networking site, an electronic commerce marketplace, a news site, or a photo gallery, or whatever ... there's a module for that. Probably. Best of all, Drupal is free software, open source, and distributed under the GPL. If you are a site creator building for yourself or for others, you need to check it out. But, like almost anything, even Drupal can still be improved upon. Developers are doing this all the time as Drupal evolves, but I'm talking about making it easier to work right now using some really cool tools.
To create a Drupal site, you need a Linux server with Apache, MySQL, and PHP. This would, of course, be the classic LAMP server. Drupal itself is available from the Drupal website [1]. Get the latest bundle and extract it into your server document hierarchy and rename the resulting directory to something that makes sense in your environment:
tar -xzvf drupal-6.17.tar.gz
mv drupal-6.17 mysite
Of course, you will also need to set up an appropriate Apache configuration for that host so that you can point to it (e.g., mysite.mydomain.dom). When you point your browser to that address, installation can begin. Even if you have never done a Drupal installation, it's all pretty simple stuff. The first screen is basically a welcome screen and, unless you have downloaded a special Drupal bundle with a custom installation profile, you can just click the Install link and move on.
The second screen merely asks for your language of choice. The default is English, but you have many choices here. The third screen (Verify Requirements) reminds you that if you haven't already done so, you should copy the default.settings.php file, to be found under sites/default in the install directory, to settings.php. Also, be sure the file is writable by the web server user (usually www-data or apache, depending on your server). Once the configuration is complete, the installer will rename these files and change their permissions to read-only for security reasons. Step four involves creating and configuring your database (Figure 2).
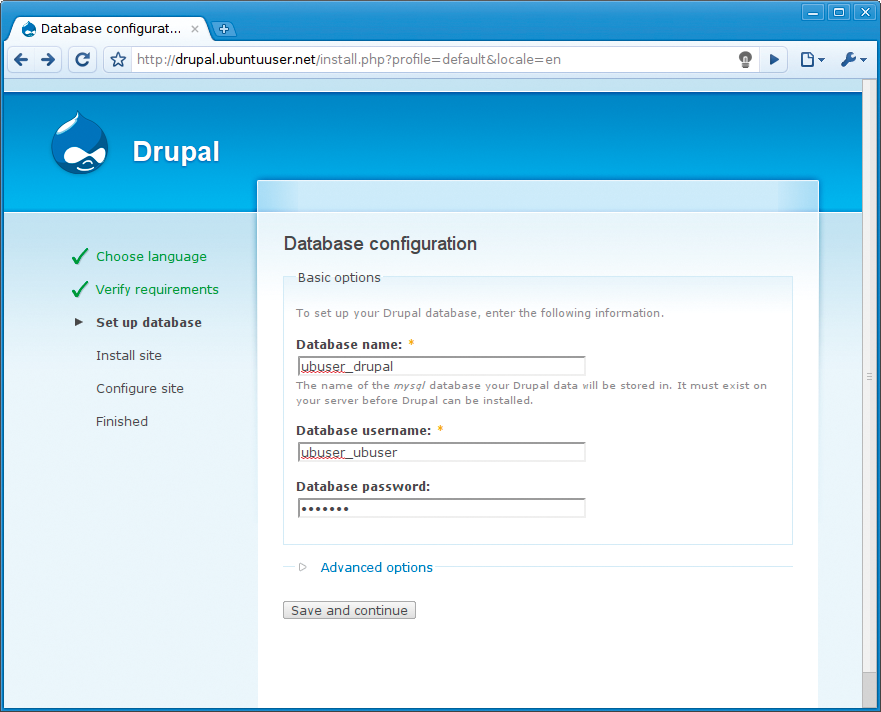
In the form, you are asked to enter a database name, a database user, and a password for that user, all of which must already exist. To create these things, you'll have to use a web tool like phpMyAdmin or Webmin. Alternatively, you could just use the command line and work with the MySQL interpreter manually. The steps are as follows: Create the database and assign a privileged username and password to access and update the database. Type help or \h for help, and \c clears the current input statement. The dialog looks similar to the following:
$ mysql -u root -p
Enter password:
Welcome to the MySQL monitor. Commands end with ; or \g.
Your MySQL connection id is 684004
Server version: 5.0.90-community MySQL Community Edition (GPL)

mysql> create database drupal;
mysql> grant all privileges on atrium.* to 'someuser'@'localhost' identified by 'somepassword';
mysql> flush privileges;
mysql> \q
The rest of the web-based installation involves the final steps in configuring the site before launching your new site. The Configure step asks for your site name, your email address, and what will become the administrator account and password. Choose your default time zone (it might well be selected by default) and whether you want to run clean URLs (server-side configuration). Checked by default is a box labeled Check for updates automatically. This is very handy, and I highly recommend that you leave it as is. The final screen is a congratulatory one, telling you how clever you've been and providing you a link to the first page. Well done!
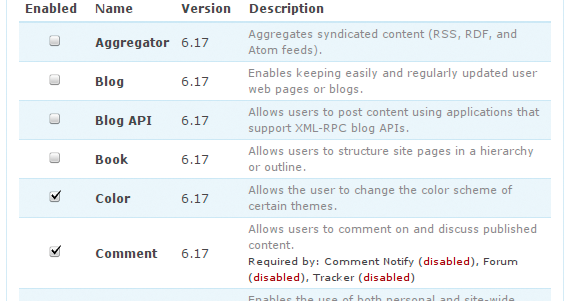
After you've installed a fresh copy of Drupal, some modules are enabled by default; I'll show you where this is defined shortly. To enable additional modules, log in with the administrator account, click Administer | Site building | Modules. A list of all the current modules and their states (enabled or not) are displayed (Figure 3). Only a handful of modules are enabled by default.
To enable additional modules, click the Enabled checkbox next to the module name, scroll down to the list of modules, and click the Save Configuration button. If the module you checked depends on another installed module being activated, you will be told as much and asked to confirm this decision.
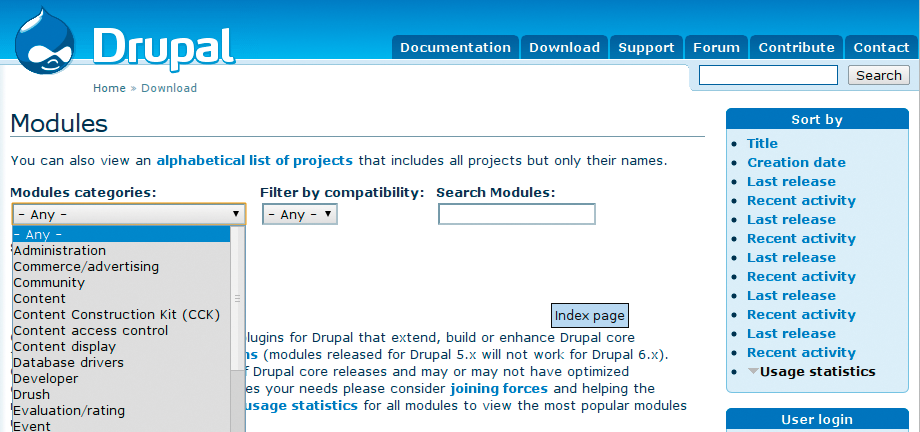
However, if the module isn't there, you need to install it. Hundreds of contributed modules at the Drupal website can take care of practically any need (Figure 4).
The best behaved installs require you to do as little as possible, and if you are installing the same site configuration with the same list of modules over and over again, you need to learn about profiles. The best place to start is with the profile included in a standard Drupal distribution. You'll find it in the profiles/default folder, and it's called default.profile. Near the top of this file, you'll see:
/**
 * Return an array of the modules to be enabled when this profile is installed.
 *
 * @return
 * An array of modules to enable.
 */
function default_profile_modules() {
  return array('color', 'comment', 'help', 'menu', 'taxonomy', 'dblog');
}
Already you can see where this is headed. Using my own modified profile, I can build a Drupal tarball that includes my own list of enabled modules:
function default_profile_modules() {
  return array('color', 'comment', 'help', 'menu', 'taxonomy', 'dblog',
  // My own list of modules I want enabled
  'blog', 'forum', 'aggregator', 'poll'
  );
}
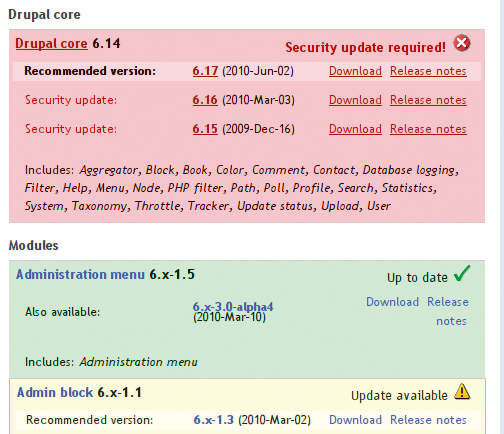
With Drupal, as with any software, you need to keep everything up to date and running smoothly, especially when it comes to security updates. To make sure you stay on top of security-related updates, sign up for an account on the Drupal website [2]. By clicking Administer | Reports | Available updates, you can check the status of your site. A list of all your current modules and themes and their update status will be displayed (Figure 5).
Although you should be backing up your system and your databases regularly, it's particularly important to back them up before you run an update - major or otherwise. Upgrading Drupal involves backing up, putting your site in maintenance mode, removing (or moving to a new name) the old install directory, extracting the latest Drupal, and copying or restoring modified .htaccess and settings.php files, custom modules and scripts, images, and so on. The final step is to run yoursite.dom/update.php to migrate whatever database changes are required.
Oh, and if you have installed any contributed modules, you need to download each of these individually, remove the old ones, extract the new ones, and run update.php again - for each module.
Truth be told, it's not so much difficult as time-consuming, especially if you have a lot of websites to maintain. As good as Drupal is, there's got to be a better way. And there is.
Drush gives me a rush. Seriously. Any long-time systems administrator will tell you that there is a time and a place for the GUI, but for sheer speed and efficiency (and the ability to automate tasks), nothing beats the command line. So it is with Drupal, and that's why Drush makes me happy. With a single Drush command, you can download one or more modules, enable or disable modules, upgrade your Drupal installation, perform a database backup, check out the availability and status of a module (installed or not), run cron hooks for the site, perform an update, and a whole lot more.
Granted, Drush does require that you have shell access to your site, so that's a priority, but if you are the systems administrator, that's probably a given. It's frightfully easy to install Drush [3]. Just download it and extract the package somewhere outside of your web server's root (I put mine in /usr/local). In the drush folder (created when you extract the bundle), you'll find an executable shell script called drush. To make your life easy, create a symbolic link in /usr/local/bin to this executable. Here's what the commands look like:
cd /usr/local
tar -xzvf drush-6.x-3.1.tar.gz
cd /usr/local/bin
ln -s /usr/local/drush/drush
When I first tried to run Drush on two different systems running different distributions, I received fatal errors that Class 'Console_Table' was not found. You might not have this problem but if you do, the fix is simple:
pear install Console_Table
Now, say I want to find out about the admin_menu module for a particular site. The command would look like Listing 1.
| Listing 1: admin_menu Information |
01 -bash-3.2$ drush pm-releases admin_menu 02 Project Release Date Status 03 admin_menu 6.x-3.0-alpha4 2010-Mar-10 Supported 04 admin_menu 6.x-3.0-alpha3 2009-Aug-16 05 admin_menu 6.x-3.0-alpha2 2009-Aug-01 06 admin_menu 6.x-3.0-alpha1 2009-Jun-10 07 admin_menu 6.x-3.x-dev 2010-Jul-31 Development 08 admin_menu 6.x-1.5 2009-Jul-02 Supported, Recommended, Installed 09 admin_menu 6.x-1.4 2009-May-15 10 admin_menu 6.x-1.3 2009-Jan-24 11 admin_menu 6.x-1.2 2009-Jan-19 12 admin_menu 6.x-1.1 2008-Sep-12 13 admin_menu 6.x-1.0 2008-Jun-26 14 admin_menu 6.x-1.0-beta 2008-Jun-08 15 admin_menu 6.x-1.x-dev 2010-Jul-28 Development |
That's just a sample of the shell in action, but I'll give you a more practical example with a little clarification.
Once a site is up and running, it's only a matter of time before one or more of its modules requires an update, whether as part of normal development or for security reasons. The traditional method is to download and extract the module, then run the update from the website as the admin user. Drush is also great for checking on and doing updates to existing modules, all in one pass (Listing 2). The notes at the end tell you that a backup will be taken of the package and that any modifications you made to the projects need to be migrated. Type y to continue (Listing 3).
As you recall, to add modules in the old-fashioned way, you needed to find the latest tarball for your Drupal installation, extract it into the sites/all/modules folder, go into the admin interface, enable it, and so on. When you use Drush, you simply type:
-bash-3.2$ drush dl wysiwyg
Project wysiwyg (6.x-2.1) downloaded to     [success]
/home/dairey/public_html/sites/all/modules/wysiwyg
To enable the module, you just pass en to Drush like this:
-bash-3.2$ drush en wysiwyg
The following projects will be enabled: wysiwyg
Do you really want to continue? (y/n): y
wysiwyg was enabled successfully.
That's pretty cool. Finally, if you want to remove a module completely, you must first disable it then uninstall it.
drush dis module_name
drush pm-uninstall module_name
All of your Drush commands could be included in a simple shell script so that you can then download, install, and enable all your standard add-on modules in one simple command. But it gets better.
| Listing 2: Drush Update Information |
01 -bash-3.2$ drush pm-update 02 Refreshing update status information ... 03 Done. 04 Update information last refreshed: Fri, 2010-08-06 12:06 05 06 Update status information on all installed and enabled Drupal projects: 07 Name Installed Proposed Status 08 version version 09 Administration menu 6.x-1.5 6.x-1.5 Up to date 10 Admin Role 6.x-1.2 6.x-1.2 Up to date 11 Drupal core 6.17 6.17 Up to date 12 Calendar 6.x-2.2 6.x-2.2 Up to date 13 Content 6.x-2.x-dev 6.x-2.7 SECURITY UPDATE 14 Construction Kit available 15 (CCK) 16 Date 6.x-2.4 6.x-2.4 Up to date 17 Image 6.x-1.0-beta5 6.x-1.0-beta5 Up to date 18 jQuery UI 6.x-1.3 6.x-1.3 Up to date 19 Pathauto 6.x-1.3 6.x-1.3 Up to date 20 Tagadelic 6.x-1.2 6.x-1.2 Up to date 21 Token 6.x-1.12 6.x-1.13 Update available 22 Views 6.x-2.10-acquiade 6.x-2.11 SECURITY UPDATE 23 v-1 available 24 25 Code updates will be made to the following projects: 26 Content Construction Kit (CCK) [cck-6.x-2.7], Token [token-6.x-1.13], 27 Views [views-6.x-2.11] 28 29 Note: Updated projects can potentially break your site. It is NOT recommended to update production sites without prior testing. 30 Note: A backup of your package will be stored to backups directory if it is not managed by a supported version control system. 31 Note: If you have made any modifications to any file that belongs to one of these projects, you will have to migrate those modifications after updating. 32 Do you really want to continue? (y/n): |
| Listing 3: Updated and Migrated Changes |
01 Project cck was updated successfully. Installed version is now 6.x-2.7. 02 Backups were saved into the directory [ok] 03 /home/dairey/public_html/backup/modules/20100806120635/cck. 04 05 Project token was updated successfully. Installed version is now 6.x-1.13. 06 : 07 : etc, etc, etc, until all modules are downloaded and updated. 08 : 09 'all' cache was cleared [success] 10 No database updates required [success] 11 'all' cache was cleared [success] 12 Finished performing updates. [ok] |
This little command-line extension to Drush makes all the difference. Drush Make [4] brings the concept of makefiles to Drush and to Drupal. Not only can you download and install additional modules, but you can also throw in the complete Drupal core as well.
To make the magic happen, begin by downloading Drush Make from the Drupal modules site. In the folder in which you installed Drush, which in my case is /usr/local/drush, there's another folder called commands. Just extract the drush_make tarball in this folder. That's all there is to it.
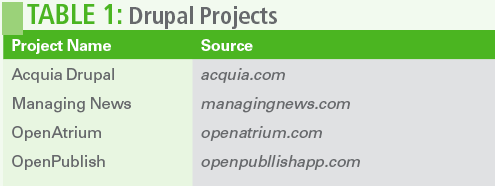
Drush Make makefiles are generally very simple things, but you can create some pretty amazing stuff, too. In Table 1 you'll see a small list of Drupal projects that make extensive use of profiles, Drush, and Drush Make files. To begin, you can download their packages, extract them, and explore the profiles to discover how the Drupal masters do it.
For the moment, please allow me to share my simple Drush makefile (Listing 4).
| Listing 4: A Drush Make File |
01 ; Marcel's drush make file ; Yes, this is a comment 02 ; First, the Drupal core we use 03 core = 6.x 04 05 projects[] = drupal 06 07 ; Now, the extra modules I want 08 projects[cck][subdir] = "salmar" 09 projects[wysiwyg][subdir] = "salmar" 10 projects[filefield][subdir] = "salmar" 11 projects[date][subdir] = "salmar" 12 projects[backup_migrate][subdir] = "salmar" 13 projects[admin_menu][subdir] = "salmar" 14 projects[adminrole][subdir] = "salmar" 15 projects[masquerade][subdir] = "salmar" 16 projects[calendar][subdir] = "salmar" 17 projects[comment_notify][subdir] = "salmar" 18 projects[google_analytics][subdir] = "salmar" 19 projects[image][subdir] = "salmar" 20 projects[imageapi][subdir] = "salmar" 21 projects[imagefield][subdir] = "salmar" 22 projects[img_assist][subdir] = "salmar" 23 projects[jquery_ui][subdir] = "salmar" 24 projects[pathauto][subdir] = "salmar" 25 projects[tagadelic][subdir] = "salmar" 26 projects[token][subdir] = "salmar" 27 projects[views][subdir] = "salmar" |
This little makefile, as simple as it is, will create a Drupal install directory with every add-on module listed as "projects" included. The subdirectory named salmar in my example will be created in sites/modules/all with all my add-on modules below it:
drush make ../mysite.make mysite
The folder mysite does not need to exist; it will be created for me. Drush Make takes the information from my file and downloads everything necessary. Listing 5 shows a snippet of the output from the above command.
| Listing 5: My Drush Make Output |
01 Project information for token retrieved. [ok] 02 Project information for views retrieved. [ok] 03 Project information for drupal retrieved. [ok] 04 drupal downloaded from [ok] 05 http://ftp.drupal.org/files/projects/drupal-6.17.tar.gz. 06 cck downloaded from [ok] 07 http://ftp.drupal.org/files/projects/cck-6.x-2.7.tar.gz. 08 wysiwyg downloaded from [ok] 09 http://ftp.drupal.org/files/projects/wysiwyg-6.x-2.1.tar.gz. 10 filefield downloaded from [ok] |
Once you have the necessary bits and pieces in place, you can create a tarball based on the included Drupal core and modules, even if it wasn't created with Drush Make. The result is a mysite.tar.gz file
drush make --tar mysite.make mysite
Now, you can distribute that tarball as your own custom Drupal site distribution.
As you can see, even complex sites built about the Drupal CMS can be simplified with a little automation. In this article, I've only touched the surface of what you can do, but for the busy admin or the Drupal site developer trying to do more with less time, learning about Drupal profiles, Drush, and Drush Make is a must. And that's how you make a really great CMS even better.
Until next time ...
| INFO |
|
[1] Drupal: http://drupal.org/
[2] Drupal upgrade procedure: http://drupal.org/upgrade [3] Drush: http://drupal.org/project/drush [4] Drush Make: http://drupal.org/project/drush_make |
| THE AUTHOR |
|
Marcel is an award-winning columnist, book author, public speaker, and radio and television personality and a well-known voice in the Linux and open source universe. He's also a published science fiction author and editor, a private pilot, and was once a Top 40 disc jockey. |