
By Aditya Shevade
The Emacs and Vim war is well known among Linux veterans. Numerous websites brag about one editor over the other and the debate keeps growing. Emacs however, has nudged a bit forward with the addition of Org-Mode. It remains the only reason I have Emacs on my computer along with Vim.
Org-Mode started as an extension for Emacs that takes care of your organizational needs. You can manage your daily agenda, meetings, to-do lists, and all those other Getting Things Done (GTD) elements with Org-Mode [1]. I began using Org-Mode to manage my final year project - tracking things that needed to be completed by a certain deadline and all the finer details of a larger module. Turns out that Org-Mode made life much easier than it would have been otherwise.
The greatest advantage with Org-Mode is the file format. It's plain text [2], you don't have to worry about having particular software, and tracking changes is extremely easy (with SVN/Git). Even if you don't have Emacs, you can use a simple text editor to edit the files. The processing needs are also minimized greatly.
I am not going to go into the details of Emacs installation and usage. If you are a new user, this might actually turn out to be a motivation to use Emacs. As I said, Org-Mode started as an extension for Emacs; however, it's now included with the Emacs vanilla package [3]. If you have Emacs version 22 or higher, you probably already have Org-Mode installed. To make sure, issue the command M-x org-mode while in Emacs (see the "Emacs Notations" box). If you do not have Org-Mode, Emacs displays No Match.
At this point, you can do one of two things: either install a newer version of Emacs or install Org-Mode manually. If you decide to install Org-Mode manually, head over to the website [1] and read the installation instructions. Once you have installed Org-Mode, rerun the previous command. If your installation was successful, you will see (org) in the mode line area. If you are running Emacs in graphical mode, you will see a drop-down menu. As a long-time Vim user, I never used the graphical menu. The keyboard shortcuts are much more productive once you are familiar with them.
Now it's time to write an Org-Mode file. To do this, add the following lines to your ~/.emacs file and restart Emacs:
;; Org-mode settings
(add-to-list 'auto-mode-alist '("\\.org$" . org-mode))
(global-set-key "\C-cl" 'org-store-link)
(global-set-key "\C-ca" 'org-agenda)
(global-set-key "\C-cb" 'org-iswitchb)
(global-font-lock-mode 1)
The first line of this code makes sure that all files with an extension of .org will open with Org-Mode in Emacs. The next three lines are preferences for key bindings and fonts. Although you can use any configuration that works for you, this is the default configuration from the official manual. The final line activates the font lock mode. Many Org-Mode features only work with this feature turned on.
To begin, I'll create a file with a .org extension, call it orgTut.org, and open the file in Emacs.
| Emacs notation |
|
Emacs notation was established in Emacs' early days and differs from the usual "Ctrl+C" notation used for window systems. In Emacs, a simultaneous key combination uses the hyphen instead of the plus sign. The Ctrl key and the meta key (Alt, Option, or Esc, as defined for your system) are shortened to a single letter and capitalized - C for the Ctrl key and M for the system-specific meta key. Any accompanying key pressed simultaneously is shown here in italic and is case sensitive. Any key pressed after a key combination is italic, case sensitive, and preceded by a space. Therefore, C-c . and C-c ! mean you press and release the Ctrl and c keys together, then press the period or exclamation mark key. In the first example, M-x org-mode, press the meta key and x, release, and type org-mode. Action keys (i.e., Return, Shift, Arrow keys) appear in normal font, as usual. |
The most sought after and basic feature in any organizer is note taking. Org-Mode is based on the Outline Mode of Emacs. You can format an entire document in a hierarchical form with this mode. This multilevel support lets you add sub-notes and contextual descriptions along with them. To create a headline or level-one note, put an asterisk (*) at the start of the line. To add a second-level note, add two asterisks, and so on. Any text added without the asterisks and after a headline acts as the description of the note (Figure 1).
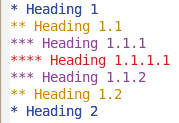
In the figure, the headline would represent the primary task. The sub-tasks would then outline the work flow, with appropriate notes to simplify the process. You can add as many sub-levels as you want. If you want to hide all sub-notes, highlight the main task and press Tab. The entire tree will be folded with an ellipsis after the head. Additionally, you can add various properties to the level-one headlines. Some people get really annoyed with the number of asterisks and the lack of indentation in the format described above, but you can add indentation and have only one asterisk at the beginning of the line, as shown in Figure 2.

To achieve this type of formatting in Emacs v23.1.50.3 and above, just activate org-indent-mode and the document will be indented dynamically. To achieve this effect in earlier versions of Emacs, you can refer to a full-fledged tutorial in the official Org-Mode manual [4].
For example, you might need ordered, unordered, or both styles of lists in your documents. To create unordered lists, add a + or - as the bullet point for the list. To make an ordered list, add the number followed by a dot (.) or a right parenthesis. To add intermediate lines in the document, use M-Return - it automatically adjusts the numbers. Starting a line with a square bracket pair, [ ], adds a checkbox that can be checked/unchecked with C-c C-c. (Remember, to put a space between the pair of brackets.)
The best feature of these notes is the ability to reorder them on the fly using the M-Arrow key sequence. The Up and Down arrow keys will move the items around, and Left and Right arrows can be used to promote/demote the items. The use of M-Shift-Arrow changes the level of an entire sub-tree. Org-Mode also automatically recognizes URLs, and Emacs can open them on clicking if you have configured the default browser.
Any headline in the document can be assigned tags. A tag is enclosed between two colons (:). To tag a headline, just press C-c C-c, and Emacs will prompt you for tags. You can also add multiple tags to a single headline. Once you have created a tag, pressing C-c C-c will provide a list of all tags in the document. To tag the headline, select the tag you want and press the return key.
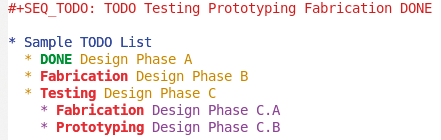
Simple notes can be turned into a powerful to-do management system (or, Next Actions) by tagging them. Any entry from the outline can be configured as a to-do item by pressing C-c C-t when the cursor is on the headline (Figure 3). It adds the label TODO at the start of that headline. Pressing C-c C-t again changes the status to DONE, and pressing it again removes the label. TODO items have two default stages. However, you can, add your own stages as needed: for example, TODO/Testing/Prototyping/Fabrication/Done. To do that, add the line
#+SEQ_TODO: TODO Testing Prototyping Fabrication Done
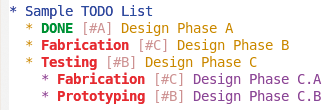
to the start of the document. Now the TODO items will cycle through this sequence instead of the default. Because the TODO management system is so exhaustive, it's only fair that there should be a prioritizing system, and Org-Mode has that feature as well: You can prioritize tasks in three different levels. The A level is the highest level, and C is the lowest level. You can add priorities to a task with C-c ,X. That is, press C-c then press the comma and the priority letter A, B, or C (Figure 4). Pressing Shift-Arrow Up/Down while the cursor is on an item changes the priority of that TODO item.
Another very popular feature of an organizer is the ability to represent data in table format (Figure 5). With Org-Mode, you can create simple tables very easily. The tables, like everything else in Org-Mode, are represented in ASCII format. If the first non-whitespace character of a line is |, then table mode is initiated.
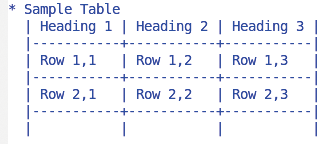
Pressing Tab inside any cell advances the cursor to the next cell in an adjacent column; pressing Return moves it to the next row, same column. Column spacing depends on the heading line. Pressing a Tab on a new line with | will automatically add column separators, and a Tab with |- will add a horizontal separator. All the movement keys work in this mode also. Pressing M-Arrow, as in the case of simple notes, lets you move columns and rows around in a table. Also, you can use simple formulas in the tables, like summation, and you can plot graphs from the data in the tables. The details of these features can be found in the official documentation [5].
With the use of the built-in calendar, you can add date and time information to any task or note in the outline (Figure 6), such as deadlines, a scheduled time, a range to track the number of hours spent, or a range of dates for an event that spans over multiple days. You can add it all.
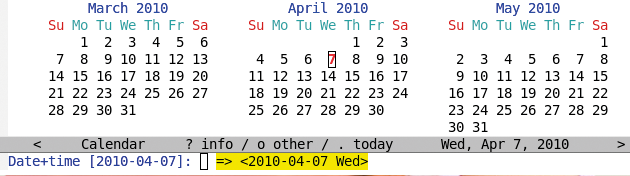
Dates can be active or passive. Passive dates do not show up in agenda views, whereas actives dates do show up. The commands for active and passive dates are C-c . and C-c !, respectively. This will open up a graphical calendar in a separate buffer, and you can select the date there with your mouse.
Adding a clock entry is done with C-c C-x C-i. The clock can be stopped with C-c C-x C-o. Pressing C-c C-c updates the time taken by the task. Alternatively, you can manually insert the CLOCK label at the start of a date range, and it will be converted automatically to a clock entry. The labels SCHEDULED and DEADLINE can also be used to specify timings for a task. The shortcuts for these are C-c C-s and C-c C-d, respectively.
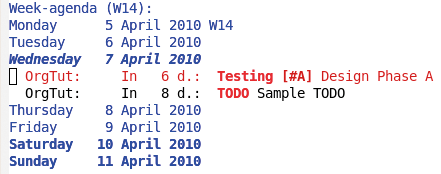
In the agenda view, any task having today as the deadline will be shown, along with any missed and approaching deadlines (Figure 7). The approaching deadlines are listed starting with org-deadline-warning-days before the due date and continuing until the entry is marked DONE. The same goes for SCHEDULED, except there is no warning. The items will show up in agenda views from the SCHEDULED date until they are marked DONE.

You might have noticed that, with the flexibility provided by Org-Mode, you can keep your content in a single file or multiple files (e.g., all your TODO items in one file, meetings in another, and so on). However, you don't have to go through all the files every day just to get information about tasks and projects currently open and due for completion. With the agenda view, all your information can be displayed in an organized manner. Org-Mode will collect it with any one of seven views:
DONE.TODO states.All the information gathered from the files is displayed in a separate buffer by Emacs. Useful commands edit the original entries in the original Org-Mode files directly. To use this mode, you need to add your Org-Mode files to the Org-Mode agenda by pressing C-c [. Next, press C-c a to be presented with a list of agenda modes you can use (see Figure 8).
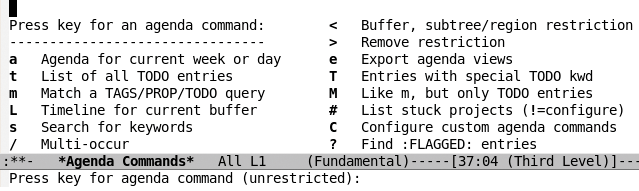
When you select any of the views listed, a separate buffer will be shown with the view you chose. Figure 9 shows a weekly agenda view with all open tasks.
Org-Mode integrates all elements of a GTD system into a single environment. You can create lists about your work, tag them with people or other contexts, and add to-do items in the contexts of the remaining project ... it just works. Additionally, you can generate HTML and ASCII files directly from Emacs with M-x org-export-as-ascii and M-x org-export-as-html. The HTML files are linked and also display images (any image URL will be displayed as an image).
Org-Mode is not an exception to the inherently customizable nature of Emacs, in that you can tune it to your specific needs and make it work exactly the way you want it to work. This flexibility naturally is the biggest advantage of choosing to use Org-Mode.
| INFO |
|
[1] Org-Mode website: orgmode.org
[2] Org-Mode - Organize Your Life In Plain Text: http://doc.norang.ca/org-mode.html [3] Emacs wiki: www.emacswiki.org [4] Org-Mode manual: http://orgmode.org/org.html [5] Org-Mode official documention: http://orgmode.org/org.html#The-spreadsheet |
| AUTHOR |
|
Aditya Shevade is a photography and Linux enthusiast. He is a graduate student of Electrical Engineering at the University of Southern California. Find out more at http://www.adityashevade.com. |