Reader polls are a popular Web site feature. Try one of these simple packages to add a poll to your site.
François, you cannot tell me you had nothing to do with this. The numbers here are skewed highly in your favor. Ordinarily, I would not question your integrity, mon ami, but the restaurant just opened and our guests have not arrived yet. How else would you explain the votes you have managed to acquire? Quoi? Yes, François, I can see that our guests are here now, but they were not here a few minutes ago. To the wine cellar, immédiatement. Bring back the 2001 Sonoma County Zinfandel. We shall discuss this later. Vite!
Welcome, everyone to Chez Marcel, home of tasty Linux fare, the world's finest wine cellar and, now, the home of electronic democracy in action—Linux-style, of course. While my faithful waiter is in the cellar getting your wine, let me tell you about tonight's menu. Electronic democracy is arguably still in its infancy, but it is making inroads nevertheless. With your Linux system and an Apache Web server, you can launch your own experiment with on-line polling and voting.
Ah, François, you have returned. Please, pour for our guests while I describe our first experiment in electronic democracy and a question that is near and dear to your heart. Democracy. Mes amis, you have seen Web sites with on-line polls of various sorts, asking questions ranging from serious to silly. With little effort, you can add a poll to your own Web site. The first item on the menu is Michael and Erin Spiceland's My Voting Script (see the on-line Resources section). To use this one, simply extract the tarball to your cgi-bin directory. On my system, it's /usr/local/apache/cgi-bin:
cd /usr/local/apache/cgi-bin
tar -xzvf vote-2.1.tar.gz
A directory called vote should have been created. Switch to that directory and edit the file called sitevariables.pl. Several parameters can be changed here, including the colors used when the poll is presented to the user. You should take a little time to familiarize yourself with the various tweaks. In the meantime, the things you probably are most interested in are the questions and possible answers:
$question = 'Should François get a raise?';
@answers = ('Yes','No');
The question doesn't have to be strictly yes or no. You could have something like this as well: @answers = ('Yes','No','Maybe');. Before we run this poll and decide François' salary, let's look at a couple of other important parameters:
$lockhours = 0;
$url = 'http://yourserver/cgi-bin/vote/index.cgi';
The $lockhours parameter defines how long an IP address should wait before another vote may be posted. Set to zero, as above, a user may vote any number of times from the same IP address. Finally, you should make sure that the address to your server and the path to the script are entered properly. To use your new poll, point your browser to the index.cgi file, http://yourserver/cgi-bin/vote/index.cgi. Your poll question should appear in the browser, as shown in Figure 1.
To register a vote, simply click on one of the answers, in this case, Yes or No. When the votes are entered, a pop-up window appears with instant results. A percentage of votes is tabulated along with a colorful bar offering a graphical representation of the results. As you can see in Figure 2, my faithful waiter has managed to garner amazing support for his raise.
This script is simple and can handle only a single question at a time. For something a little more flexible, check out David S. Raeman's Sympoll. As the name indicates, this is a simple polling system, but it's simple more from a setup perspective than from functionality. The installation took me a few seconds and then everything simply worked. Nevertheless, this little voting package allows you to run multiple polls that allow for more than one choice per vote, thus adding a level of complexity to the available choices. The polls and related information are stored in a MySQL database file. For this one, you need an Apache server with PHP enabled and, of course, MySQL running on your system.
Extract the Sympoll source (see Resources) to an appropriate directory in your Web server's document hierarchy. For example, my document root is at /usr/local/apache/htdocs, so I extracted the source distribution in that location with tar -xzvf sympoll-1.5.tar.gz. Once the directory is in place, make sure that the config.php is writable by your Apache server, chmod 660 config.php. Before you head to your browser, I should tell you that the author recommends changing the name of the admin directory to something other than admin to make it a little harder to locate.
Next, I created a MySQL database called sympoll, the name could be anything you like, with the following command:
mysqladmin -u root -p create sympoll
I don't want root to be the database administrator for on-line Web access, so I created a new user called polling. I did this by connecting to MySQL with the command mysql -u root -p. At the mysql> prompt, I entered the following to create a user that would have control over my Sympoll tables:
mysql> grant all privileges on sympoll.*
  -> to polling@localhost identified by 'secr3t';
When you do this, make sure you use a different user name and password, non? We would not want every visitor to this restaurant to provide such easily guessed passwords. The next step is to create the tables in your new database, and this is done through the administrative interface. Point your browser to your server, using the directory where you loaded Sympoll, http://yourhost/sympoll/admin (Figure 3).
The admin setup is friendly and takes you through the configuration, step by step. It first requires that you enter the MySQL user name and password. Four tables get added to the system (sympoll_data, sympoll_list, sympoll_auth and sympoll_iplog). You are asked to confirm the creation of those tables. Click Continue until you are taken to the super administrator configuration screen. Here, this becomes the Sympoll administrator, the user that creates other admins and regulates polls. Enter a user name and password, confirm your choice of password, and you're done. You now are at the login screen, ready to launch your exercise in democracy.
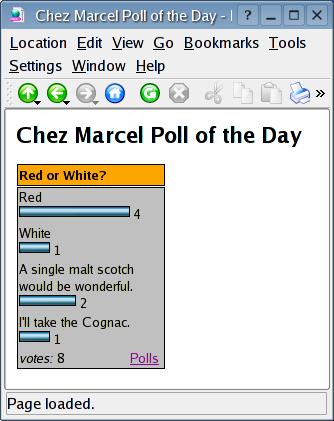
The main menu is extremely simple to work with. You can add, delete or modify existing polls, create or remove admin users, change display attributes and log, plus a few other easy-to-modify options. Polls aren't static either. Imagine a poll with a choice of red or white wine. Along comes Roger at table 2 who wants Cognac added to the list, while Gar at table 16 absolutely must have single malt scotch as one of the choices. No problem. You can add more choices after the fact and continue with the voting.
Once you have entered a poll category, you are shown code similar to the following:
<?php require
 '/usr/local/apache/htdocs/sympoll/booth.php';
 display_booth(2); ?>
Enter that code on a PHP Web page, and you are on your way. Have a look at Figure 4 for an example of the results you can expect.

Figure 4. Red is looking good in early voting.
Take a moment to get familiar with the miscellaneous configuration options. The default colors and appearance of the poll display can be changed to something more to your taste.
The final item on tonight's menu comes from Benjamin D. Jones, and it certainly sounds political. It's called Recount. It was inspired, apparently, by the 2000 United States presidential election. Recount is a PHP application that allows you to create extremely flexible polls, both in terms of how they are presented and how the results are generated. It uses either MySQL or PostgreSQL as its database.
Download the latest Recount bundle from its Web site, and extract it into your Web server's hierarchy (usually right under document root). As I mentioned, Recount supports both PostgreSQL and MySQL, but I'm going to stick with MySQL for now. To start, we create a Recount MySQL database using the same technique we used for Sympoll above, mysqladmin -u root -p create recount. As in my last example, I'm going to use the polling MySQL user I created, which means I need to give polling the rights to work with this database. Again, I do this by connecting to MySQL with the command mysql -u root -p. From the mysql> prompt, I enter the following:
mysql> grant all privileges on recount.*
    -> to polling@localhost identified by 'secr3t';
Then, from the Recount source directory, I run the following command to create the necessary tables:
mysql -u polling -p recount < sql/mysql.recount.sql
Inside the Recount distribution directory, there's a file called config.recount.php-dist. Copy that file to config.recount.php and open it with your favorite editor. You should have no trouble with this file as it is well documented. However, the lines you probably are most interested in are these:
define('RECOUNT_HOME_PATH',
       '/usr/local/apache/htdocs/recount');
define('RECOUNT_DB_TYPE',
       'mysql');       /* "mysql" or "pgsql" */
define('RECOUNT_DB_HOST',
       'localhost');     /* db host */
define('RECOUNT_DB_USER', 'polling');
define('RECOUNT_DB_PASS', 'secr3t');
define('RECOUNT_DB_NAME', 'recount');
A little further down, enter a user name and password for the Recount administrator. This isn't your user name or even the MySQL user name but a name and password you use to administer the polls:
define('RECOUNT_ADMIN_USER', 'admin_name');
define('RECOUNT_ADMIN_PASS', 'admin_password');
When you are done with the configuration file, make sure you protect it by changing its permissions:
chmod 600 config.recount.php
That's the whole setup. To create a new poll, point your browser to http://yourserver/recount/recount_admin.php and log in using the admin user and password you created above. Keep in mind that this user is different from the MySQL user that updates the actual Recount database. When entering a new poll into the form (Figure 5), you can specify the usual question with multiple answers as well as an expiration date for the poll. If you already have polls defined, you can edit or delete them. When you have finished entering your information, your new poll is assigned an ID.
The package includes a ready-to-use page to test your new polls, called recount_testing.php. If you point your browser there, you can specify any poll ID. Both the poll and the results can be shown on the page. Creating a voting page for yourself specific to a given poll is easy. Have a look at this simple HTML/PHP page:
<html>
<head><title>Make sure you vote!</title></head>
<body>
<p><img src="images/logo.png">
<h1>Ready to cast your vote?</h1>
<?php
     require('config.recount.php');
     $poll = new RecountPoll(2);
     print($poll->basicForm());
?>
</body></html>
The poll ID is identified in the $poll = new RecountPoll(2) line above. In that example, the poll ID (in brackets) is 2. You can dress this up any way you want or include the PHP code in another Web page. To view the results requires another page with the following PHP code inside the default HTML tags.
     <?php
     require("config.recount.php");
     require("results.recount.php");
     ?>

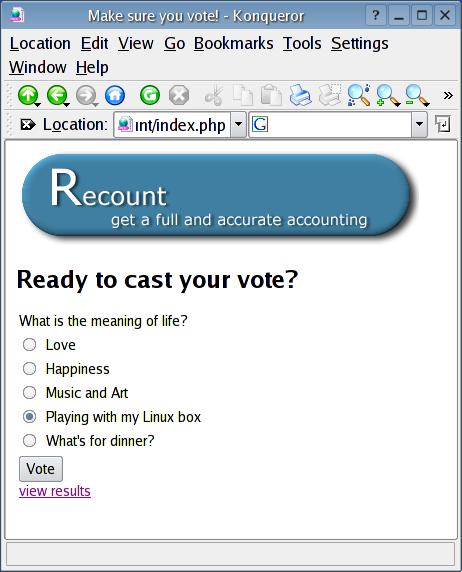
Figure 6. What is the meaning of life?
That's all there is to it. Check out Figure 6 for a Recount poll in action. As I mentioned, this is a flexible package. It's worthwhile to look through the included documentation for extra tips.
Once again, it appears that closing time is fast approaching. Let's have a look at the results of François' raise poll. Mon Dieu, 17,972 votes for your raise and only 26 against? We don't have that many people in the restaurant, mon ami. I demand a recount. Perhaps while we restart the voting on this raise, you would be kind enough to refill our guests' glasses once more. I'm quite certain that the question of a refill is one issue where we can be assured of a yes vote. Until next time, mes amis, let us all drink to one another's health. A votre santé Bon appétit!
Resources for this article: /article/7504.