
Keep vulnerable systems out of trouble with a layer of high-performance protection on your Linux mail server.
The winner of Linux Journal's 2004 Editors' Choice Award for Security Tool was ClamAV, a 100% free and open-source virus scanner that runs on Linux but scans for viruses that affect a variety of platforms (see Linux Journal, August 2004). As Reuven Lerner noted in the award article, “ClamAV is giving the commercial virus-checking programs a real run for their money.”
In this month's column, I show you how to harness the power of ClamAV on your Postfix e-mail gateway. Along the way, you also learn a few things about Amavisd-new, a powerful e-mail-processing dæmon that serves as a crucial conduit between e-mail servers, such as Postfix and Sendmail, and mail-scanning tools, such as ClamAV and SpamAssassin.
The scenario I'm about to describe by no means represents the only good way to use ClamAV. But it's the scenario I personally have encountered the most; it's certainly typical. Say we have an SMTP gateway that receives all Internet e-mail destined for our organization, and we want to configure that SMTP gateway to pre-filter that mail for viruses (Figure 1). Our gateway can be configured to deliver mail to local mailboxes, or it can relay everything to an internal mail server. Everything that follows works the same regardless of the delivery method.
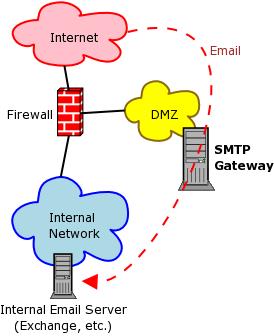
Figure 1. Our Example E-mail Architecture
In a high-volume setting, we could do all of our virus scanning on a standalone scanning server rather than locally on the SMTP gateway; all the tools described here work well that way. But for simplicity's sake and because it's common practice, we're going to run our virus scanner directly on the SMTP gateway.
We're going to use Postfix for our Mail Transfer Agent (MTA) because it is popular, securable and can work well with ClamAV. But Postfix can't interact directly with ClamAV, at least not reliably. ClamAV isn't too good yet at dissecting actual e-mail messages, as opposed to data streams. Therefore, we need to introduce a helper dæmon called Amavisd-new.
Amavisd-new is another free and open-source tool, and its sole purpose in life is to broker transactions between MTAs, such as Postfix and Sendmail, and anti-virus and anti-spam utilities, such as ClamAV and SpamAssassin. Among other things, Amavisd-new excels at converting MIME e-mail attachments into conventional data files that scanners can understand.
Amavisd-new's dæmon, amavisd, can communicate through a variety of protocols, including the SMTP and LMTP e-mail protocols, and also through UNIX sockets. Here, we configure amavisd to listen for e-mail by way of SMTP on TCP port 10024, communicate with ClamAV by using ClamAV's local UNIX socket and send e-mail and scanning-results back to Postfix on TCP port 10025. Figure 2 illustrates how e-mail flows through our SMTP gateway.
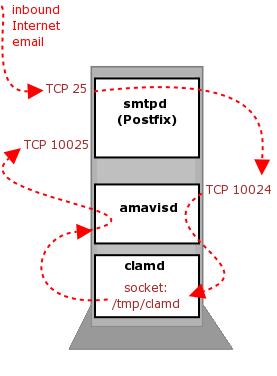
Figure 2. Postfix, Amavisd-new and ClamAV Data Flows
Both ClamAV and Amavisd-new are written in Perl and depend on numerous Perl modules. Therefore, I recommend you find and use binary packages of recent versions of these two tools for your distribution. You should have a much easier time letting apt-get, Yum or up2date automatically handle the dependencies that arise when trying to install everything manually.
The ClamAV Web site, besides being the home of the latest ClamAV source code, has a page that lists sources of binary packages for ClamAV for a variety of Linux distributions and other operating systems. For Red Hat and Fedora users, Dag Wieers' page (see the on-line Resources) provides Yum repositories and up2date sources containing both ClamAV and Amavisd-new. The Amavisd-new Web site has links to other sources of Amavisd-new packages, as well as the latest Amavisd-new source code. ClamAV is now a standard package on Debian beginning with the sarge release, and Amavisd-new is part of SuSE 9.1.
If you install either package from source code or from a standalone package, as opposed to using Yum, up2date or apt-get, be sure to see the Prerequisites section of Amavisd-new's INSTALL instructions (see Resources). ClamAV's prerequisites aren't quite as well documented. When in doubt, it doesn't hurt to try rpm --test -iv clamav_packagename.rpm on your ClamAV RPM to see which required packages your system is lacking.
Chances are your distribution provides packages for the various Perl modules that ClamAV and Amavisd-new require. Any not provided can be obtained from CPAN or from other third-party sites that specialize in packaging software for your distribution.
Once you've installed ClamAV and Amavisd-new, you can configure them. We start with ClamAV, the simpler of the two. ClamAV's configuration file is /etc/clamav.conf. To configure ClamAV, open this file with the text editor of your choice. Listing 1 shows the parameters most people need to change from the defaults.
The first line seems innocent enough, but it's important that you comment it out. If it isn't, clamd cannot run.
The two LogFile... settings are commented out by default. Uncomment them to enable logging to the file of your choice and to overwrite the file when it reaches the size specified in LogFileMaxSize.
DatabaseDirectory is crucial. This is where ClamAV keeps its virus-signature databases—its brains, as it were. In the ClamAV RPM I installed, the clamd dæmon was compiled to use /usr/share/clamav for this setting, but the included sample clamav.conf file showed a commented-out value of /var/lib/clamav, so I uncommented this setting and changed it to /usr/share/clamav in order to minimize confusion.
LocalSocket determines which socket file clamd uses to communicate with the outside world, namely, Amavisd-new. If you use this setting, which I recommend, be sure to leave the lines for TCPSocket and TCPAddr commented out. On my Genco package, the default value for this path for LocalSocket is /tmp/clamd, but /tmp is world-readable/writable. I recommend you instead set this path to /usr/share/clamav/clamd.sock and set the permissions on /usr/share/clamav to rwxrwx. In other words, remove the read/write/execute bits for other.
The last setting in Listing 1, User, specifies the name of the non-privileged user account clamd should run as after initialization. clamd must be started as root, but if this parameter is uncommented and set, clamd demotes itself after it's done initializing.
This is all most of us need to set in /etc/clamav.conf. Before you start clamd, however, make sure your system has an account for clamav and the permissions on any path you set in /etc/clamav.conf are set accordingly. It's also a good idea to use a group, clamav, for this account. As we see in the next section, this makes it easier to share certain resources between clamd and amavisd.
The /etc/passwd entry for clamav user account is:
clamav:x:52:52:ClamAV Daemon:/:/bin/false
And, the /etc/group entry for clamav group account is:
clamav:x:52:
Once clamd is configured, you can start it simply by entering the command clamd. If you installed ClamAV from a binary package, your system may have an init script for clamd in /etc/init.d. If so, be sure to enable it so clamd starts at boot time. Otherwise, you need to create and enable your own startup script.
As with clamd, we need to edit only a single file, /etc/amavisd.conf, in order to configure amavisd. However, we've got a little more work to do here. Listing 2 shows the most important settings in my /etc/amavisd.conf file.
The first two settings in Listing 2, $daemon_user and $daemon_group, specify the user and group amavisd should run as, amavis and clamav, respectively. As I mentioned previously, I like to use a common group for all of amavisd's and clamd's files, so it makes sense to have amavisd run as that group too. The /etc/passwd entry for my amavis account looks like this:
amavis:x:53:52:Amavisd-new Daemon:/var/amavis:/bin/false
$mydomain specifies your organization's name domain. $MYHOME, which should be set to the same path as your amavis account's home directory, specifies the root path to Amavisd-new's files, customarily /var/amavis. This directory should be owned and writable only by root. $QUARANTINEDIR is the path to the directory in which you want amavisd to dump quarantined e-mail messages. This directory should be owned by your amavis user account and writable only by it.
$db_home, which you may need to uncomment, specifies where amavisd should keep its databases, such as include cached scan results, among other things. $helpers_home specifies the directory in which you want amavisd to keep its SpamAssassin settings and other miscellaneous things. $helpers_home may be commented out by default. The directories specified by $db_home and $helpers_home should be owned and writeable only by your amavis user account.
$pid_file and $lock_file, also possibly commented out, can be used to specify where amavisd writes its pidfile and lockfile, respectively.
$log_level specifies how verbose amavisd's log messages should be, expressed as a number between 0 and 5, with 5 being the most verbose. The default is 0, but I find 2 to be a much more useful setting that nonetheless doesn't clutter my logfile. By default, amavisd sends its log messages to the local syslog system under the mail facility. In other words, your amavisd log messages should turn up in the same place as where your Postfix messages are written.
The next four settings concern e-mail originated by amavisd when a virus or spam message is detected. $virus_admin is the e-mail address to which you'd like virus notifications sent. This must be a valid e-mail address; update your local aliases file if the value you set here isn't yet. In practice, this probably should be the e-mail address of you, the system administrator.
It's also possible to configure amavisd to send notifications to each message's intended recipient or to its sender, but most people find this annoying, especially because the from addresses of spam and virus e-mails nearly always are forged. Don't do that.
$mailfrom_notify_admin and $mailfrom_notify_spamadmin specify the from address to use when amavisd sends virus or spam notifications, respectively.
Finally, we come to amavisd.conf's real magic: the antivirus scanner definition for ClamAV. In my default /etc/amavisd.conf file, this entire section was commented out, so I first had to delete the initial # on each line. You may or may not need to do this yourself.
You do, however, need to check the clamd socket path in this section. In Listing 2, I've changed mine from the default of /var/run/clamav/clamd to /usr/share/clamav/clamd.sock, the same path I defined in /etc/clamav.conf.
Once you've edited /etc/amavisd.conf and set the permissions on amavisd's directories accordingly, you can start the dæmon by entering the command amavisd without arguments. As with clamd, you need to enable and maybe even first create a startup script for amavisd so it starts at boot time. I advise setting this up so that clamd starts first. That way, by the time amavisd starts, clamd's socket already is in place.
Also, as with clamd, you should start amavisd as root. It demotes itself to the user and group you specified in amavisd.conf.
Our ClamAV and Amavisd-new dæmons are configured and running. Only a couple more tasks remain, configuring Postfix for content filtering and updating ClamAV's virus databases.
Important note: the following assumes that Postfix already is configured for and successfully performing its normal receiving/forwarding duties.
First, open /etc/postfix/master.cf with your text editor of choice, and add the lines in Listing 3 to the bottom of the file, if they aren't there already.
The smtp-amavis section defines Postfix's outbound communications, using the SMTP protocol, with amavisd. It corresponds to the following line you should add or edit in /etc/postfix/main.cf:
content_filter = smtp-amavis:[127.0.0.1]:10024
This line tells Postfix to send all incoming e-mail to 127.0.0.1, the local system, on TCP port 10024, amavisd's default SMTP listening port, by using the smtp-amavis interface we defined in master.cf. You can change amavisd's listening port by editing the $inet_socket_port parameter in /etc/amavisd.conf.
The second section in Listing 3 defines the inbound interface on which Postfix should accept messages returned by amavisd. In other words, Postfix listens on the local loopback IP 127.0.0.1 on TCP port 10025, which are the address and port to which amavisd sends notifications and forwarded messages by default. You can change amavisd's notification and forwarding address and ports by editing the parameters $notify_method and $forward_method parameters, respectively, in /etc/amavisd.conf. After editing master.cf and main.cf, you need to restart or reload Postfix.
Before we go any further, let's test the system. The simplest way to test is to send yourself an e-mail message containing the following string, which is not a real virus but a test string called the Eicar Test Signature:
X5O!P%@AP[4\PZX54(P^)7CC)7}$EICAR-STANDARD-ANTIVIRUS-TEST-FILE!$H+H*
If everything is working, amavisd sent an e-mail to the account you specified in amavisd.conf's $virus_admin parameter, and the message should be quarantined in the directory specified in amavisd.conf's $QUARANTINEDIR parameter.
I highly recommend tailing your mail log while performing this test. Type tail -f /var/log/mail, and Postfix and amavisd will log their actions there. In my own experience, this is the fastest way to identify problems, especially if you increased amavisd's log-verbosity as described earlier.
Also, be sure to do at least one test with clean e-mail to ensure you haven't impaired Postfix's ability to receive and deliver unfiltered mail.
There's only one thing left to do, but it's important: update ClamAV's virus-signature databases and create a cron job to do so automatically every day. ClamAV includes a utility called freshclam for this purpose.
Because using freshclam is the simplest task in this entire undertaking, and because I'm basically out of space for now, I leave it to you to explore the freshclam(1) and freshclam.conf(5) man pages. Suffice it to say that in normal practice you use the command form freshclam -l /path/to/logfile, where /path/to/logfile specifies the file to which you want freshclam to write its logs.
It's recommended that you run freshclam every couple of hours. The easiest way to do this is by running freshclam in dæmon mode via the -d and -c startup options. See the freshclam(1) man page for more information.
With that, you now should have a ClamAV-enabled SMTP gateway or at least be started down the road towards one. If you're having problems, the on-line Resources includes additional Postfix plus Amavisd-new tutorials. Good luck!
Resources for this article: www.linuxjournal.com/article/7811.
