How to use Webglimpse to search and add search-based ads to your site.
Back when I was a curious undergrad, I attended a seminar on a tiny imaginary creature called Maxwell's Demon. This clever beastie can make an engine run off hot air, but only if it knows the location and speed of all the hot air molecules. Essentially, the Demon transforms knowledge into energy (strictly speaking, information plus heat into work, or usable energy). I think the Demon stuck in my mind because it demonstrated in a physical way the value of information, especially organized information.
A Web site rich in useful content attracts visitors because of its valuable information. Adding a search engine multiplies that value. And, what if you don't have your own content-rich site? Do you have, perhaps, a collection of favorite bookmarks on a particular subject? Using Webglimpse, you can create a form on your own Web site that allows users to search those Web sites. Now your work of researching and selecting those high-quality, subject-specific sites you bookmarked can help attract visitors to your own site. In this article, I describe how to use Webglimpse to enable users to search the content of your chosen Web sites, and how to generate ad revenue quickly from your traffic.
Webglimpse is a creature of several parts: a spider and manager, written in Perl, and Glimpse, the core indexing/search algorithm written in C. Glimpse was created first, by Udi Manber and Sun Wu, Computer Science professors who wanted to apply the neat new search algorithm for finding fuzzy patterns that they had developed (and released as agrep) when Sun Wu was Manber's student. Glimpse was originally written in 1993 as “a tool to search entire filesystems”, useful for people who have ever misplaced a file or old e-mail message somewhere on their hard drive.
Webglimpse was wrapped around Glimpse a few years later, as a way to apply the powerful searching and indexing algorithms to the task not of searching the entire Web, but of combining browsing and searching on individual Web sites. Written by grad students Pavel Klark and Michael Smith, Webglimpse introduced the notion of searching the “neighborhood” of a Web page, or the set of pages linked from that page. Meanwhile, Manber and another student, Burra Gopal, continued to add features and refine Glimpse to make it optimally useful in its new context.
I arrived on the scene at about this point. I'd just quit my job debugging assembly network code at Artisoft in order to start my own company doing something with discovery and categorization of information on the Internet. In the early Web of 1996, Webglimpse stood out as the most promising search tool. It was newborn and still rough around the edges, so when Udi Manber accepted my offer to help with the project, my first job was to rewrite the install. I became more and more involved with Webglimpse, adding features and supporting users, and in January 2000 the University of Arizona granted my company exclusive license to resell it. I didn't feel I could make Webglimpse my primary focus and still make a living if it were open source, but I did make the decision always to distribute all the source code and to keep it free for most nonprofits. As a result, many users were willing to provide feedback and patches, and I was able to provide free, even resalable, licenses to anyone who helped with the project.
Having been around for many years, Webglimpse runs on almost any Linux version and configuration. The only real prerequisites are a Web server with Perl 5.004 or above and shell access to that server.
Full details regarding installation are available on the Webglimpse home page (see the on-line Resources), so I mention only a few tips here. If you find Webglimpse already installed on your system, check the version. Most of the preinstalled copies out there are old (v. 1.6, circa 1998), and it's likely you have rights to upgrade. The simplest way to check the version of Webglimpse is to run a search and view the source of the results page. The version number is in a comment line at the beginning of the search results.
At the time of this writing, Webglimpse 3.0 is beta testing a new FTP-only install. You can try this version, or install the older 2.0 if you have SSH access to your server. To go the SSH route, first download trial version tarballs from the site. Follow the Installation Instructions linked at the top of the download page, which tell you first to compile and install glimpse by the usual steps:
./configure
make
make install
then to install Webglimpse by running its installation script:
./wginstall
The script walks you through the usual choices as to installation directory and where to put the cgi scripts. It also tries to parse an Apache configuration file if it finds one, and it confirms with you the key Domain name and DocumentRoot settings for your server. Because Webglimpse can index local files on your hard drive and map them to URLs, it needs to know how to translate filesystem paths to URLs. This is such a key point that in the Web administration interface, there is a screen devoted to testing URL→file and file→URL translations to make sure it is set up correctly.
Other settings during the install are security-related. In order for the archive manager to run from the Web, the directory where archives are placed needs to be Web-writable. The most secure way to do this is not to make it world-writable, but rather owned by the Web user, which is the user name that your Web server runs as. Most often this is www or nobody. You can tell by examining the process list:
ps aux | grep httpd
which will show a number of lines something like:
nobody     873  0.1  0.5 16492 11416 ?
   S    18:03   0:00 /usr/local/apache2/bin/httpd
nobody     874  0.0  0.5 16492 11416 ?
   S    18:03   0:00 /usr/local/apache2/bin/httpd
nobody     875  0.0  0.5 16552 11620 ?
   S    18:03   0:00 /usr/local/apache2/bin/httpd
The first column is the user name the Web server is running as—in this case nobody. Now you can answer the prompt when wginstall asks, and if you are running wginstall as a user that is capable of changing ownership, it sets the ownership for you. If not, become root after the install is complete and change ownership manually. Supposing you installed to the default location of /usr/local/wg2, you would run:
chown -R nobody /usr/local/wg2/archives
to make the archives directory Web-writable.
Once the install is complete, it is time to choose the files you want to index and create the search form. Webglimpse calls this Configuring an Archive.
Upon completing the install, you will see something like the following:
********************************
Done with install! You may use
 http://mycoolserver.com/cgi-bin/wg2/wgarcmin.cgi
or:
/usr/local/bin/wgcmd
to configure archives at any time.
(The web version currently has more features)

Run wgcmd to create new archive now? [Y]:
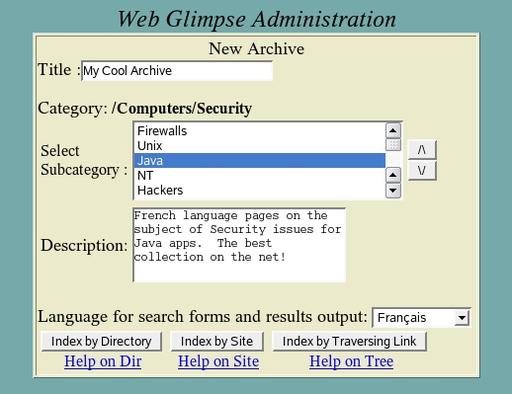
Once you are familiar with Webglimpse, the command-line tool is very handy for managing multiple archives or quickly setting up new ones. Your first time, I'd recommend using the Web version. So you enter N to not run wgcmd, and instead open the wgarcmin.cgi URL in your browser, and enter the user name and password you chose during the install. This brings you to the archive manager, which will later list all the archives you have configured. If this is your first time installing, the list is empty, so press Add New Archive. Now you should see the New Archive screen shown in Figure 1.

Figure 1. The New Archive screen allows you to enter a title and description, choose a category and select the language in which the search results should be presented.
Here you can enter a title and description, and optionally select a category and language. The language doesn't restrict the sites you can include, but it does select a template and character set for the search form and results page. Then you will click on one of the buttons at the bottom:
Index by Directory: lets you index files already on your Web server in a specific directory.
Index by Site: lets you index everything at a particular Web site, either on your server or somewhere else on the Net. Use this for dynamic files on your own server.
Index by Tree: lets you index everything linked to from a particular starting page, with configurable settings for how many and which “hops”, or links, to follow.
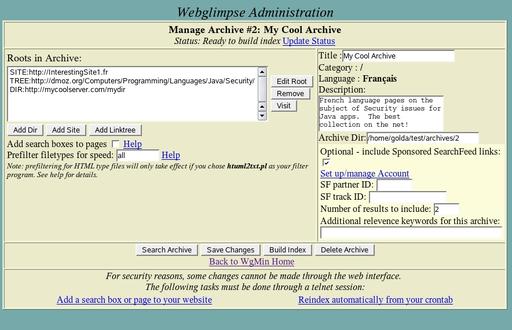
After entering the specific directory or URL to index and entering settings, such as maximum number of pages, you will come to the main control screen for managing an archive. Here you can add additional sources of pages to index, so that one archive can combine local files, remote sites and trees of remote pages on multiple sites if so desired. Figure 2 shows the archive ready to go. Once you press the Build Index button, the spider goes out and gathers remote pages, filters out the HTML tags, and then runs glimpseindex to create a block-level inverted index for fast searching.

Figure 2. The Manage Archive page lets you combine Web pages from different sources into one searchable index.
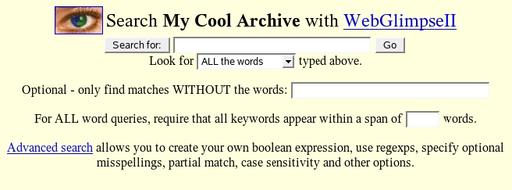
Finally, you can get a search form to include in your pages by clicking on the text link Add a search box or page to your website. This link takes you to a page with the source code for three example search forms for this archive, ranging from a bare input box to an advanced search form supporting regular expressions and making all the options visible to the user. The simple version of the search form, supporting all, any or exact phrase searching, is shown in Figure 3.

Figure 3. The search templates that come with Webglimpse can be modified to fit your Web site. Only the form action and the names of the input tags need to be preserved.
You also can get the same forms by pressing the Search this Archive button or entering the URL directly to the Webglimpse cgi (http://mycoolserver.com/cgi-bin/wg2/webglimpse.cgi?ID=2). Normally they are generated in the language of the archive, but we're showing them in English here.
So, now you have a searchable archive of your chosen sites, the coolest collection of links anywhere on your particular subject. Users everywhere can take advantage of your research and use your server to search through your highly optimized index. If you want, you now can serve ads in order to generate revenue and support your site. Back on the Manage Archive screen shown in Figure 2, check the box labeled Optional - include Sponsored SearchFeed links. Then, click on Set up/manage Account, which is a link to set up an account with Searchfeed.com. An on-line advertising and content provider company, Searchfeed.com provides sponsored search results that are supposed to be relevant to the keywords on which the user searches. Once your account is set up, simply enter the partner ID and track ID provided by Searchfeed.com and choose how many ads should appear at the top of your search results. It's pretty simple to set up. To get the most out of your ads, you can use the suite of on-line tools provided by Searchfeed.com to monitor what keywords users are searching on, which ads they are clicking on and how much you make from each click.
Whether or not you choose to add sponsored links to your search results, very likely you will want to wrap them in the “skin” of your site—your own look, feel and navigation menus. To accomplish this, you need to edit the file named wgoutput.cfg in the archive directory. (The location of the archive directory is shown on the Manage Archive screen.) This file contains the snippets of HTML code that go above, below and in between individual search results. You also can include your own header and footer files instead of typing in the HTML.
In some cases, you also may want to customize the ranking order of your search results. Webglimpse, unlike some search engines, doesn't claim to know what “percent relevant” a particular page is to the user. Instead, it lets you see under the hood how it calculates relative relevance of search results, and if you like, you can implement your own customized relevance ranking formula(s). Simply edit the file .wgrankhits.cfg in that same archive directory with a snippet of Perl code using these available variables:
# Available variables are:
#
# $N           # of times the word appears
# $LineNo      Where in the file the word appears
# $TITLE       # of matches in the TITLE tag
# $FILE        # of matches in the file path
# $Days        Date (how many days old the file is)
# $META        Total # of matches in any META tag
# $LinkPop     Link popularity in the site (how
#              many times other pages link to it)
# %MetaHash    Hash with the # of times the word
#              appears in each META tag, indexed
#              by the NAME= parameter.
# $LinkString  actual url of link

# The following uncommented lines
# are the actual ranking formulae that will be used

# This is the default ranking, it gives high weight
# to keywords in the title, plus some weight to
# regular hits, link popularity and freshness

$TITLE * 10 + $N + $LinkPop + 5/($Days + 1)
By making use of the $LinkString variable, for instance, you can make sure that selected regions of your site always appear above others. In the Webglimpse home page, for example, we add this term to the default formula to make sure that pages in the /docs directory appear first in the search results:
+ ($LinkString =~ /\/docs\/)*1000
By now you may have an inkling of what the strengths and weaknesses are of Webglimpse: a bunch of neat features that are directly configurable by the user, and a bunch of neat features combined in a somewhat ad hoc manner. Webglimpse has, depending on your perspective, enjoyed or suffered from a great deal of tweaking to make it able to perform a lot of different tasks. The next version, which is in the works at the time of this writing, is intended to be simpler to install and maintain, and even to have an FTP-only install for users without shell access to their servers. Be that as it may, the most common problems you are likely to run into with the current version are as follows:
Permissions issues—these occur when you sometimes re-index from the Web administration interface, and sometimes from a shell or from your crontab. You can re-index any archive either by pressing the Build Index button in the Manage Archive screen or by running the script ./wgreindex from the archive directory. The best thing to do is decide on one way to re-index, stick to it and make the archive owned by the user who will run the re-index script.
URL/file translation issues—these occur mainly when the DocumentRoot is not correctly specified. You can check what file a given URL will be translated into or vice versa by pressing the Test Path Translations button on the main Web administration screen. All the applicable settings for local and remote domains are stored in this file: /usr/local/wg2/archives/wgsites.conf. You can edit wgsites.conf directly, or make changes by pressing the Edit Domain Configuration button in the Manage Archive screen.
More troubleshooting tips are available in the Documentation and How-tos page (see Resources).
The author thanks Udi Manber for trusting me with these wonderful creations! I am still trying to take care of them as they deserve! Thanks also to Sun Wu, Burra Gopal, Michael Smith and Pavel Klark, the co-creators of Webglimpse and Glimpse, and to all the users who have submitted bug reports, patches, translations and suggestions over the years.
Resources for this article: /article/9021.