They say a picture is worth a thousand words. As videos could be 25 pictures per second and might last several minutes, how many words is that?
François, what are you doing still sitting in front of your computer? Our guests will be here any moment. Quoi? I appreciate, mon ami, that you are teaching your Aunt Marguerite to use Linux, but must you do it in real time over a VNC control session? Of course there are other ways, mon ami. For instance, you could create instructional videos, screencasts, and e-mail them to her. Yes, I would be happy to show you how, but for now, you must say Au revoir to your aunt and log off. I can see our guests coming up the walkway now.
Welcome everyone, to Chez Marcel, where great Linux and open-source software meets great wine, and of course, great people. C'est fantastique to see you all here tonight. Please, sit and make yourselves comfortable. François! To the wine cellar, mon ami. Bring back the 2003 Château Maris Minervois Old Vine Grenache from the south wing. I remember seeing a half-dozen cases there.
Before you arrived, mes amis, François and I were discussing approaches for showing people how to use various software packages, perhaps for teaching a friend or relative how to use a Linux desktop. I suggested that rather than resorting to remote control sessions, it might be more efficient to create small training videos and use those instead. Besides, instead of reaching one person, this way you could reach many. This is popularly referred to as screencasting. Creating screencasts doesn't have to be difficult, and the features on tonight's menu will have you creating your own in no time.
The first program I'd like to show you is Zaheer Abbas Merali's Istanbul, a screen recording program that sits quietly in your system tray, waiting to be called on. The program is available from live.gnome.org/Istanbul. Source (both stable and development) is available from the Istanbul site as well as Debian packages. And, packages for other distributions are easily located, for example, at rpmfind.net.
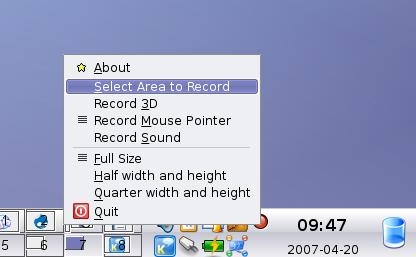
To start Istanbul, simply run the command name, istanbul. When you do, a small red icon appears in the system tray. Right-click on the system tray icon (a small red circle at this point), and a small pop-up menu appears (Figure 1). From here, you can make a number of changes in Istanbul's default recording. For instance, you may choose to make a smaller recording by selecting half width and height instead of full size. You also can choose to record your entire desktop or select a specific area to record. If you do the latter, Istanbul provides you with a large X cursor that you can drag around the area you want to record.

Figure 1. Access Istanbul's settings by right-clicking the red circle in your system tray.
I should alert you to one other very important point, mostly because I scratched my head for some time on this one. Notice that there is also a selection labeled Record Sound. You need to enable that if you want to add sound to a screencast.
To start recording, simply click the red button. It changes to a gray square while you record your session. Talk clearly into your microphone and demonstrate the steps in the window you selected as you explain the process. When you are done recording, click the gray button. A dialog labeled Save Screencast appears (Figure 2).
On the left-hand side of that dialog, there's a preview window showing your captured video. To preview it before saving it, click the Play button below the preview window. On the top left, you can enter a file for your video and select a folder in which to save it. As you might have guessed from the save dialog, this is a GNOME application, but it works very well under KDE also.
Note that Istanbul saves in OGG format, so if you want something else, you have to convert it after the fact using a program like FFmpeg or mencoder. Many Linux distributions come with a copy of FFmpeg or provide it on their repositories. Using it is pretty simple. For instance, to convert an OGG video to an AVI file, you might use this command:
ffmpeg -i recording.ogg newrecording.avi
As you might expect, there's a lot more to the program, but it can be this simple. For a whole lot more on FFmpeg, check your on-line documentation.
The next item on this star-studded menu, is John Varouhakis' recordMyDesktop, a desktop screencasting program that includes both a command-line tool and a graphical front end, gtk-recordMyDesktop. You can pick up a copy of gtk-recordMydesktop from recordmydesktop.sourceforge.net. For the purpose of this demonstration, I concentrate on the graphical client rather than the command-line version.
When you start gtk-recordMyDesktop, a simple recording dialog appears (Figure 3). On the left-hand side of the program, there's a preview pane with a button labeled Select Window directly underneath. Before you begin recording, click the window you want to capture. You'll see it outlined in red in the preview pane. To record the whole desktop, click on an empty (or shall we say, uncluttered) portion of your desktop. Adjust video and sound quality using the sliders on the top right. To begin recording, click the red Record button. When you do that, the dialog vanishes.
If you are paying attention, you might notice something that looks a little like Istanbul here. It's that little red circle sitting in your system tray. This similarity isn't entirely accidental. Parts of Istanbul are in gtk-recordMyDesktop. Incidentally, another way to start a recording is to click the red system tray icon. It then changes to a gray square while you record your session. When you click it again, the recording stops and you return to the gtk-recordMyDesktop window. Although there's no preview of your recording, you can save it by clicking the Save As button.
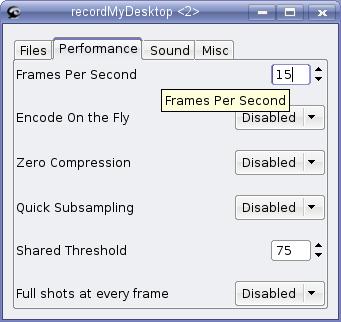
Let's take a closer look at another part of the interface, the Advanced settings. Clicking the Advanced button brings up a more comprehensive settings dialog with four tabs (Figure 4). In Figure 4, I've highlighted the Performance tab, which controls frames per second, on-the-fly encoding and more. Changing settings here makes higher quality screencasts possible, but keep in mind that doing this impacts system performance, and you may require more horsepower to achieve good results.

Figure 4. Depending on your system's power, you may want to adjust some performance-related settings.
The Files tab has two functions. It allows you to define your working directory (/tmp is the default), and it lets you decide whether you want to overwrite files as they are recorded. The resulting videos are saved to out.ogg. Subsequent writes will use out.ogg.1 and so on. If you would rather have gtk-recordMyDesktop overwrite the file each time, check the appropriate box on the Files tab. Under the Sound tab, you can change the number of audio channels, the frequency and the audio device location. Finally, under the Misc tab, you'll find primarily visual settings, such as the appearance of the mouse cursor in your videos.
For the KDE users out there, Marios Andreopoulos has created reKordmydesktop, a feature-rich and fantastic front end to recordMyDesktop. This program is a single Kommander script, and as such, it doesn't require a complicated installation, but you do need to have Kommander installed. Save the file to your desktop (or any location you please) and click on it. The reKordmydesktop dialog (Figure 5) appears, ready to do your bidding.
As you can see, the GUI does add some great flexibility, starting with a definable location and name for your OGG file. Everything you need is covered under these three tabs, although most of what you'll want is on the Common Settings tab. Let's look at a few of those, starting with sound. To record audio, make sure you click the Capture Sound check box. You can specify a time delay to your recordings—you can screencast reKordmydesktop, so you may want to minimize it first when capturing the whole desktop—or set a time limit on the recording (look in the Chrono section). By default, reKordmydesktop captures the entire desktop. To select a window, click the Grab Window button on the left, and click on the program window you want to capture (again, you even can click reKordmydesktop if you choose). To start recording, simply click the Record button.
One thing I like about this program is that you can pause a recording, change things around, then continue by clicking Pause again. When you are done, click Stop, and the OGG file is written to disk.
Let's have another look at that three-tabbed interface. Under the Encoding Settings tab, audio and video settings can be changed and tweaked to give you a recording that balances your system's performance to provide the best quality possible. This might include dropping frames, selecting multichannel audio or choosing a higher sampling rate. The Advanced Settings tab allows you to select an alternate cursor (or none), change the working directory and more. If you think you've gone and changed things for the worse, there's a handy Restore Default Settings button here as well.
And that, mes amis, is what we call a wrap. The system clock, sadly, does not lie, and closing time is nearly upon us. I invite each and every one of you to try your own screencasts. Post them to your blogs, Web sites or even YouTube. Show others how much fun Linux and open-source software can be. In the meantime, perhaps François will be so kind as to refill your glasses once more. Until next time, please raise your glasses, mes amis, and let us all drink to one another's health. A votre santé! Bon appétit!