
You want to record a simple voice message on your Linux system. It seems like an easy enough thing—until you need a certain audio format, complex edits, special effects and other audio tweaks. However, it's still pretty easy.
That must be the 30th time I've heard you repeat that phrase, François. What are you doing? Trying to record a new voice message for our Asterisk Linux-based answering machine? But you keep repeating yourself. Don't you like any of the recordings you've made so far? Quoi? None of them have worked? Ah, here is the problem...the microphone isn't on. Wait! I see a second, similar, problem. Your mixer gain is set all the way down. Now try it. Much better, non? Finish this later, François, I can see that our guests are already arriving and we must be ready. Look sharp.
Welcome, mes amis, to Chez Marcel, where the best in Linux and open-source software is paired with superb wine from around the globe. Makes yourselves comfortable, and I will send my faithful waiter to fetch tonight's wine selection. François, we have a few bottles left of that Niagara Region 1998 Reif Estates Vidal Ice wine. Please fetch them from the cellar.
On tonight's menu, mes amis, we will examine sound recording tools for your Linux system. Recording audio is actually pretty simple, though you must remember to turn up the microphone on your desktop's mixer applet (Figure 1). Some systems, notebook computers for instance, have multiple inputs. In addition to the internal, built-in microphone, you may also have a jack to plug in a headset, which has its own microphone. Make sure you select the appropriate source.
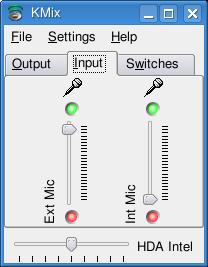
Figure 1. Remember to set your microphone gain before you record.
Getting a sound sample is easy enough and doesn't require fancy software. Command-line tools that are very likely already included in your system will do the job nicely. For instance, look for a command called arecord, which comes with a companion program called aplay. Simply put, arecord is a sound recorder for the ALSA (Advanced Linux Sound Architecture) subsystem. Here it is in its simplest form:
arecord -d 10 myrecording.wav
The result is a WAV format file named myrecording.wav that is ten seconds in length. The WAV format is the default, so if I hadn't given my file an extention, the result still would have been a WAV file. Other file formats (au, voc or raw) can be specified on the command line with the -f option. Plenty of options let you change the sample rate, number of channels and so on. Run the command with a -h, or check the man page for a list of available options. Here's another example:
arecord -d 15 -f cd secondrecording.wav
The really interesting option here is -f cd, a shortcut for -f S16_LE -c2 -r44100, which effectively means 16-bit, little endian, 2-channel sound and a 44,100Hz sample rate. Then, if you want, you can play that clip using the aplay command.
There are, of course, some limitations with such a simple program. For instance, what if you want another audio format? Or, what if you want to do some kind of special effect using that clip? This is where another great little command-line program comes into play. It's called sox, the SOund eXchange universal sound sample translator.
Let's say you want to convert an MP3 file to OGG; sox makes it easy:
sox audiofile.mp3 audiofile.ogg
Simple, non? The sox program also has a set of effects you can apply to your sound clip. For instance, let's do a two-second fade in for a voice clip:
sox voicefile.ogg newfile.ogg fade 2
As you can see, it's not difficult. To get a handle on the various effects, type sox --help-effects=all.
There are, of course, graphical tools for recording sound. For instance, the KDE desktop's multimedia suite includes a program called KRec (Figure 2), a very capable sound recorder that takes advantage of KDE's aRts sound system. Because of this aRts integration, make sure your aRts dæmon is set to use full-duplex mode—you can enable this in the KDE Control Panel, kcontrol, under the Multimedia section.
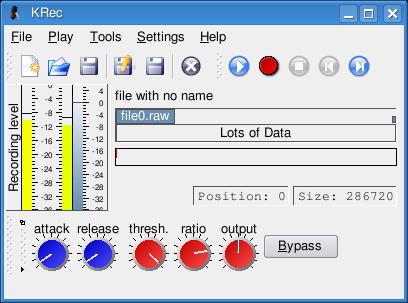
Figure 2. KDE's KRec tool is surprisingly complex under the surface, but it makes a great tool for simple audio recordings.
To record a sound with KRec, start by clicking the New icon on the top left (or click File on the menu bar and select New). Then, click the red Record button and begin speaking into your microphone. Recording and playback levels are displayed, as is positional information on the raw data being recorded. At the bottom, there are a series of dials that let you adjust the aRts compressor settings. When you have finished recording, press the Stop button, rewind, then press Play to listen to your clip. When you are ready to save it, you can choose to keep the raw data or export it to a more familiar format, such as WAV, OGG or MP3. Click File on the menu bar and select Export.
For GNOME desktop users, we have the GNOME sound recorder (Figure 3), which is available from the Multimedia menu. Using that program, you can select your input source (internal or external microphone and so forth), and the audio file format from the Record as drop-down box. To start recording, click the red Record button and start talking, singing or reciting Shakespearean poetry—whatever turns you on. When you are done, click the Stop button (the gray square at the end of the icon bar). Then, click the Save button.
These are all easy ways to record sound, but editing is limited. You have only so much control over recording quality, and anything other than the simplest of edits can be difficult or impossible. That's where a program like Audacity comes into play.
Audacity is a wonderful, easy-to-use, audio editing program. With Audacity, you can record audio from a variety of sources, including a microphone—podcasts, anyone? You also can use it to convert audio files into other audio formats. Take your old records or tapes, clean up the noise, and convert them to digital audio so you can burn them to CD. Edit, cut, copy, mix, add special effects and splice sound sources to create new sounds. Audacity is a multitrack real-time audio editing system that can handle 16-, 24- and 32-bit samples. Audacity is also just plain fun. You can get a copy of Audacity from your favorite Linux distribution's repositories (or install disks), or you can visit audacity.sourceforge.net for the latest source. In the following examples, I am using version 1.3.3 beta.
Audacity starts with a blank slate by default (Figure 4). Along the top of Audacity's main window, you will find a pretty standard menu bar with access to various categories of tools in Audacity's toolbox. Directly below the menu bar and toward the center, a number of buttons reflect Audacity's audio editing nature. These buttons are Pause, Play, Stop, Skip to Start, Skip to End and Record. I mention these first because they are so familiar.
To the right of those buttons is a compact toolbox with six small icons representing some common tools used in Audacity. The vertical bar icon, which looks like a capital I, is the Selection tool, and it is selected by default. Now, let's record something.
Make sure your microphone is plugged in, and then click the Record button to start. Be creative. Sing a short tune, recite a line or two of poetry, or just speak whatever nonsense pops into your head.
As you record, keep your eye on the microphone icon near the top on the far right. If you pause your mouse cursor over it, the tooltip reads, “Input level monitor - click to monitor input”. When using a stereo input source, you'll see both the left and right channel levels being displayed, as shown in Figure 5. Of course, if you are using a single-channel microphone, you'll see only the right channel.

Figure 5. While you are recording, keep your eye on the input level meter on the top right.
As you record, you will see the appearance of an audio track with details about the quality of the recording—whether it's a mono or stereo recording and so on. When you are finished recording, click the Stop button. The full audio track remains with timing marks above (Figure 6).
As you can see from the preceding sample, I recorded a little more than six seconds of speech. To listen to the recorded track, click the Play button (Figure 7).

Figure 7. When playing back the sound clip, look at the meter directly to the right of the Record button.
At the bottom of the screen, there are additional details on the recorded track, the project audio rate (more on that shortly), as well as positional information.
Now that you have a sound clip to work with, this is a good time to save your work, and a good time for François to refill everyone's glass. While he does so, let me tell you about exactly what you are saving. At this stage, you do not have a finished product, but a work in progress. Audacity calls these projects. To save your project, click File on the menu bar and select Save Project As. A file navigation dialog appears where you can select the folder that will house your project. Give your project a name (I'll call mine justplaying), and then click Save.
When you save a project, everything having to do with your project is saved, as it is at that moment. The only thing to remember is that Audacity project files (with an .aup extension) cannot be opened by other packages. The AUP file is accompanied by another folder of the same name, but with a _data extension. Now that your project is safe and sound, let's do some edits on that file.
Basic audio editing consists of identifying a section of track, selecting that section and performing some action on that section. Notice the first second or so of my recorded sample in the close-up in Figure 8. Yes, it's the dreaded dead air, the mini-uhm we tend to sneak in at the beginning of these things. I got lucky with that small pause, but it can often be a lot worse. Click the beginning of the sample at the zero mark, and drag the mouse pointer to select that pause.
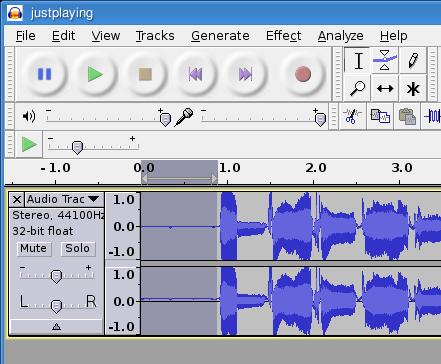
Figure 8. The first second of dead air in my recording is selected in preparation for trimming.
After you've selected the section of audio that contains the dead air, click the Play button to make sure that you haven't selected a portion of your speech. If necessary, adjust the selected area by positioning your mouse cursor over the beginning or end of the selected area and dragging to the left or right. The cursor changes to a hand with a pointing finger. If you are satisfied with your selection, click Edit on the menu bar and select Cut (you also can press the Delete key). Now, click the Play button again to listen to your file without that little bit of dead air. If you make a mistake, you can undo the changes by pressing Ctrl-Z.
With Audacity, you can let your creativity run wild with tons of included effects. Let's say, for example, you want to fade out the last few seconds of your recording. Select that section of the audio track, play it first to confirm you have what you want, and then click Effect and select Fade Out.
Perhaps you need to emphasize a few words. Again, select the section of audio you want, click Effect, and select Amplify. In the dialog that appears (Figure 9), amplify your selection by using the slider for a decibel increase. For finer control, simply type the number into the Amplification (dB) field. I should point out that despite the name, Amplify, you can enter a negative amplification to reduce the volume. Click the Preview button to sample the effect before you click OK.
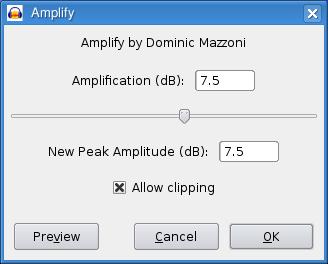
Figure 9. Despite the name, Amplify, this dialog can be used to decrease the volume as well.
Sometimes, repetition is the best way to get your point across. Make your selection, click Effect on the menu bar, and select Repeat. The default is to repeat the selected audio ten times, but you can override that in the dialog (Figure 10). This repeat effect can be a lot of fun if you select a very short segment (or a single word) and set it to repeat for several beats.
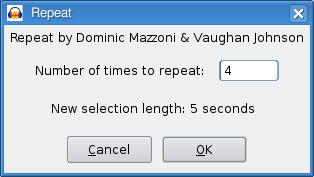
Figure 10. The repeat effect identifies the length of the segment and then asks how many times you want that segment repeated.
I highly recommend that you spend some time playing with the effects—there are plenty of them. Aside from being a great way to waste time, you'll be impressed with the arsenal of effects at your disposal. Change your pitch (without changing tempo), change the tempo, equalize soft and loud portions of your audio, add tremolo, remove noise and more. The latest version of Audacity also has tons of additional plugins (under the Effects menu) to keep you entertained.
Okay, I want to cover one last effect, which I'll call “Nostalgia Time at Chez Marcel”. One of my favorite effects is something those of us who can still remember vinyl albums will appreciate. On the occasional album, there were sections of a recording where you could play the sound backward to reveal a secret message. Granted, some of these so-called hidden messages were imagined, and playing your album backward did nothing but add wear and tear to your needle, but others really were there. Well, you can create your own hidden message by using the Reverse effect.
So, where do you go from here? You've created some cool sound samples, played with them, cut and trimmed them, amplified here, reverbed there, changed pitch and tempo, and otherwise created something totally new from what started out as a simple voice clip. What else is there? One option is to create your own podcasts, and I mention this mostly to bring up this point. When you are finished with your masterpiece, you want to save that file in a format that your listeners can use—that might be MP3, OGG, WAV or something else. Remember, up to this point, you are dealing with Audacity project files only. Click File on the menu bar and select Export. The Export File dialog appears (Figure 11) from which you can select a filename, location and type.
Mon Dieu! That clock on the wall cannot be right! Can it already be closing time? Ah, mes amis, I fear it may indeed be correct. Perhaps we can convince François to refill everyone's glass one final time before we must all head out into the open night. Raise your glasses, mes amis, and let us all drink to one another's health. A votre santé! Bon appétit!