
Remember the SCO lawsuit, claiming Linux used code from UNIX System V? Disproving that claim required a tremendous amount of work, partly because Linux had no revision control system to help track down the original authors of any given patch.
In response to that whole mess, Linus Torvalds implemented the Developer's Certificate of Origin (DCO) in 2004, which required people submitting a kernel patch to include a “Signed-off-by” header, identifying themselves and certifying that the code was legal to go into the kernel.
Luis R. Rodriguez recently said the DCO was so great, that a lot of other projects had started using it, but that in some cases, they weren't using it in a way that actually would help them track the origins of each patch. He wanted to extract the text of the DCO into its own git repository, so that other free software projects could access the explanatory text more easily and use it better.
This initially met with some resistance from people like Alan Cox and Jiry Slaby who felt that any project wishing to use the DCO could extract it from the kernel sources without much of a problem. They saw no reason for a standalone git repository.
W. Trevor King disagreed. He felt a standalone git tree for the DCO would be a fine idea. But (ironically), he had some copyright questions about the DCO itself. He said that in the initial patch to add the text of the DCO to the kernel sources, Linus hadn't used a “Signed-off-by” header, so he couldn't be sure the DCO's explanatory text even was legal to release under the GPL version 2. That might seem like nitpicking, except that Trevor also pointed out that the Open Source Development Labs (OSDL) had put out a press release announcing the existence of the DCO and had specifically licensed the DCO under the Creative Commons Attribution-ShareAlike 2.5 License.
This could have turned out to be a thorny issue—except it didn't. No one spoke up to clarify the licensing question on the linux-kernel mailing list. It went completely unanswered.
Trevor, however, didn't wait. He created a new git repository at https://github.com/wking/signed-off-by, exactly along the lines of what Luis originally had requested. It even preserved the commit history of the DCO, through to its current version of 1.1.
To address the licensing question himself, he said that the project was derived from the GPLv2 Linux kernel, so it also was released under that same license. But, he also said, “Because many projects that are not GPLv2 may still want to use the DCO/s-o-b approach, I've included an example CONTRIBUTING file (and CONTRIBUTING.md for GitHub) that are licensed under the very permissive Creative Commons CC0 1.0 Universal. Merge the 'contributing' or 'contributing-github' branch into your project and edit as you see fit.”
Somehow I don't think anyone will start complaining about any leftover licensing issues that may remain concerning the DCO. Luis certainly won't. He immediately replied to Trevor, saying he'd already started using Trevor's repository in his own free software projects.
A fight broke out recently on the linux-kernel mailing list between the kvmtool developers (primarily Ingo Molnar and Pekka Enberg) and Linus Torvalds. The issue was whether kvmtool should go into the official kernel tree.
kvmtool is used by the KVM (Kernel Virtual Machine) subsystem to boot up virtual computers under a running Linux system. It's awesome. Everyone should use it, whether they have a need for it or not. Create your own cluster of 20 systems without spending a dime.
There was a lot of heated back-and-forth discussion over what to do. Essentially, Ingo and Pekka argued that kvmtool should be included in the official kernel sources, because kvmtool was tightly integrated with kernel development. They relied on the same pool of developers and used the same mailing lists. Ports of the KVM subsystem to other architectures would have a functioning kvmtool immediately—in some cases before the KVM port even had been completed. Ingo and Pekka cited many examples of instances where the existence of kvmtool in the kernel tree (really in the linux-next tree, waiting to go to Linus) had resulted in better, stronger, faster development overall. They argued that this constituted a real benefit that would be lost if kvmtool had to exist outside the kernel. Without that tight integration, development would be slower, and the kvmtool developers would have to implement all the infrastructure required by a standalone project.
Linus, however, was completely unmoved by any of these arguments. In fact, the whole idea of speeding up development and making things easier for the developers didn't register to him as even remotely relevant to whether a piece of code should go into the kernel.
Instead (which he said over and over again) he needed to have a solid technical reason why the code “belonged” in the kernel rather than staying outside. It had to make sense, not from his personal perspective or from any other developer's perspective, but from the kernel's perspective itself. Did kvmtool really belong in the kernel? And that question, he said, Ingo and Pekka had not even addressed.
Ultimately, he simply refused to merge the code, and the kvmtool developers probably will extract it from the kernel and create a standalone git repository and the rest of the necessary infrastructure. Or, they'll articulate better technical (and less developer-focused) reasons why kvmtool should be more tightly integrated.
Since this is our Raspberry Pi issue, I did some research on “what folks do with their Raspberry Pi”. I sent queries out via Twitter, Facebook, the Linux Journal Web site and even the #linuxjournal IRC room. When it comes to doing extra-geeky projects with the RPi, every person I spoke with mentioned buying parts from Adafruit.
Anybody familiar with Raspberry Pi development most likely has done business with Adafruit. I had the pleasure of speaking with Limor Fried, owner of Adafruit Industries regarding its most popular products. Although I was expecting the most common Raspberry Pi-related sales to be cases or SD cards, as it happens, the list of most-popular products was much geekier!
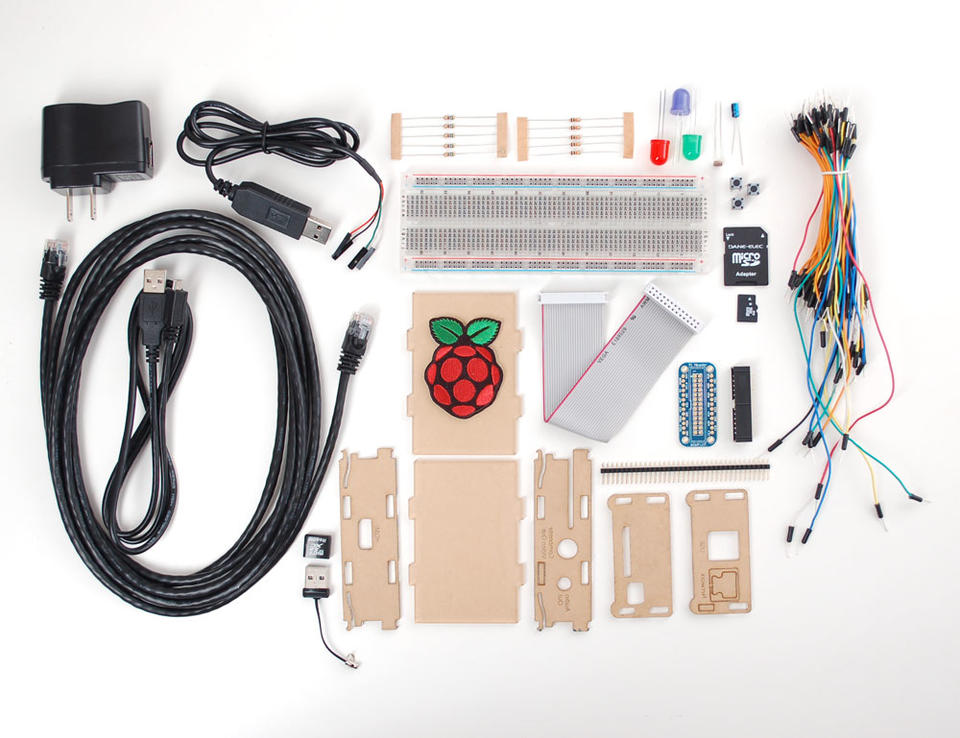
Figure 1. The Raspberry Pi can be a building block to nerdery! (Photo from www.adafruit.com.)
While the low-profile microSD card adapter is popular, Limor told me the breakout boards and breadboard PCB kits are the most-popular items. This news both surprised and fascinated me. Although I've certainly done some cool things with RPi, the notion that folks have been doing elaborate and complex projects based on the Raspberry Pi is awesome! (A special thanks to Limor at Adafruit for talking to me about what folks are doing with their Raspberry Pi devices.)
When the Space Shuttle program shut down, I have to admit, it deflated my excitement about space exploration just a bit. Although it's not fair to pin the future of manned missions to space on a fleet of aging crafts built in the 1980s, the Space Shuttle represented the latest step in a process that would get us to other planets. Because there wasn't anything immediately replacing the Shuttle, it felt like we were giving up on space. (Some might argue we gave up on space after landing on the moon, but that's an entirely different discussion.)
Then the Mars Curiosity rover arrived at Mars, and I remembered how much I love science! My daughter stayed up late with me, and we passed a jar of peanuts back and forth while we chewed our nails watching NASA TV. The seven minutes of hell ended, and after a painfully long wait, we heard from Curiosity! My excitement was palpable, and that moment sparked a new generation of space geek in my daughter. The first thing she did was look on her phone for NASA information, and I'm glad she did.
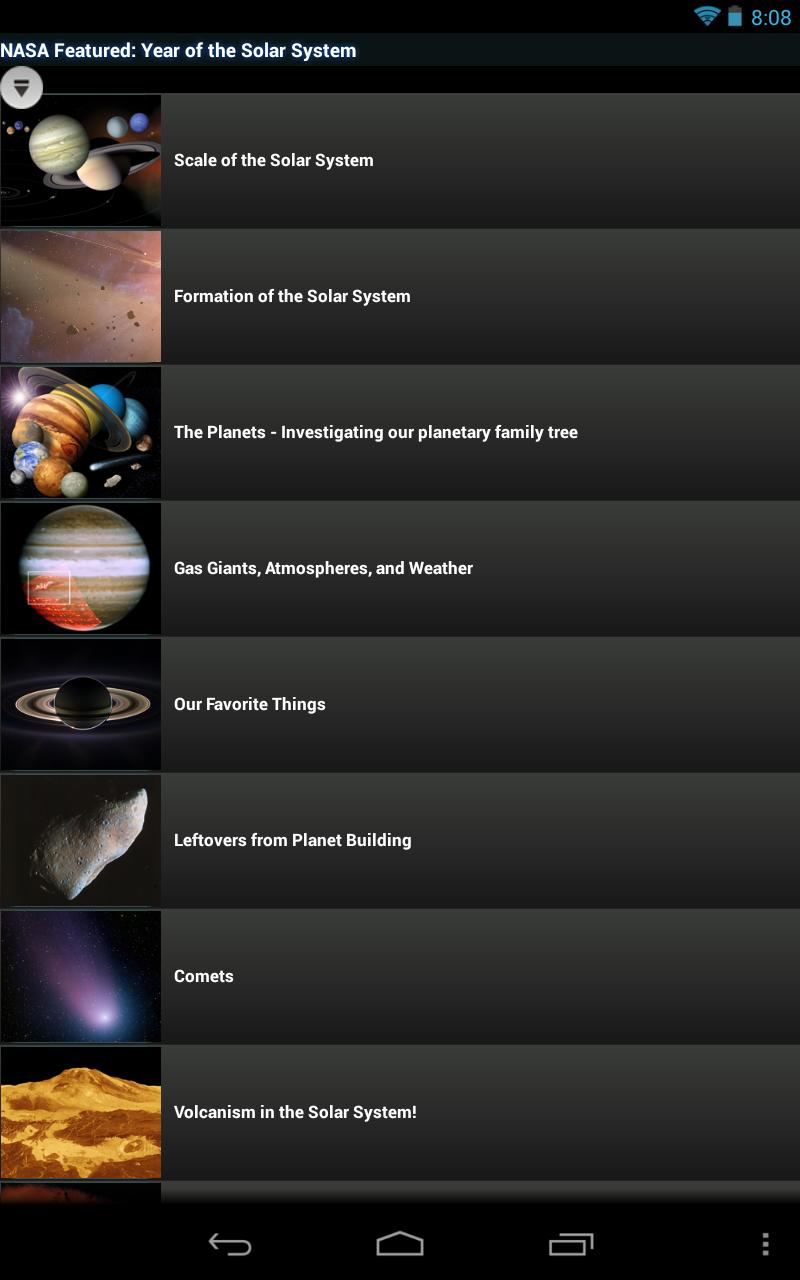
If you haven't looked at the NASA Android app in a while, you owe it to yourself to check it out. The last time I tried a NASA app, it was a simple streaming app that did a poor job of streaming the NASA TV video. It crashed. It was ugly. It did not inspire awe or excitement. The current NASA app is amazing! Not only does it have high-definition streaming video (which doesn't seem to crash), it also has information on current and upcoming missions, a launch calendar, categorized information on moons and planets, and tons of other space-nerd fodder. It even will change the background photo on your Android device to the Astronomy Pic of the Day.
I think my favorite feature of the NASA app is its ability to grab your GPS location and tell you exactly where and when to spot things like the International Space Station! If you're a space nerd like I am, I urge you to grab your jar of peanuts and let the NASA app touchdown on your Android device (https://play.google.com/store/apps/details?id=gov.nasa). It's so much better than the last time I tried it, several years ago, that the NASA app for Android is this month's Editors' Choice.
As Linux users, we tend to take programs like GIMP for granted. Thankfully, as of version 2.8.2, GIMP is available as a native application for OS X! Because everyone reading this most likely is familiar with how awesome GIMP is for photo editing, it's worth mentioning there is another open-source photo-editing application for OS X named Seashore.
Seashore is an application written in the native OS X Cocoa language, so it clearly looks like a native application when running (Figure 1). Although OS X users no longer have to install X11 in order to take advantage of GIMP, Seashore is a powerful image editor in its own right, and because it's open source, it's well worth the effort to try it out! You can download Seashore at seashore.sourceforge.net. The native version of GIMP is available at www.gimp.org/downloads.
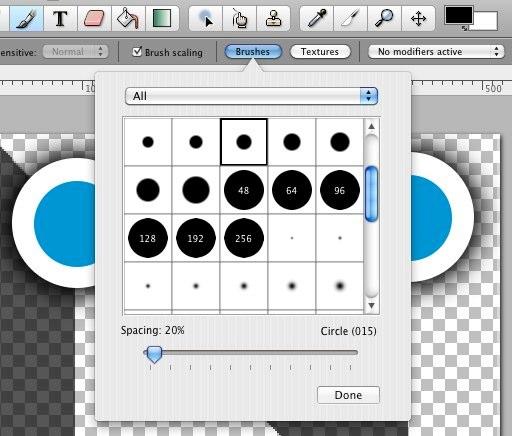
Figure 1. Based on the interface alone, it's obvious Seashore is a native OS X application.
In many scientific disciplines, the research you may be doing is completely new. It may be so new that there isn't even any instrumentation available to make your experimental measurements. In those cases, you have no choice but to design and build your own measuring devices. Although you could build them using trial and error, having a way to model them first to see how they will behave is a much better choice—in steps oregano (https://github.com/marc-lorber/oregano). With oregano, you can design your circuitry ahead of time and run simulations on it to iron out any problems you may encounter.
The first step, as always, is installing the software. Most distributions should have a package for oregano available. If you want to follow the source version, it is available at GitHub. Oregano also needs another software package to handle the actual simulation. The two packages it currently can work with are Gnucap and ngspice. Either of these two packages needs to be installed in order to do the calculations for the simulation. While this is handled automagically by your distribution's package manager, you will need to install this dependency yourself if you are building from source.
Once it's installed, you will get a blank new project when you first start up oregano (Figure 1). On the right-hand side, you should see a list of elements you can use to build your circuits. It starts up with the default library selected. This library provides all the standard electronic components you likely will want to use. But, this isn't the only library included. You can select from other libraries, such as TTL, Linear, CPU or Power Devices, among others.
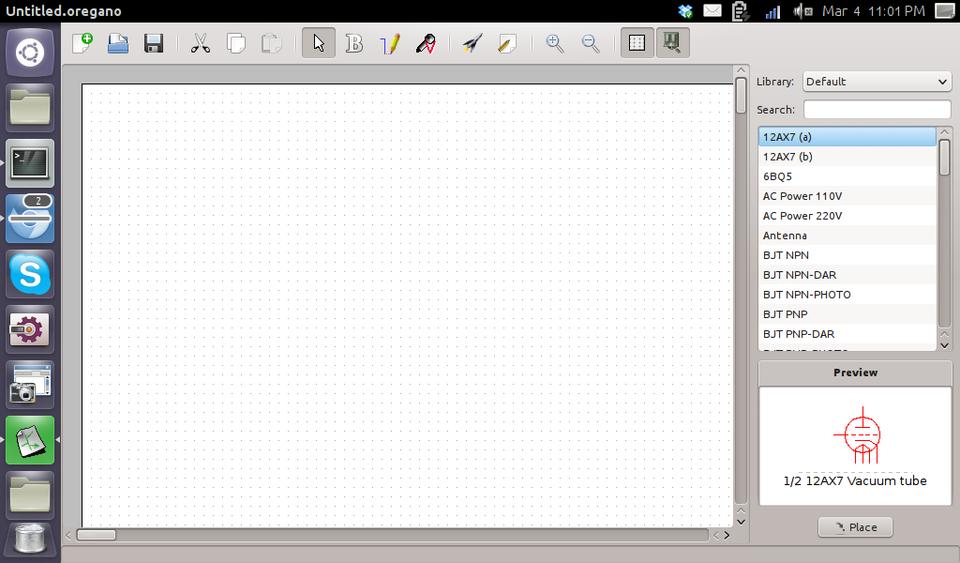
Figure 1. On startup, you get a blank canvas and a parts list.
Each of these libraries contains a list of associated elements you can use in your circuits. Selecting one of the elements shows a preview of the schematic drawing of that element in the bottom window. You then can drag and drop the element onto your canvas and start building your circuit. Once you have an element on the canvas, you can double-click the element to edit its properties (Figure 2). You need to click on the “Draw wires” icon at the top of the window in order to connect the elements together into a proper circuit.
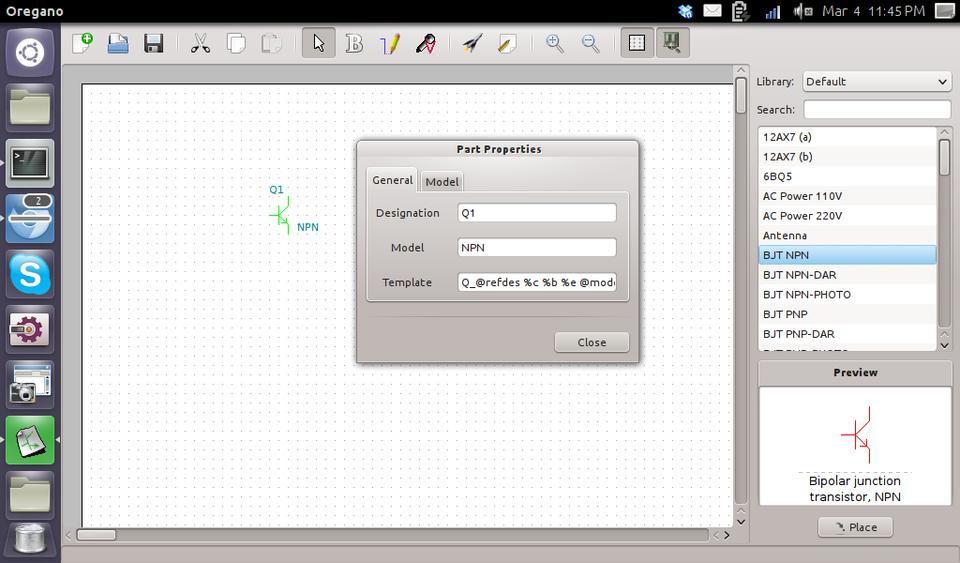
Figure 2. The property window depends on which properties are available for that element.
All circuits have some necessary components to make an actually functioning circuit. The first of these is the ground. This element is labeled GND in the default library. Along with ground, you need some sort of power source. In most cases, you will want some form of DC current. This is provided by the element labeled with VDC in the default library. With those two important elements in your circuit, you can go ahead and wire up the rest of the circuit.
Once you have a circuit made up, you will want to run a simulation to see how it behaves. Because of the nature of electrical circuits, you need to put sensors into the circuit to see its behavior. You can click on the “Add voltage clamp” icon at the the top of the window to select the sensor object. Then, you can click on the areas of your circuit where you want to measure during the simulation. At each point you click, you will see a new icon on your circuit marking a sensor location. Double-clicking on the clamp will pop up a window where you can set the parameters of what is being measured (Figure 3). You need at least one clamp in your circuit before you can run a simulation; otherwise, you won't have any measurements to study in your simulation.
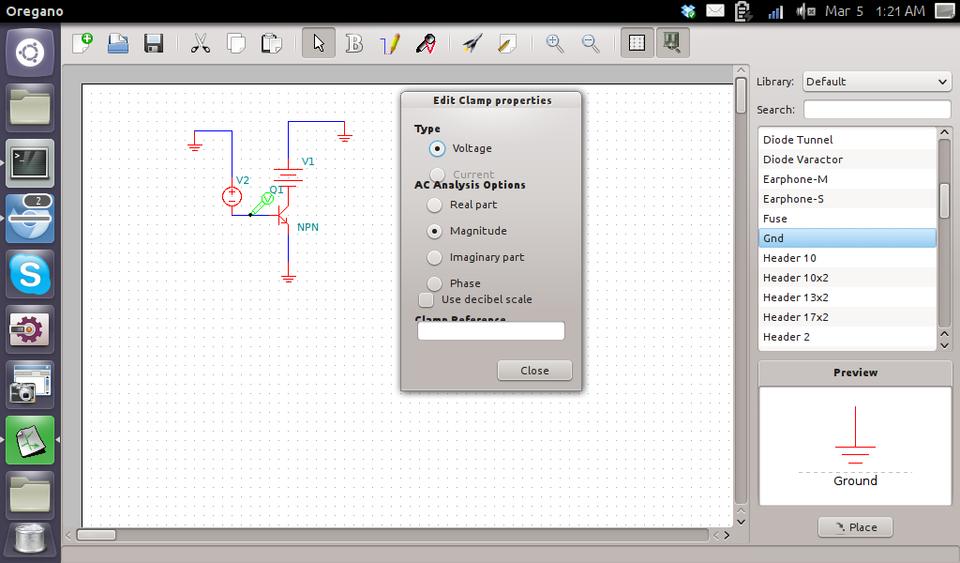
Figure 3. Here you can select the properties for the clamp.
Once you have all of your clamp points selected, you can run the simulation and see what happens by clicking on the “Run a simulation” icon at the top of the window (Figure 4). When you do so, oregano opens a new window where you can see a plot of the data registered by the clamp (usually voltage or current).
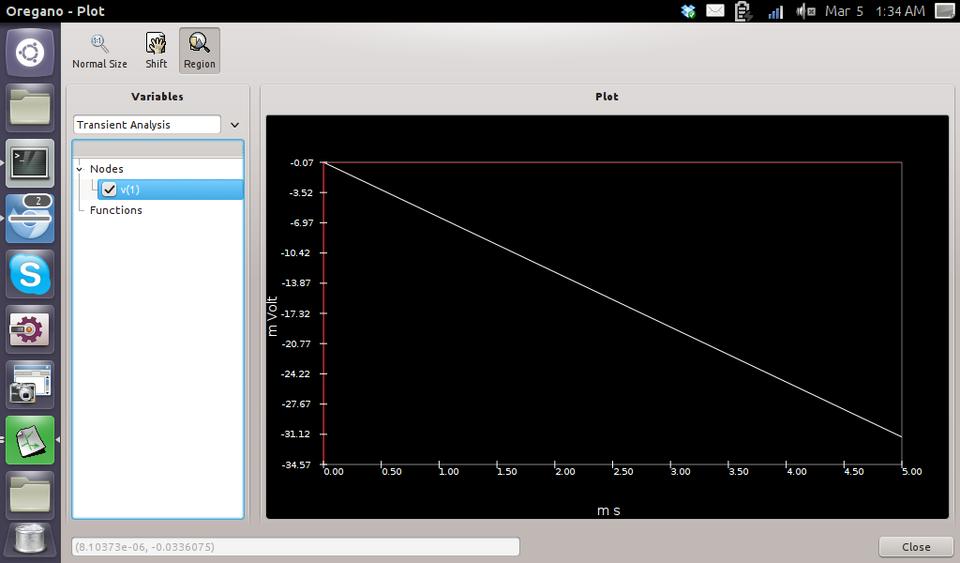
Figure 4. Plotting the results of a circuit clamp.
When you do analysis, you have the choice of two different circuit analysis programs: Gnucap and spice. On Ubuntu, the default analysis program that is installed as a dependency is Gnucap. This means you need to install spice explicitly if you want to use it instead.
To select the analysis engine, click on Edit→Preferences. In this dialog, you also can set whether the log window will open automatically when needed, and you can set the data paths for the models and libraries that will be available for your circuits. In most cases, you will want to leave those as is.
To help you get started, oregano comes with several examples. Again, on Ubuntu (since that is my current desktop), these examples are located in /usr/share/doc/oregano/examples. You might want to load one of these examples first.
Once you have a completed circuit and want to run a simulation, you will want to set parameters to control this simulation. Click on the menu item Edit→Simulation Settings to bring up the dialog window. The first tab lets you see analysis parameters, such as transient options, fourier options, DC sweep options and AC options. Clicking on any of the check boxes will open up a subset of further options for each of those sections. The second tab lets you set a series of analysis options. You also can set parameters that may affect your circuit, such as the ambient temperature.
Once you have all of the options and parameters set, you can start the simulation by selecting the menu item Tools→Simulate or by pressing F11. Don't forget to attach some test clamps first; otherwise, you will get an error. Your simulation will run and pop up a new plot window where you can look at the values generated within your circuit. You can select whether to look at the transient analysis or AC analysis.
On the left, you will see a list of available plotting options. On the right-hand side, you will find the actual plot of your data. Only the items that you select from list will be plotted, so that means when this window first opens, nothing actually will be plotted.
You also can plot functions of the available values. For example, you could plot the difference in voltage between two separate test clamps. These functions will be available in the list on the left side, so you can select them and have them plotted on the graph.
Additionally, you can include even more complicated elements like full CPUs to your circuit. The problem with these is that the way they respond to electrical signals can be very complicated. These elements need a separate model file that describes this response to signals. Unfortunately, the licensing for model files means that many cannot be included with oregano. You can search the Internet and download the model files for the elements that interest you, or you can create your own model file. In either case, you can place the model files into the directory set in the preferences.
When you actually want to build your circuit, you can export the associated diagram by clicking on the menu item File→Export. You then can export the circuit diagram as either an SVG file, a PDF, a PostScript file or a PNG. Now, you can go ahead and build your new test equipment, secure in the knowledge that you did some initial testing and should get the behavior you need.
We asked LinuxJournal.com readers about their Raspberry Pis, and the results are below. We see that 11% indicated that they have multiple models, and 6% own more than 3 Pis, and at $35 a piece, we can hardly blame you. Also fun to note is that 77% percent of respondents bought their Pi with no specific purpose in mind, just to experiment with, which is yet another fabulous side effect of the low price and wee form factor. Only 35% of our readers indicated that the Pi is not fast enough to use as a desktop machine, while the rest found it at least sufficient enough for basic tasks. Command-liners and GUI users are split down the middle with 50% each, which is not surprising considering the multitude of applications for a Pi, each of which lends itself to a different way of interacting. And finally, Raspian is the favorite operating system by far, but there are many to experiment with. So, please continue to enjoy your Pi, and we'll continue writing about new and fun ways to help you with that.
1) Do you own a Raspberry Pi?
Yes: 83%
No: 17%
2) If you own a Raspberry Pi, which model do you own?
Model A: 5%
Model B: 35%
Updated Model B with 512MB of RAM: 49%
Multiple models: 11%
3) What do you keep your Raspberry Pi units in?
Computer case for RPi: 53%
Custom-built case (Legos, Pop-Tart box and so on): 16%
No case, it hangs in the wind: 31%
4) If you own a Raspberry Pi, did you pay extra for the MPEG2 license?
Yes: 14%
No: 86%
5) What potential model C feature is most important to you?
USB boot: 37%
PXE/Etherboot booting: 17%
Power Over Ethernet (POE): 32%
Other: 14%
6) Do you overclock your RPi?
Yes: 31%
No: 69%
7) What operating system is on your Raspberry Pi?
Raspian: 63%
RaspBMC: 9%
OpenELEC: 6%
Fedora Remix: 3%
PiBang Linux: <1%
Arch Linux: 9%
SliTaz: <1%
Android: 2%
Other: 7%
8) Did you buy a Raspberry Pi...
For a specific purpose: 23%
To experiment with: 77%
9) Did you already own the required peripherals (SD card, Micro USB power adapter, HDMI cable)?
Yes, I have several of each: 47%
I had some and had to buy some: 45%
No, and it more than doubled the cost: 8%
10) Is the Raspberry Pi fast enough for you to use as a desktop machine?
Yes: 8%
No: 35%
For basic things, but not as my main computer: 57%
11) Do you use a GUI on your Raspberry Pi or CLI only?
CLI only (server, etc): 50%
GUI (desktop or video playback): 50%
12) How many Raspberry Pis do you own?
1: 67%
2–3: 27%
More than 3: 6%
I'd learned enough about circuitry in high school electronics to know how to drive a TV and get it to draw—shapes of characters and things.
—Steve Wozniak
I think it's very comforting for people to put me in a box. “Oh, she's a fluffy girlie girl who likes clothes and cupcakes. Oh, but wait, she is spending her weekends doing hardware electronics.”
—Marissa Mayer
Other kids went out and beat each other up or played baseball, and I built electronics.
—Robert Moog
When I was a teenager in the late 1930s and early 1940s, electronics wasn't a word. You were interested in radio if you were interested in electronics.
—Ken Olsen
I met Woz when I was 13, at a friend's garage. He was about 18. He was, like, the first person I met who knew more electronics than I did at that point.
—Steve Jobs
