
Firmware support has become more and more difficult to maintain over time, especially as more and more features have been added. Some features aren't even about loading firmware so much as just doing something that's more easily done at the same time as loading the firmware. And, whenever the firmware API gets updated, the patch has to include updates to all user code that uses that particular programmer interface. Over time, this tends to make the patches bigger and more error-prone overall.
Luis R. Rodriguez recently proposed a new firmware API, not quite a total replacement of the existing code, but something that would at least make more sense and tolerate updates more easily. At the same time, the new code would leave open the question of certain thorny problems, such as what to do when a particular piece of firmware doesn't work. What's the fallback procedure? For this, he described the existing code as “hairy” and didn't want to touch it until various other issues could be resolved. For example, he said that the kernel's init code contained race conditions that would have an impact on any attempt to fix up the firmware fallback implementation, so the one would have to wait for the other.
Various folks like Greg Kroah-Hartman and Bjorn Andersson had suggestions and objections. In particular, Bjorn wanted the old firmware API to go away at some point and be fully replaced by the new interface. But, Luis said the two would have to coexist for the foreseeable future, although he did add that the old interface would become static, and all new fixes and updates would go into the new API.
Hardware acceleration involves performing certain work in hardware that was specifically built for that purpose, as opposed to doing the same work using the standard opcodes available on a general-purpose CPU. In terms of efficiency, all else being equal, specialized hardware beats the pants off general-purpose CPUs.
Binoy Jayan recently wanted to migrate some of the kernel's crypto code into hardware to take advantage of that speedup opportunity—specifically the initialization vector (IV) routines in the dm-crypt.c file. But, Milan Broz warned against moving the code out of dm-crypt.c, because it would make it harder for the crypto team to modify the key data structures in the future, if they so desired. Also, he said, some of the IV generator code was hacky and risky, and it shouldn't be considered good enough to migrate into hardware.
Ultimately, Binoy's code became more and more controversial, as folks like Ondrej Mosnáçek proposed completely different solutions to the problems Binoy wanted to address.
By the end of the discussion, hardware acceleration remained an option for the crypto IV routines, but there still was no agreement on the exact implementation.
The quest to access more and more memory is ongoing. Nikita Yushchenko recently pointed out that while PCI devices potentially could support up to 64-bit DMA (direct memory access) addressing, some of the PCI code, such as host bridge, had software limitations that prevented it. Nikita wanted at least to prevent PCI devices from claiming the ability to access that much memory, if it couldn't in reality.
During the course of discussion, however, and particularly with Arnd Bergmann, who'd written his own patch to address the issue in a different way, it turned out that Nikita wasn't entirely sure where the RAM access limitations really were. It ended up being a thorny question. Arnd and Nikita pursued the problem together, each cursing loudly (and loudly agreeing with each other) over the horribleness of the API.
The discussion ended with only an incomplete understanding of the problem, but at least the question had been identified. The issue of how best to allow PCI devices to access 64-bit DMA addresses remains open.
The kernel boot process is one of the scariest parts of the whole kernel. Trying to support every CPU ever made, including those with hardware errors, mis-features and various other design flaws, is quite simply insane. It should be no surprise that efforts to improve the boot process tend to be highly controversial.
Trying to support the multiboot specification, for example, turns out to have all kinds of pitfalls. Chao Peng tried to do this recently, and H. Peter Anvin offered strenuous objection. He said:
Multiboot has a fundamentally broken assumption, which is to do certain work for the kernel in the bootloader. This is fundamentally a bad idea, because you always want to do things in the latest step possible during the boot process, being the most upgradeable, and have the interface as narrow as possible. Therefore, using Multiboot is actively a negative step. It is declared an “Open Standard” but anything can be such declared; it really is a claim that “everything should work like Grub.”
The debate was not resolved during this email thread, but typically the boot specification would need to address the kernel folks' objections before any code would be accepted.
When it first came out, I thought the Palm Touchstone Charging Dock was just about the coolest idea ever. Of course, the Palm Pre that it charged never really became popular, and I'm not even sure Palm exists as a company anymore. That wireless charging idea was really cool though. Nowadays companies like Samsung include wireless charging capability in many of their phones, and there's actually a standard (thank goodness) that all or most of the manufacturers use. It's called Qi, and even if your phone doesn't support wireless charging, you might want to learn more.
Although I'm not certain whether Palm used the Qi standard back in the day, that standard means you can get very inexpensive charging pads and place them all over your home and office. The charging pads are small and usually are less than $20 each. And because Qi is a standard, it means you can charge any Qi device on any Qi charger—Android or iPhone. And even cooler? If your device doesn't support built-in Qi charging, there are slick add-on devices you can put under your case to transform your phone into a wirelessly chargeable one!
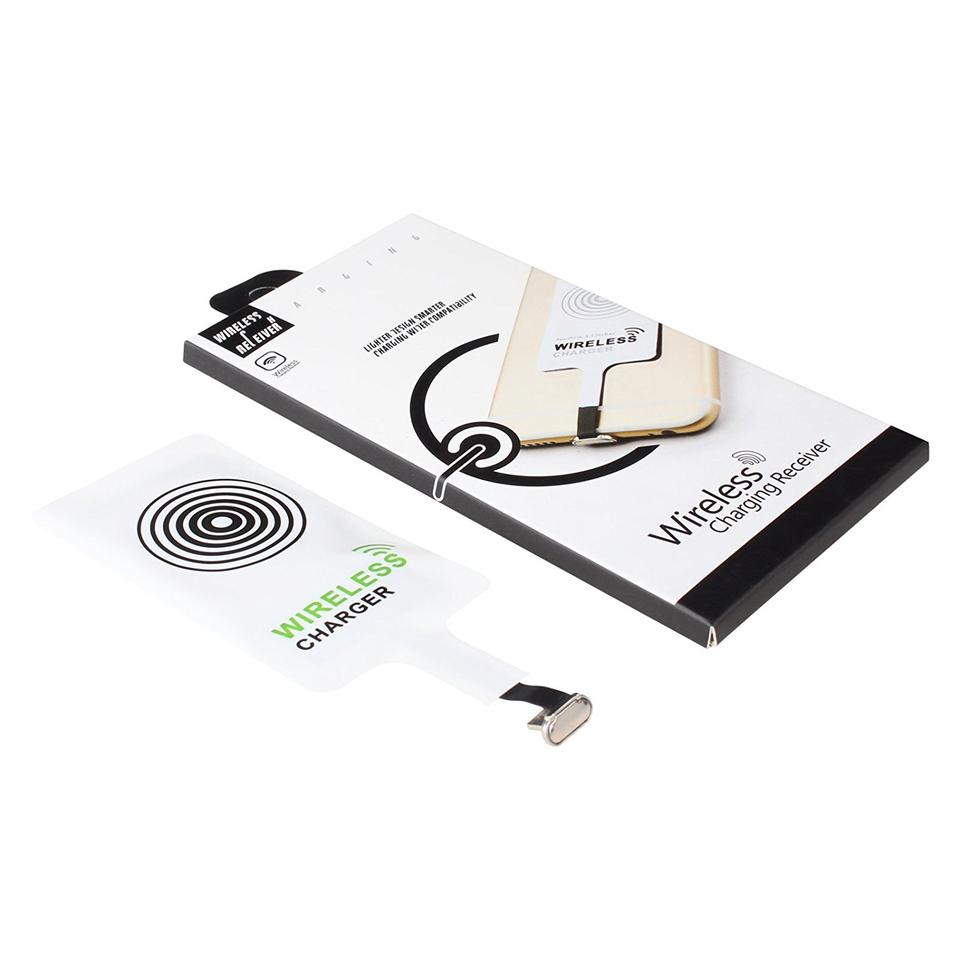
For $10–$15 I was able to find many options that plug in to the micro-USB port on my Android device and fit under my case. That means I can just place my phone on any Qi base (I have several), and my phone happily will charge without ever getting plugged in. The only thing to pay attention to is the size of the add-on charging receiver and which way the USB port faces. It isn't terribly useful if your charging receiver is located over the screen of your phone instead of over the back.
This technology has changed the way I think about charging my phone, and if you place a few charging pads around your house and workplace, it will change yours too. And if your device supports Qi charging natively, like many Samsung Galaxy devices, using Qi is a no-brainer!
I've written about Bitcoin several times during the past few years, and I still love the technology. I am a little disturbed by the amount of electricity the Bitcoin blockchain consumes using dirty power sources, but that's another discussion altogether. Although there are many places to spend Bitcoin directly, and services like Purse.io exist that allow you to spend Bitcoin at Amazon, what if you want to buy a pack of gum at the local gas station?
I recently ordered two different Bitcoin debit cards. One card is from BitPay (https://bitpay.com/card), and one is from Shift (https://www.shiftpayments.com/card). They both conceptually do the same thing, which is convert your Bitcoin into currency that can be spent anyplace that accepts debit cards. They work slightly differently in function though.
The BitPay card is a “reloadable” debit card that allows you to add US Dollars to your card. When you load the card, Bitcoin is converted at the current price, and the dollar amount is stored in your account. Once the card is loaded, Bitcoin is out of the equation, and fluctuating prices don't matter. If you want to know exactly how much money you have on your card, the BitPay card is the way to go.

In contrast, the Shift card doesn't have any money loaded onto it. Rather, the Shift card connects to a Coinbase account, and at the time of purchase, your Bitcoin is converted to US dollars. This is actually “cleaner” than the BitPay method, but the volatility of Bitcoin can mean your actual available money isn't consistent. If Bitcoin tanks, so does your buying ability with the Shift card.
Each card was $10 to buy, and neither has an ongoing fee to use. The transactions don't cost anything, and the only fees are when one of the cards is used at an ATM to get cash. Considering that you instantly can get cash from an ATM from Bitcoin, however, the small fee associated with the process isn't too difficult to accept.
If you've been avoiding digital currency because you don't have any way to spend it, I urge you to check out one or both of these cards. There are other options, but these seemed like the best deal, and I've personally used both.
I've looked at several scientific packages in this space that generate nice graphical representations of your data and work, but I've not gone in the other direction much. So in this article, I cover a popular image processing package called ImageJ. Specifically, I am looking at Fiji (https://imagej.net/Fiji), an instance of ImageJ bundled with a set of plugins that are useful for scientific image processing.
The name Fiji is a recursive acronym, much like GNU. It stands for “Fiji Is Just ImageJ”. ImageJ is a useful tool for analyzing images in scientific research—for example, you may use it for classifying tree types in a landscape from aerial photography. ImageJ can do that type categorization. It's built with a plugin architecture, and a very extensive collection of plugins is available to increase the available functionality.
The first step is to install ImageJ (or Fiji). Most distributions will have a package available for ImageJ. If you wish, you can install it that way and then install the individual plugins you need for your research. The other option is to install Fiji and get the most commonly used plugins at the same time. Unfortunately, most Linux distributions will not have a package available within their package repositories for Fiji. Luckily, however, an easy installation file is available from the main website. It's a simple zip file, containing a directory with all of the files required to run Fiji. When you first start it, you get only a small toolbar with a list of menu items (Figure 1).

Figure 1. You get a very minimal interface when you first start Fiji.
If you don't already have some images to use as you are learning to work with ImageJ, the Fiji installation includes several sample images. Click the File→Open Samples menu item for a dropdown list of sample images (Figure 2). These samples cover many of the potential tasks you might be interested in working on.
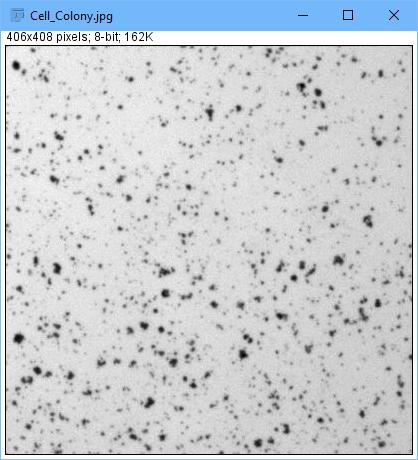
Figure 2. Several sample images are available that you can use as you learn how to work with ImageJ.
If you installed Fiji, rather than ImageJ alone, a large set of plugins already will be installed. The first one of note is the autoupdater plugin. This plugin checks the internet for updates to ImageJ, as well as the installed plugins, each time ImageJ is started.
All of the installed plugins are available under the Plugins menu item. Once you have installed a number of plugins, this list can become a bit unwieldy, so you may want to be judicious in your plugin selection. If you want to trigger the updates manually, click the Help→Update Fiji menu item to force the check and get a list of available updates (Figure 3).
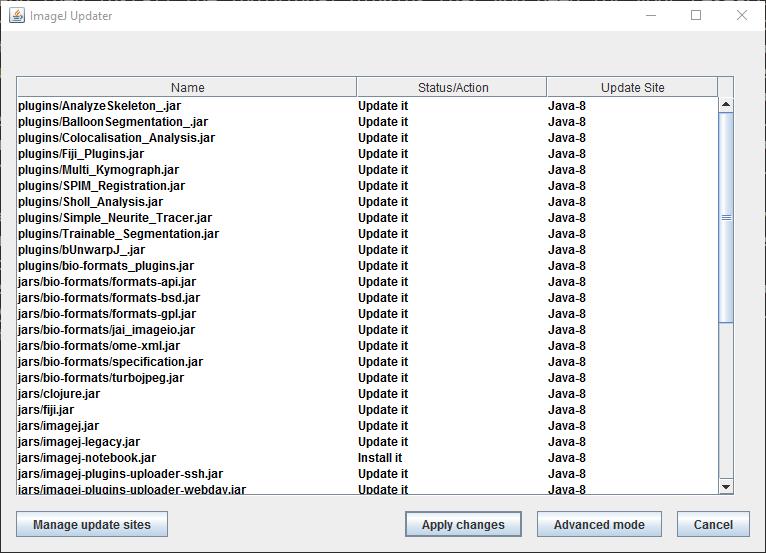
Figure 3. You can force a manual check of what updates are available.
Now, what kind of work can you do with Fiji/ImageJ? One example is doing counts of objects within an image. You can load a sample by clicking File→Open Samples→Embryos.
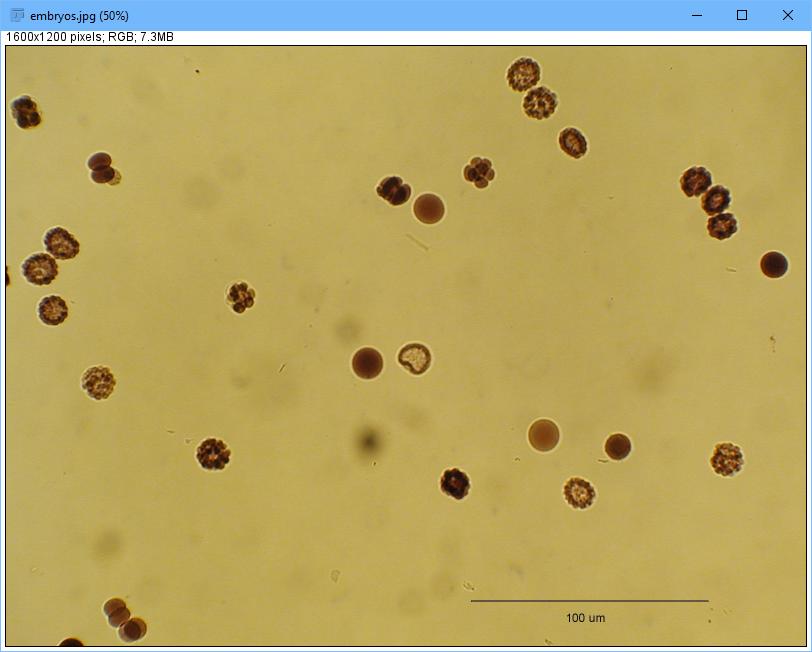
Figure 4. With ImageJ, you can count objects within an image.
The first step is to set a scale to the image so you can tell ImageJ how to identify objects. First, select the line button on the toolbar and draw a line over the length of the scale legend on the image. You then can select Analyze→Set Scale, and it will set the number of pixels that the scale legend occupies (Figure 5). You can set the known distance to be 100 and the units to be “um”.
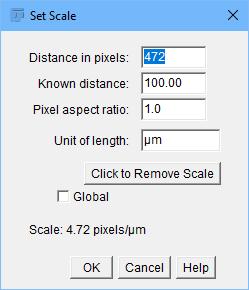
Figure 5. For many image analysis tasks, you need to set a scale to the image.
The next step is to simplify the information within the image. Click Image→Type→8-bit to reduce the information to an 8-bit gray-scale image. To isolate the individual objects, click Process→Binary→Make Binary to threshold the image automatically (Figure 6).
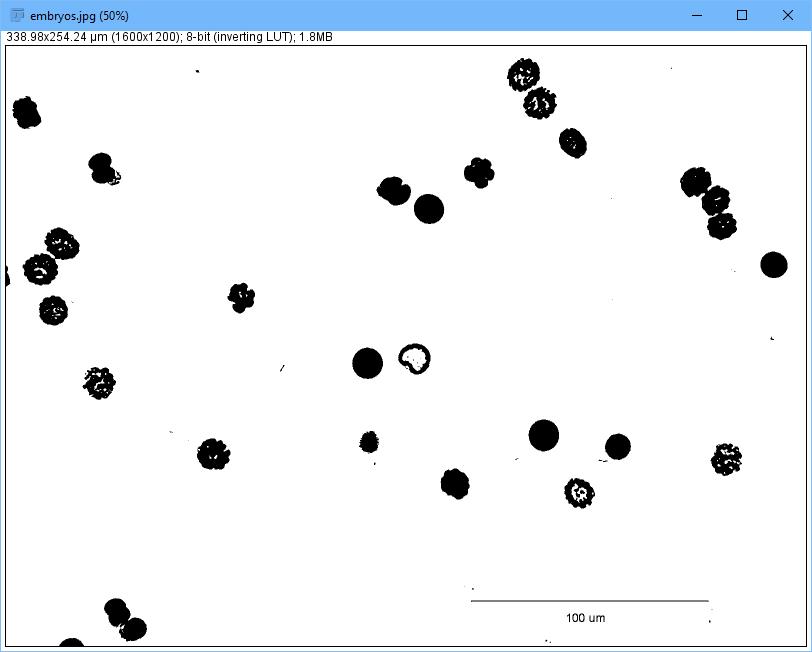
Figure 6. There are tools to do automatic tasks like thresholding.
Before you can count the objects within the image, you need to remove artifacts like the scale legend. You can do that by using the rectangular selection tool to select it and then click Edit→Clear. Now you can analyze the image and see what objects are there.
Making sure that there are no areas selected in the image, click Analyze→Analyze Particles to pop up a window where you can select the minimum size, what results to display and what to show in the final image (Figure 7).
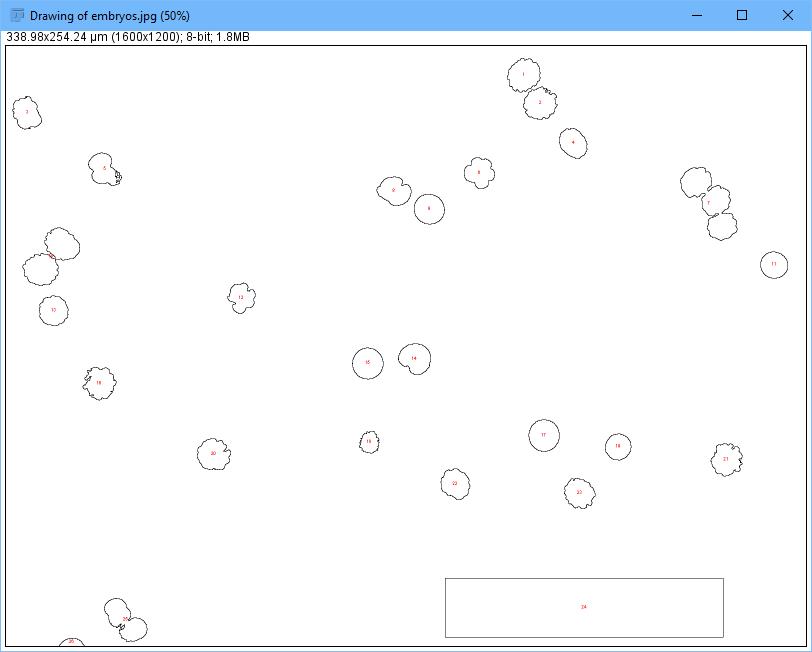
Figure 7. You can generate a reduced image with identified particles.
Figure 8 shows an overall look at what was discovered in the summary results window. There is also a detailed results window for each individual particle.
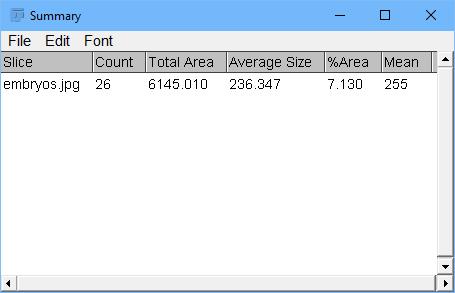
Figure 8. One of the output results includes a summary list of the particles identified.
Once you have an analysis worked out for a given image type, you often need to apply the exact same analysis to a series of images. This series may number into the thousands, so it's typically not something you will want to repeat manually for each image. In such cases, you can collect the required steps together into a macro so that they can be reapplied multiple times. Clicking Plugins→Macros→Record pops up a new window where all of your subsequent commands will be recorded. Once all of the steps are finished, you can save them as a macro file and rerun them on other images by clicking Plugins→Macros→Run.
If you have a very specific set of steps for your workflow, you simply can open the macro file and edit it by hand, as it is a simple text file. There is actually a complete macro language available to you to control the process that is being applied to your images more fully.
If you have a really large set of images that needs to be processed, however, this still might be too tedious for your workflow. In that case, go to Process→Batch→Macro to pop up a new window where you can set up your batch processing workflow (Figure 9).
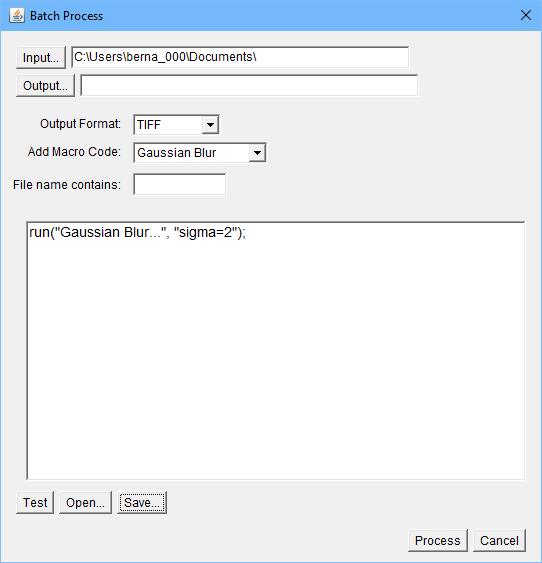
Figure 9. You can run a macro on a batch of input image files with a single command.
From this window, you can select which macro file to apply, the source directory where the input images are located and the output directory where you want the output images to be written. You also can set the output file format and filter the list of images being used as input based on what the filename contains. Once everything is done, start the batch run by clicking the Process button at the bottom of the window.
If this is a workflow that will be repeated over time, you can save the batch process to a text file by clicking the Save button at the bottom of the window. You then can reload the same workflow by clicking the Open button, also at the bottom of the window. All of this functionality allows you to automate the most tedious parts of your research so you can focus on the actual science.
Considering that there are more than 500 plugins and more than 300 macros available from the main ImageJ website alone, it is an understatement that I've been able to touch on only the most basic of topics in this short article. Luckily, many domain-specific tutorials are available, along with the very good documentation for the core of ImageJ from the main project website. If you think this tool could be of use to your research, there is a wealth of information to guide you in your particular area of study.
Once again, my friend and fellow Linux Journal club member Kris Occhipinti introduced me to an awesome bit of software. This time, it's an open-source project that brings Linux-like package management to Windows! Don't get me wrong; installing software on Windows isn't difficult, but it's definitely more cumbersome than with Linux. Plus, with Chocolatey (chocolatey.org), you can keep your installed packages up to date as easily as you can with Linux.
There is an open-source version of Chocolatey and paid versions. With the open-source version, you can install and maintain all the community packages, which for me is plenty. Literally thousands of software packages are available to install with a simple command-line entry. And unlike Cygwin (a wonderful program as well), Chocolatey installs the same Windows applications you'd install if you downloaded the installers and went through the process on your own.

Installation on Windows can be done via the command prompt (cmd.exe) or via Powershell. If you open the command prompt as administrator (right-click, open as administrator, see screenshot), you can install with:
@powershell -NoProfile -ExecutionPolicy Bypass -Command
 ↪"iex ((New-Object System.Net.WebClient).DownloadString
↪('https://chocolatey.org/install.ps1'))" && SET
 ↪"PATH=%PATH%;%ALLUSERSPROFILE%\chocolatey\bin"
Or even better, visit https://chocolatey.org/install for more options and a chance to look at the installation script before installing. The site actually recommends looking at the installation code before running it to make sure it's safe. That doesn't make me less confident of the code, but it makes me happy to see smart security choices.
So, thanks to making Windows a bit more like Linux and easing the process of keeping your software up to date, Chocolatey earns this month's Editors' Choice award. If you use Windows, head over to the website and check out this awesome system. It's especially useful for brand-new Windows installs, because managing all your third-party software with a single tool is wonderful. Thanks again, Kris!
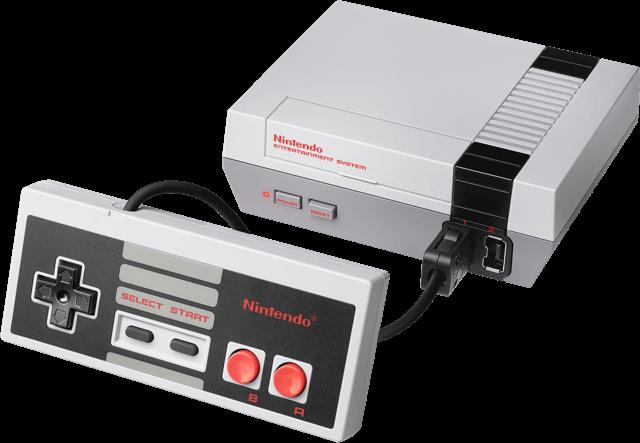
It's no secret that I love classic gaming. It seems like every other month, I write about an emulation project or some online version of a 1980s classic. The system that defined my youth was the Nintendo Entertainment System, or the NES. Its chunky rectangle controller and two-button setup may seem simple today, but back then, it was revolutionary. My hands still even form to the awkward controllers automatically like they did back in middle school.
Knowing that people like me exist, and that we're now old enough to buy things, Nintendo recently released its NES Classic Edition. Although they're still absurdly hard to find, I managed to buy one. And for anyone wondering whether the tiny replica is worth the $60 (okay, I paid $80), if the NES defined your youth, I would say yes!
I was worried the controller wouldn't feel like the original. I read a few reviews that said they felt too light or cheaper than the old ones. Well, I have both original controllers for my emulation machine that I wrote about a few months back and the controller that came with the NES Classic Edition, and I can say they both feel about the same. Also, although the gameplay isn't any different on the NES Classic Edition versus my emulation machine, I'm actually quite happy to pay for the “proper” device and give Nintendo money. I know ROMs are easy to find, but the only reason I download them illegitimately is that I can't buy them legally. Now, at least for 30 of the best games, I can!
I'm a hacker at heart, so although I urge you to buy the NES Classic if you're into that sort of gaming, I also want to play a few games that are not included. Thankfully, the NES Classic is super easy to hack. It's possible to hack the device to add ROMs manually, but there's also a great open-source tool called hakchi2 that will do all the heavy lifting for you. From what I can tell, it's a Windows-only program, but if you want a simple way to add a few ROMs, it's the way to go: https://github.com/ClusterM/hakchi2.
The hardest part? Finding an NES Classic Edition in stock. Good luck fellow gamers.
Everything that I understand, I understand only because I love.
—Leo Tolstoy
The human brain is unique in that it is the only container of which it can be said that the more you put into it, the more it will hold.
—Glenn Doman
Fear does not have any special power unless you empower it by submitting to it.
—Les Brown
Train yourself to let go of the things you fear to lose.
—George Lucas
Let us so live that when we come to die even the undertaker will be sorry.
—Mark Twain
