
Salvatore Mesoraca recently posted a patch to make it harder for hostile users to trick regular users into putting sensitive data into files and pipes controlled by the attacker. The problem was that attackers could create a file, or a FIFO (first in/first out) pipe, that had a filename expected by one of the regular pieces of software on the system. Regular users then innocently would use the regular piece of software, thinking they safely could input a password or whatever, but instead of creating the safe and private file on the filesystem, the regular software mistakenly would open the attacker's file or FIFO instead and send the sensitive data right into the attacker's hands.
The solution, as Salvatore saw it, was to tighten the system's controls over directory permissions. Salvatore's patch would affect directories that had been set world-writeable, with the sticky bit set, such that the regular user, and the regular software, would not have permission to edit the hostile files and FIFOs created by the attacker. Instead, the software simply would fail to create the file it needed. This might result in users being unable to use the software until the hostile file had been identified and removed, but at least the attack would have been foiled.
Kees Cook was thrilled to see this particular security hole plugged. He had a couple coding suggestions and also suggested documenting an example attack that Salvatore's patch would stop.
But, Alexander Peslyak replied, “I doubt there are (m)any examples of attacks and blog posts on this, because most systems didn't have similar (sym)link restrictions until recently and those attacks are simpler.” He pointed out that symbolic links also were susceptible to this sort of attack, and he advocated making /tmp, /dev/shm and other potential target directories entirely unwriteable except via known library interfaces.
By way of advocating for Salvatore's patch, Alexander also added, “policy enforcement like this implemented in a kernel module helped me find weaknesses in an old Postfix privsep implementation, which were promptly patched (that was many years ago). Having this generally available and easy to enable could result in more findings like this by more people.”
One of the things that's good about Linux is that security fixes are treated like holy Silmarils. They even supersede ABI preservation in the importance given them by Linus Torvalds and others. Now that Linux systems are being targeted more seriously by government hackers around the world, it's all the more important to fix problems as they appear and to make no exceptions. I personally find it mind-boggling that anyone is still advocating putting “official” back doors into security software, and that Microsoft still relies so much on anti-virus software rather than closing the holes that allow attackers to get in in the first place.
We don't usually get to see Linus taking the lead on a particular kernel feature or fix. Usually he leaves that to the other contributors, while he gives the final thumbs-up on whatever makes it through the legions of reviewers and testers. The most notable time when Linus really led a full project—aside from the kernel itself—was when he created Git entirely from scratch, after BitKeeper failed, and no other revision control system was able to meet his requirements.
But recently, Linus did take the reins on a lesser project. Masahiro Yamada raised the question of whether it would be okay to have the kernel build system require third-party tools like Flex and Bison. The current situation was to include files directly in the source tree that already had been processed by those tools. That way, Linux could avoid messy problems like versioning conflicts in the toolchain. But Masahiro said that if it were possible to overcome those problems, it would be useful to rely on real source files in the kernel source tree, rather than these processed untouchable blobs of generated C code.
Specifically, Masahiro had noticed that kbuild recently had added rules for regenerating those files, so it already was possible to do. But, he asked if it was therefore acceptable to do this all the time, or only under certain key circumstances. And in fact, he asked if it was possible to do away with the processed files altogether and simply have the build system regenerate them as part of its default behavior. As he put it, “the advantage is we do not need to version-control generated files, i.e. shipped files will be deleted.”
Linus took a look at the situation, and said, “Yeah, I think we probably should do that.”
He did a test run and found that one of the files would be regenerated improperly because gperf changed its behavior in version 3.1. He said, “I'm not sure how to detect that automatically....gperf doesn't seem to generate any version markers.”
He worked around that particular problem by hand, only to run into a similar problem elsewhere.
Linus said, “one of the advantages of the pre-shipped files is that we can avoid those kind of crazy version issues with the tools. But if we can solve the versioning thing easily, I certainly don't mind getting rid of the pre-generated files. Having to have flex/bison/gperf isn't a huge onus on the kernel build system.”
However, he also added the caveat, “the traditional way to handle this is autoconf, etc. Since I think autoconf is evil crap, I refuse to have anything what-so-ever to do with it.”
He also felt that gperf was seriously misdesigned, because “it would have been trivial for them to add some kind of marker define so that you could test for this directly rather than depend on some kind of autoconf 'try to build and see if it fails' crap.”
His solution was simply to ditch gperf altogether and make something else that could do the same work. And he added, “I assume that flex/bison are stable enough that we don't have the same kind of annoying stupid version issues with it.”
He posted a patch to get rid of the gperf dependency in the build system and included many warnings that the code might be completely broken, but just happened to work for him. He added, “Honestly, the code is better and more legible without gperf.”
A couple weeks later, Masahiro noticed that Linus' patch had made it into the kernel's git tree (surprise!), and he tested it out. He reported that with CONFIG_MODVERSIONS enabled, he saw a lot of error messages.
Linus looked it over, but wasn't able to see the problem. He hadn't used Modversions when he'd tested his patch, but said he'd take a look and see if he could identify the problem.
In fact, after doing a git clean -dqfx, he noticed a ton of warnings that had slipped past his normal build test, but that clearly were visible from a pristine build that regenerated various versioning data.
Digging deeper, he was able to identify a one-line change in a generated file that should not have happened. Apparently, it occurred throughout the rest of the kernel build as well. He remarked:
What is special about that one particular function vs. the other ones in that file? I have absolutely no idea. So the really odd thing here is how things clearly still work. The parser works fine for everything else. And looking at the gprof-removal patch it's not at all obvious how everything could work fine except for some random thing. Strange.
But after a little more digging, he reported, “Found it. Stupid special case for 'typeof()' that used is_reserved_word() in ways I hadn't realized.”
He put a fix into the Git tree.
So apparently, the kernel build system now will depend on tools like Flex and Bison, and will regenerate its C files from those sources at build time, rather than storing the regenerated files in the source tree itself at development time.
It's hard to tell when Linus will dive into a particular problem and work it out himself. I suspect he just found this to be a curious diversion that happened to interest him at the time. In the case of Git development, he resisted working on it for years, allowing kernel development to depend on a non-free piece of software, tolerating many flame wars along the way, allowing many competing projects to vie for his attention, and ultimately choosing none of them. Although in that instance, when he finally did decide to write Git, he actually put the entire kernel project on hold for several weeks while he devoted himself entirely to the new project.
If you want to do science with Anaconda, one of the first things to consider is the spyder package, which is included in the basic Anaconda installation. Spyder is short for Scientific PYthon Development EnviRonment. Think of it as an IDE for scientific programming within Python.
You probably will want to have the latest version available, because it's under fairly constant development. You can be sure your entire Anaconda installation is up to date with the command:
conda update anaconda
There are two ways to launch spyder. If you're using the Anaconda Navigator, you simply can click the spyder icon.
Figure 1. You can start spyder directly from the Anaconda Navigator.
If you have a terminal window open, you can launch spyder simply typing spyder and pressing enter. You may get a pop up window saying that spyder is not the latest version. This is just because the version within Anaconda is a few revisions behind.
Once you have spyder started, you should see an open editor window on the left-hand side and a Python console window on the lower right-hand side.

Figure 2. Starting up spyder gives you an empty editor window to start your first project.
The upper right-hand side is used for a help browser, a variable explorer and a file explorer. Like most IDEs, you can change which panes are visible and their layout within the window.
You can begin working with spyder immediately in the console window. The new default in spyder is to provide an IPython console that you can use to interact with the Python engine directly. It works, essentially, the same way that it works on the command line. The big difference is that spyder can inspect the contents of the Python engine and can do things like display variables and their contents within the variable explorer.
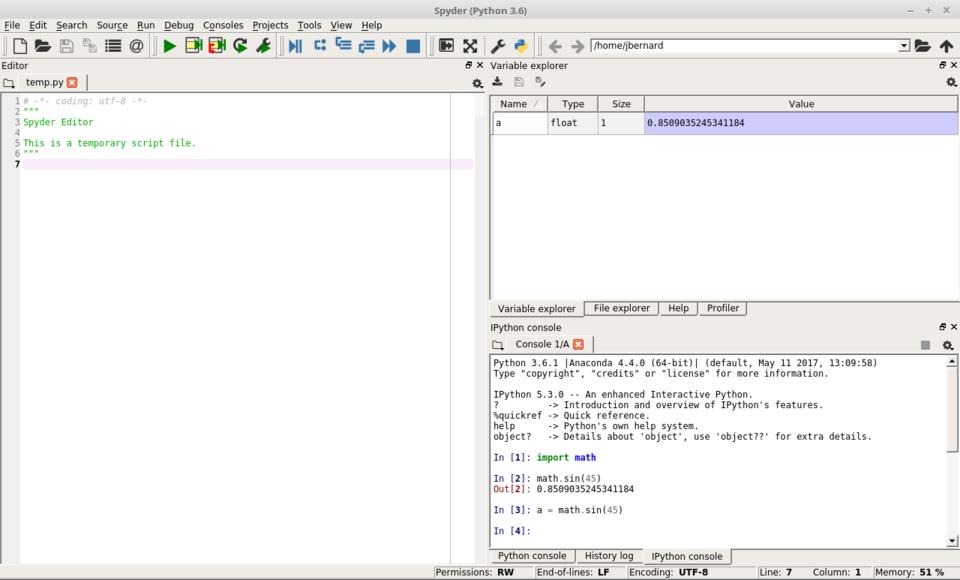
Figure 3. You can interact directly with the IPython console.
Although this is fine for smaller code snippets, you'll likely end up working on much larger chunks of code. In that case, you can use the editor to write functions and larger pieces. In order to execute this Python code, you can click the green arrow icon, click the menu item Run→Run or press the F5 key. Again, the results are available from within the variable explorer. If instead you click the blue arrow icon (or click on the menu item Debug→Debug), your code will be run within the IPython debugger, which lets you step through your code one line at a time.
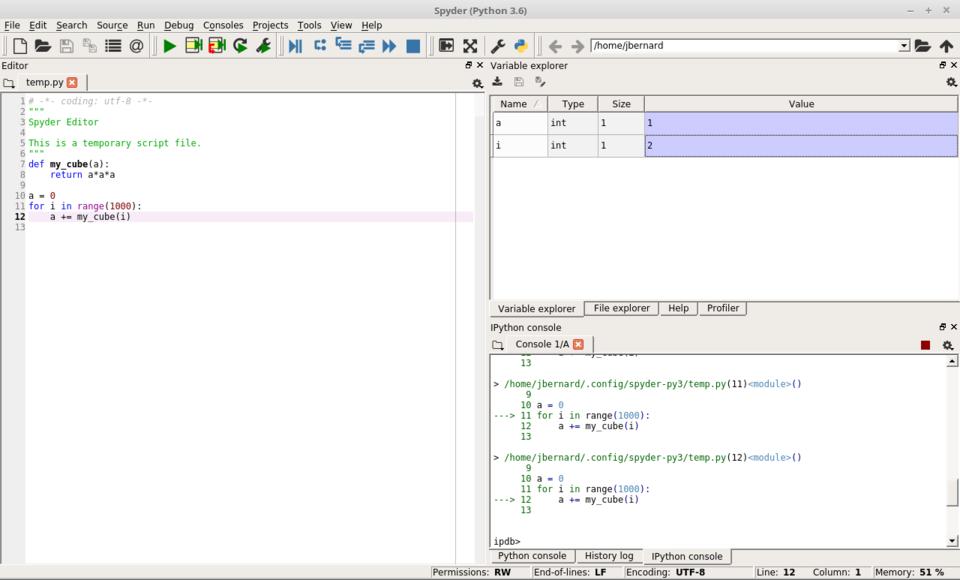
Figure 4. Spyder includes a front end, allowing you to interact with ipdb, the IPython debugger.
You can gain more control over the debugging by adding breakpoints to your code. To do so, double-click the left-hand gutter in the editor pane. You should see a dot added for each breakpoint you insert.
Several tools are available for working on code and algorithm quality. You'll probably want to start with a static code analysis. Run it by clicking the “Source→Run static code analysis” menu item or by pressing F8. This will run the analysis and will provide the results in a new pane that will pop up in the top right-hand pane.
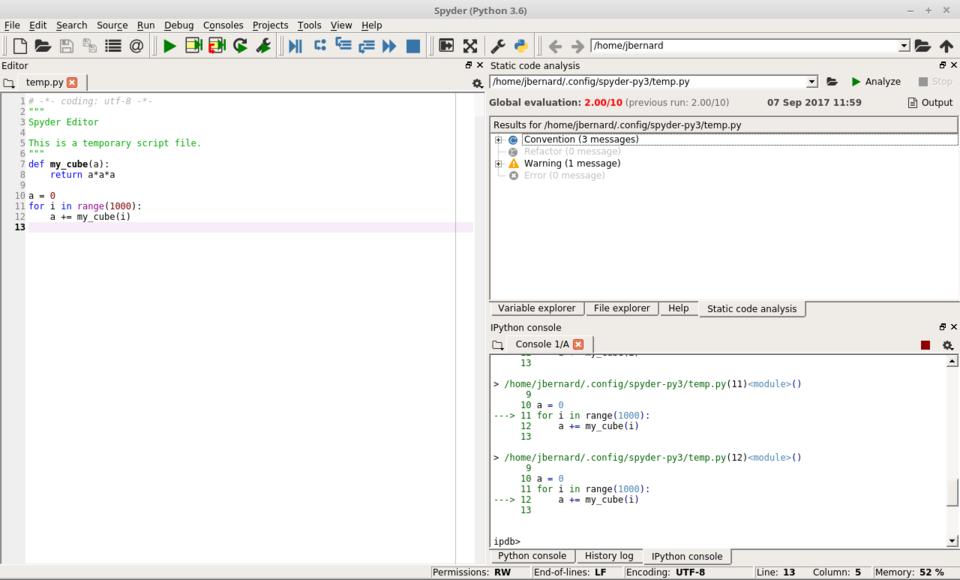
Figure 5. You can run a static code analysis to check for syntactic errors.
The results are categorized into convention breaks, refactoring suggestions, syntax warnings and actual errors in your code. This will catch the most obvious errors.
Once you have code that actually works, the next step is to check that code's performance. Spyder includes a front end that gives you access to the profiler included in the standard Python library. Start it by clicking the Run→Profile menu item or by pressing F10. Once it finishes, a new pane will appear in the same upper left-hand location.
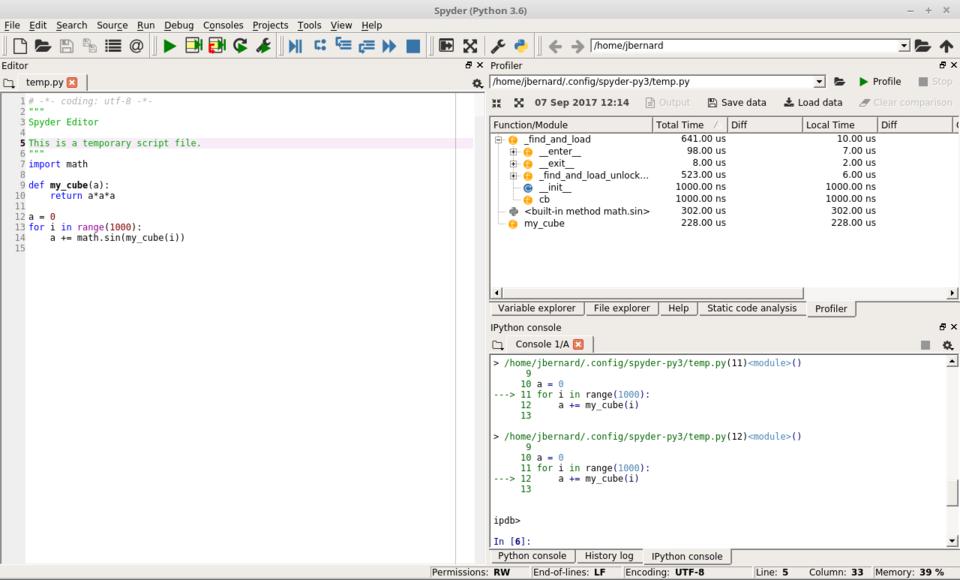
Figure 6. When you run the profiler, you'll get a display of how much time is being used in each function.
Unfortunately, the default profiler goes down only to the function level, and that may not be fine enough in detail. If that's the case, you can dive into one of the great features of spyder, its plugin architecture. Several plugins are already included within the Anaconda repository. Use the following command to install the line profiler plugin:
conda install -c spyder-ide spyder-line-profiler
Then you can add the function decorator @profile to any functions that you want to explore, and then start the line profiler by either clicking the “Run→Profile line by line” menu item or by pressing Shift-F10. You'll then get the results in a new output pane.
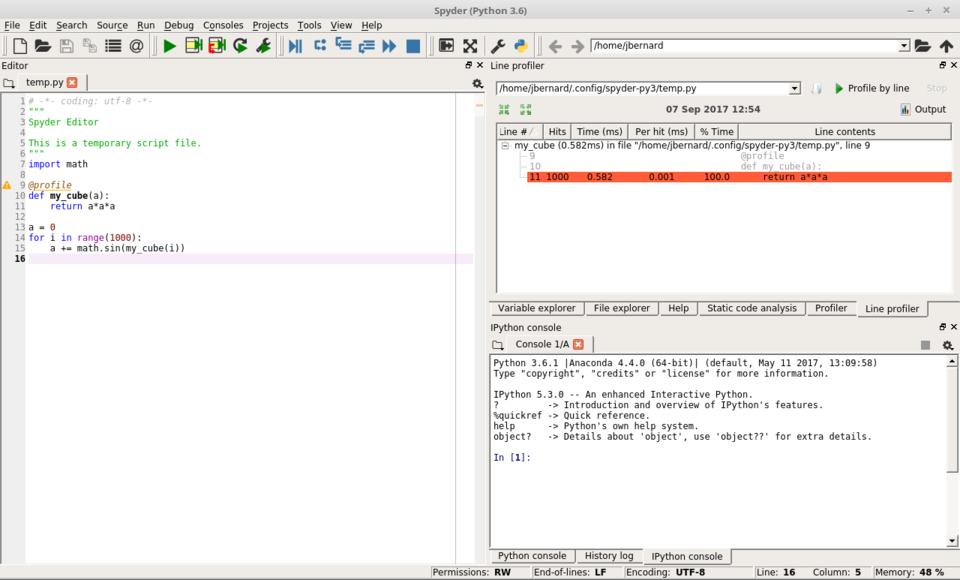
Figure 7. You can use the line profiler to see how efficient functions are in more detail.
You can look at how much time is spent on each line, both per hit and the total for the complete program run. This way, you can focus on the most costly parts of your code to get better performance.
Along with optimizing time, the other parameter you'll want to look at optimizing is memory usage. This is becoming much more important as more and more research is focusing on big data problems. In those cases, you'll want to use the following command to install the memory profiler plugin for spyder:
conda install -c spyder-ide spyder-memory-profiler
Once the plugin is installed, you can add the decorator @profile just as with the line profiler. Start the memory profiler by clicking “Run→Profile memory line by line” or by pressing Ctrl-Shift-F10. Another pane will appear in the top right-hand side where you can see how memory usage changes after each line of code. This will allow you to figure out which lines of code are being wasteful and where to focus your brain power for improving performance.
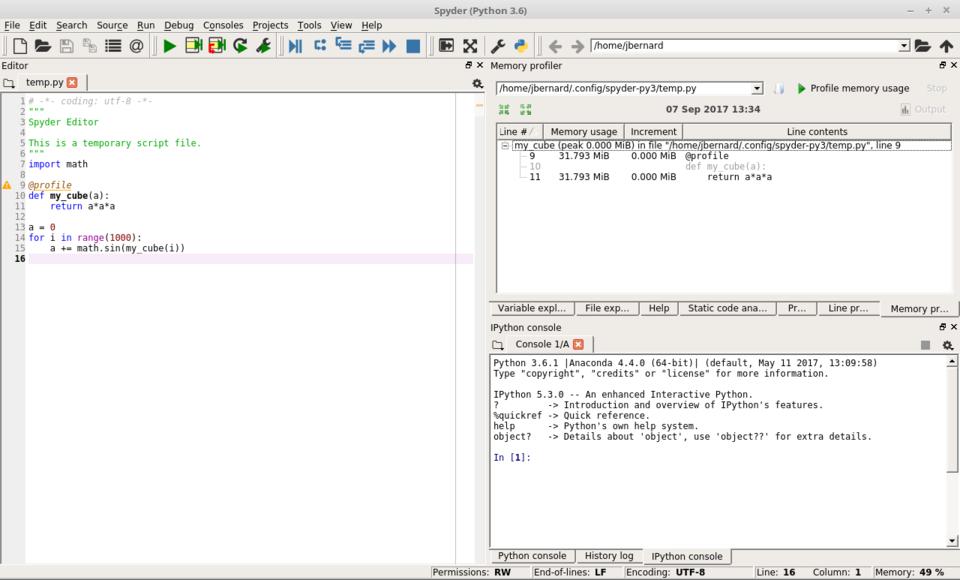
Figure 8. There is a memory profiler plugin for spyder that allows you to figure out how to optimize memory usage.
For scientific computing, the last item I want to look at is the ability to visualize data. Humans often can make intuitive leaps by being able to see how data looks. The default setting for spyder is that graphs are drawn inline within the IPython console.
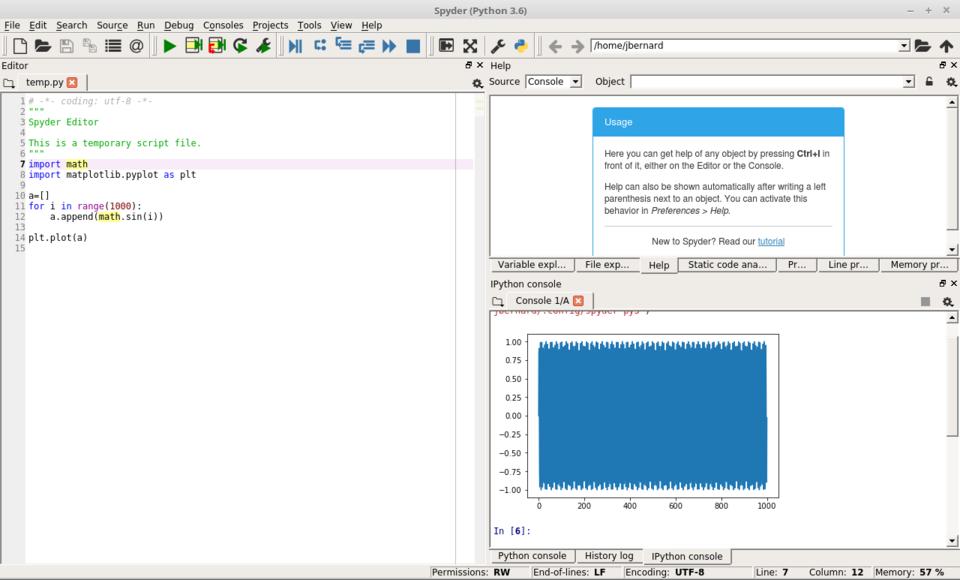
Figure 9. By default, spyder allows you to generate plots within the IPython console.
This is fine for a quick glance at the data, but it isn't the easiest to look at. If you click Tools→Preferences, you'll see a new window where you can change this behavior and have plots show up in a different window instead.
Figure 10. You can change the preferences on how plots are generated and displayed.
If you rerun the code, you'll now get the plot in a new window. This allows for the ability to play with the plot display and even save off the final image. If you change the settings around plotting in the preferences, you may need to restart the IPython engine to pick up the new preferences.
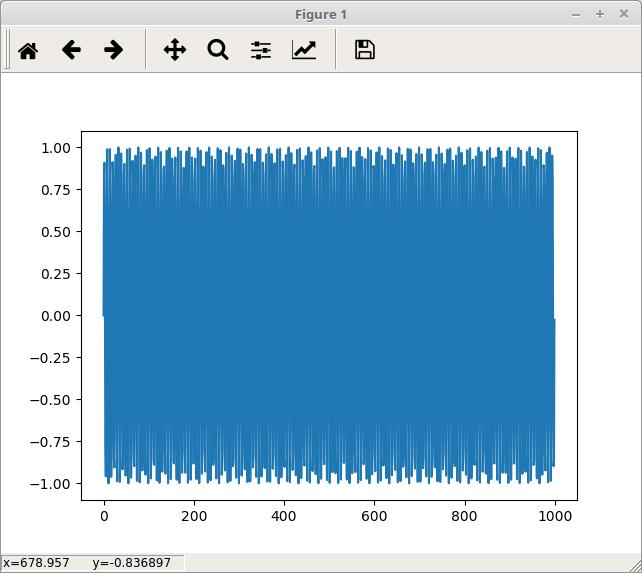
Figure 11. Generating plots in their own window allows for more interaction.
And, that should be enough to get started using spyder in your computational science problems. In my next article, I'll look at the version of Jupyter that is included with Anaconda and see how it can be used effectively. Both tools are good, but they fit within slightly different ecological niches.
I realized a while back that I've started setting my alarm an hour early so I can snooze over and over before waking up. Intellectually, I know that's silly, but there's just something fulfilling about hitting snooze and snuggling back into bed. But since I end up losing an hour of good sleep, I decided I needed a change. Change is hard, and so I opted for an app to help me. Meet Alarmy.
Alarmy is an Android app that calls itself “The World's Most Annoying Alarm Clock App”, and after using it, I think I agree. Like other apps designed to make you actually wake up before snoozing, Alarmy supports things like math problems that must be solved or violently shaking your phone in order to turn off the alarm. But Alarmy doesn't stop there. The most popular (and heinous) mode has you register a place in your home that must be visited and photographed in order to stop the alarm.

When you're fully awake, it's easy to figure out what sort of place makes the most sense to register. The Alarmy folks recommend the bathroom sink, but I personally recommend the coffee pot. If I trot out to the kitchen, and take a photo of the coffee pot, you can bet I'm also going to make a cup of coffee while I'm there. It's just too tempting. I'll probably visit the bathroom while my Keurig brews a cup, but by that point, I'm awake and craving coffee, so I'm unlikely to go back to bed.
Is it cruel? Yes. Does it work? Absolutely. Alarmy is free and offers ad-elimination for a small fee. Ads usually don't bother me in an app like this, but if I like an app, I usually pay for it anyway to support the developer—in this case, the sadistic, cruel developer! Check out Alarmy at the Google Play Store: https://play.google.com/store/apps/details?id=droom.sleepIfUCan.
We have a sense of humor here at Linux Journal, so thanks to Alarmy's annoyingly wonderful way of forcing users to wake up, it gets this month's Editors' Choice award (and also a bit of loathing, but we don't have an award for that).
You'll probably get tired of hearing about my farm, but it has been a great opportunity for me technology-wise to learn about new products. I've never had property with acreage, and so the idea of remote outbuildings is new. If you look at Figure 1, you'll see my farmhouse is about 200 feet away from the barn. We don't raise animals, but we're remodeling the barn into a tech-friendly location for music, parties, worship and movie nights. That requires bandwidth, if nothing else, so Spotify can be streamed for entertainment. The metal roof extends down the sides of the building and makes it impossible to get a Wi-Fi signal from inside the barn. So I tried to find an affordable wireless bridge that was reliable and wouldn't saturate the 2.4GHz spectrum on my farm. Thankfully, the EnGenius ENH500 outdoor wireless bridge (available in pairs on Amazon) did the trick.
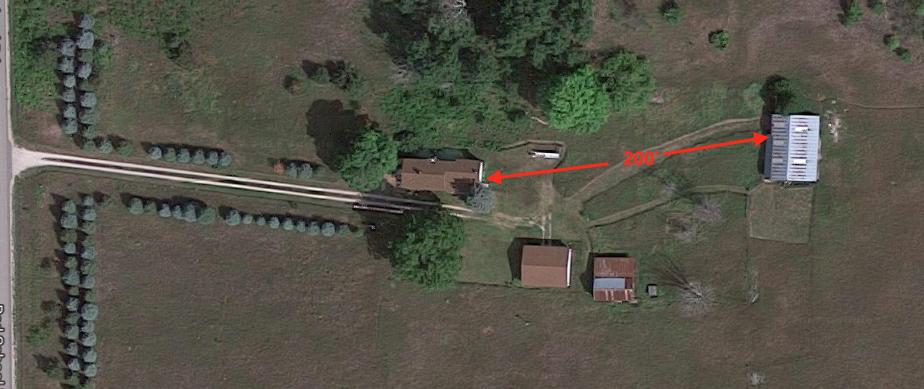
Figure 1. The Farm

Figure 2. The EnGenius ENH500 Outdoor Wireless Bridge
The ENH500 is 5GHz-only, and once configured, it acts like a physical wire connecting the two ends. The devices obviously don't show up in my UniFi WiFi management software, but they also don't interfere with communication to the remote APs in the barn. I set them up in WPS bridge mode, which involves entering the MAC addresses of each device into the other, and pointed them in the general direction of each other. The connection is rock-solid, throughput is amazing, and since they're using the uncluttered 5GHz frequency range, there aren't any issues with my other devices. I do wish the “signal strength” meter worked in WPS Bridge mode, but for some reason, the layer-2 bridge doesn't allow the fancy strength lights to work. You have to check the dB strength via the web interface to make sure you have a solid connection.
Honestly, once they're set up, the EnGenius bridge devices just work. I don't notice any difference from having a wired connection, and it was much easier (and cheaper!) than running a fiber-optic cable out to the barn. If you have an outbuilding or need to extend network coverage across an area that would be challenging to hard-wire, the EnGenius bridges work as advertised!
You may have noticed that I've mentioned in my last few articles that my family recently bought a farm. It's beautiful. There are rolling hills, scenic landscapes and this time of year, the autumn leaves are stunning. When we considered buying the place, my first concern was the availability of broadband internet. Yes, I eventually checked out the house's foundation and such, but really, if I couldn't get broadband, it was a showstopper. Thankfully, the farmhouse is serviced by CenturyLink DSL. And so, we bought the farm. Unfortunately, I didn't realize DSL speeds in rural areas could be as slow as 2.5mbps down and less than 0.5mbps up. Not only is it impossible to stream HD video, it's almost impossible to browse the internet at all!
So for the past few months, I've been doing everything I can to cache videos, proxy web traffic and delay network maintenance until the wee hours of the night to preserve what precious throughput is available. Then I stumbled across https://unlimitedlteadvanced.com. The URL sounds like a phishing site. The site looks like a pre-baked phishing site. And the product offering seems too good to be true, and it comes with a hefty up-front fee. There is little in the way of reviews online, but I still pursued the idea for a couple reasons:
Did I mention the DSL speeds?
Unlimited LTE Advanced resells T-Mobile cellular data. Historically, T-Mobile has had zero coverage in my area. Oddly enough, however, there's a tiny little tower about a mile from my farm that T-Mobile leases space on. In fact, I literally can see the tower from my farmhouse kitchen window. And although T-Mobile does QOS management on crowded towers, the odds of my little tower being crowded is slim to none.
I decided to try it. For the Sim-only plan with a Netgear LB-1120 cellular modem (awesome product, by the way) so I could use my own router, it was close to $300 to start up. There is a 14-day trial window (shipping time counts against the 14 days!) that allows you to cancel, but you're out the activation fee, which is the majority of the initial cost. And unless you have T-Mobile, there's no way to know what your bandwidth actually might look like until you get the hardware.
In the end, I got the equipment and sim card in two different shipments. They came from two different companies, neither named “Unlimited LTE Advanced”. But when I plugged everything in, I got five bars of service, and my bandwidth is around 18mbps up and 7mbps down. The service is $76 a month, which might seem expensive, but crappy DSL was $50 a month. And so far, I haven't noticed any issues with data caps or throttling, even when streaming 1080p HD video. If you need broadband service, and you are in a T-Mobile LTE coverage area, I can actually recommend Unlimited LTe Advanced for internet service. But boy does it seem sketchy during the sign-up period!
You must lose a fly to catch a trout.
—George Herbert
I am looking for a lot of men who have an infinite capacity to not know what can't be done.
—Henry Ford
Success isn't permanent, and failure isn't fatal.
—Mike Ditka
The only people who can change the world are people who want to. And not everybody does.
—Huge Macleod
There are some things you learn best in calm, and some in storm.
—Willa Cather
It's no secret that I love Ubiquiti hardware. Its Wi-Fi access points are amazing, and its management software installs perfectly on my Linux servers completely free. Since we recently purchased a farm that we visit only on the weekends, I decided to give the Ubiquiti security camera system a try. I'm happy to say, it works just as well as the Wi-Fi and networking systems. In fact, it has a web-based management system that installs on my Linux servers as well. It's completely free, and it has all the major features you'd expect from an NVR.
There are a few oddities with the Ubiquiti UniFi Video system, but all are tolerable. First, Ubiquiti wants you to purchase its NVR hardware to manage the cameras. It's a small, energy-efficient computer that works perfectly fine. But it's just that, a computer running Linux. If you dig a bit on the website, you can find the software and install it on your own computer! It's the exact same hardware, and it even gives you free access to Ubiquiti's “cloud access”, which allows the software to log in to the cloud server and gives you remote access via the web (video.ubnt.com) or mobile apps without the need to forward any ports into your network.

The cameras are incredibly high-quality, and they provide 1080p video with sound. The dome camera is POE+, but the soda-can style camera is sadly 24v passive POE only. If you buy them singly, they come with power injectors, but if you buy a five-pack of the cameras, know that they don't come with any POE injectors, regardless of the camera style you get. If you use UniFi switches that support 24v passive POE, it's no problem, but otherwise, you need to figure a way to power the cameras.
The UniFi software (again, free, but not open source) allows you to record motion and be notified if any motion has been recorded. You can access the recording or the live feed remotely (as in the picture here). You can set the software to delete old footage after a certain time frame or tell it to start erasing old video once a certain amount of free space has been reached on the computer. It supports a large number of cameras, and so far, I've been extremely impressed by the quality of the hardware and software. Not surprising, but still, it's great to see Ubiquiti carrying its product quality into the video-surveillance world as well.
