
rdiff-backup combines the best features of a mirror and incremental backups.
rdiff-backup is a Python-based backup program that uses the sync algorithm. It is similar to sync in that it syncs a source directory to a mirror directory. It differs in its use of reverse diffs to maintain file versions trailing back from the current version. The program is available at rdiff-backup.nongnu.org. The current stable version at the time of this writing is 1.2.8. Source code and binary versions are available. The program is available for POSIX systems and for Windows, and it will sync across platforms. In addition to describing rdiff-backup in this article, I also demonstrate rdiffWeb, a Web-based interface for restoring files from an rdiff-backup directory.
rdiff-backup uses librsync (librsync.sourceforge.net) as its rsync provider. For more detail, see librsync.sourcefrog.net/doc/librsync.html and, in particular, librsync.sourcefrog.net/doc/rdiff.html, which explains how the sync and diff process works. To paraphrase the information from the above site, librsync allows two files to be compared and a diff generated without access to both copies of the files at the same time. Instead, the signature of the old file is compared to the new file. The signature contains checksums calculated over blocks in the old file. The signature checksums are used to find blocks that match in the new file and then calculate diffs.
The plus is that when comparing files across a network, it's possible to generate a diff simply by sending the signature across the wire. The minus is that the checksums are block-oriented, so small changes that affect multiple blocks will result in larger diffs than other diff methods. The preceding works at the byte level and has no concept of higher-level concepts, such as filename, permissions and so on. This is where rdiff-backup comes in. It provides the mechanism to take the byte stream and wrap it with the necessary metadata.
Basic operation of rdiff-backup is as follows. The backup is done from a source directory to a destination directory. The destination contains a mirror of the most recent versions of the file. In addition, rdiff-backup creates a subdirectory named rdiff-backup-data in the destination directory. It is in this subdirectory that rdiff-backup keeps the information necessary to do backup versioning. At the top level are files that contain the metadata for the files in the backups as well as information about the status of the backups.
For those who are interested, the mirror-metadata* files contain the specific file information, such as user, group, permissions and so on. Also included is the subdirectory named increments. It is here that the reverse diffs from the current version of a file are kept. The diffs themselves are gzipped to save space.
The directory structure in the increments subdirectory matches that of the mirror directory. So if the mirror has Documents/Personal/, increments will have Documents/Personal/ also. Besides the diffs, the directories contain files that are placeholders and or metadata. For instance, there will be zero-length timestamped *.dir files that indicate when a backup was done. There also are *.missing files that are created retroactively to mark the backup prior to which a file appeared. For example, if a backup was done on a Monday and directory A had file_1, and then a backup was done on Tuesday and directory A had files file_1 and file_2, a file_2_<timestamp>.missing file would be created. The timestamp would be the time of the backup on Monday. To get a feel for how things work, I suggest monitoring the rdiff-backup-data directory and subdirectories for a while. Once you do, it will become more apparent how the process works.
Now let's get to the fun part, creating a backup. To back up from a local directory to a local directory, use the command:
rdiff-backup software_projects /var/backups/test_backup
In this case, test_backup will have a subdirectory software_projects with the above-mentioned rdiff-backup-data subdirectory in it (Figure 1).

Figure 1. Directory Listing of Full Backup
In order to have some failure redundancy, a more useful case would be to back up to another machine. In this situation, rdiff-backup uses SSH to make the connection between machines. This means you need to have SSH set up for the machines concerned. The preferred method is to set up public key authentication so passwords are not required. It's also necessary to have rdiff-backup installed on the remote machine. In this case, the command is:
rdiff-backup software_projects \
                 user@host.example.com::/var/backups/test_backup
Note that it's possible to customize how rdiff-backup makes its remote connections by using the --remote-schema switch. The default connection string is 'ssh -C %s rdiff-backup --server', where %s is the host information. This uses the default port(22) for SSH. If you have SSH set up to listen on a different port, do the following:
--remote-schema 'ssh -p xxxxx -C \%s rdiff-backup --server'
Both cases shown here are simplistic and would do a complete backup of only /software_projects and all its subdirectories to the appropriate directory in /var/backups. It is possible to fine-tune rdiff-backup's behavior in a number of ways. What I show here is only a sample of what is possible. Spend some time at rdiff-backup.nongnu.org/rdiff-backup.1.html for the complete picture. This is just an HTML conversion of the man page, so you can find the same information on your machine via man, assuming you have rdiff-backup installed. In particular, look at the FILE SELECTION section. In fact, go through that section multiple times. There is a lot of power there, but it is somewhat confusing the first couple times through.
Let's start by excluding some files that we don't really want to back up:
rdiff-backup --exclude '**track_stocks' \
                software_projects \
                    /var/backups/test_backup
In this example, we are excluding the entire track_stocks directory (see Figure 2 and compare it with Figure 1). The '**track_stocks' matches (and, therefore, excludes) any pathnames that end in track_stocks (see below for more details).
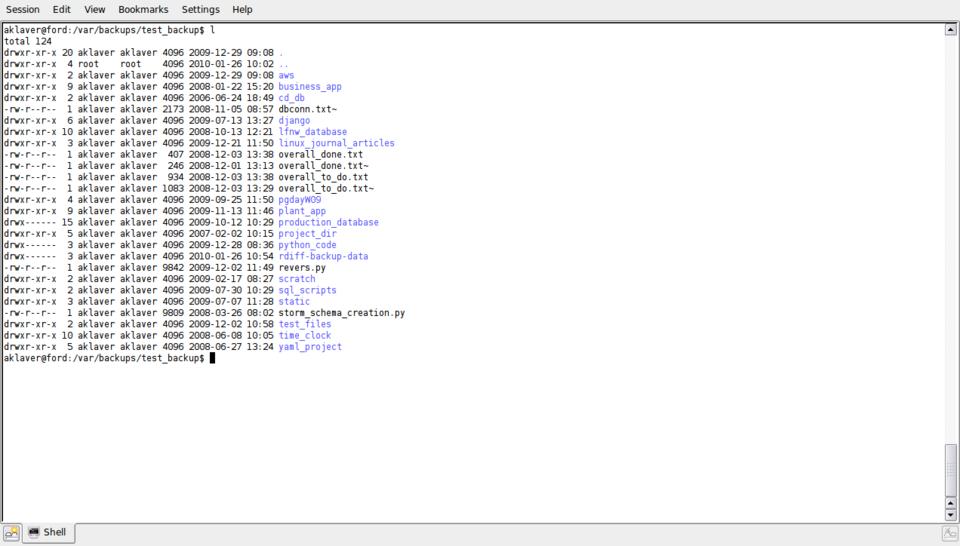
Figure 2. Directory Listing Showing the Effect of Excluding track_stocks Directory
Now, let's go the other way and specifically include something, excluding everything else:
rdiff-backup --include '**linux_journal_articles' \
             --exclude '**' \
                software_projects \
                    /var/backups/test_backup
The important thing to remember here is that the order of your --include and --exclude options is important. In the example above, the inclusion of /linux_journals_articles takes precedence over the exclusion of everything ('**'). Figure 3 shows the result. I could go on with all possible combinations, but the above covers the basics. Work with some test files first to get a handle on the interactions between --include and --exclude. Also, note that each include or exclude pattern needs to be in a separate switch.
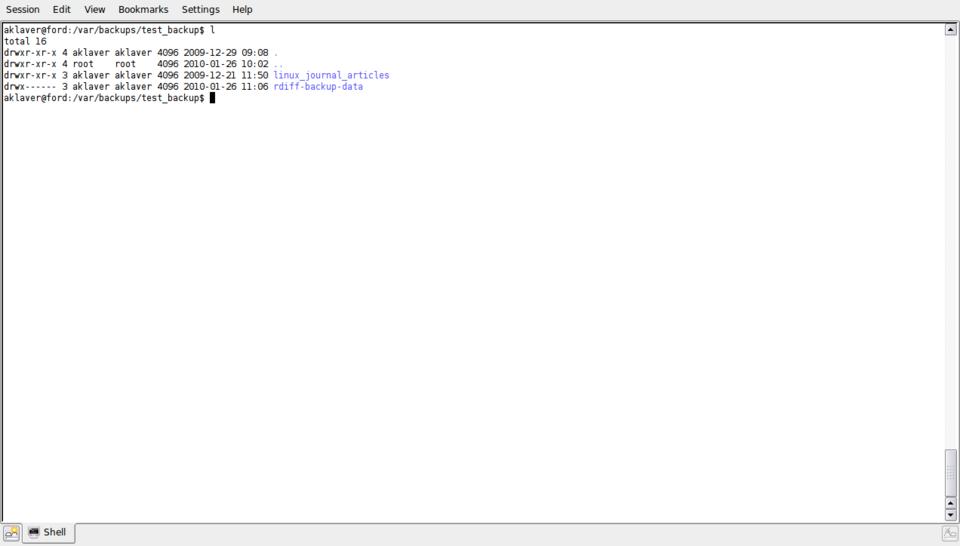
Figure 3. Directory listing for backup where only the linux_journal_articles directory is included.
Let me explain a bit more how the include and exclude pattern-matching works. As previously mentioned, order determines precedence, so patterns specified earlier override those specified later. The include/exclude switches work with extended shell globbing patterns. In “standard” shell globbing, the * matches any character except /. Extended globbing adds the ** pattern, which matches any character including /. In addition, patterns can be prefixed with ignorecase: to match regardless of uppercase/lowercase. For more details, see the above link. As to how the pattern-matching works, I couldn't come up with a better description than the one found in the documentation:
The --exclude pattern option matches a file if: 1) pattern can be expanded into the file's filename, or 2) the file is inside a directory matched by the option.
Conversely, --include pattern matches a file if: 1) pattern can be expanded into the file's filename, 2) the file is inside a directory matched by the option, or 3) the file is a directory which contains a file matched by the option.
The practical outcome of this is that if you include a file, the directories that form its path also will be included, whereas excluding a file excludes only it and not the directories above it.
For simple cases, the command-line includes and excludes shown previously work well. However, they get unwieldy as the number of include and exclude parameters grow. Fortunately, there is a another way of specifying the parameters, namely file lists. There are three variations: filelist, filelist-stdin and globbing-filelist. The three forms each take an include or exclude prefix—for example, --include-filelist. This is somewhat misleading though, because it is possible to specify include and exclude parameters within a file by using + and -, respectively, which override the prefix. For consistency's sake, I will work with the globbing-filelist, as it follows the same rules as the --include and --exclude options on the command line. The other forms do not follow the globbing expansion and include pattern-matching behavior. So, to replicate the last command above using a file list, do:
rdiff-backup --include-globbing-filelist rdiff_globbing.txt \
                software_projects \
                    /var/backups/test_backup
The contents of rdiff_globbing.txt are:
+ **linux_journal_articles
- **
The result is the same as shown in Figure 3.
Creating backups is good, but they are of little use if you can't restore files from them. A restore, at its simplest, is just a backup reversed. In other words, the order of directories on the command line is reversed—the mirror first, the directory to restore to second. There is one important caveat: rdiff-backup, by default, will not restore over an existing file/path. Think of it as sort of a foot/gun safety. You have two options, restore to another path or use the --force switch to override the default behavior.
rdiff-backup gives you two basic methods for restoring a specific version of a file: time-based and number-based.
Time-based restorations are based on the time of the increments. Assuming you have a cron job that does a backup every night at the same time, you would have increments stretching back in time that are timestamped. To see what increments you have, do:
rdiff-backup --list-increments \
                user@host.example.com::/var/backups/lj_article
You also can use -l rather than --list-increments. The target here is the backup directory. The following is the actual output (using a different target) from an EC2 instance that I ran a cron job against to seed with changes for this article:
increments.2010-01-16T02:15:05Z.dir   Fri Jan 15 18:15:05 2010
increments.2010-01-17T02:15:06Z.dir   Sat Jan 16 18:15:06 2010
increments.2010-01-18T02:15:05Z.dir   Sun Jan 17 18:15:05 2010
increments.2010-01-19T02:15:06Z.dir   Mon Jan 18 18:15:06 2010
increments.2010-01-20T02:15:06Z.dir   Tue Jan 19 18:15:06 2010
increments.2010-01-21T02:15:05Z.dir   Wed Jan 20 18:15:05 2010
increments.2010-01-22T02:15:05Z.dir   Thu Jan 21 18:15:05 2010
increments.2010-01-23T02:15:05Z.dir   Fri Jan 22 18:15:05 2010
increments.2010-01-24T02:15:06Z.dir   Sat Jan 23 18:15:06 2010
increments.2010-01-25T02:15:06Z.dir   Sun Jan 24 18:15:06 2010
With this information in hand, I then can do the following to restore an increment from a particular time:
file=/var/backups/lj_article/software_projects
file="$file/linux_journal_articles/rdiff_backup/lj_rdiff_article.txt"

rdiff-backup --restore-as-of 2010-01-20T02:15:06Z \
                 user@ec2.example.com::$file \
                     test/lj_rdiff_article.txt
You also can use -r rather than --restore-as-of.
I then would have a version of this article as it was when it was backed up at that particular time. There is a more user-friendly variation of this that uses a different view of time. In that method, you specify time as an interval, using the following syntax integer[modifier], where the modifiers are s, m, h, D, W, M and Y, and the time periods they represent are seconds, minutes, hours, days, weeks, months and years, respectively. An example would be -r 2D12h, which translates as “restore the file as it was 2 days and 12 hours ago”. The question then is, what happens if there is no increment that falls exactly on that time? The answer is, rdiff-backup uses the increment closest to that time that is not later than the specified time. So, for this example, if there were an increment 2 days and 18 hours ago and one 2 days and 11 hours ago, it would use the one from 2 days and 18 hours ago.
The second way to specify a restoration, a number-based restore, is based on the concept of session numbers, where the syntax is integer[B], and 0B is the current mirror version. So to restore from the second-most-recent backup, you would do -r 2B.
Although the restore options are powerful, they do require command-line knowledge and a certain amount of familiarity with rdiff-backup. To ease the end-user experience, let's look at rdiffWeb, a Web-based interface for restoring files backed up using rdiff-backup.
But first, here's a couple quick general usage tips. Each backup session is done in a transaction. This means if the session is interrupted, the next time you do a backup, the previous incomplete backup will be removed. If you want to check for this condition, do:
rdiff-backup --check-destination-dir /var/backups/test_backup
If there is an incomplete backup in the directory, it will be rolled back. The transactional nature of a session means that there can be problems if you are backing up remotely over an unstable connection. This especially comes into play when doing an initial backup of a large dataset. One solution to avoid this potential problem is to do a local rdiff-backup backup, and then use rsync to sync the local rdiff mirror to a remote site. rsync allows for interrupted sessions and can be rerun to complete the transfer. Once the remote mirror is complete, change the rdiff-backup mirror directory from the local to the remote. From that point on, you will be transferring only the changes.
Second, each time you do a backup, it creates an increment, and over time, these can build up. To see the space being used by your backup directory, do this:
rdiff-backup --list-increment-sizes \
                user@ec2.example.com::/var/backups/lj_article


        Time                   Size    Cumulative size
----------------------------------------------------------------------
Tue Jan 26 18:15:05 2010     5.98 MB       5.98 MB   (current mirror)
Mon Jan 25 18:15:07 2010     1.14 KB       5.98 MB
Sun Jan 24 18:15:06 2010     1.54 KB       5.99 MB
Sat Jan 23 18:15:06 2010     0 bytes       5.99 MB
Fri Jan 22 18:15:05 2010     0 bytes       5.99 MB
Thu Jan 21 18:15:05 2010     0 bytes       5.99 MB
Wed Jan 20 18:15:05 2010     0 bytes       5.99 MB
Tue Jan 19 18:15:06 2010     25.8 KB       6.01 MB
Mon Jan 18 18:15:06 2010     1.22 KB       6.01 MB
Sun Jan 17 18:15:05 2010     32.7 KB       6.04 MB
Sat Jan 16 18:15:06 2010     0 bytes       6.04 MB
Fri Jan 15 18:15:05 2010     0 bytes       6.04 MB
Thu Jan 14 18:15:05 2010     0 bytes       6.04 MB
Wed Jan 13 18:15:05 2010     0 bytes       6.04 MB
Tue Jan 12 18:15:05 2010     0 bytes       6.04 MB
Mon Jan 11 18:15:06 2010     0 bytes       6.04 MB
Sun Jan 10 18:15:06 2010     0 bytes       6.04 MB
Sat Jan  9 18:15:07 2010     0 bytes       6.04 MB
Fri Jan  8 18:15:08 2010     0 bytes       6.04 MB
Thu Jan  7 18:15:06 2010     0 bytes       6.04 MB
Wed Jan  6 18:15:06 2010     31.5 KB       6.07 MB
Wed Jan  6 07:05:52 2010   194 bytes       6.07 MB
This is a good way of seeing where the storage is being used and the total for your backup directory. Unless you have unlimited backup disk space, at some point, you will want to start pruning your backup directory. To prune increments, use --remove-older-than 'time', where time is specified the same as is used when restoring. For my own personal data, I have a cron job that runs each night with:
rdiff-backup --remove-older-than 7D 'destination_dir'
This keeps a rolling seven-day version history of my backups.
Now as promised: rdiffWeb, available at www.rdiffweb.org. rdiffWeb, like rdiff-backup, is written in Python. It uses CherryPy to serve up its pages. I am using the 0.6.3 version, which is the testing release at the time of this writing. The primary reason for this is that 0.6.3 uses SQLite as its datastore instead of MySQL, as the stable version 0.5.1 does. SQLite comes bundled with Python 2.5+, so it is one less thing to set up. Be sure to follow the Installation link on the page listed above. The installation is fairly straightforward, but there are some manual changes you need to do for the program to function properly. Note that it's possible to set up rdiffWeb for https, which is how it is used for this article.
When you first access rdiffWeb, you will be prompted to set up an administrator account. Once that is done, you then can set up users and work with User Preferences (Figure 4). Of note is the Directory Restore Format option. This comes into play if you are going to restore an entire directory. rdiffWeb either will create a zip file or gzipped tarball, depending on the setting, which is good for dealing with Windows or UNIX users. Also worth noting is the Update Backup Locations button. This is a way of forcing rdiffWeb to find any new backup directories you have added. It will find them on its own, but generally not immediately.
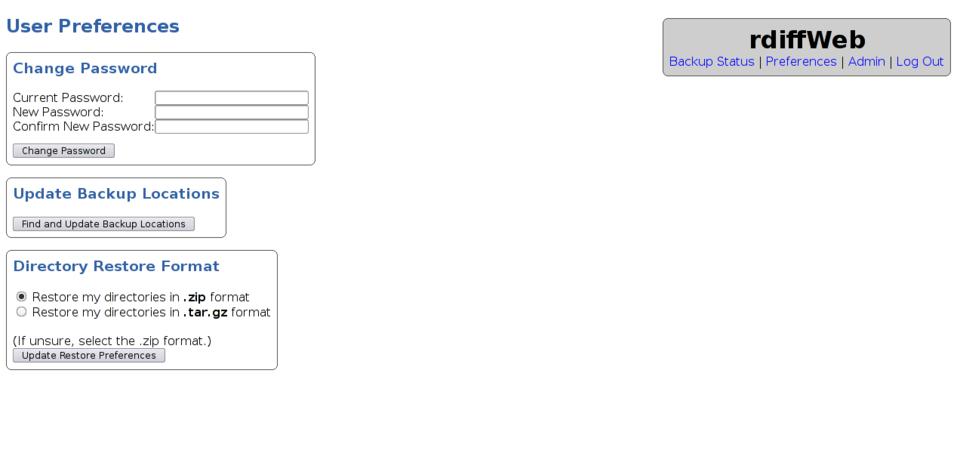
Figure 4. User Preferences Page in rdiffWeb Setup
The point is to find files. When you log in, a page will be presented with the backup directories for which you have permissions. You then can traverse the directory tree to get to the file or directory you want. Figure 5 shows four versions of this article available. Clicking on a timestamp opens the browser download dialog allowing you to download the file to your choice of location. If you want to download a directory, click on the Restore Folder link. You then will be taken to a page that lists the various available timestamped versions. Select the appropriate version, and the directory and its contents will be bundled up according to the Directory Restore Format specified on your User Preferences page.
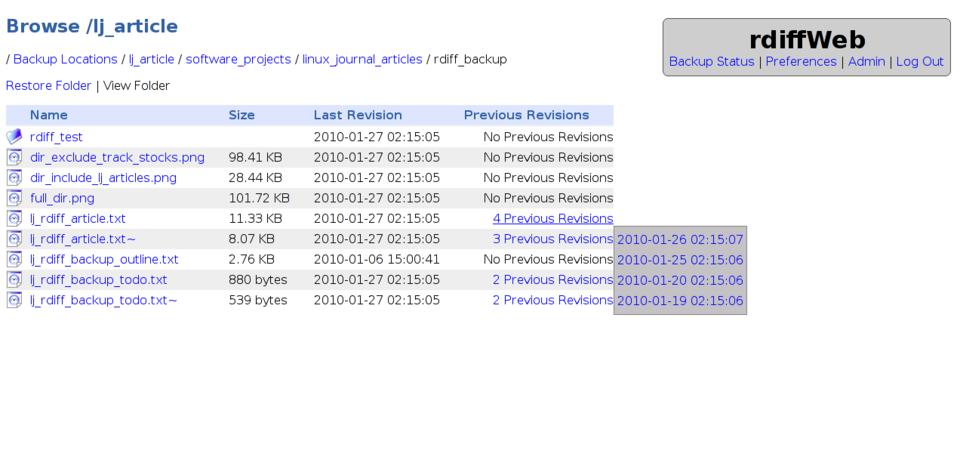
Figure 5. Selecting a File Version in rdiffWeb
rdiff-backup is a useful tool to use when you want to have versioning of backups without keeping around full copies of the versions. It is relatively easy to set up. The command-line nature of the program is both a plus and a minus. The plus is that it lends itself to scripting. The minus is that not all users are command-line-savvy, hence the section on rdiffWeb. My method of running it is to have cron jobs that do the backups and then use rdiffWeb for restoring.
Finally, here are some general observations on the incremental nature of the backups. The amount of space saving is dependent on usage. rdiff-backup saves all information, so if you do a lot of deletes, the backup directory will fill up with the deleted files unless you prune regularly. As described earlier, the block nature of the file comparison is not efficient for small changes across multiple blocks. I bring this up as a prompt to have you monitor the disk space for your destination directory for a period of time until you have a sense of how your usage pattern affects it. On the whole though, I have found rdiff-backup provides a good compromise between backup size and backup versatility.
