
A little care and some excellent FLOSS software can yield some ear-popping audio goodness.
Podcasting and satellite radio have brought back the age of audio fiction. The Golden Age of radio may have run through the 1930s and 1940s, but with the advent of Audible.com, Podiobooks.com and the hundreds of streaming stations, the true Golden Age of audio fiction is now.
Everywhere you look, people are producing their audio fiction with...Garageband? If Macs are the price of entry, count me out. Excellent though Apple is on a number of points, I've never been able to reconcile myself to paying a premium for the privilege of being a member of a totalitarian-minded gadget-nut club.
But audio fiction has been a dear love of mine since childhood, and at the urging of Scott Sigler, I joined the rising wave four years ago. I've done fairly well for myself, producing my way, on Linux. What follows is a quick-and-dirty guide to making a radio drama that sounds amazing, rather than just adequate, using only FOSS tools.
I'm gonna rocket through these really quick, because they're not software-intensive, but they are important—desperately important. Without good quality audio to start with, you might as well go home and forget the whole thing.
The goal is to get good performances, with good technical quality, in a semi-dead room. Good performances come from a good director and good actors working together, either through a well-annotated script in a remote studio, or through recording with the director and actor in the same studio—work styles vary, as may your mileage. If you're starting this from scratch, experiment to find out what works best for you and your actors.
A semi-dead room is important as well. A number of the qualities of the human voice only manifest in space—a close mic in a completely dead room can rob some voices of their richness, while micing a few inches away in a room with a few diffuse reflective surfaces will help bring out the texture and timbre in your actor's voice as the sound waves play phase games in the space. Put some time into tuning your room and doing experiments, and you'll be well rewarded. Also, a good pop screen (about $30) and a copy of The Yamaha Sound Reinforcement Handbook will save you hours of grief on the far end.
Good technical quality comes through good equipment, clean power and quiet. Ultimately, you want a signal that's free of ground loop buzz with an ambient noise floor of below –60db. Don't try cheating by reducing your recording gain—this won't help you. When you amp it back up in post, you'll just hear all the noise again and some extra besides. Instead, aim for a mean signal ratio of more than –20db for a normal speaking voice, peaking up to 0 for shouting or loud talking, and dipping down to –40db (at the lowest) for whispers or low voices. Check your work with the spectrum analyzer, and double-check it by listening with a good pair of headphones.
Getting your power cleaned might require a power conditioner (a $60 Fuhrman will do fine) or a battery-operated recorder like the Zoom H4, and minimizing cable runs to reduce the chance of radio interference. Getting your room quiet enough may require installing foam pads in the windows and removing all computers from the room. A good handbook on setting up a home recording studio wouldn't go amiss.
And, of course, when recording voice, always record at as high a sample rate as possible. For best results, if you're recording on Linux, record in either Audacity or Ardour. (Watch those xruns; they will cause skips, so make sure you have JACK well set up for your equipment if you're using Ardour.) Also, make sure you're working with Planet CCRMA, 64Studio, UbuntuStudio or another “Studio” distribution—you'll need that real-time kernel with all its special patches if you want this to work like a dream, rather than a nightmare.
Most of the cleanup you'll need to do actually will come in the next step, and you can do that easily with in-line effects in Ardour—but I'll get to that in a moment. First, let's assume that, despite your best engineering-fu, you haven't quite been able to get a clean enough signal. You've got white noise at –50db—no buzz, just some annoying spread-spectrum hiss—so how do you deal with it?
This is the kind of thing the noise removal tool in Audacity was born for—and the one thing it's really good at. Here's how to make the most of it.
Select a short clip of room tone (where your actor isn't talking, and there's no noise other than that which you wish to reduce), bring up the noise removal tool, and click “sample”. Then, select the entire area you want to quash (typically the whole raw dialogue track) and open the noise remover again. This time, with your frequency blend set at 130 and your reduction set at –8db (over the years, I've found these settings give the best trade-off of noise reduction/quality preservation for spoken word material), then click OK.
Once you've run this—and, if you've got really bad audio, run it a second time with a new noise sample—export your audio as a .wav file. Do not overwrite your original .wav file—if anything's gone wrong that you haven't caught yet, you want to be able to go back to the unaltered file.
When you're done with your cleanup, bring up Ardour and build your project. For the purposes of this article, I'm going to assume you have one room in which the characters are conversing, that there will be sound FX and some music as well.
Your track layout, then, will look like this: two mono tracks for dialogue, two stereo tracks for sound FX and one stereo track for music. You're also going to need one stereo bus for the reverb rooms—all of which I'll get to in the next section. For now, lay out your tracks, pull in your audio and lay it down.
Now comes the edit—arguably the most arduous part of the process. Select your performance keepers, trim them and lay them in. Adjust their timing, and time them with your audio effects. Ardour's non-destructive slide-edit and automatable faders make this process much quicker and easier than it is in other programs—trust me on this one. In my misspent youth, I edited three full-length films and several short films and corporate videos in destructive editors like Audacity, and that's a kind of hell I wouldn't wish on my worst enemy.
In dramatic terms, the edit is where your emotion is created, sustained and communicated. Get the edit close to correct, then give your ears a break before moving on to the next step—you're going to need yourself in top form to make the magic happen.
My 18-hour full-cast audiobook Down From Ten took place entirely in a single house. Since the house and the house's geography are key to the drama, it was essential to make the environment a character, with every room as distinct and sonically interesting as the characters who were performing in it. That sense of place is one of the things mentioned frequently in reviews by listeners—“immersive”, they call it.
But I'm not alone in doing this. Dirk Maggs of Above The Title Productions made his name pioneering this sort of deep audio texturing for BBC radio, and it's the kinds of touches and flourishes I'm about to describe that make the difference between a pleasant and listenable production and a full-blown audio movie.
To create that sense of place, start by building a “room”. The characteristics of the materials, angles and distances in a space are what makes the difference between a kitchen and a living room, or a cathedral and a park outdoors. For this sample project, let's assume you need a bedroom and a cathedral, because most of us know what each of those sound like.
This is where that stereo bus comes in. Rename it “Cathedral”. From your two dialogue tracks, put “sends” in before the faders (in Ardour, everything is inserted by right-clicking above the fader in the mixer window). Route those sends to “Cathedral”—left-to-left, right-to-right. Double-click on each send, and adjust your send level and pan—this is how hard your sound will hit the reverb room and on what side. You can't automate these, but there's rarely a need. Set the send level at –12db or a little lower for now, and leave the pan pot dead center. Now, duplicate these settings on the other dialogue track, and then set up another send on the sound FX track.
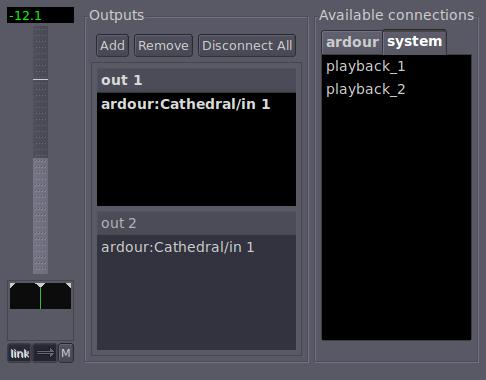
Figure 1. Controlling the intensity with which the audio hits the reverb is key to managing the characteristics of your room.
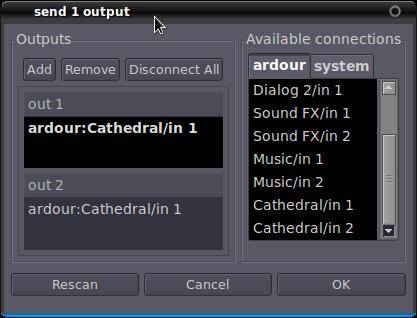
Figure 2. Piping the Audio through the Reverb Room by Creating a Send
Popping over to the Cathedral bus, insert a reverb. Linux has a number of excellent reverbs available in LADSPA, LVR2 and VST flavors (just less than a dozen at my last count). Pick your poison. For my purposes, I'm using the somewhat limited but most excellent TAP Reverberator. Because we're doing this room as a cathedral, we'll use the “Cathedral HD” preset. As you bring it up, you'll notice things like wet/dry balance, decay time and other controls—adjusting these will give you an innate feeling of the space you're in. For these purposes, let's just use the default setting.

Figure 3. Setting Up the Reverb Room Using the TAP Reverberator
You now have your room. If you click play, you'll hear everything playing in that room. But, what if it's too live? The reverb might be too hot in certain frequency ranges—cathedrals tend to sound a bit sharp, because the processor simulates all that stone and vaulting you find in a real cathedral. You can finesse your room further by adding an EQ to the cathedral bus—for example, the LADSPA “Multiband EQ” plugin—and selectively damping some frequencies. For voice in a cathedral, dumping the extreme low end and extreme high end, and subtly damping 800Hz, 1KHz and 2,400Hz can sweeten up the room wonderfully. You can control (and automate) the volume of your reverb with the fader on the bus.
Now, the real magic happens. Let's say you want to have one character enter the room from the left and approach the other character, who the audience is standing near (in audio space). If the POV character's voice is on dialogue 1 and the visitor is on dialogue 2, here's what you do.
Set dialogue 2's fader to “write”, and start it off at a low volume. Push play, and gradually raise the volume as the character crosses the room to the other character. When he reaches his destination, his fader's endpoint volume should be the same as the other character's fader volume level. You'll notice that you're already hearing that sense of “approach”, as if the character is walking straight toward you—that's because as you change the fader volume on the track, you're changing the wet/dry balance for the reverb. The drier the signal, the closer it seems; the wetter the signal, the farther away it seems.
But, you wanted the character to come in from the left, not walk toward you from deep in the distance. So, set that fader back to “play” and return the transport to the beginning of the walk-in.
Now, set the track's pan pot to “write”, and drag it all the way off left. Press play, and, in tandem with the increasing volume, slide that pot from extreme left to just left of center, arriving at a stop just off-center at the same time the volume fader reaches its maximum. Set the pot back to “play” and give it a listen. You'll hear the character walking into the room (without footsteps), approaching through sonic space. (If you want footsteps, put them on the sound FX track and repeat the same automation moves for them.)

Figure 4. Setting the Pan Pot to “Write”
Now that you've got a handle on how these things interact when you start moving pots and faders around, it's time to mix your project. Do it now, adjusting the relative volume levels of everything (and their positions in the room) in “write” mode, then switch back to “play”. Watch the redline while you're doing it—you don't want to create a mix that clips on exports. Keep everything below 0db, and you'll be fine.
Go ahead. I'll be here when you get back.
Without a doubt, EQ is the single-most powerful tool in audio-drama engineering. It's through EQ tweaks that you can turn a regular spoken voice into a tinny phone voice, a voice shouting through a wall from a neighboring room or a voice of great authority. For the human voice, a good 15-band parametric EQ (such as the Multiband EQ plugin that comes with almost all Linux distros) will do just fine. As each voice is different, there aren't many universal recommendations—even so, here's a few that will apply almost anywhere:
Dump everything below 125Hz. Almost all human voices bottom out at around 125. Anything lower is noise, and that noise can screw up your reverb, so just mute the low bands. Ditto for anything above 16KHz.
Vocal crispness comes in above 2KHz. Your consonants are up here—the difference between good articulation and bad is the quality of the consonants. Damping these frequencies makes the voice muddy, boosting them makes it crisp. You can tune the performance subtly by tweaking the consonants. Similarly, if your actor has harsh consonants, damping these subtly will take out those nasty sibilants and dentals.
Vocal richness and texture comes in the middle of the range: 300–600 for tenors and around 500–800 for altos and sopranos. These frequencies create vocal warmth when they're higher than the others, and damping them down makes for a cold, emotionally distant sound.
Authority comes in the low registers: 150–400 for most men and 250–600 for most women. Boosting these lends more gravity and urgency to the voice, cutting them does the opposite.
But, when it comes to constructing a good drama mix, you'll also want to take a look at your music and sound FX. Because ambient room tone, most music and many sound effects are very strong in the mid-range frequencies, they easily can swamp your voices, even if the music is at a very low volume compared to your voices. Your actors can get lost in the mix, even when you've been sure not to mix the music too hot.
To solve this, slap an EQ on your music and effects channels, and cut those middle frequencies just a bit—5db usually does the trick, and adding another subtle reduction up around 2,500Hz will make room for your consonants. Doing this lets the music and sound FX fill in the sound around your actors, rather than running over them, and the resulting sound will be much cleaner and more pleasing.
Once you've finished your editing, mixing, reverb, EQ and all the other various sweetening and tweaking you want to do, it's time to export. Assuming you've got a good mix that doesn't clip—or clips only on one or two occasions—you won't need a compressor. Throw the LADSPA Declipper on the master bus just for safety and export your project.
If you're destined for CD distribution, you may want to pull JAMin into this—it's a bit esoteric if you're new to this game, but well worth learning. The easiest way to use it is by setting up an insert on the master bus (see Dave Phillips' many excellent articles on LinuxJournal.com for instructions on using JAMin).
If you're aiming for MP3 distribution, import your exported .wav into Audacity and use it to master your MP3. This gives you the chance to do a final waveform inspection, looking for pops, skips or dead spots (as can sometimes happen on export with some systems) and to do your tagging as the file spools out.
And that's really about it. Whether you're soundtracking a film, doing a radio drama or an audiobook, the procedure and tools are very similar. A few plugins (far fewer than most people think you need), a little care and some excellent FLOSS software can yield some ear-popping audio goodness. Once you learn the basics here, all that's really left is practice. Which reminds me, I have another audiobook due next week. Best get back to it.
