
Porting Android to new hardware? You must read this!
Imagine having a refrigerator in your kitchen that could give you the nutritional contents and shelf life of the food you keep inside, or an automatic room cleaner that could take your commands via a chat app or SMS and clean your house in your absence. A few years ago, such devices were only dreamed of, but with rapid advancement in mobile operating systems and the ecosystem around them, such devices will be a reality soon.
Android specifically has an edge here. Because it is an open-source OS, developers all over the world are free to contribute, improve or even adapt it specifically to their needs (read: hardware requirements), and with the community growing larger by the day, much innovation is happening. But, this freedom to change the OS and adapt it to different hardware has to be managed somehow. There must be a mechanism to ensure that all the devices running Android provide the same experience to end users. Although developers get a chance to port Android to their hardware, users should not need to know about the underlying changes.
As per Google, Android compatibility consists of three key components:
Android source code: the source code itself serves as a specification for the developers aspiring to port it to new hardware, and anyone who understands the code, will learn about the platform, APIs and their behavior.
CDD (compatibility definition document): CDD serves as the policy for Android compatibility. It is a document that aims mainly to clarify and remove ambiguity in the implementation. So if you want to port Android to new hardware, you should read the CDD and follow all the guidelines mentioned there.
CTS (compatibility test suite): this is the mechanism for Android portability. Because it is difficult—rather, impossible—to test hardware behavior via software, CTS helps with testing the APIs and the platform functionality. So, where CDD tells you what to do, CTS helps you check whether you have done it properly.
In this article, I discuss the CTS (Compatibility Test Suite), an application that allows you to validate your Android porting. CTS helps you check that the app developers get the same set of APIs (and that those APIs will behave properly) and that users get the same overall Android experience in you new device. The testing is as easy as running test cases and generating a report and logs. Looking at the report will tell you whether everything is okay with your implementation. If that's not enough, you can send the report to Google to claim entry to Google play.
CTS, like Android, is an open-source tool, and the code for CTS is available with the Android source code. CTS also is available separately as an installable file on the Android developer Web site. So if you just want to run the tool without modifications, you can download it from the Web site. But, if you want to add or delete some test cases, or change a test case, you need to use the source code available with the Android source code, change it and then run the test cases. It is worth mentioning here that for every version of Android released, a corresponding CTS version is available. It's best to use the same versions of Android and CTS for testing. I use the latest CTS version 4.2_r1 for this article.
CTS is composed of two major components: 1) the application that runs on your desktop and manages the test execution, and 2) the test cases that actually are executed on the mobile device or emulator. The test cases are written in Java as JUnit tests and packaged as .apk files, so that they can be run on the target Android device. Once the testing starts, the test application loads each of the .apk files (in the test scenario that is run) to the target, executes it, records the test result and, finally, removes it from the target device.
In this article, I provide a step-by-step guide to configure, run and generate the test reports. I also show how to add or remove test cases from the test harness. As a open-source enthusiast, I have an inclination toward the Linux OS, so I explain the CTS configuration on a Linux system first. But, Windows users need not worry, because I explain the configuration of Android on Windows also. Configuring it on a Mac machine shouldn't be much different, and once you configure it, running CTS is the same for all three platforms.
To run CTS, you must have the CTS build downloaded from the Android developer Web site. If you are planning to add or remove test cases, you need the CTS source code also, which is available with the Android source code. When you change the CTS source code, it has to be built again, and you will need a compiler for that, depending on your personal preference.
Along with the CTS, you also need to download the Android SDK available on the Android Web site. The SDK has the adb (android debug bridge) utility, which is required for CTS to run. Also, using the SDK lets you create virtual devices on which to run your CTS test cases if you don't want to use a real Android device.
Here are the steps for configuring your Linux system to run CTS.
Ensure that adb is in the system path. This can be done with the command:
export PATH=$PATH:/path/to/android-sdk-linux_x86/platform-tools
Once the path is set, you can launch the CTS console by running the cts-tradefed script. To run the script, browse to the folder containing the android-cts folder and run the command:
./android-cts/tools/cts-tradefed
This takes you to the cts command prompt. Now you can run the test cases for your device using the cts commands. The commands are discussed below, but more details on configuring and running CTS are available in the official CTS documentation at source.android.com/compatibility/downloads.html.
If you use Windows, here are the steps to configure CTS on your computer.
Put the CTS prebuilt package downloaded from the Android developer site in a suitable location on your PC. Next, create a .bat file with the following contents and put it in the tools folder inside the CTS folder:
SET SDK_ROOT=<Path to the Android developer tools folder>
SET CTS_ROOT=<Path to the CTS folder>
if not exist %SDK_ROOT% GOTO showError
if not exist %CTS_ROOT% GOTO showError
SET PATH=%PATH%%SDK_ROOT%\platform-tools;
if not exist %SDK_ROOT% GOTO showError
java -cp
ddmlib-prebuilt.jar;tradefed-prebuilt.jar;
↪hosttestlib.jar;cts-tradefed.jar
-DCTS_ROOT=<Path to the CTS folder>
com.android.cts.tradefed.command.CtsConsole
:showError
Echo.
Echo "SDK_ROOT/CTS_ROOT not configured properly;
Remember to change the values of SDK_ROOT, CTS_ROOT and the -DCTS root. This batch file sets the required environment variables and prepares your system to run the CTS.
Next, run the .bat file you created in the above step. This should create a cts-tf command prompt. Start your Android virtual device (not required for real devices), and run the command list devices at the cts-tf command prompt. This will list the Android devices that are available currently on your computer. If it doesn't, you may want check whether the previous steps were followed properly.
That's it for the CTS configuration, but if you are planning to use the virtual Android device, you need to configure it. To do that, just run the SDK manager.exe in the adt folder. This tool helps you manage the Android packages and the Android virtual devices. You can install your (modified) Android package and then create a virtual device with a target as your Android package. So, you can have a virtual device with your Android code loaded. (Skip this step if you plan to use an actual device, and just plug in your Android device to your computer via USB cable. CTS should be able to identify the device.)
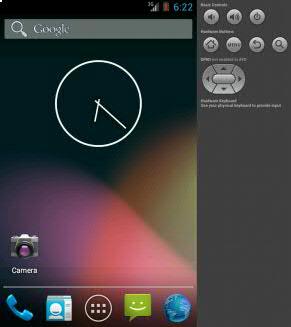
Figure 1. Android Virtual Device Window
The CTS testing mechanism is arranged as test cases, test packages and test plans. As the names suggest, test cases test a particular class, while the test packages are used to test functionality, which can be a combination of several APIs. Test plans are comprehensive testing schemes where features of the OS, such as signature and appSecurity, are tested. Now as you know, CTS is a combination of all these test cases and the application that manages these tests. So, to run a CTS test case, you need to communicate with the application, which internally will start running the tests.
The CTS application can be run via the cts-fd command prompt (which you get after running the .bat file mentioned previously). It has its own set of commands, and you need to use these commands to interact with it. The following are a few of the most important CTS commands:
help: lists all the available commands and their options—type this command if you are stuck somewhere.
list: the list command can be used with different options to list the test packages, test plans, test results, devices and so forth on the command prompt. For example, if you want to list all the test plans, type list plans.
run cts: this command runs the test cases in CTS. You can use it to run test packages, test plans and so on. For example, if you want to run the android.view package, type run cts -p android.view.

Figure 2. Device Listing on the CTS Prompt
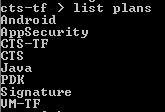
Figure 3. Plan Listing on the CTS Prompt
Now that you know the important CTS commands, you can start running the CTS test cases to verify your android implementation.
Once you run the CTS test case/package/plan, you need to wait for the test to finish running. Once the test is finished, CTS automatically generates the reports and logs. The reports generated by CTS are quite comprehensive with clear information about the passed/failed cases. If there are any failures in the test, the report shows it on the top along with the failure details to help you analyze the failed test cases. You can access the report in the folder android-cts\repository\results\<Time-Stamp>\testResult.xml. CTS also generates detailed logs of the test case execution, which can help you if you need to troubleshoot issues. The log is available for both the device and the host system. The logs are available in the folder android-cts\repository\logs\<Time-Stamp>.
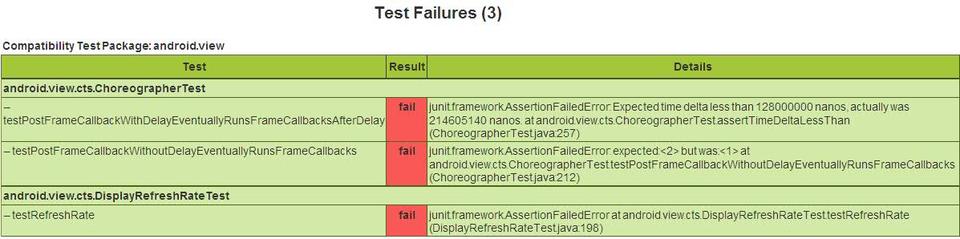
Figure 4. Test Failure Summary in Report
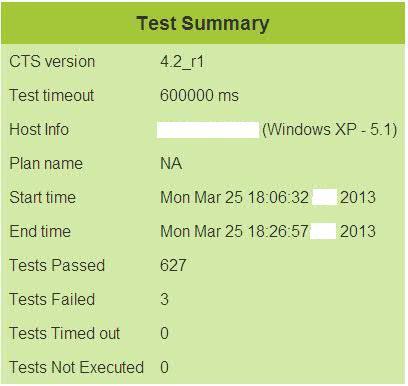
Figure 5. Test Report Summary
Thus far, I've been discussing how to run the default test cases available with CTS, but CTS is open source, so where is the fun if we don't play around with the code and add something extra? Let's look at how to write test cases for CTS and then integrate them with the framework.
Probably the best way to get started with adding a test case to the CTS is to look at the existing test cases present in the framework source code. (The CTS source code is available with the Android source code, so you need to download the Android source code.) As you go through the folder structure and the test cases, you will get an idea of how the test cases are written and organized in the framework.
You can see that the default test cases included with CTS in the cts/tests/ folder are segregated according to the different features they are meant to test. There are folders for processtest, signaturetest, accessibility and so on, which correspond to the various features. The folder cts/tests/tests has the general test cases, and most of the time, this is where you can add your own test case. If you go to a folder inside the cts/tests/tests folder, say the bluetooth folder, you can see it has an AndroidManifest file along with a make file. So, these tests essentially are Android apps written based on JUnit.
JUnit is an open source, unit-testing framework for the Java language, which aims at testing the code and then its implementation. So, with JUnit, developers can add the test cases in their code and get feedback while developing the code. The Android CTS uses features like assertion and annotations in the test cases, so I primarily focus on these features here.
Assertion: using assertion, you can test whether a given condition is true or false. JUnit provides an assertion method for all the primitive types and objects. So, you can use assertion in your test case to check whether things are as they should be. There also is an optional field for a string message that is output on failure. Assertion methods available in JUnit are assertTrue, assertFalse, assertEquals, assertNull, assertNotNull, assertSame, assertNotSame and so on.
Annotations: annotations are used before a method definition to identify whether it is a test method. They also are used to define the execution order of the test case or even ignore a test case. The annotations available in JUnit are @Test, @Before, @After, @Ignore, @BeforeClass, @AfterClass and so on.
Enough theoretical knowledge, let's look at a working sample! Let's take a working test case based on JUnit and see how it works. Below is a small code snippet from the CTS source to show how assertions are used in the test cases (you can see the full code here: cts/tests/tests/bluetooth/src/BasicAdapterTest.java):
public class BasicAdapterTest extends AndroidTestCase {
private static final int DISABLE_TIMEOUT = 8000;  // ms timeout for BT
disable private static final int ENABLE_TIMEOUT = 10000;  // ms timeout
                  ↪for BT enable
private static final int POLL_TIME = 400;         // ms
                  ↪to poll BT state
private static final int CHECK_WAIT_TIME = 1000;  // ms
                  ↪to wait before enable/disable
    private boolean mHasBluetooth;
    public void setUp() throws Exception {
        super.setUp();
        mHasBluetooth =
        ↪getContext().getPackageManager().hasSystemFeature(
                PackageManager.FEATURE_BLUETOOTH);
    }
    public void test_getDefaultAdapter() {
        /*
         * Note: if the target doesn't support Bluetooth at all,
         * then this method should return null.
         */
        if (mHasBluetooth) {
            assertNotNull(BluetoothAdapter.getDefaultAdapter());
        } else {
            assertNull(BluetoothAdapter.getDefaultAdapter());
        }
    }
}
As you can see, the BasicAdapterTest extends the AndroidTestCase. The first method in this class, the setUp method, sets a variable as true or false based on whether the device has a Bluetooth feature available. The second method, test_getDefaultAdapter, tests whether an application can access the default Bluetooth adapter using the assert function available in JUnit. Similar methods to test different features are written. Additionally, you can use Eclipse to write new JUnit test cases—just select JUnit test case in the new Eclipse project window.
Now that you know how to write a test case and where the files are stored, let's look at how to integrate these newly written tests to the CTS framework so they can be executed as the default tests. Following are the steps to add a test case to the CTS:
Develop the test case as a JUnit Android application. Add the folder to the cts/tests/tests folder.
Add the line LOCAL_PACKAGE_NAME: = <TestPackageName> to the Android.mk file present in the application folder. Here, TestPackageName is the name of test package you just created.
Add the name of the test package to the CTS_CASE_LIST variable in the android/build/core/tasks/cts.mk file.
Open the command prompt and change the current directory to the Android source folder. Now you can build the CTS by running the command make cts at the command prompt. (To run the make command on Windows, you need a compiler toolchain installed.)
That's pretty much everything about the Android CTS tool. Use it whenever you are making changes to the Android source code, so that you can be sure of being inline with the original Android code. Happy coding!
