
XBMC or Plex? Why not both?
My family likes to watch TV. Yes, I know that makes us the clichè American family, over-saturated with media and slowly disconnecting ourselves from humanity, but that's just the way we are. We also are a family who takes our passions very seriously, so in the Powers home, movies and television shows are archived and accessible from pretty much any device in any room (and even over the Internet). Granted, we have more than 40 terabytes of storage in the basement, gigabit Ethernet in almost every room and a robust multi-access point wireless network that allows us to roam around the property without ever disconnecting. We're basically one step away from becoming the Borg.
Although many would consider our multimedia entertainment system overkill, the technology itself scales to meet any need. So in this article, I want to talk about our two main methods for watching media: Plex and XBMC. The former is what we use for mobile viewing, and the latter is for our set-top boxes. Yes, Plex can be used on a television, and XBMC can be used on a mobile device, but the two seem to excel at one thing over the other, so we use both.
I think the current “best hardware” for building an XBMC set-top box is probably a Cubox-i from www.solidrun.com. A variety of models are available, but all run XBMC very well. They also include an infrared receiver for a remote control, but in my experience, success using that included receiver is inconsistent.
The other very popular option is a Raspberry Pi unit running OpenElec from an SD card. I have two of them running in our house, and apart from a slightly slow menu interface, they play quite well, even 1080p content. Many people purchase a Zotac Zbox or Intel NUC system for XBMC, but if all you plan to do is run XBMC, I think both options are fairly pricey. If you have cause to do more with your set-top box than just run XBMC (for instance, if you want to run a TV tuner or something), go with one of the more expensive non-ARM-based devices. If you just want to stream audio and video, I really recommend one of the less expensive options.
Depending on what system you choose, you might end up with a remote out of the box. Chances are, however, you'll need to purchase one. In the case of the Cubox-i, it's possible to program any old remote you have lying around the house to be the controller for your XBMC install, but in my experience, it's fairly difficult, and the result isn't always worth it.
I've had a dozen or more varieties of XBMC and Windows MCE remotes through the years, and hands down the best experience has been with an inexpensive remote/USB receiver combination from Ortek. It costs less than $15 and emulates a mouse along with performing flawlessly as an XBMC remote. It's even eligible for Amazon Prime if you're a Prime subscriber: www.amazon.com/Ortek-Windows-Infrared-Receiver-Ultimate/dp/B00224ZDFY.
Most Windows MCE remotes will work with XBMC out of the box with no additional configuration required. That's the case with the Ortec remote I mentioned earlier, but it's probably true of any MCE remote you might have.
This would seem like the easiest decision to make. Because XBMC runs on a computer, the screen can be any monitor or HDMI-capable television. Our experience has been that volume can be challenging, however, so either plan on a really nice set of amplified speakers to go along with your monitor (for small installs), or get a flat-screen television with decent volume. XBMC itself will let you adjust the volume with the remote (such a nice feature and one of my favorite things about XBMC), so you can leave the TV or speaker volume fairly high, needing to use the remote only for adjustments from the couch. I hate multiple remotes, so being able to turn the volume up and down via XBMC software is really awesome.
As far as which option is better, realize it depends on the need. In my living room, I have a huge flat-screen TV and use an audio receiver with big speakers. In my bedroom, I have a 720p television using its surprisingly loud built-in speakers. And then in my front room, I have a 22" monitor and a set of computer speakers. The front room setup is by far the most quiet, but since it's basically a reading room, I most often play a video of a fireplace anyway, so volume isn't an issue. (If you watch the monthly LJ issue intro videos, I record them in the front room in front of my XBMC machine.) The important thing is to plan ahead so you have enough volume. It's easy to turn things down if they're too loud, but much more difficult to get louder than “10” on the dial of a small speaker.
Setting up XBMC is fairly straightforward. I actually recommend using OpenELEC (www.openelec.tv) as your operating system, because it works so well on a wide variety of hardware. OpenELEC on a Raspberry Pi functions almost identically to OpenELEC on a Zotac box. I'm not going to talk too much about actually installing OpenELEC—just follow the directions and you should be fine. The configuration, on the other hand, has to be done in a specific way if you want the XBMC machines to stay in sync.
Step 1—Adding Sources:
The reason it's beneficial to share a common MySQL database among all your XBMC machines is that you can start a show in one room, and then move to another room and pick up where you left off. It also means metadata is shared between all the XBMC machines, and the library is updated once for your entire system instead of redundantly by every individual XBMC device.
I recommend setting up your video sources on a single XBMC machine (Figure 1) and making sure the video type is correct. In the configuration screen, you choose whether a particular source is Movies or Television, and the metadata scrapers do their work accordingly (Figure 2). One of the important things about a MySQL back end with XBMC is that every device has to have the exact same sources set up. Rather than add sources over and over, I prefer to get one machine completely set up and then copy the configuration files to the other units.
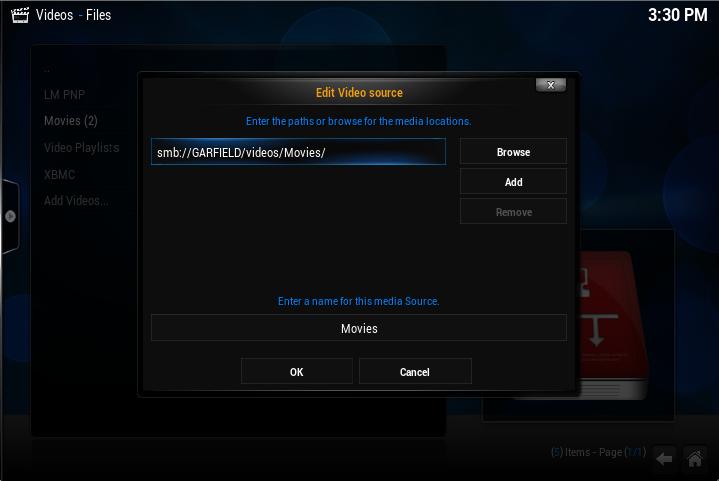
Figure 1. Adding a video source is much more fun if you have a USB keyboard attached.
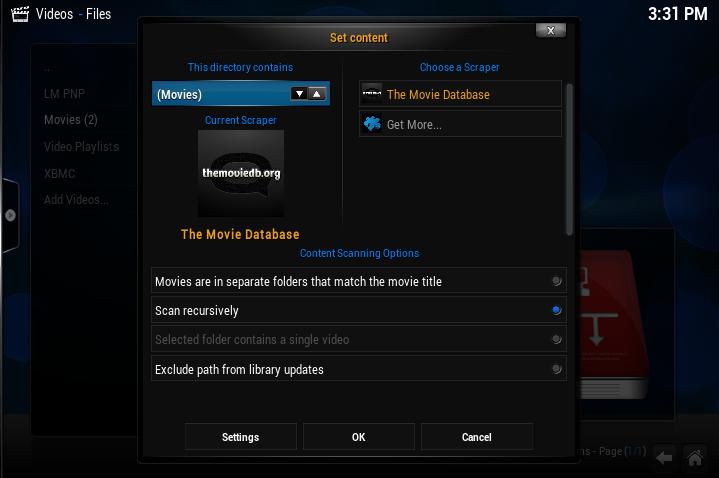
Figure 2. Be sure to select the type of video files in your source, so the scraper can download your metadata.
Step 2—Adding MySQL:
Although adding sources can be done with the built-in menu system, MySQL is something that must be done from the configuration file. The first step, however, is getting a MySQL server ready. I assume you can install a MySQL server from your distro's repositories, so let's move on to configuring MySQL for XBMC. This is a little more complex than you'd think, and I found the easiest way is to give XBMC all the permissions it might want and then lock things down afterward. So basically, you create a super-powerful MySQL user named “xbmc”—on the command line, type the following:
$ mysql -u root -p
$ (type the password of your MySQL root user when prompted)
mysql> CREATE USER 'xbmc' IDENTIFIED BY 'xbmc'; (then press return)
mysql> GRANT ALL ON *.* TO 'xbmc'; (again press return)
mysql> quit (press return to exit the mysql program)
I'm sure half of you are screaming at how insecure it is to create such a powerful MySQL user, especially with such a horrible user/password combination. The other half of you is probably unconscious from fainting. I do not recommend you leave this user with all this functionality, but at first, it works best if XBMC can create the database and tables it wants. After everything is working, feel free to lock down the permissions a bit.
Step 3—Configuring XBMC:
Armed with the IP address of your MySQL server, you either need to SSH in to the running XBMC device or somehow get to the configuration files. If you're using a Raspberry Pi with an SD card, you could mount the SD card on your workstation and edit the files from there. The important thing is to make sure you're in the right place. With OpenELEC, you want to edit the files in /storage/.xbmc/userdata (you should see a few files in there if you're in the right place). The sources.xml file contains the source information from the step above, and you'll want to copy that somewhere safe so you can use it on any subsequent installs of XBMC. (Remember, the sources have to match exactly, and copying the sources.xml is the easiest way to accomplish that.)
You most likely will not have a file named advancedsettings.xml in your folder. If you do, you'll need to add the information I'll talk about in a moment. You probably don't have one, however, so you'll need to create it and put the following text inside (matching your settings of course):
<advancedsettings>
    <videodatabase>
        <type>mysql</type>
        <host>192.168.1.11</host>
        <port>3306</port>
        <user>xbmc</user>
        <pass>xbmc</pass>
    </videodatabase>
</advancedsettings>
That's really all there is to set up. When you reboot your XBMC (after saving the advancedsettings.xml file into /storage/.xbmc/userdata/), the metadata scrapers should start filling your MySQL database with all the information, including where you leave off watching a particular movie. What MySQL database, you ask? Well, that's why you created the super-powerful xbmc user. XBMC should create a database on the server automatically, named something like MyVideos75, which I personally think is a strange naming convention, but whatever.
I probably should note that you can do the same for XBMC music and have it create a database for that too. I just never play music via XBMC, so it hasn't been something I've been interested in doing. Once you see the database has been created and is being populated with data from XBMC, you can feel free to lock down permissions a bit to make sure the xbmc user has access only to the specific database.
Now that the hard work is done, subsequent XBMC installs will be much, much simpler. Just install the base system, and then copy the sources.xml and advancedsettings.xml from your original system to the new system. Reboot the new system, and everything should be configured perfectly with shared metadata. To test it out, start watching a movie from the first XBMC system, and halfway through, press stop. Then go to the second system, and start to play the same video. You should be asked if you want to continue from where you left off, even though you're on a completely new device (Figure 3).

Figure 3. Resuming in the next room means getting kicked off the big TV doesn't result in losing your place!
Having several different versions of XBMC (Frodo and Gotham, for instance) should work, but I've always kept my XBMC boxes at the same version to make sure nothing weird goes on between versions. I've tried many, many (oh so many) different set-top programs for watching videos on a television, and nothing compares to XBMC. It's smooth, attractive and works very well. When it comes to mobile viewing, however, XBMC isn't even close to the best option. Mobile viewing is where Plex really shines.
Unlike XBMC, Plex has a server back end much like MythTV does. This back-end/front-end combination means that a server can handle many clients (front ends) and transcode video appropriate for the device and bandwidth. Whereas XBMC plays video files from local or network locations, Plex creates streams of video for front-end devices in real time. Granted, sometimes those streams are just a direct transfer of the raw video, but Plex is smart and sends video that is appropriate for the front end.
The first step is to install Plexmediaserver. This is a Linux (or other) based program that runs on a server and creates the transcoded streams. Because video transcoding is involved, a beefy server is recommended. Head over to https://plex.tv/downloads and get the Plexmediaserver .deb or .rpm that matches your system. Install the package with your distribution's package manager, and let the server start up. Configuration is all done over the Web, so once it's installed and running, head on over to http://your.server.ip:32400/manage/, and walk through the initial setup process. After you name your server and walk through the initial wizard, you'll need to add sources (Figure 4). This is slightly different from XBMC, because Plexmediaserver requires you to specify local folder locations. If you don't have it installed on the same machine you store your files, that's not a big deal, it just means you'll need to mount the remote file server on your Plexmediaserver's filesystem. That's actually what I do, and I never have a problem with slowdowns. Figure 5 shows my actual Plexmediaserver, and you can see the NFS-mounted folders are easy to add.
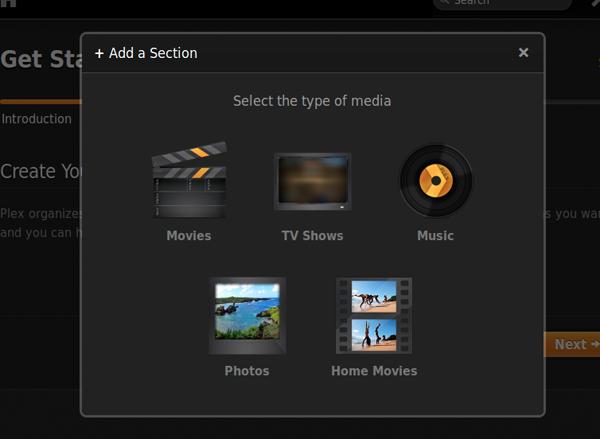
Figure 4. As with XBMC, choosing the source type means proper metadata scraping.
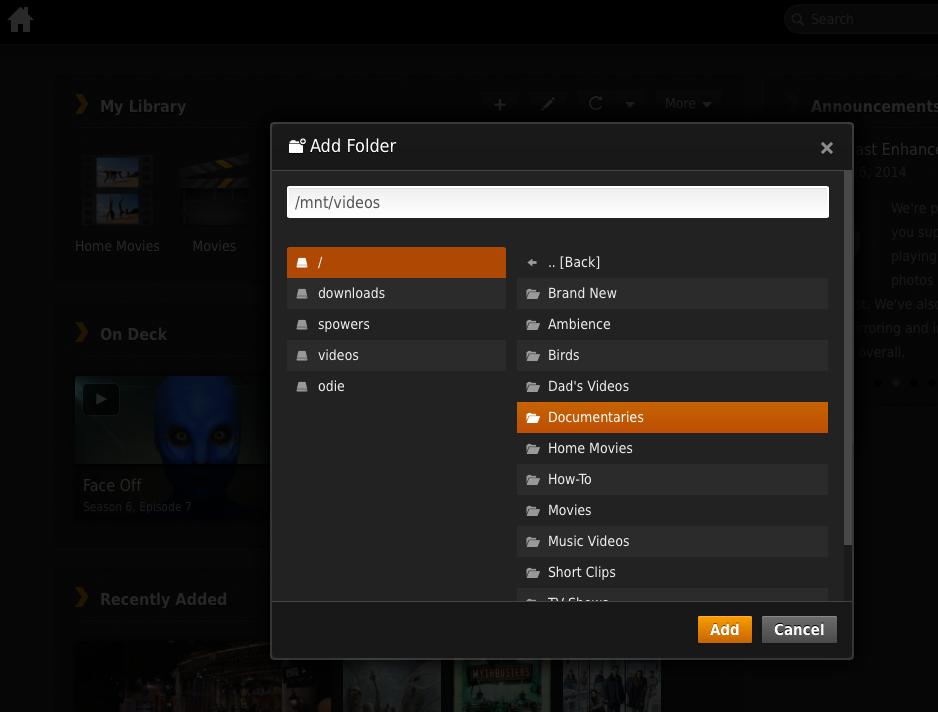
Figure 5. Plex requires videos to be in a local folder, but that folder certainly can be a network-mounted server.
Once you add all your various media locations and types, Plex will churn away for hours or days compiling its metadata. You still can watch videos during this time, but you might not see the pretty metadata for a while.
Plex is flexible. I mentioned the mobile applications available for Android and iOS earlier, and a few months back, the Android app was “Editors Choice” for its awesomeness. When you set up your Plexmediaserver, you'll be prompted to create an account with Plex. That account will allow you to log in to your server remotely and stream from your home video collection to your mobile device. Plex also allows you to use the awesome Plexweb interface (which again, I've written about before) by visiting my.plexapp.com and logging in.
If you start to love Plex as much as I do, you might be tempted to purchase a PlexPass, which is a subscription service giving early access to new features and a more robust platform. Currently, being a PlexPass subscriber means you can sync content locally to your mobile devices, so you can watch them without needing access to a network. I'm a PlexPass member, but honestly, I very rarely take advantage of any features it provides.
If anything, you realize by now that I watch far too much television. I agree with you, but I don't plan on stopping any time soon. I've recently integrated Live TV into our XBMC experience with a digital TV tuner and network-based PVR. Once my guilt wears off, perhaps I'll write about that process as well. Live TV is a relatively new feature for XBMC and setting it up is challenging at best. If you're a movie buff or just love setting up nerdy multimedia, you can't go wrong with the one-two punch of XBMC and Plex. Have fun, and don't forget the popcorn!
