
How to detect dubious login attempts and deny access to hackers.
Whenever a server is accessible via the Internet, it's a safe bet that hackers will be trying to access it. Just look at the SSH logs for any server you use, and you'll surely find lots of “authentication failure” lines, originating from IPs that have nothing to do with you or your business. Brute-force attempts (such as “dictionary attacks”) try different passwords over and over to try to get into your box, and there's always a chance that they eventually will succeed. Thus, it's a good idea to apply these “three Ds” for your security: detect intruder attempts, decide when they've gone “over the top” (past what would be acceptable for honest-to-goodness typing mistakes), and deny them access at least for a (longish!) while.
Several tools manage this kind of monitoring (see the Resources section). In this article, I describe installing, configuring and running DenyHosts. With it, you'll have a running background dæmon that will check your system continuously for access attempts, decide if they look unsafe, block them and inform you. DenyHosts even can be configured to share information with other servers, so whenever a hacker is detected on one system, it will be blocked on other systems too.
DenyHosts' current version is 2.6 (from June 2013). It is a Python script, and you probably already have that language installed. If not, you'll need to use your distribution package tool to set it up first. You need version 2.3 or higher.
Many distributions already provide a “denyhosts” package, and using your system tools is the simplest installation method. For example, type sudo apt-get install denyhosts for Ubuntu, sudo yum install denyhosts for Red Hat or sudo zypper install denyhosts for OpenSUSE. Otherwise, you can download the tar.gz file (see Resources) and then do:
$ tar zxvf DenyHosts-2.6.tar.gz
$ cd DenyHosts-2.6
$ sudo python setup.py install
No matter how you install DenyHosts, a /usr/share/denyhosts will be created, with all configuration and script files within it. You'll want to edit the denyhosts.cfg file to configure DenyHosts for your environment. (Should that file not exist, do cp denyhosts.cfg-dist denyhosts.cfg to get a basic sample configuration file to start with.) Blank lines and lines starting with # are ignored. There are plenty of comments to help you understand each configuration item, but pay close attention to some key items (Table 1).
Table 1. Key Configuration Items for DenyHosts
| Parameters | Explanations |
|---|---|
| SECURE_LOG | Location of the access log: /var/log/secure for Red Hat, /var/log/auth.log for Ubuntu or OpenSUSE, and so on. DenyHosts will scan this file to detect possible hacking attempts. |
| HOSTS_DENY | Location of the restricted host file, usually /etc/hosts.deny. DenyHosts will add lines to this file whenever a possible intruder is detected. |
| LOCK_FILE | A file path and name: this file is created when DenyHosts starts and is deleted when it exits. If you try to run DenyHosts, and this file exists, Denyhosts will exit immediately, preventing more than one instance from running at the same time. |
| WORK_DIR | The directory DenyHosts will use for its own data. |
| DAEMON_LOG | Location of the log file that DenyHosts will use to report its status when run in dæmon mode. |
| DAEMON_SLEEP | Amount of time that DenyHosts will wait before checking the SECURE_LOG. |
| DAEMON_PURGE | Amount of time between purges of old entries in HOSTS_DENY (see PURGE_DENY below). |
| BLOCK_SERVICE | What service should be blocked in HOSTS_DENY. Set it to “sshd” to disable only SSH access or to “ALL” to block every attempt from the remote host. |
| ADMIN_EMAIL | Address to which e-mail messages regarding blocked hosts and suspicious logins should be sent. If you set this to a non-blank value, you'll need to set SMTP_HOST, SMTP_PORT, SMTP_USERNAME and SMTP_PASSWORD as well, so DenyHosts can connect to your mail server. |
| DENY_THRESHOLD_INVALID, DENY_THRESHOLD_VALID and DENY_THRESHOLD_ROOT | After how many failed login attempts DenyHosts should block a host (due to wrong user account names, correct user names but wrong passwords or failed root access attempts). But, you shouldn't allow remote root access at all; see the Resources section for some suggestions about this! |
| RESET_ON_SUCCESS | If set to “yes”, the failed count for the server will be reset to zero after a successful login. |
| AGE_RESET_INVALID, AGE_RESET_VALID and AGE_RESET_ROOT | After what period of time the failed count for the host will be reset to 0 for wrong user account attempts, wrong password attempts and root access attempts. |
| PURGE_DENY | Time after which HOSTS_DENY entries will be purged if you run DenyHosts with the --purge flag. I usually go with “1w” (one week), but you can leave it blank (never purge), or you can use minutes, hours, days or weeks. |
| PURGE_THRESHOLD | How many times a host can be purged until DenyHosts decides it's a confirmed risk and stops purging it, thus disabling it forever. Set this to zero to disable the feature. |
As an extra assurance that you won't be banned from your own server, you should edit /etc/hosts.allow and add a line for each IP you use, in a format like sshd: 111.222.33.44. DenyHosts has a file of its own, allowed-hosts, that defines IPs (one per line) that won't ever be blocked.
Now you are ready to start running DenyHosts—let's move on to that!
You can run DenyHosts periodically (let's say as a cron job), but it's better to run it in dæmon mode. DenyHosts then will run in the background, checking the access logs to detect possible intruders. For this, you need to create an extra configuration file by executing cp daemon-control-dist daemon-control. Then, edit the file to make sure its three parameters are defined correctly (Table 2).
Table 2. Running DenyHosts in dæmon mode requires extra configuration.
| Parameters | Explanations |
|---|---|
| DENYHOSTS_BIN | Should point to the denyhosts.py script. |
| DENYHOSTS_CFG | Should point to the denyhosts.cfg configuration file. |
| DENYHOSTS_LOCK | Should point to the same file as LOCK_FILE in Table 1. |
Then, all you need to do is start the service with /etc/init.d/denyhosts restart or service denyhosts restart, depending on your server, and you are set. From that moment on, DenyHosts will monitor login attempts, and upon detection of oft-repeated failures, it will decide to deny all access to the would-be intruder (Figure 1). Just in case, you also should set DenyHosts to start automatically on reboot—doing sudo chkconfig denyhosts on is a way to manage this.
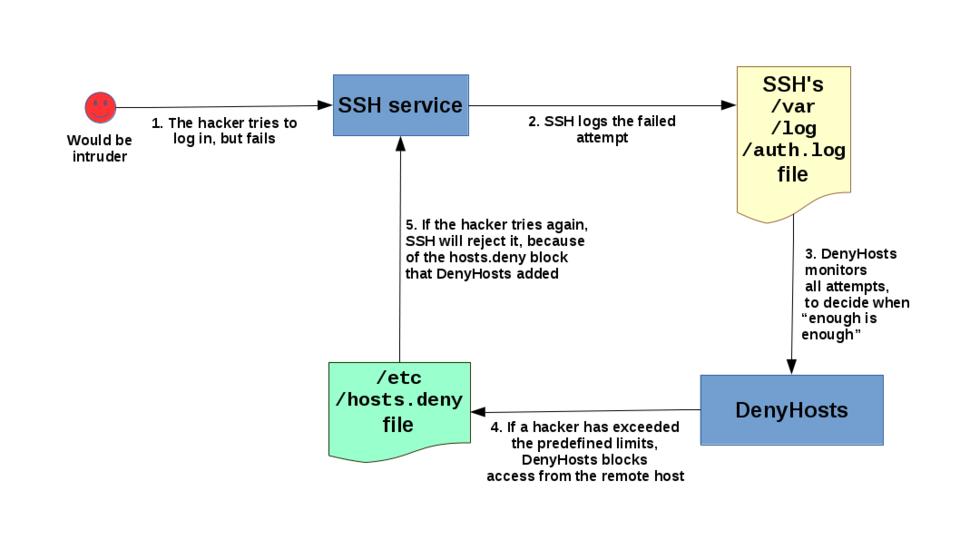
Figure 1. DenyHosts monitors the access logs and eventually locks out the hacker's host.
Once DenyHosts is running, it will monitor the logs, and after detecting repeated failed login attempts, when certain thresholds are reached, it will decide to block the remote IP to deny the would-be hacker all possibilities of connection. For example, I deliberately entered wrong passwords time after time, and eventually I was blocked (Figure 1 also explains why DenyHosts needs to run as root; otherwise, it wouldn't be able to edit the hosts.deny file):
> ssh fkereki@your.own.server
fkereki@your.own.server's password:
Permission denied, please try again.
fkereki@your.own.server's password:
Permission denied, please try again.
fkereki@your.own.server's password:
Permission denied (publickey,password).
> ssh fkereki@your.own.server
fkereki@your.own.server's password:
Permission denied, please try again.
fkereki@your.own.server's password:
Permission denied, please try again.
fkereki@your.own.server's password:
Permission denied (publickey,password).

.
.
.
several attempts, and then...

> ssh fkereki@your.own.server
ssh_exchange_identification: read: Connection reset by peer
DenyHosts eventually will lift the restriction (depending on the configuration), but if a valid user somehow managed to get banned from a valid server, you can fix the problem without further delay (see the Forgiving a User sidebar).
DenyHosts provides another service that allows you to share whatever IPs you block with other servers around the world, and vice versa. The idea is simple. If anybody detects that hacking attempts are coming from a certain IP, every server that blocks it without waiting to be attacked is made a bit safer. There are a few parameters you need to consider, as shown in Table 3.
Table 3. Sharing blocked IPs with other servers helps everybody.
| Parameters | Explanations |
|---|---|
| SYNC_SERVER | To what server you should connect for central synchronization. Currently, xmlrpc.denyhosts.net:9911 is the only available server, but in the future, organizations may install their own synchronizing servers for internal usage. |
| SYNC_INTERVAL | How often to synchronize with the server. |
| SYNC_UPLOAD and SYNC_DOWNLOAD | Whether DenyHosts should upload and download banned IPs; the logical option is YES in both cases. |
| SYNC_DOWNLOAD_THRESHOLD | Download only IPs that have been detected and blocked at least by this number of DenyHosts distinct servers. |
| SYNC_DOWNLOAD_RESILIENCY | Download only IPs that have been detected over this period. The larger this value, the more probable the IP is an actual hacker. |
Sharing this information is usually a good idea, so you can stave off would-be hackers even before they start sniffing at your server. The sharing service currently is free (although donations are accepted), but eventually businesses might be charged for it, as the DenyHosts FAQ states. You can contact the DenyHosts creator to license the server component and run your own sharing server.
Security is a 24/7 job, and all the tools that you can add into the mix go a long way toward making your server secure. DenyHosts is easy to install, and it provides quick detection of hacking attempts, blocking remote hackers and impeding brute-force attacks. Although it's not a “silver bullet” solution for all possible intruder problems, it's a worthy tool that you should add to your security toolkit. Give it a try!
