
I have a drawer in my office full of screws, braces, gaskets, washers and countless other “extra” pieces from various things I've built through the years. It seems that every time I assemble a bookshelf or put together a toy for my girls, there always are parts left over. If you're the type of person who reads directions, you might argue that I simply missed some steps along the way and don't really have extra pieces after all. You might be right, but I still prefer to learn by doing, even if that's a messy way to go about it.
In this article, I talk about doing stuff with Docker. Linux Journal has covered the Linux container system before in depth (Dirk Merkel wrote an incredible article for the March 2014 issue that explained the entire system in fine detail, and Federico Kereki has a great article this issue as well). I don't cover all the intricate workings of Docker here; I just explain how to use it. If you learn along the way, well, let's call it a bonus—just like all those bonus parts I have leftover when I build things!
If you're already familiar with the concept of Linux containers, Docker will be a no-brainer. The only thing Docker does is provide a convenient interface for creating and managing containers. If you're like me, the concept of containers makes about as much sense as feathers on a frog. Fear not, once you get it, it makes sense (the containers, not the flying frogs).
Hardware virtualization is pretty easy to understand. Every VM gets a virtualized set of hardware, and it behaves just like bare-metal hardware off a shelf behaves. You install an operating system and so on and so on. With containers, it's more like The Matrix for applications. Applications are all running on the same computer, but they don't realize it, because their environments are completely separated from each other.
The main advantage of using containers is that they're more efficient. Because all applications run on the same system, only one OS is installed, and only one set of hardware (real or virtual) is used. The isolation of the apps means they can have different dependencies, even dependencies that conflict with other apps! If you have one Web application that requires PHP version 4 and one that requires PHP version 5, normally you'd need to set up two separate machines. With containers, you just package the application and its dependencies together, and they interact independently from the rest of the apps in other containers!
In fact, containers are so flexible, you can run an application that depends on CentOS inside a container hosted on Ubuntu. You just package the required CentOS files in the container with the app, and it has no idea it's actually running on Ubuntu, because it sees all the CentOS files it needs inside its container!
If that's all a little too confusing, here's my simplified version. Traditional hardware virtualization (VMware and so on) virtualizes the hardware. Containers virtualize only the software environment in which an application runs.
Everything I just described concerns containers in general. There are multiple ways to manipulate containers on Linux. Docker is one of those ways. Arguably it's the best way, but at the very least, it's the most popular way. If you're a VMware user, think of Linux containers as being ESXi and Docker being like VSphere. It's a way to create, interact and manage Linux containers.
Like most things in the Open Source world, the best thing about Docker is the community of users who use it. Not only does Docker provide a great user interface for using containers, but the community also has created hundreds (maybe thousands) of pre-made environments for running specific applications inside Docker. In this article, I walk through installing one of those images—specifically, the first Docker container I ever installed: Plexmediaserver.
Although I'm not going to delve into the low-level Docker stuff here, it's still important to understand the concepts regarding what Docker actually does. The two main Docker bits I cover in this article are “images” and “containers”.
Images are downloaded from the Internet or built locally. These images are stored on the Docker server, but are not directly executed. They're basically a collection of the dependencies, the application and any other things required to create a running container. It's like a cake mix. All the ingredients are packaged nicely, waiting for you to mix them up and bake them. Pre-built images are available from the Docker Hub, which is a community-driven repository of images anyone can download.
Containers are what you get when you deploy an image. A container is the actual running application nestled inside its own environment. When you unpack an image and start a container, it takes all the ingredients in that “cake mix” and extracts them into an isolated environment, then executes the app. Unlike a cake mix, however, it's possible to create multiple containers from a single image. Once you have an image, it's a simple one-line command to start up the application in a container of its own.
Most Linux distributions (along with Windows and OS X) can run Docker. I cover the method for installing on Ubuntu 14.04 here, but a quick Google search will show you how to install Docker anywhere. In order to install the most recent version of Docker on your system, simply type:
wget -qO- https://get.docker.com/ | sh
Normally, installing an application using a script is horrible, horrible advice. In this case, however, the folks at Docker have created a script that does things properly. If you're running Ubuntu or Debian, it will create the proper repositories and install the correct dependencies using APT. In fact, the same wget command probably will work on a CentOS or Red Hat system as well. It just detects your system type and installs repos using the YUM tools. I've tested it only in Ubuntu 14.04, however, so if you want to experiment elsewhere, things might behave slightly differently.
Once the installer is finished, type:
docker -v
Before downloading an image and starting a container, it's important to know how Docker containers access data. See, when a container is created, it's purposefully isolated from the rest of the system. The filesystem that the app inside the container sees is a virtualized filesystem to which only it has access. If your application is a standalone app that doesn't require any external data, that's fine. In this case (and most cases), however, you need your container to have access to shared folders. It's certainly possible to create a container with an NFS client and mount directories internally, but Docker provides a really simple way to share folders with containers. When you start a container, you specify what folders you want to have accessible from inside the running container, and it “maps” that folder on the fly without any complicated NFS or Samba configuration required.
Docker also allows for several networking options with containers. By default, Docker tries to create a bridged network interface intelligently and start each container with a unique private IP. You can then redirect ports on your firewall to the appropriate container IP address, or connect directly to the private IP from within your network. While that allows for a very robust and complex network infrastructure for Docker, it also makes things frustratingly complex for people just starting out. In this example here, you'll use the “host” feature of Docker, which allows the container to share an IP with the host system. In production, there potentially are security concerns with this method, but especially at first, it's a great way to use Docker.
Although it's possible to create Docker images from scratch and build them on your local system, the best way to start is by downloading an image someone else already created. You can browse those images by heading over to https://hub.docker.com, or you can search the same repository directly from the command line. If you think of an app you'd like to run in Docker, the first thing I suggest is to check the Docker Hub and see if someone else already has “dockerized” the app for you. (That's what you're going to do with Plex.)
It's possible to log in to Docker Hub from the command line using the docker program, but you don't have to have an account in order to use existing images. You need to have an account only if you want to host or upload images. In order to see if Plex has been dockerized by someone else, type:
sudo docker search plex
You should see a huge list of images uploaded by multiple people. It's very likely that they all work, but I recommend using images that have the largest number of “stars” rating them as favorites. Figure 1 shows the first few lines of my search query. Notice that the timhaak/plex image has 40 stars. Let's use that one.
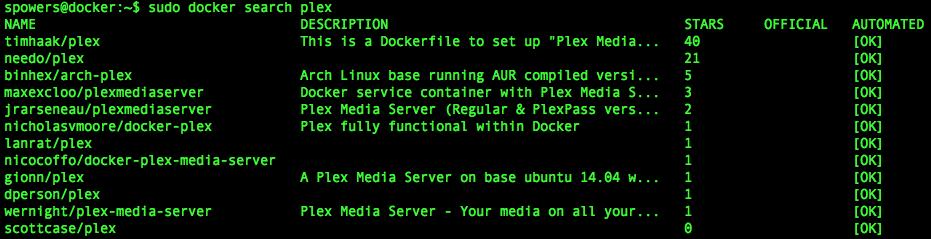
Figure 1. There's actually a huge listing, but the “cream” floats to the top.
In order to download the image to your local system, type:
sudo docker pull timhaak/plex
You should see the process as it downloads all the files so you can create your own container from the downloaded image. Remember, downloading the image doesn't create a container, it just downloads the “cake mix” so you can start up your own instance.
Once it downloads all the information it needs, you can type:
sudo docker images
You should get a listing of all the images stored on your local system, and you should see the timhaak/plex image listed. You'll probably also see a “debian” image that has been downloaded automatically as well. The plex image builds on top of the debian image, so it downloads that too. When you start the container, it won't create a separate debian container, it will pull what it needs (as defined by the plex image) from the debian image and include it in the running container.
In my case, I need to have the Plex app be able to access my video files. I also want the log files to be accessible from outside the container, so I can see what's going on from the outside. I created a shared folder on my host computer called /mnt/docker/plex, and I have my videos stored on /mnt/videos. Once those places have been created (again, not always necessary, but in this particular case, I need to access the videos!), the last step is creating the container. Here is the command I use (I'll go over it piece by piece afterward):
sudo docker run -d --net="host" \
-v /mnt/docker/plex:config \
-v /mnt/videos:data \
-p 32400:32400 \
timhaak/plex
I used the backslashes because it's a really long command, but it can all be typed on a single line since it's really just a single command. Here's the breakdown:
sudo docker run — This tells Docker to create and execute a container.
-d — This is a flag specifying that I want the container to run as a dæmon in the background.
--net="host" — This specifies that the container will be sharing the host's IP address.
-v /mnt/docker/plex:config — This tells Docker to create a folder inside the container located at /config that is mapped to the host system's /mnt/docker/plex folder.
-v /mnt/videos:data — Another shared folder, this maps the /data folder inside the container to the /mnt/videos folder on the host system.
-p 32400:32400 — Here the single port 32400 from inside the container is mapped to the host system's 32400 port. That makes Plex accessible from other computers.
timhaak/plex — This specifies the image to use when creating the container.
As long as you don't get any errors, you should be returned to the command-line prompt. Head over to a Web browser and visit http://host-ip:32400/web/, and see if you can connect to the Plex server! (Note: host-ip in that URL is the IP address of your host system.) Figure 2 shows my Plex server running from a container.
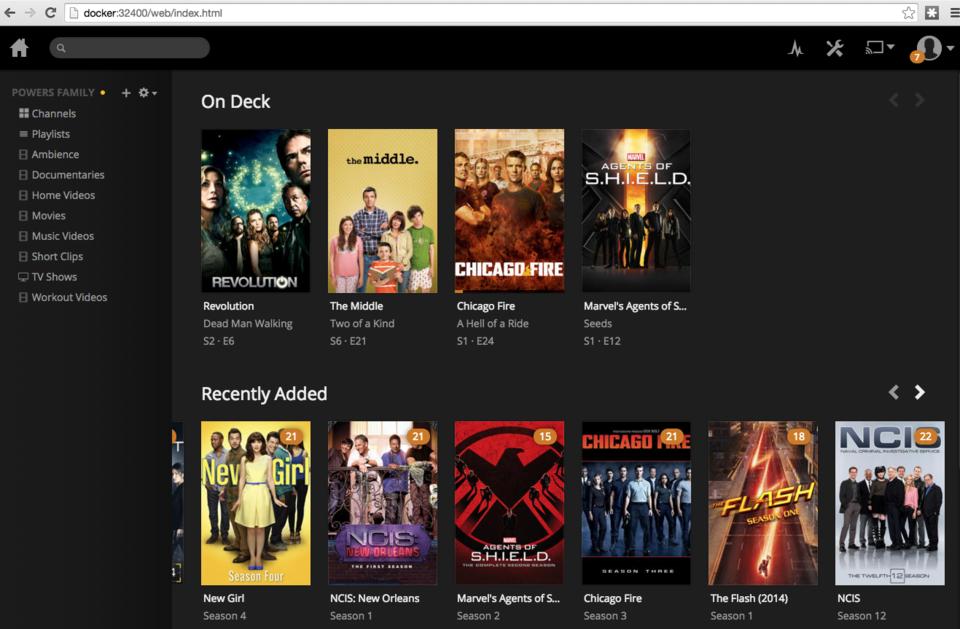
Figure 2. Don't judge me on the shows my family watches!
Of course, my screenshot shows my Plex server after it has been configured. The first time you visit the server, you'll need to configure it for your own system. Still, it should be that easy to get the container running.
shows you the images on your system, you can see the containers on your system by typing:
sudo docker ps -a
If you leave off the -a, it will show you only running containers on your system. Once you see the containers that are running, you can start, stop, restart or destroy (delete) them using the docker command. So running:
sudo docker restart CONTAINER_ID
will restart the container specified by the ID. You also can specify the container you want to manipulate by referring to its funny name listed in the “NAMES” column of the ps -a results. For instance, mine is called “sad_babbage”, but yours will be some other two-word name.
There are tons more things you can do with Docker. You can create custom images. You can build your own images from scratch. You can automate the creation and destruction of containers on the fly. In this article, you probably learned just enough to understand what Docker is and how to use it. Hopefully you're inspired to learn more.
If you prefer not to use the command line to deal with images and containers, there also are a few GUI tools. Docker has an official GUI called Kitematic that works about like you'd expect a GUI to work. You can manipulate images and containers by pointing and clicking instead of typing on the command line.
However you choose to use Docker, the important part is not to be afraid of the technology. Even if you never plan to use it in production, I urge you to play with it a bit. Linux containers and Docker specifically are really efficient ways to utilize your resources. Plus, it's really fun!
