
Gain a deep understanding of SSH port forwarding by implementing a streaming video server on a BeagleBone Black.
You probably have used SSH as a remote login shell, but you also can use SSH in a number of unexpected but very useful applications. One such use is tunnelling, or port forwarding, which is an effective method of accessing networked hosts located behind routers, firewalls and NAT gateways. As an added benefit, SSH encrypts the data passing through the tunnel, increasing the security of your communications. This article shows you how to set up stable and resilient SSH tunnels that will survive network outages, computer reboots and idle connection timeouts.
The SSH man page describes SSH as “a program for logging into a remote machine and for executing commands on a remote machine...X11 connections and arbitrary TCP ports can also be forwarded over the secure channel.”
Starting at the socket level, let's take a look at how SSH forwards TCP ports securely. It's easiest to begin with an example.
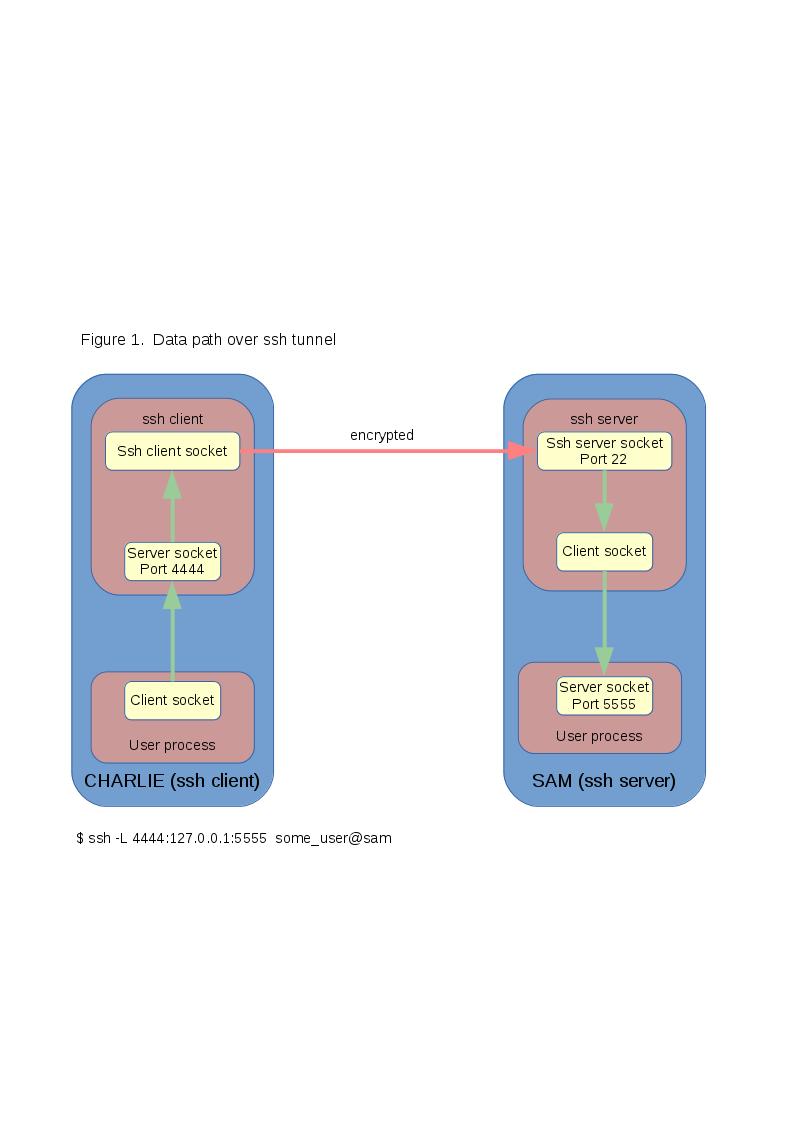
Figure 1. Data Path for TCP Packets Traveling between Hosts Charlie and Sam
Figure 1 illustrates the data path for TCP packets traveling between hosts charlie and sam. In this example, the following command was executed on charlie:
$ ssh -L 4444:127.0.0.1:5555 some_user@sam
This command directs the SSH client on charlie to forward port 4444 to port 5555 on sam. The -L flag indicates that port 4444 is on the local (or client) host, which, in this case, is charlie where the ssh command was executed.
When this command runs, several actions take place:
The SSH program establishes a connection to sam using the default SSH port 22.
The SSH process on charlie creates a server socket bound to localhost:4444 and begins listening.
When an arbitrary user process creates a client socket and connects to the server socket at 4444, the SSH process encrypts the data, then transmits it over the SSH connection (established in step 1) to sam.
The SSH server on sam decrypts the data.
The SSH server creates a client socket and writes the data to the host and port specified in the SSH command, which, in this case, is 127.0.0.1:5555. 127.0.0.1 is, of course, the loopback or localhost address.
The arbitrary user server process on sam that created the server socket bound to 5555 receives the data.
The location of the server socket and client socket is key to understanding how SSH tunnels work. As Figure 1 shows, SSH tunnels always result in the creation of a client and server socket. In a forward tunnel, the local host creates the server socket and the remote host creates the client socket. In a reverse tunnel, the local host creates the client socket and the remote host creates the server socket. The local host is the machine where the SSH command was executed.
The remote host to which the port is forwarded does not have to be the SSH server. Consider the following command executed on charlie:
$ ssh -L 1234:www.some_website.com:80 some_user@SAM
In this instance, charlie creates a server socket bound to port 1234. If you run a Web browser on charlie and point it to localhost:1234, SSH securely forwards the connection to sam, where the SSH server there creates a client socket and connects to the Web server at some_website.com. This command can be used to connect to a server from a private network on which it is blocked.
Reverse SSH tunnels work exactly the same way, except that the remote host creates the server socket and the local host creates the client socket. The -R option instructs the SSH process to create a reverse tunnel:
$ ssh -R 1234:www.some_website.com:80 some_user@SAM
This command executed on charlie creates a server socket on sam at port 1234. A browser running on sam and connecting to port 1234 on sam would have its traffic encrypted and routed to charlie, and thence to some_website.com.
One source of confusion when using 127.0.0.1 (or localhost) in port-forwarding commands is determining which host is the localhost from the point of view of the tunnel. One way to resolve where localhost refers is to remember that a client socket at the end of the tunnel is used to connect to the specified host; thus, localhost is the machine that creates the client socket. For forward tunnels, 127.0.0.1 refers to the remote SSH server, and for reverse tunnels, 127.0.0.1 refers to the client machine where the SSH command executes.
Now, let's look at using SSH tunnelling to stream video from a BeagleBone Black. An Amazon Web server, configured with a public static IP will serve as a relay where the video can be viewed.
Follow these steps to create and configure an EC2 instance. Amazon has an excellent set of instructions on its Web site documenting each step if you encounter problems.
Sign up for an AWS account at https://aws.amazon.com/free. (The AWS Free Tier is free for one year at the time of this writing; however, be aware that if you exceed the bandwidth limit, it will trigger charges to your credit card.)
Open the EC2 dashboard by clicking on the “EC2 virtual servers in the cloud” tab and create an EC2 instance. Select the Ubuntu Server 14.04 LTS (HVM) image. Note carefully the location of the downloaded private key file (.pem), as you will need it to ssh in to your EC2 instance.
Assign a public static IP to your instance using the Elastic IP tab under the EC2 dashboard.
Open port 5555 on your instance by creating a new security group.
Assign the newly created security group to your instance.
The final step is to configure the keep-alive time for the SSH server. Append the following lines to /etc/ssh/sshd_config (note: it is sshd_config, not ssh_config):
# vi /etc/ssh/sshd_config
ClientAliveCountMax 3
ClientAliveInterval 60
Then reboot:
$ sudo shutdown -r now
ClientAliveInterval is a timeout interval. If a connection has been idle for ClientAliveInterval seconds, the sshd server will send a message through the encrypted channel to request a response from the client.
ClientAliveCountMax sets the maximum number of client alive messages, which may be sent without any client response. If this threshold is reached, sshd will disconnect the client, terminating the session.
Many intermittent BeagleBone Black problems can be resolved by using a 5V 2A DC power supply instead of powering the BeagleBone over USB. Likewise, it is safer to use a powered USB hub when connecting multiple USB devices.
I used a BeagleBone Black Rev C to complete the steps outlined in this article. The default Debian image as shipped at the time of this writing was Debian GNU/Linux 7.4 (wheezy):
$ lsb_release -a
No LSB modules are available.
Distributor ID: Debian
Description: Debian GNU/Linux 7.4 (wheezy)
Release: 7.4
Codename: wheezy
The kernel was upgraded to 3.8.13-bone79 using the built-in script:
$ cd /opt/scripts/tools/
$ git pull
$ sudo ./update_kernel.sh
$ sudo reboot

$ uname -r
3.8.13-bone79
I used a Logitech HD Webcam C270 for the USB Webcam.
To complete these steps, ensure that your BeagleBone has a live Internet connection. Log in to your BeagleBone and type:
$ cd
$ wget https://github.com/shrkey/mjpg-streamer/raw/master/
↪mjpg-streamer.tar.gz
$ tar -xvf ./mjpg-streamer.tar.gz
$ cd mjpg-streamer
$ make
Note that in the following scripts and commands you must replace my_beagle with its IP address.
Plug in your Webcam. You can use lsusb to check that it has enumerated properly:
$ lsusb
Bus 001 Device 003: ID 046d:0825 Logitech, Inc. Webcam C270
If the Webcam doesn't enumerate, leave it connected and reboot the BeagleBone.
Start mjpg_streamer:
$ ./mjpg_streamer -i "./input_uvc.so" -o "./output_http.so
 ↪-w ./www -p 8090"
Check whether the BeagleBone is streaming video by opening a browser in a host on the same network as the BeagleBone and browse to http://my_beagle:8090/?action=stream.
Now, create a script to start mjpg_streamer:
$ cd
$ mkdir scripts
$ cd scripts
$ vi mjpg_streamer.sh
#!/bin/bash
if ! pgrep -f /home/debian/mjpg-streamer/mjpg_streamer
then /home/debian/mjpg-streamer/mjpg_streamer -i "/home/debian/
↪mjpg-streamer/input_uvc.so --resolution QVGA " -o
 ↪"/home/debian/mjpg-streamer/output_http.so -w
 ↪/home/debian/mjpg-streamer/www -p 8090"
fi
$ chmod +x mjpg_streamer.sh
Create a cronjob that checks whether mjpg_streamer is running once per minute:
$ crontab -e
* * * * * /home/debian/scripts/mjpg_streamer.sh
At this point, the video server is running on port 8090 with QVGA resolution and will restart automatically when the BeagleBone is rebooted.
To ssh in to your EC2 instance, you will need to copy the private key to the BeagleBone. The private key is the .pem file that you downloaded when configuring the EC2 instance. You can copy the private key to the BeagleBone using scp (which coincidentally also uses the SSH protocol) to transfer files between hosts. So from the computer where you downloaded the private key, type:
$ scp my_private_key.pem debian@my_beagle: ~/
Now log in to the BeagleBone and type:
$ chmod 0400 my_private_key.pem
Next, look up the public IP of my_amazon. The public IP for my_amazon can be found in the Elastic IP tabs in the AWS console.
Test that you can ssh in to your EC2 instance by typing:
$ ssh ubuntu@my_amazon -i my_private_key.pem
To make things easier, let's set up an alias to store the EC2 information. Append these lines to the end of /etc/ssh/ssh_config:
$ sudo vi  /etc/ssh/ssh_config

Host ec2
        HostName my_amazon
        IdentityFile  /home/debian/my_private_key.pem
        User ubuntu
        ServerAliveInterval 60
        ServerAliveCountMax 2
Replace my_amazon with its public IP address.
The ServerAliveInterval and ServerAliveCountMax are the client-side analogs to ClientAliveInterval and ClientAliveCountMax. They function in exactly the same way.
Now typing the following should log you in to your EC2 instance:
$ ssh ec2
Many how-tos explain how to use SSH commands for port forwarding but fail to describe how to keep the SSH tunnel alive. One common challenge in keeping network connections up is managing the router or firewall inactive connection timeout. Routers often will close a connection if it is idle for a certain period, sometimes closing a connection if it is idle for as few as five minutes. Server reboots and network outages also obviously can kill the tunnel.
Fortunately, there is a ready-made utility that monitors SSH connections and restarts them when they die: autossh. The ServerAlive configuration flags you added to send a packet periodically through the tunnel will defeat the inactive connection timeout.
Install autossh on my_beagle by typing:
$ sudo apt-get install autossh
Now, let's write a startup script that launches autossh at boot time using the init.d facilities. Create a script named tunnel in /etc/init.d:
$ cd /etc/init.d
$ sudo vi /etc/init.d/tunnel

#!/bin/bash
### BEGIN INIT INFO
# Provides:          tunnel
# Required-Start:    $local_fs $remote_fs $network $syslog $named
# Required-Stop:     $local_fs $remote_fs $network $syslog $named
# Default-Start:     2 3 4 5
# Default-Stop:      0 1 6
# Short-Description: Start/stop  ssh tunnel
### END INIT INFO

set -e #abort at first error
LOGFILE=/home/debian/my_autossh.log
export AUTOSSH_GATETIME=0  #Prevents autossh from exiting if first
                           #attempt  fails
export AUTOSSH_PIDFILE=/home/debian/my_autossh.pid

case $1 in
 start)
  su -c "date >>$LOGFILE; autossh -M 0 -N -R 5555:localhost:8090
 ↪ec2 &>>$LOGFILE" -s /bin/bash debian
 ;;
 stop)
  if [ -e $AUTOSSH_PIDFILE ]
   then
   kill -9 `cat $AUTOSSH_PIDFILE`
  fi
 ;;
 *)
  echo "Usage: /etc/init.d/tunnel {start|stop|}"
  exit 1
 ;;
esac

$ sudo chmod +x tunnel
$ sudo update-rc.d tunnel defaults
$ sudo shutdown -r now
Since this is a video streaming application, it is likely that you want to view the video stream on different computers. This can be achieved by allowing the sshd server on your AWS server to forward connections from any host (and by setting a password on mjpg_streamer for security). I'll explain how to do that shortly; however, this exposes mjpg_streamer to brute-force password attacks. The intruder would only be able to view the video stream, but that may not be desirable.
One alternative is to create a forward tunnel and stream the encrypted video over this tunnel. This requires installing the private key on whatever machine you are viewing from, as well as setting up the tunnel.
To reduce typing, create an alias for your EC2 as you did on my_beagle:
$ sudo apt-get install autossh
$ vi ~/.ssh/config
Host ec2
        HostName my_amazon
        IdentityFile  path_to/my_private_key.pem
        User ubuntu
        ServerAliveInterval 60
        ServerAliveCountMax 2
The command to create a forward tunnel to my_amazon is the following:
$ ssh -L 1234:localhost:5555 ec2
The choice of the local server port (1234) is arbitrary; it can be any port. Port numbers under 1024 will require root access, however.
Once this command is executed, start a browser and open http://127.0.0.1:1234/?action=stream.
You should see the live video stream from the Webcam on my_beagle.
You can make this tunnel permanent by adding a startup script following the same model as before:
$ cd /etc/init.d
$ sudo vi /etc/init.d/forwardtunnel
#!/bin/bash
### BEGIN INIT INFO
# Provides:          forwardtunnel
# Required-Start:    $local_fs $remote_fs $network $syslog $named
# Required-Stop:     $local_fs $remote_fs $network $syslog $named
# Default-Start:     2 3 4 5
# Default-Stop:      0 1 6
# Short-Description: Start/stop  ssh forwardtunnel
### END INIT INFO

set -e #abort at first error
LOGFILE=/home/your_username/my_autossh.log  # CHANGE YOUR_USERNAME!!
export AUTOSSH_GATETIME=0 #Prevents autossh from exiting if
 ↪first attempt fails
export AUTOSSH_PIDFILE=/home/your_username/my_autossh.pid # CHANGE
 ↪YOUR_USERNAME!!

case $1 in
 start)
  su -c "date >>$LOGFILE; autossh -M 0 -N -L 1234:localhost:5555
 ↪ec2 &>>$LOGFILE" -s /bin/bash your_username# CHANGE YOUR_USERNAME!!
 ;;
 stop)
  if [ -e $AUTOSSH_PIDFILE ]
   then
   kill -9 `cat $AUTOSSH_PIDFILE`
  fi
 ;;
 *)
  echo "Usage: /etc/init.d/forwardtunnel {start|stop|}"
  exit 1
 ;;
esac

$ sudo chmod +x forwardtunnel
$ sudo update-rc.d forwardtunnel defaults
$ sudo shutdown -r now
Note that you will have to change your_username in the above to your user name.
Unsecured video streaming permits anyone with the correct user name and password to connect to the mjpg_streamer server and view the video stream. Although mjpg_streamer has password protection, it is vulnerable to brute-force attacks. However, the convenience of viewing the video stream from any platform without the private key and without setting up a forward tunnel may be worth it.
First, let's add some security by requiring anyone viewing the Webcam to authenticate with the correct user name and password by using the authentication option to mjpg_streamer.
On the BeagleBone:
$ vi /home/debian/scripts/mjpg_streamer.sh
#!/bin/bash
if ! pgrep -f /home/debian/mjpg-streamer/mjpg_streamer
then /home/debian/mjpg-streamer/mjpg_streamer -i "/home/debian/
↪mjpg-streamer/input_uvc.so" -o "/home/debian/mjpg-streamer/
↪output_http.so -w /home/debian/mjpg-streamer/www -p 8090
 ↪--resolution QVGA -c userNamE:Passw0rd"
fi
$ shutdown -r now
Change userNamE:Passw0rd to one of your own invention. The user name is unrelated to any account on your BeagleBone.
The second change is to set the GatewayPorts flag to yes on the Amazon Web server:
# vi /etc/ssh/sshd_config
ClientAliveCountMax 3
ClientAliveInterval 60
GatewayPorts yes
# service ssh restart
Once the SSH tunnels are re-established, browsing to my_amazon:5555/?action=stream will open the video stream after entering the correct user name and password. The GatewayPorts flag controls whether the sshd server forwards connections from external hosts (GatewayPorts yes) or only from localhost (GatewayPorts no).
In this article, I have described how to set up secure and reliable SSH tunnels, explained the underlying mechanism behind SSH tunnelling and implemented a secure video streaming server accessible from external networks without requiring any router or firewall changes. Another configuration you might explore is a tunnel to an sshd server on your BeagleBone. With this tunnel, you could log in remotely from any external network. Happy tunnelling!
