
A high-resolution wireless IP camera for less than $100? You bet!
During the past few years, my BirdCam setup has evolved significantly. As I mention in the UpFront section of this issue, I hope to get the stream transferred to a YouTube Live stream at some point, so I can watch the feathery show on my television. And although watching the birds is the end goal, I'm constantly on a mission to improve the quality and flexibility of my setup.
Right now, the “best” quality video comes from Logitech 720p cameras that connect to my motion server via USB. (You can check out the setup in previous articles—just search for “birdcam” on www.linuxjournal.com, and you'll find lots of information.) I've purchased several IP cameras, but each one has its limitations and frustrations. For one, the quality of an IP video camera is just not as sharp as a photo from a local device—at least not without spending literally thousands of dollars for a high-quality IP camera from Axis. I figured there must be an easier way, and with the dawning of the Raspberry Pi 3 era, I think I found it.
The RPi3 has built-in Wi-Fi. That means I can access it without worrying about Ethernet cabling. And, that means I can potentially put it outside without trying to weatherproof a network cable or figure out how to poke a hole in my house to get the Ethernet inside!
The RPi3 has an incredible camera module. Literally the day after I purchased my 5 megapixel camera module, RPi released an 8 megapixel camera, which means if you buy now, you'll get even better results.
The RPi3 is small. That's important, because I plan to put everything inside a weatherproof project case and mount it outside next to a bird feeder that isn't right outside my window (they all are now by necessity).
The RPi3 is fairly inexpensive, especially when compared to an IP camera with similar image quality. The RPi3 itself is about $35, the camera is $25, and I have a pile of MicroSD cards and MicroUSB chargers lying around. Even with the cost of the project box (around $15), it's all less than $80.
Since the Raspberry Pi device I'll be setting up is a full-blown Linux computer, the configuration options are endless. It's possible to install Motion on the little beastie and handle motion detection fully on the RPi. I already have Motion installed on my Birdcam server though, so what I want is for the Raspberry Pi simply to serve out a stream that my existing server can use to capture movement like it does with the USB cams locally connected.
My first attempt at creating the perfect RPi IP camera (RPIPCam?) included compiling mjpg_streamer and creating an MJPEG streaming camera that could be added to the Motion setup on my BirdCam server. I realized after the fact that Motion would be just as happy with a simple Web server on the RPi serving up a still image, then constantly re-downloading that image. It means my Raspbian Linux image doesn't have to have any custom software installed at all, which is ideal.
The first step is to install Raspbian. This is done easily by getting the NOOBS zip file from https://www.raspberrypi.org/downloads/noobs and unzipping it onto your freshly formatted MicroSD card. Don't let the insulting name fool you; NOOBS is incredible. It allows you to install a variety of distributions, and it does all the heavy lifting. I can't recommend it enough.
Once you get the file unzipped onto your MicroSD card, connect the RPi Camera Module via ribbon cable, an HDMI monitor, USB mouse and USB keyboard. It's possible to install without all that, but it's much nicer to use a keyboard/mouse/monitor while installing. You won't need them later, but at first, save yourself a lot of hassle and set it up like you would a desktop.
During the setup process, you'll be asked what OS you want to install. Don't bother setting up the network yet, because although a working network will allow you to install other operating systems (like the awesome OpenELEC), it won't save your Wi-Fi settings, and you'll have to set it up again anyway. Raspbian will be the only option, which is what you want.
Once Raspbian is installed, you'll reboot the system, and it should come up into a GUI desktop. Thankfully, if you set up Wi-Fi now with the GUI tool, it will save the configuration for you and automatically connect even after you turn off the GUI. While you're still in the GUI, open a terminal window and figure out your MAC address so you can configure DHCP to give the RPi the same address every time. At the very least, type ifconfig and see what your IP address is so you can connect to the device over the network later.
Once you know your network information, type sudo raspi-config to start the Raspbian configuration tool. Inside the text menu system, you want to do four things:
Enable the camera. It's a menu option. You'll simply select “enable” in the menu, and that should be it.
Change the “pi” user's password.
In the “boot options” menu, choose the console option requiring login.
In “advanced options”, make sure the SSH server is enabled.
When you're finished, type sudo reboot and wait for the RPi to boot back up. Make sure the GUI doesn't start, and make sure you can ssh in to the RPi from another computer. Once you're sure it's working, you can disconnect the monitor, keyboard and mouse.
The only software I installed on my RPi, in addition to what came by default, is the lighttpd package. It's a very fast, simple Web server. Since all I need to do is serve out an image via HTTP, it's perfect. So, if you're following along, ssh in to the Raspberry Pi and type:
sudo apt-get update
sudo apt-get install lighttpd
The next step is to start taking photos and serving them out, but before doing that, check to make sure the camera module is working. On the terminal, type:
vcgencmd get_camera
You should see something like this:
supported=1 detected=1
If not, run raspi-config again and make sure the camera module is enabled. You may need to reboot. It should work out of the box without any additional software. I spent a long time trying to troubleshoot a non-working camera, and it turned out to be a bad camera. With a working unit installed properly, with the ribbon cable in tight, the camera worked right away. Double-check the connections, but if it appears to be connected and just won't work, perhaps you have a bad camera. I doubt bad cameras are common, but since I purchased two cameras and one was broken, my track record shows they have a 50% failure rate. (Never do statistics with small sample sizes!)
Once the camera reports that it is working, you can start taking photos. The built-in programs are really the best (possibly only) way to do this. Run the raspistill command and have it take a new photo every 100ms, overwriting the previous photo each time. Here's the command:
raspistill --nopreview -w 1280 -h 720 -q 80 -o /dev/shm/pic.jpg
 ↪-tl 100 -t 0 -th none
And, this is what the flags do:
--nopreview: You aren't using a GUI, so there's no point in trying to generate a preview image to see on the monitor.
-w: width of the snapshot, in pixels.
-h: height of the snapshot, in pixels (the camera can do much more than 720p, but that's the size I want for my BirdCam).
-q: quality 0–100; the bigger the number, the higher the quality, but also the bigger the filesize. Experiment and find your happy compromise. Keep in mind the limitation of Wi-Fi speeds.
-o: Where to save the file. Since you want it to overwrite, this is a static location. I always put it in /dev/shm/, because that's the ramdisk on the machine, and it won't wear out the SD card with constant writing.
-tl: time between snapshots. I set this to 100ms so the “video” results in about 10fps. You might need to go slower depending on resolution and quality. Just watch the output for dropped frames.
-t: how long to keep capturing before stopping. This defaults to 5 seconds, which does no good. Setting it to 0 seems to make it never timeout.
-th: the size and quality settings of the thumbnail image. You don't want a thumbnail here, so “none” simply makes sure none are created.
The only other configuration to make is to link the image file so that it can be seen remotely via HTTP. Since you installed lighttpd earlier, just type:
sudo ln -s /dev/shm/pic.jpg /var/www/html/pic.jpg
Then see if it's working by opening a browser window and heading over to http://raspberry.pi.ip.address/pic.jpg, and you should see a still image. If you refresh the browser, you should see a new image. Move the camera a bit to make sure when you click refresh, you're seeing a new image. Note that the image won't refresh automatically in your browser yet, but if you manually refresh, you should see the updated image.
If it's working as expected, go back to the SSH terminal and press ^C to stop the raspistill process. If you want it to start automatically, I recommend typing crontab -e and then making an entry like this in the crontab file:
@reboot raspistill --nopreview -w 1280 -h 720 -q 80 -o
 ↪/dev/shm/pic.jpg -tl 100 -t 0 -th none > /dev/null 2>&1
That will start the process on boot and send all the output to /dev/null so you don't get constant e-mail messages from the cron dæmon.
I love mock-ups. In fact, on about half my projects, I never really go beyond the mockup stage. Quite frankly, I'm just impatient and want to make something work quickly! So my first implementation of the RPi IP Camera looks like Figure 1. I propped the box against my office window and was able to get a pretty decent image (Figure 2). Keep in mind that the image isn't even close to the maximum image quality the RPi camera can manage, and it's really quite awesome. One frustration I have is that the RPi camera module has “infinite focus”, so it can't be adjusted for macro shots. If you look at Figure 3, you'll see the difference. That's with my Logitech USB camera, which supports manual focus. I like the sharp image with the fuzzy background a bit more. Still, the images from both are very high quality. And, since 1280x720 is fairly low resolution for the RPi camera, I'm very happy.

Figure 1. My “mock-ups” usually deserve to be mocked.
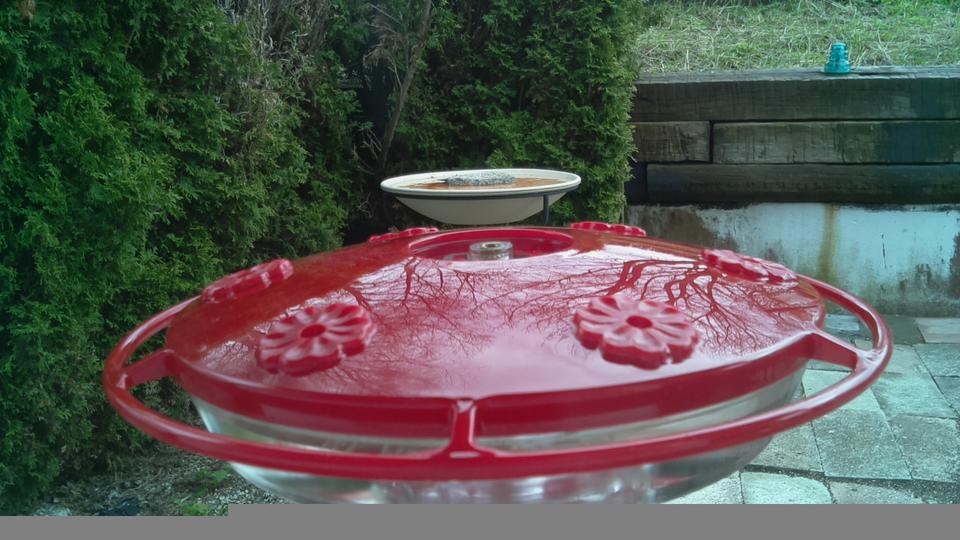
Figure 2. This is the hummingbird feeder as recorded via the Raspberry Pi camera.

Figure 3. This is the hummingbird feeder as recorded via the Logitech USB Webcam.
Remember, since the Raspberry Pi is a complete computer, you don't need to implement Motion on another system. In my case, the Motion install is on another computer, but yours doesn't have to be.
I won't go into the setup process for Motion itself, because that's covered in depth in my past BirdCam articles. What I will show you, however, is how simple it is to configure a new thread.conf file for the new camera you just created. In /etc/motion/, I created a new file, thread4.conf, which I included in the main /etc/motion/motion.conf file. Here's what thread4.conf looks like:
framerate 10
output_normal on
quality 80

webcam_port 8084
webcam_quality 75
webcam_maxrate 10
webcam_localhost off
webcam_maxrate
webcam_limit 0

netcam_url http://rpi.ip.address/pic.jpg
netcam_tolerant_check on
There are lots of other things you can configure with Motion, like capturing motion, movies and so on. This simple configuration file, however, turns the simple .jpg file served by the RPi into an MJPEG stream, which can be viewed on port 8084. So if you load up http://birdcam.ip.address:8084, you'll see a full-motion MJPEG video stream!
My next step is to put the RPi IP Camera into my weatherproof project box. I have the box (Figure 4) and plan to do the following for my final product:
Cut a hole in the plastic box for the camera to see through, then cover the hole with a piece of glass from an old photo frame. I'll use silicone sealant to make sure the hole is waterproof, and I'll mount the camera with double-sided tape or possibly hot glue. I'll also cover the bright-red LED on the camera to avoid glare.
Experiment with mounting lenses from cheap reading glasses over the camera. I'd like to mount the RPi IP Camera very close to a bird feeder, so I might need to use the reading lens to make a low-tech macro lens for the camera.
Secure the MicroUSB transformer inside the project box so that during the winter, the transformer's warmth will keep the RPi from freezing. I'm not sure of the operating temperature for the camera unit, but the transformer should keep the box warm enough.
Drill and seal a spot for an extension cord to come out of the project box. I want it to be airtight, so more silicone sealant will be involved.

Figure 4. The project box was $15 on Amazon and will have plenty of room for everything.
Honestly, I really want to make the camera solar-powered. I could mount a solar panel on the roof of a bird feeder, and then use that to power a lithium-ion battery to run the RPi. The biggest problem is that Raspberry Pi computers tend to be very sensitive to voltage changes and reboot easily. My concern is that the charging/powering circuitry is beyond my ken right now. I'd ideally like to get a solar cell powerful enough to charge a battery that will keep the RPi running all night. But, that's a project for another day!
If you do any interesting projects inspired by or similar to my BirdCam, I'd love to hear about them. In the meantime, keep an eye on birds.brainofshawn.com, because I plan to make lots of enhancements this summer!
