
Use a Raspberry Pi and inexpensive components to detect cellular man-in-the-middle attacks.
The technical and financial barriers for entry into the world of cell-phone interception technologies seem to be on a race to the bottom. Building a device for intercepting cell-phone calls is something one can accomplish without a deep knowledge of GSM networks for around $600.
Sometimes labeled as IMSI (International Mobile Subscriber Identity) catchers, Cell Site Simulators or Evil BTS (Base Transceiver Station), these devices can be used to identify an individual cell-phone account holder by fooling the phone into transmitting the IMSI, which is a unique ID burned into your phone's SIM card. Moreover, these devices can be used to record cell-phone conversations and SMS messages. To complicate the issue, cell phones, by default, don't have a method for ascertaining the trustworthiness of the BTS before association (this is specifically a problem with 2.5G GSM networks). The implications are serious for everyone from foreign media correspondents to CFOs, where an intercepted conversation could compromise the safety of a source or lead to insider trading or even market manipulation.
Without a doubt, the use of such a device is quite illegal. Detection, however, proves challenging. Without installing software onto your smartphone to interrogate the cell radio—see AIMSICD (https://github.com/CellularPrivacy/Android-IMSI-Catcher-Detector) and Femto Catcher (https://github.com/iSECPartners/femtocatcher)—you don't have a great way to know if your phone is associating with a known good BTS. Established open-source detection methods often have revolved around the use of Software-Defined Radios (SDRs) in a dedicated piece of hardware or installing software on the phone itself to put the handset into airplane mode in the event that a questionable BTS association occurs.
Rogue BTS detection has found its way into commercial offerings with PwnieExpress and Bastille Networks, but you're not here for a commercial product pitch, and the author doesn't work for either of those companies. The author is pitching SITCH, which stands for Situational Information from Telemetry and Correlated Heuristics. SITCH is open-source, the cost per-sensor is around $150, and you easily can source the parts from your favorite maker-oriented electronics vendor.
Before looking at how SITCH works and how to set it up, let's have a closer look at currently available methods for solving the problem of detection. One of the projects that inspired the early design of SITCH is Pedro Cabrera's FakeBTS (fakebts.com/en). It uses a Bash script to coordinate and analyze output from Airprobe and Wireshark to track nearby BTSes. This is an SDR-centric approach, which lends itself to using inexpensive hardware and takes more of an objective approach to the detection of rogue BTSes. Other methods, like the Android IMSI Catcher Detector (AIMSICD), involve interrogating the phone's cell radio and, therefore, produce a more subjective analysis, based on the radio's preference of nearby BTSes for association. These represent two methods: SDR-based scanning and GSM radio interrogation. Both of these methods are incorporated in SITCH.
SITCH Overview
Now, let's consider how these methods come together in SITCH. SITCH uses an SDR device for tracking the observed power of GSM channels. The SDR USB dongle used in development is the RTL-SDR-based NESDR XTR from NooElec. The open-source software tool used to operate the SDR dongle and process the signal is called Kalibrate. Kalibrate typically is used for determining the frequency offset for an SDR device. This is necessary because the tuner components in software-defined radios are notorious for drifting high or low, sometimes just because of a variation in ambient temperature. I'm not using Kalibrate for determining frequency offset here though.
Kalibrate produces a number representing the power of the signal for each channel it detects. For the remainder of this article, I refer to this channel as ARFCN, which stands for Absolute Radio Frequency Channel Number. Within each ARFCN, there is a frequency correction channel. This is what GSM radios use to calibrate themselves. Think of a musician using a tuning fork as a reference pitch for tuning a horn. The Frequency Correction Channel (FCCH) is what Kalibrate uses to produce a list of ARFCNs.
The SDR approach takes around seven minutes to scan an entire GSM band, and it can positively detect when a femtocell goes live nearby. Femtocells are the range-extender devices that your cell-phone provider will sell you if you have bad reception indoors. Although these devices often are legitimate, they haven't proven invulnerable. Live hacking of a femtocell has been demonstrated (https://www.nccgroup.trust/us/about-us/newsroom-and-events/blog/2013/august/femtocell-presentation-slides-videos-and-app), and it's just as effective as an evil BTS at capturing communications traffic. For a more subjective reading, SITCH interrogates a GSM radio to determine the BTSes it prefers to associate with, which takes into account more than just signal strength.
The use of a GSM radio can get results in seconds, which is far better than waiting the seven minutes required for the SDR scan, and with more detailed information than you get using Kalibrate. Where SITCH's SDR approach is lacking is in producing information you can use to identify a specific provider's network, like the Mobile Country Code (MCC) and Mobile Network Code (MNC), which are used to identify a specific cellular network service provider. The information provided by the GSM radio goes even further by providing MCC and MNC along with Location Area Code (LAC) and CellID (CID), and when these network identifiers are combined (MCC+MNC+LAC+CID), you get the Cell Global ID (CGI). You never should see the same CGI in two different locations.
The actual detection process happens in two stages. The first part occurs within the SITCH sensor itself. The information gathered is compared against two data feeds. One feed is derived from the FCC license database, which tells what frequencies are licensed to each provider and the geo-location of the tower permitted to operate on that frequency. The second data feed is the OpenCellID database (opencellid.org). This is a crowd-sourced feed of observed BTSes. Using these two feeds with the information you collect, you can determine the following:
Is the observed ARFCN licensed to operate in this area? (ARFCN comes from both SDR and GSM radio observations.)
Is the observation of this CGI in this area corroborated by the OpenCellID feed (comparing GSM findings and OpenCellID database)?
Has there been a change in preferred BTS (tracking the GSM radio's preferred BTS)?
Has an ARFCN been observed over the site threshold I set (able to set a per-sensor ARFCN power threshold)?
In addition to tracking cellular network information, functionality recently has been added to detect GPS spoofing (www.rtl-sdr.com/spoofing-gps-locations-with-low-cost-tx-sdrs), using GeoIP and a GPS dongle. GPS spoofing has a great potential for mischief, especially if used to defeat geolocation-based phone unlocking like Google's Trusted Places (www.androidcentral.com/how-add-trusted-place-android-50-lollipop).
The second method of detection happens in the service side of SITCH. I'm using a time-series database to track measurements over time, and I can use this to find anomalies. This is especially useful for tracking ARFCN power as reported by Kalibrate.
SITCH System Details
SITCH was designed so that once you have the back-end services set up, it is as simple as plugging components into a Raspberry Pi 2, imaging and installing an SD card, and providing power and connectivity to the device. Device updates are managed by a service called Resin.io, so ideally, you never have to touch the device again, except to decommission it. No more SD card re-imaging to update the software—it's all delivered automatically, to all of your sensors, within minutes of building the new version of the software. All the telemetry information flows up to the service (which you host with your favorite cloud provider). Alerts generated by the system are delivered through Slack, and you optionally can forward the collected information to the log aggregation or SIEM system of your choice, provided there's a Logstash output plugin that will facilitate the information delivery for you.
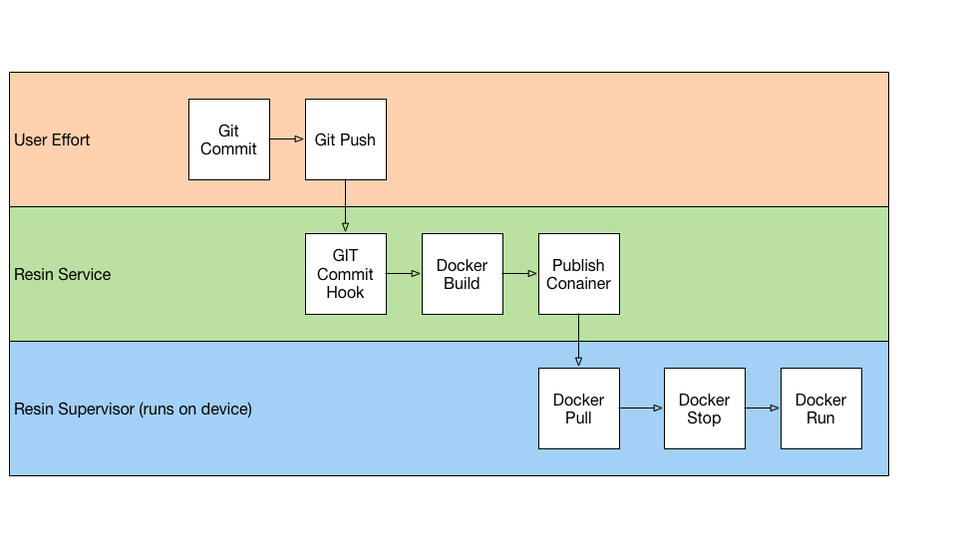
Figure 1. One code push to Resin causes all sensors to update, hands-free.
The service side of the SITCH system is composed of a few components. Resin.io is used for managing the device software and runtime variables. Elasticsearch-Logstash-Kibana (ELK stack) is used for aggregation and storage. Graphite and InfluxDB are interchangeable in the SITCH service. However, testing uncovered the hazard of using Graphite/Whisper, which allocates files for the entire lifecycle of a metric as soon as it's first observed, in an environment where the metric namespace can rapidly expand. Slack is used for alerting. Vault (https://www.vaultproject.io) is used for the secure distribution of certificates and keys to sensors. Although it sounds like a lot to manage, much of this has been containerized and automated to get you up and running rapidly.
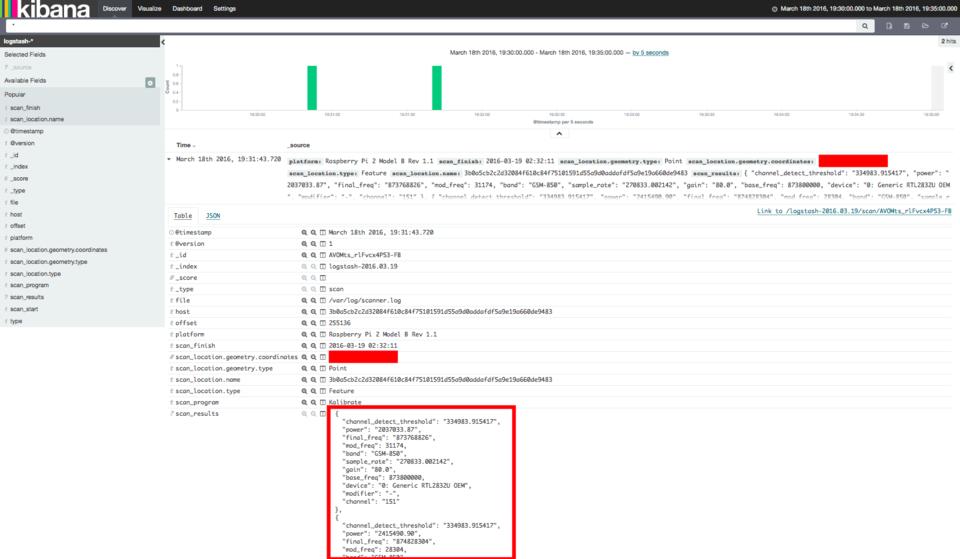
Figure 2. Kalibrate Scan Results Viewed in Elasticsearch
The SITCH sensor itself is based on the Raspberry Pi 2 platform. SDR functionality is provided by a USB RTL-SDR device (www.nooelec.com/store/sdr/sdr-receivers/nesdr-xtr-rtl2832u-e4000.html). The GSM modem used in testing is a SIM808, but the AT command set used for interacting with the modem is general enough that many GSM modems will work.
Here's the sensor parts list:
16GB MicroSD card (faster is better).
NooElec NESDR XTR (NESDR Mini will work too, but only for the lower-frequency 850–900MHz bands).
SIM808 GSM breakout board.
GSM antenna (frequently sold with the SIM808).
Some SIM808 modules require a lithium-ion battery.
ND-105C GlobalSat USB GPS dongle.
USB-to-serial RPi console adapter (consider Adafruit product 954).
Power supply for the Raspberry Pi (>=2A).
USB cable for relocating the SDR dongle (due to its size, it can block other USB ports).
USB cable for providing power to the GSM modem.
Ethernet cable or Wi-Fi adapter.
Services you'll need logins for:
Choose a cloud provider. Nothing here is provider-specific. You just need to be able to instantiate Linux instances.
GitHub: set up multi-factor authentication (MFA).
Resin.io: https://resin.io (use MFA here as well).
OpenCellID: opencellid.org.
Slack.
Twilio (API credentials).
Your favorite domain registrar (as long as it provides DNS too).
Docker Hub: https://hub.docker.com (if you plan on modifying any of the base images).
Setting Up the SITCH Service
Before getting started, a few caveats. This walk-through is going to provide you with a demo-grade service. You're urged to consider using Kubernetes, Mesos + Marathon, or another more resilient platform to get the benefit of a more self-healing application. That being said, the components are all containerized, so restarting pieces in the event things get weird is trivial. For the sake of brevity, some common administrative tasks are not covered in detail. You can find more documentation and troubleshooting information at sitch.io.
Instance Creation
Create one Linux instance with at least 4GB of RAM and 8GB of disk space on the root volume, and add a second volume with at least 40GB of space. This demo relies on Docker, not any specific Linux distribution. Allocate a static IP to the instance and give it a DNS name. Initially, you need only SSH access. Make sure that your instance is only reachable via SSH from your current IP address. Once the instance is alive, ssh in, format the 40GB volume with XFS, and mount the 40GB volume under /opt/shared.
Obtaining Certificates
I use EFF's Certbot to obtain certificates for the web server portion of the service (letsencrypt.readthedocs.io/en/latest/install.html?highlight=docker#running-with-docker). Open up TCP ports 443 and 80 for inbound access so that the Let's Encrypt service can verify your control of your server's DNS name. Next, run this command:
docker run -it --rm \
-p 443:443 -p 80:80 \
--name certbot \
-v "/etc/letsencrypt:/etc/letsencrypt" \
-v "/var/lib/letsencrypt:/var/lib/letsencrypt" \
quay.io/letsencrypt/letsencrypt:latest \
certonly
This runs the certbot container image, which will walk you through the process of obtaining a certificate for your environment. Close TCP port 80. You won't need it again until you renew the certificates. You also should consider only leaving TCP port 443 open to IPs where your sensors will live.
Setting Up Your Own Vault
I use Vault by Hashicorp to store the crypto material for securing the sensor-to-service communication. Start up Vault, mounting in the certificates created in the prior step:
docker run -d  \
--cap-add=IPC_LOCK \
-p 8200:8200  \
-v /etc/letsencrypt/:/etc/letsencrypt/ \
-e 'VAULT_LOCAL_CONFIG={"backend": {"file": {"path":
 ↪"/vault/file"}},"listener":{"tcp":{"address":"0.0.0.0:8200"
↪,"tls_cert_file": "/etc/letsencrypt/live/YOUR_DOMAIN_NAME_HERE/
↪fullchain.pem","tls_key_file":"/etc/letsencrypt/live/
↪YOUR_DOMAIN_NAME_HERE/privkey.pem"}},"default_lease_ttl":
 ↪"7200h", "max_lease_ttl": "7200h"}' \
--name sitch_vault \
vault server
Replace YOUR_DOMAIN_NAME_HERE in the above command with the DNS name of your server, which is the same name that you used in the Certbot wizard, above. Running docker ps should confirm that the vault service is now up and running. Next, you need to unseal the vault and obtain a root token.
To unseal the vault, start with this: docker exec sitch_vault vault init --tls-skip-verify You'll see something like Figure 3.
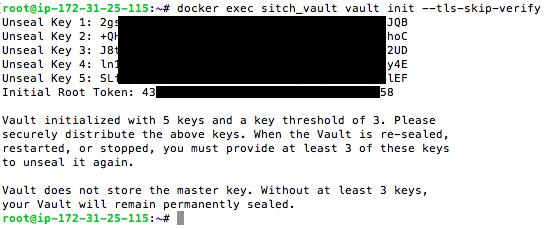
Figure 3. Output from docker exec sitch_vault vault init --tls-skip-verify
To unseal the vault, run this command:
docker exec -it sitch_vault vault unseal --tls-skip-verify
That will result in a prompt requesting a key. Copy/paste one from above. Do this three times total, using a different unseal key each time, and the vault will unseal. You should see output from the final command that reads: Sealed: false. Record your Initial Root Token in your password manager.
Populating Vault with Keys
Log delivery uses Filebeat and Logstash. These require certificates for operation. Fortunately, the process for generating and uploading it has been automated. First, you'll need to open TCP port 8200 from the world, into your server. Next, you'll run the SITCH Self-Signed Seeder (https://hub.docker.com/r/sitch/self_signed_seeder):
docker run -it \
-e VAULT_URL=$VAULT_URL \
-e VAULT_TOKEN=$VAULT_TOKEN \
-e LS_CLIENTNAME=$LS_CLIENTNAME \
-e LS_SERVERNAME=$LS_SERVERNAME \
docker.io/sitch/self_signed_seeder
This will cause the Vault to be populated with certs and keys for sensor and service. Make sure that your LS_SERVERNAME is set to the same hostname as included in the VAULT_URL, because these containers are running on the same host. There are two tokens mentioned in the (quite verbose) output at the end: Client token and Server token. Look under each section and grab the token labeled client-token (Figure 4).
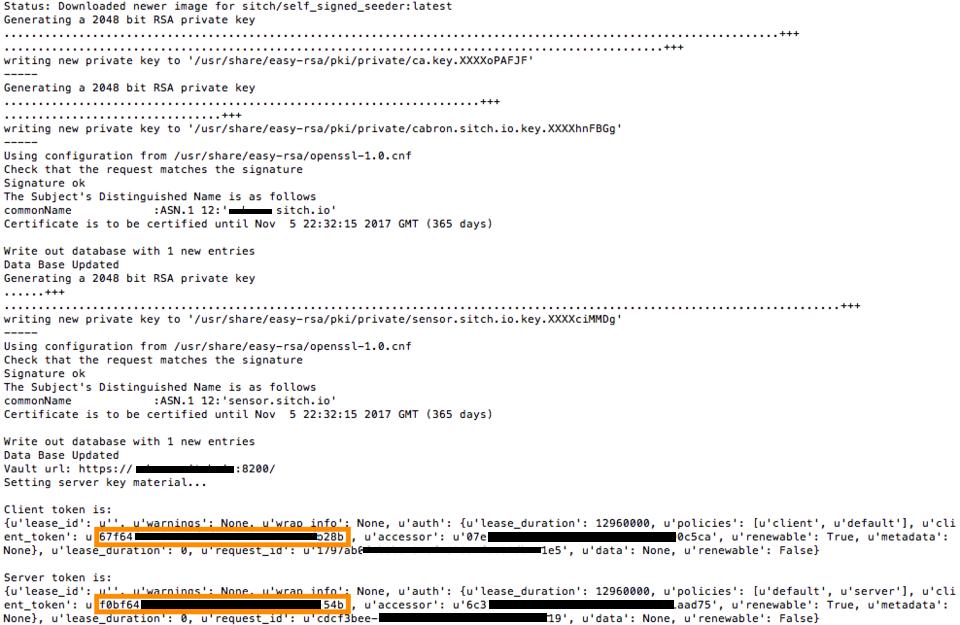
Figure 4. Grabbing the Token
Your Vault is now seeded with self-signed certs and keys for Logstash.
Configuring Storage for Scans
Set up the Elasticsearch and Kibana portions of the ELK stack in whatever manner makes the most sense for your environment. If you're using AWS, you can accelerate this by using the AWS ElasticSearch Service. Use ElasticSearch version 2.3 or greater. Retain the URLs for accessing Kibana and Elasticsearch.
Configuring Logstash for Ingestion
Logstash is used for ingestion of telemetry from the sensors. There's a SITCH spin of the Logstash container—follow the instructions in the README (found at https://hub.docker.com/r/sitch/logstash) to set your environment variables for running the container. Before you complete this step, you'll need access to Slack to create a webhook for notification. GRAPHITE_HOST is the name of your server, and GRAPHITE_PORT will be 2003. The Graphite line protocol is used for delivering time-series information, which is understood by InfluxDB. Finally, open port 5001 so that the Filebeat log shipper can connect to Logstash.
Building the SITCH Data Feed
Now let's build the SITCH feed, which is composed of the OpenCellID database, enriched with information from the Twilio API and the FCC license database. Locate your OpenCellID API key and your Twilio SID and token for API access. Run the container according to the README at https://hub.docker.com/r/sitch/feed_builder. This job will take quite a while to run. If your curiosity demands to see progress, run docker logs -f CONTAINER_NAME to see the feed builder's progress. Don't stop it mid-job, or you may have to wait until tomorrow to try again. The OpenCellID database can be retrieved only once daily, per API key. So let it roll until it's done.
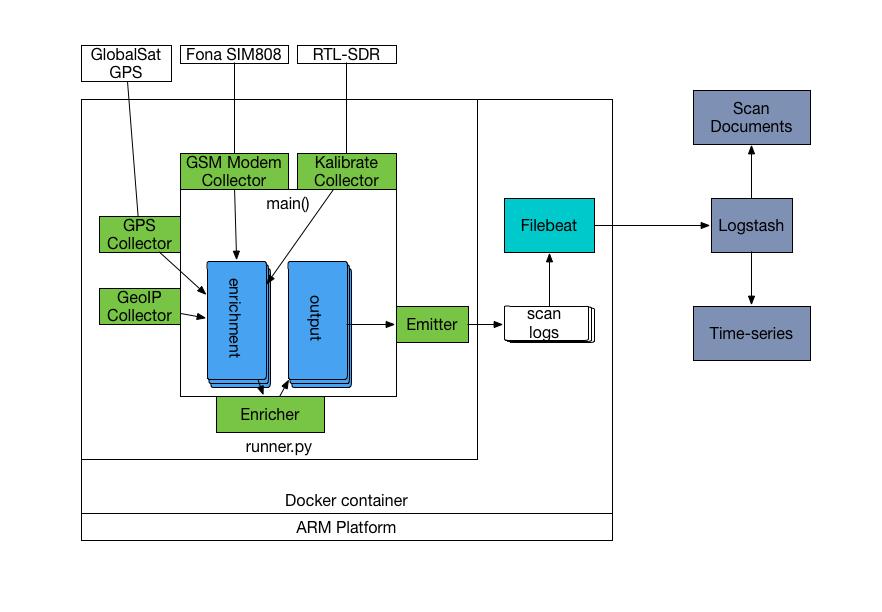
Figure 5. Diagram of Sensor Software and Enrichment Information Flow
Configuring the Time-Series Database
Any time-series database that supports the Graphite line protocol should work with SITCH. For the purposes of this demo, I'm using InfluxDB. Make sure that TCP ports 2003, 8083, 8086 and 1000 are accessible from the server itself, using its own public IP address. Start InfluxDB with this command:
docker run -d \
--name sitch_influx \
-p 8083:8083 \
-p 8086:8086 \
-p 2003:2003 \
-e INFLUXDB_GRAPHITE_ENABLED=true \
-v /opt/shared/influxdb:/var/lib/influxdb \
influxdb
The last step in preparing the persistence layer is Chronograf. I'm using Chronograf to visualize the information stored in InfluxDB. Start it like this:
docker run -d \
-p 10000:10000 \
--name sitch_chronograf \
chronograf
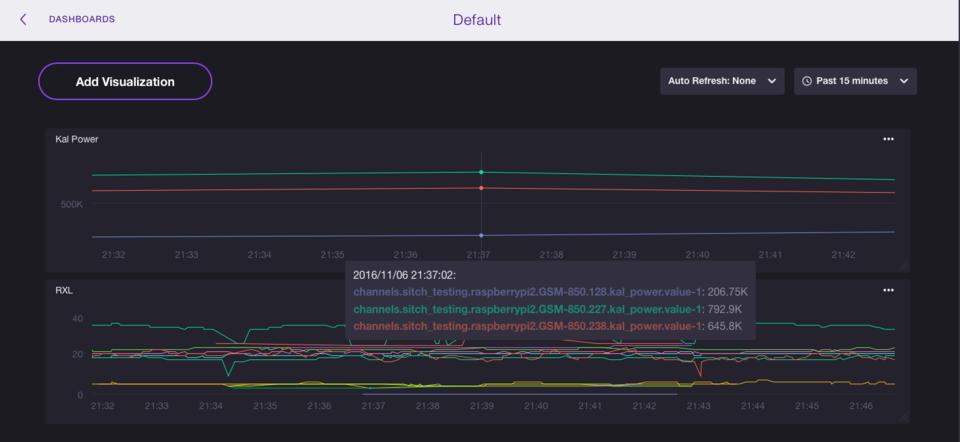
Figure 6. Time-Series Data from Kalibrate and GSM Modem Graphed in Chronograf
Instructions for running the SITCH front-end web server container are at https://hub.docker.com/r/sitch/web. Follow the instructions there and confirm that you can download https://YOUR_SERVER_NAME/310.csv.gz. This will confirm that your feed is built and available for your sensors. Now is a great time to make sure that the ports mapped in for the web container are accessible to you, from your IP address. It's not an awful idea to take it a step further and employ authentication in the web container, or a VPN for accessing it, but that's outside the scope of this demo.
Building the SITCH Sensor
Log in to https://resin.io and create your first project. Name it whatever you like. Click “Download ResinOS” to download the image for your Raspberry Pi. Follow the directions on-screen to image your MicroSD card. Insert the card into the Raspberry Pi 2, and plug in the GPS, SDR and Ethernet cable. Use the USB console cable to attach the SIM808 module to the Pi. Black goes to ground, red to vio, green to rx and white to tx. Give the Pi power and, in a few minutes, verify that the device has registered with your application. Next, set the following environment variables in your Resin project:
FEED_URL_BASE — this should be https://YOUR_SERVER_NAME/.
GSM_MODEM_BAND — try GSM850_MODE.
KAL_BAND — try GSM850.
KAL_GAIN — if you're indoors and have bad reception, try 60 or 80.
KAL_THRESHOLD — threshold for Kalibrate power alarm, try 1000000 for starters.
LOCATION_NAME — text string, no spaces.
LOG_HOST — hostname and port, colon-separated. The port for the Logstash instance created earlier is 5001.
MCC_LIST — this is a comma-separated list of MCCs. USA should be set to “310,311,316”.
MODE — set this to “clutch” to enter a holding state before starting services. It's for debugging. Set it to anything else to run normally.
STATE_LIST — comma-separated list of states to load FCC feed data for. California and Texas would be “CA,TX”.
VAULT_TOKEN — this is the client's client_token you retained from seeding the Vault.
VAULT_URL — this is the same URL you used when you ran the seeder.
VAULT_PATH — set this to “secret/client”.
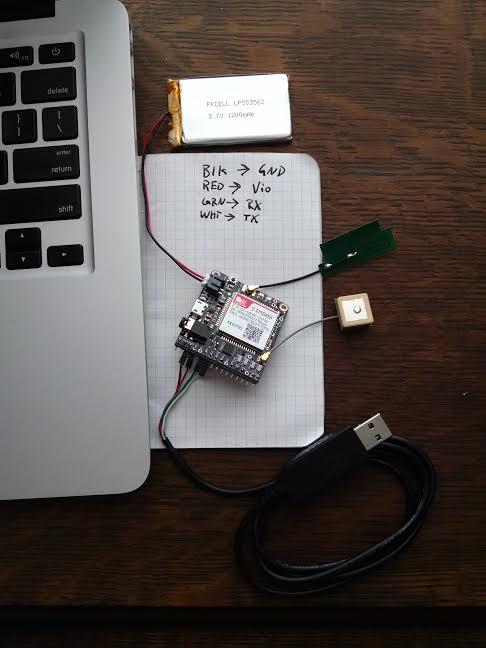
Figure 7. SIM808 Module with USB Console Cable Attached
Clone the sensor repository locally with git clone https://github.com/sitch-io/sensor. Descend into the sensor/ directory and add your Resin application as a remote Git repository using the git remote add... command in the upper-right corner of the screen when viewing the Resin application page in your browser.
Push the sensor software to Resin with git push resin master. You'll notice that it attempts to build the sensor software before accepting the push. After a few minutes, you will see an ASCII art unicorn in your terminal. Within a couple minutes, the application will begin to download to the sensor. Depending on the model of the GSM modem you're using, you may need to locate and press the GSM modem's power button.
As the sensor is powering up, you'll see a lot of information scroll by. Most important, you need to see that the device detector has picked up your GPS and GSM modem. If you're not using a SIM808 module, the README for the sensor repository has instructions for adding the proper init string so that your modem can be recognized (https://github.com/sitch-io/sensor).
As the system is currently configured, you should be able to receive alerts in Slack based on alarms fired from within the sensor itself. The higher-level correlation, for instance, ARFCN power trends, can be accomplished by configuring Chronograf (https://www.influxdata.com/get-started/visualizing-data-with-chronograf) and Kapacitor (https://www.influxdata.com/get-started/configuring-alerts-with-kapacitor) to visualize and alert on the information stored in the InfluxDB time-series database. Start with monitoring kal_power readings over time, and go from there.
Finally, this is where “ease of use” begins. In order to add another sensor, you need to assemble only one, and install the Resin OS, just like you did with the first one. Tweak your sensor metadata in Resin if you need to. You'll likely want to change the site_name environment variable to facilitate distinction between sensors in the data you're amassing. Go ahead and turn up one at every office. Just make sure you have the storage provisioned to support it. If you need to integrate this with your log management system, use the image found at https://hub.docker.com/r/sitch/logstash as a base, and adapt the configuration to accommodate your log management system. This is very much beta-grade software and feedback is greatly appreciated. Feel free to file an issue against the appropriate GitHub project, all of which are accessible via https://github.com/sitch-io.
