
Take a close look at how Trekk uses Flatfish to scrape and share content.
Trekk is a new, innovative Drupal distribution focusing on higher education. Trekk's primary goals are to enable flexible and intelligent content sharing and to simplify launching on to Drupal. As one of Trekk's main developers, I definitely can say that Trekk just wants to make your life easier.
A couple outstanding Drupal distributions already exist (Open Scholar and Open Academy), so I want to outline some use cases to help illustrate Trekk's niche. Primarily, Trekk assumes you either have or want to have several Drupal sites that display the same content. For example, the PR team wants important news and events to show up on every school's or department's Web site, or several professors are cross-listed on department or school sites, or a certificate program contains course information spread across several departments. Traditionally, duplicate content is either (tediously) maintained, out of date or simply but sub-optimally omitted. Trekk aims to solve these key problems for you. Given that universities often have dozens of key Web sites and thousands of pages of content, the other half of Trekk focuses on migration onto Drupal.
If you've ever dealt with homegrown PHP sites, Oracle's dismal 64-bit Linux support, dual-booting Windows to run Microsoft SQL Server or just a whole mess of static HTML pages, you know why I wrote Flatfish (if not, take my word that there was sufficient motivation). Flatfish is a Ruby gem that abstracts the legacy platform's technology stack, so you can use CSS selectors à la jQuery to scrape only the content you want. Trekk then provides built-in support to clean and migrate this data into Drupal.
When I talk about sharing content across sites, I really mean more than that. If you just wanted to display some simple content on two or more sites, you could do that using Drupal core and standard contrib. The Views module could provide an outbound RSS feed, and the other site(s) could use Feeds to consume the content. This architecture falls down though when you have complex data and/or what I would call a real-world workflow. Trekk conceptually builds on this Views+Feeds approach to create a lightweight content server. A Trekk server uses Views and Services to expose JSON endpoints. Trekk clients then can access the server securely and get the content they need.
Additionally, Trekk clients can manipulate the data into multiple formats. For example, a client site can consume the JSON and create Drupal nodes. This lets the client site control the display through the use of Views, Display Suite or Panels. You also could write a simple extension to the Trekk Server to share HTML, and then client sites could show this directly via Panels. It allows for a tremendous amount of flexibility in how the client sites use the shared content. This is key in helping school and department sites maintain their autonomy, but it also allows for better brand compliance and centralized control where appropriate. Trekk allows you to build a system that meets your unique requirements. The Trekk client is robust and uses Migrate under the hood to create the Drupal nodes. There is the added benefit of controlled updates and access to the Migrate plugin ecosystem. And, returning to the Views+Feeds comparison, Trekk preserves relationships. If there's a Faculty content type and a Publication content type, the connections between the nodes on the server are passed on to the clients.
As for Flatfish, you're probably wondering, “Why would a PHP Drupal developer create a tool in Ruby?” When I initially designed Flatfish, I knew that I wanted something flexible, dynamic and, honestly, a bit magical (but hopefully not cryptic). Ruby seemed like an ideal choice, but two libraries made it the only one: Nokogiri and Active Record. Nokogiri is an awesomely cool Ruby gem that provides CSS selectors as well as XPath for XHTML and XML. The end result is fine-grained control over what HTML gets scraped. This has worked out surprisingly well, even on pure HTML sites where there aren't CMS templates to force all the desired content into the div#main or div#content. The other library, Active Record, is one of Ruby on Rails' core libraries. It provides an ORM, so all persistent data manipulation in Flatfish is done via Objects. This has been incredibly handy, as Flatfish creates database tables on the fly and adapts those tables to mirror the destination Drupal system's content types transparently. Outside of Active Record and Nokogiri, Flatfish handles the mundane migration details—normalizing links and tokenizing and saving media as binary blobs.
Now that you know a little about Trekk and Flatfish, let's get our neckbeards on and walk through an example. For Flatfish, download Ruby 1.9.3, and install all of the soft dependencies (also save yourself some time and install libxml2-dev, libxslt-dev and mysqlclient-dev or your distro's equivalents—gem dependencies). A note on the soft dependencies, Ruby will install without them, but you don't want that so be sure to grab them, in particular libyaml. Rubygems, your PHP PEAR/PECL equivalent, comes with Ruby, so now you can install the Flatfish gem. This usually means typing sudo gem install flatfish. If you're struggling here, any guide on installing Rails should help, or you can try using rbenv+ruby-build or RVM to assist with the installation and management of Ruby versions, implementations and gemsets. However, be aware that rbenv and RVM come with their own set of concerns and are recommended for those interested in Ruby beyond Flatfish. Finally, there's also an IRC channel: #trekk. For gem version incompatibilities, use the Flatfish GitHub Issues.
Using Flatfish is straightforward. The program parses a CSV. Each row contains the URL to be scraped, metadata about the URL for Drupal and one or more columns of CSS selectors. Each CSS selector maps to a Drupal field.
For an example, let's scrape the Drupal Connect Web site and populate a Bios Content Type as well as a handful of blog posts to demonstrate the media handling. The first step is to create the CSVs. The bio CSV contains a header row with URL, title, path, body and an extra field for the employee's position or title within the company. Let's use the machine name for the position field, field_position. The blog posts will correspond to Drupal Articles and don't have any extra fields.
Table 1. Contents of bio.csv
| URL | Path | Body | field_position | |
|---|---|---|---|---|
| http://drupalconnect.com/team/john-florez | bio/john-florez | John Florez | .field-name-field-user-bio | .field-name-field-user-position .field-item |
| http://drupalconnect.com/team/jonathon-whitener | bio/jonathon-whitener | Jonathan Whitener | .field-name-field-user-bio | .field-name-field-user-position .field-item |
| http://drupalconnect.com/team/tim-loudon | bio/tim-loudon | Tim Loudon | .field-name-field-user-bio | .field-name-field-user-position .field-item |
| http://drupalconnect.com/team/mike-crittenden | bio/mike-crittenden | Mike Crittenden | .field-name-field-user-bio | .field-name-field-user-position .field-item |
| http://drupalconnect.com/team/christopher-jones | bio/christopher-jones | Christopher Jones | .field-name-field-user-bio | .field-name-field-user-position .field-item |
The full bios CSV as well as the articles CSV are available in the Flatfish repo on GitHub. You can see that the CSS classes match the DC site's bio and position. For each URL, you eventually will have a Drupal node. The HTML from the “.field-name-field-user-bio” selector will go in the Drupal node body, and HTML from the “.field-name-field-user-position .field-item” will go in the node position field. The aforementioned metadata includes the Drupal node URL alias and node title. Note that Flatfish dynamically creates table schemas, so you can add as many CSV columns after “body” as you need. And although it's not used here, there's concatenation support. This comes in handy if you need to skip an image or menu in the middle of your target URL's content. For example, if a CSS selector field's value is “#main-content p.one && #main-content p.three”, Flatfish would concatenate the text of those two CSS selectors ostensibly skipping HTML in the “#main-content p.two” tag.
Now copy the YAML file below and change the values to match your specifics:
# DB credentials
db_user: 'root'
db_pass: 'correcthorsebatterystaple'
db: 'flatfish_sample'

# NOTE: these map to Drupal content types
# and AR database tables
types:
  Bio:
    csv: '/home/tloudon/lj/example/bio.csv'
    host: 'http://drupalconnect.com'
  Article:
    csv: '/home/tloudon/lj/example/article.csv'
    host: 'http://drupalconnect.com'

# use the web, otherwise path to local HTML root
local_source: ''
As implied, Flatfish supports scraping multiple Content Types in a single session; just add them into the file as shown below or see the GitHub repo's example directory. Also, don't forget to create the database. Subsequent migrations can use the same database and will update the content, keeping the same IDs. And, that's it; setup is complete.
Flatfish supplies a binary (remember to exec $SHELL to update your $PATH right after the gem install), so run flatfish in a terminal in the directory with config.yml. During runtime, Flatfish will pull down the content over the Net and update all of the relative links. (There also is support for a local importation if you have a copy of the site or use wget to mirror it, which can speed up the migration substantially.) Flatfish will create two or more database tables: a media table and one for each Content Type. Any files (images, PDFs, docs and so on) referenced in the CSS selected HTML are saved in the media table. Flatfish considers URLs unique, so only one copy of an image or file is saved even if there are multiple references to it. Note that the scraped HTML now has tokens to the media table. Take a moment to query the database and verify that all content saved correctly. Again, Flatfish supports updates and maintains IDs, so you can rerun Flatfish several times during a session or during the course of a project.
On the Drupal side, we've created a Flatfish module that's included in Trekk or available on drupal.org. Trekk has a drush makefile to download Flatfish's required libraries; however, you also can download them manually (queryPath, HTMLPurifier and Spyc). Spyc provides YAML support; queryPath replaces the media tokens, and HTMLPurifier strips out all nonsemantic markup. The heart of the module uses Ctools plugins and Migrate to provide a reasonably automated, dynamic migration.
Download the Trekk tarball, run the drush makefile as specified in the README.md, and choose a “Trekk Server” with “Flatfish Support”.
The Flatfish module needs access to the config.yml, the Flatfish generated schema.yml and the scraped HTML database. Create a new directory called flatfish_migrations in sites/all, and place the YAML files in it. Review the generated schema.yml file, and ensure that each Content Type's “machine_name” matches the Drupal Content Type machine name. (Note: Rails pluralizes database tables, so a Flatfish “Bio” type has a “bios” table and matches a “bios” Drupal content type.) Navigate to admin/structure/flatfish. The Flatfish module parses the YAML files and dynamically creates the configuration page items. When you visit the Flatfish module configuration page, the items are registered as Migrate classes. This means database tables are created to store important Migration data, and you now can see and run the Migrations under admin/content/migrate.
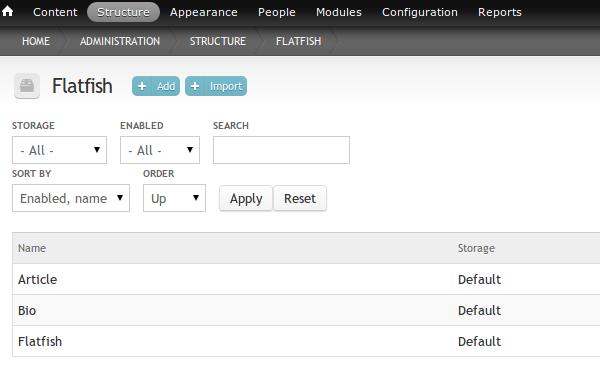
Figure 1. Flatfish Module Configuration Page
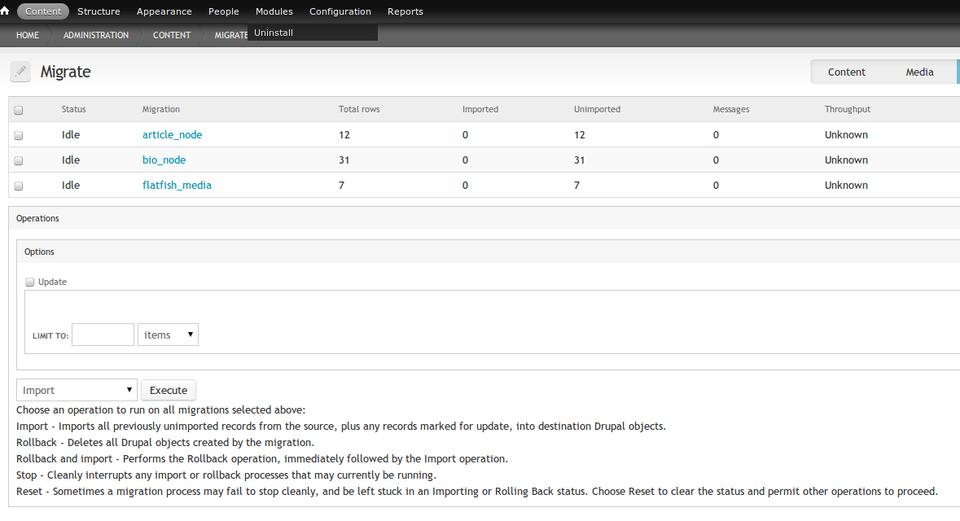
Figure 2. Migrate UI
As implied above, all media, regardless of content type, is stored in the same database table. Run the media Migration first; this will create the physical files and add them to the file_managed database table. The files are now accessible under admin/content/media and are no different from any other natively created Drupal files.
Next, run all Node/HTML Migrations. As mentioned previously, each URL from the CSV corresponds to a Drupal node. Because the HTML has simple Flatfish media tokens, it's important that you run the media Migration first, so that the files exist in Drupal and the system will update them. If you skipped the media first, click the update check box, and run the Node/HTML Migrations again. You also will notice that the HTML is clean. HTMLPurifier accepts a comma-delimited whitelist of HTML tags with attributes. Flatfish has defaulted to stripping all divs, spans, classes and ids. Although this may change if it proves to be controversial, the Flatfish module strips HTML table tags as well. In my experience, legacy HTML tends toward table-driven layout rather than legitimate tabular data presentation. If you need to import tables, either hack the module (and kill a kitten) and add the three HTML table tags to the whitelist, or file an issue on drupal.org, so we can see if there is a community need for a configurable whitelist. The major advantage of the HTML stripping is that it allows the Drupal theme to define the layout without worrying about or writing overrides for the legacy HTML. However, there also can be a huge compliance benefit in that any insecure HTML (inputs, forms), JavaScript or iframes also are removed.
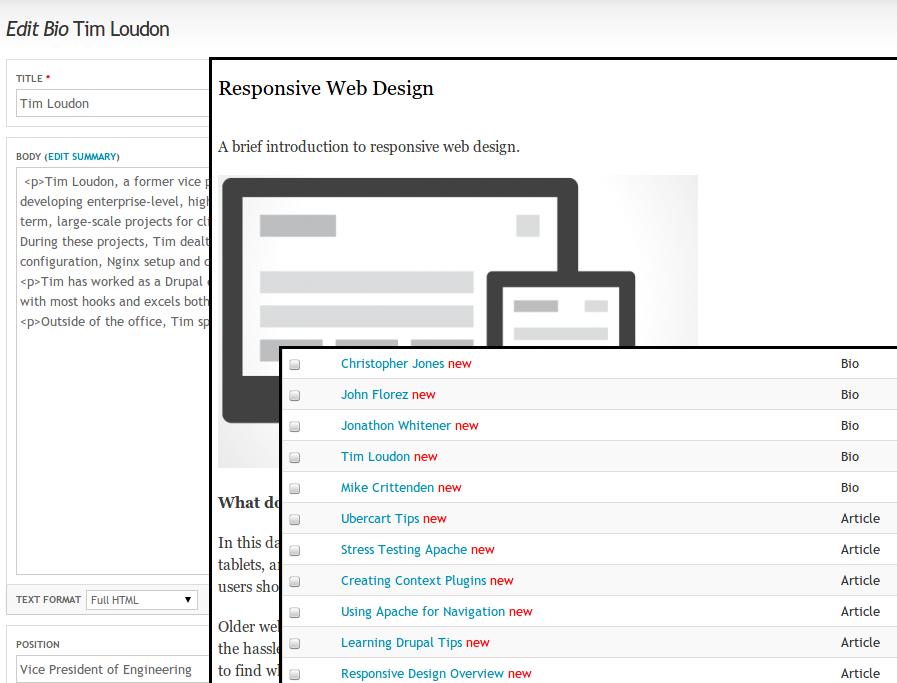
Figure 3. Example migrated content: node/edit sample showing migrated title, body and position; sample image in a responsive design blog post; and a thumbnail of admin/content.
Now that the example content is in Drupal, let's look at sharing it. Trekk's server code is fairly lightweight and builds upon several other Drupal modules. We have written a custom Views handler that outputs JSON. And, Services provides a RESTful endpoint that client servers can contact securely.
Next create a View. For this example, let's create one for the Bios Content Type. This is a normal View and can use filters, contexts, relationships and so on. Now configure your Services Server. We recommend the REST server. At the time of this writing, you will need to symlink the Spyc PHP file that Trekk's drush makefile installs in sites/all/libraries to the rest_server/lib directory. Check your endpoint configuration, and enable the View as a “retrieve” resource. Services Servers can set authentication and have configurable paths. The example endpoint is available at “http://localhost/api/bios/default” where “api” is the Services path, “bios” is the View name, and “default” is the View display. You also can add query string parameters like “output=html” to show HTML. Note, other examples and details are contained within the Trekk distribution. The Trekk Server is now set up.

Figure 4. Example Services Server
Covering the creation of a Trekk Client in detail is beyond the scope of this article; instead, I review the basic process. First, create a second instance of Trekk, this time selecting the “Trekk Client” option. Trekk clients use Migrate and need custom code to parse and import the data that's retrieved from the server. So, each Trekk Client has custom code tailored to the shared content. This code is composed of three primary parts: a Source, a Destination and a Mapping. (Note: there are examples within the Trekk distribution.)
You'll need to navigate to admin/config/services/trekk_client and add a new Trekk Client configuration item. You can define the Trekk Server URL as well as the HTTP method, but the Source schema implements hook_trekk_client_source_schema(). The schema is essentially a database-friendly version of the structure the Trekk Server endpoint outputs. For example, your bio schema would have “nid”, “node_title”, “body” and “position” as the “fields”, and each “field” would have the data type (int, varchar and so on) and length where appropriate—see Listing 1 for an illustration. The only hitch is that the Trekk Server converts a View into JSON, so it uses the View field labels instead of the machine name as you have in other areas—hence, “position” and not “field_position”. Once you have configured the Source, you can “Test Connection” and verify that the Trekk Client can access the Trekk Server, although this does not validate the schema.
Trekk extends Migrate's node and term Destinations to make them accessible to the GUI. However, many contrib modules provide Migrate Destinations, and Migrate maintains several as well in the migrate_extras module. For example, the Flatfish module media Migrations use the Media Destination to create the physical files and populate the file_managed table properly. In many cases, you will be able to use the node Destination. For complex Migrations, you may need to extend Destinations or write your own.
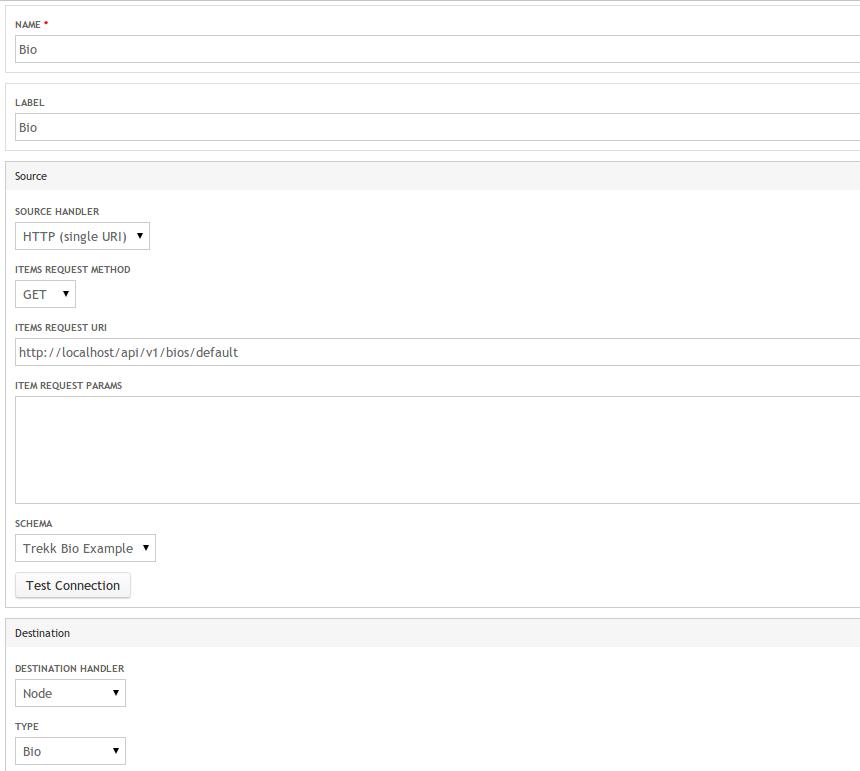
Figure 5. Example Bio Configuration
Finally, you will need to add a Mapping. Although Mappings can be very simple, they are more than just the connection between the Source and the Destination. Mappings also provide a key juncture to insert custom processing—you can register custom callbacks. For example, although we use the standard node Destination in the Flatfish module Content Type Migrations, a callback executes more than 100 lines of custom code. This is the code that cleans the HTML, handles the non-Media file creation (PDFs, docs and so on) and replaces the Flatfish tokens with Media tokens. One last note on the Mappings—Trekk handles Mappings a little differently from normal Migrations and expects Mappings to come in as configuration rather than as part of a Migration class constructor. For a full understanding, I recommend reviewing TrekkClientMapping.inc in detail.
You now should have content on the Trekk Client. From here, just write a simple drush script to execute Migrate updates and set up a cron job. The Trekk Client content will be up to date and largely maintenance-free.
As you can see from this overview and example, Trekk provides a great starting point for universities looking to leverage Drupal in a big way.
